A large number of accidents that happen on the roads at night are due to poor lighting. In the modern world, it is especially important for car owners to choose the right headlights for their car. Therefore, many are interested in the question of which headlights on the VAZ-2110 still shine better, and also how to improve road lighting in the evening and at night?
The factory head optics of vehicles of the tenth family, without a doubt, do not shine with variety. It is limited to two main positions:
- Kirzhach - produced by the Avtosvet plant (they can be purchased at an average price of 2500 to 2700 rubles);
- Bosch (their price is 200-400 rubles lower than the first ones).
Which manufacturer’s “products” should I choose?
Choosing a headlight manufacturer
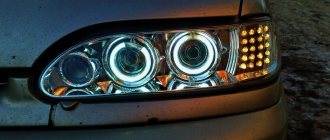
Drivers, first of all, always need a good low beam. Kirzhach headlights are equipped with a lens for low beam and, accordingly, a reflector for high beam. Bosch uses reflectors in both cases. Unlike a reflector, the lens has a much clearer light line; in addition, Kirzhach lighting devices can be legally “equipped” with xenon, which is not provided for Bosch. However, if we compare the results of the review of experts and the opinions of car owners, it is worth noting that they are somewhat different. Bosch headlights have weak flare from the side in the low beam, but besides this, they are the ones that cause preference. In addition, they have a large surface for low beam due to the reflector. This has the best effect on the quality of automobile road lighting in cloudy weather.
In order for lighting to be as productive as possible at night, choosing high-quality optics is not enough. The headlights should be adjusted correctly, and the glass should be clean (the glass should be secured with a sealant, but on Bosch they are held on by sealants. This makes the process of replacing glass easier). However, the best option would be to use bright halogen lamps for car lighting.
About affordable lighting equipment for dozens
Today, the automotive market is filled with lighting equipment from various manufacturers, with the help of which you can not only improve the illumination of the roadway, but also transform the appearance of the car thanks to their updated appearance. Most owners choose products from two companies. This is domestic, Kirzhach optics from this company receives good reviews, and German branded from Bosch.
No one can say for sure which one is better, but some features of these products should be mentioned. The optics are expensive, but have a built-in lens for the low beam lamp. Its presence allows you to focus the light flux, which means improving your visibility of the roadway. These headlights lend themselves well to numerous tuning options. Also for these products there is a legal installation of xenon.
If, to improve illumination, we take original products from Bosch as a basis, then it does not have all of the above features and advantages. Manufacturers do not produce modifications of these products, but their price is somewhat lower than domestic products. Bosch optics are more susceptible to contamination, since their glazing area is larger than that of a domestic headlight.
Tips for improving lighting on a VAZ-2110
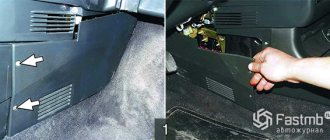
The history of the VAZ 2110 brand is very interesting and fascinating. This car can easily be called one of the most popular on the domestic market. And you shouldn’t be surprised, because the car is inexpensive and completely unpretentious to use. At the same time, many owners of “ten” complain about their light. In this situation, you should know that this problem can be easily corrected by at the same time slightly modernizing your car. To do this you need:
- Wash the headlights. Often it is the adhering dirt that is the main reason for the deterioration of lighting. If you do not have the opportunity or simply do not want to always wipe the headlights yourself, then you can install washers. The factory version of the car is not supplemented with this function. Volga washers are well suited for the “ten”. To install them, remove the bumper, make the appropriate holes, then insert the washer modules there and tighten them tightly with the bolts. Next, you need to connect the hose to the washer reservoir. Be sure to connect a button in the cabin that controls the washer. It should only be connected via a fuse.
- Next, carefully examine whether the headlight glass is intact. It is possible that it is cracked. In this case, you need to install a new one. To do this, remove the headlight unit, but before doing this, disconnect the negative terminal from the battery. Next, wash the headlight. Afterwards, you can take a hair dryer and, using it, heat the edge of the glass in a circular and smooth motion to soften the sealant. Then pry up the glass and remove it. Old sealant must be removed from the case and glass. After degreasing the body and edge of the glass, apply a layer of sealant to it. The glass should then be carefully pressed against the body.
- If the old reflector has peeled off, it can be replaced. To do this, you must first remove the glass from the case. Next you need to unscrew and remove the light bulb. Remove the reflector to be replaced, install a new one and reassemble the headlight in reverse order.
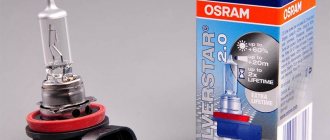
- You can also replace the “original” light bulbs with halogen ones. They will shine much brighter. Cost-effectiveness and durability are their main characteristics. However, in addition to halogen devices, you can also install xenon. Similar lamps come in different wattages, and the subsequent brightness of the glow depends on this. You only need to install bulbs that have been recommended for use on a specific car.
Removal
Kit
Obviously, without dismantling the old headlights it will be impossible to install xenon devices. Dismantling is carried out as follows.
- The car is deprived of power by removing the negative terminal from the battery.
- The connectors going to the headlights are disconnected. All without exception.
- The fasteners are removed from the top mount. The bolts are located there.
- The radiator grille is dismantled.
- The bolt that holds the headlight unit in its lower part is removed. He's there alone.
- Then pry up the cover using a flat screwdriver and remove it.
- Now take a 10 mm wrench and use it to remove the fixing nut to the bracket.
- All that remains is to remove the headlight unit.
- Do not forget to pry the hydraulic correction cylinder retainer using the same flat-head screwdriver to remove the unit.
- The direction indicators are removed. To do this, simply unscrew a couple of bolts.
Adjusting headlights on a VAZ 2110
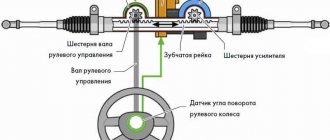
The road in front of the driver in the evening and at night should be well lit. Also, the direction of light from the headlights should be such that oncoming drivers are not blinded if they turn on the low beam. Based on this, the headlights on the VAZ 2110 must be adjusted correctly and in accordance with the requirements. It is produced using rotating screws (1 and 2 in the figure), which, when moving, rotate the corresponding optical element in the horizontal and vertical planes. The most convenient option is considered to be the use of mobile optical devices when adjusting headlights on VAZ “tenth” series models. However, if they are not there, then adjustments can be made using the screen.
International problem of burning out the eyes of motorists
I don’t understand who needs to see this. But THIS means that your high beams are on and I CAN'T SEE ANYTHING
And also, your mother, if there is no fog, turn off your fog lights!
Full light in 1999:
Probable way to fight:
Threat. The accordion meter scolded only the last picture, but it is on topic here. The main message in the first 3 films, according to them the accordion meter was silent.
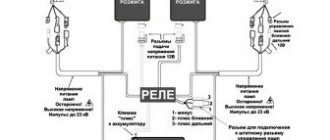
We install “foglights” with our own hands
Fog lights are a very useful attribute of every car when you need to drive in bad weather conditions. These headlights on the presented model are provided in the “Lux” configuration. As a result, their installation falls entirely on the shoulders of the car owner.
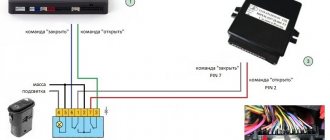
First, decide where on the machine you want to install them. The best option is the bottom of the bumper. There are holes here where they will fit perfectly. Next, you should choose their type: with transparent or corrugated glass. The first ones shine with spots, so it is better to refuse them. The second option perfectly diffuses light, illuminating the entire surface of the road. Next, you need to purchase frames for them, a set of wires, a relay and a power button. Route the wires that are located in the dashboard directly into the engine compartment. Connect the wires to the connectors on the headlights and insulate them well with electrical tape. Next, install the headlights in the frames and secure them firmly in the appropriate place on the bumper. Connect the wires. If you need the headlights to be turned on from a button, then you need to install it in the gap of the corresponding power wire. When the work is completed, adjust the headlights.
Question of law
It is not uncommon for fog lights to be installed from the factory with bi-xenon lamps and similar lenses. These are D class fog lights, which are completely legal. Therefore, no traffic inspector will dare to demand a fine or other form of punishment from you for using xenon.
Legal equipment
Therefore, to install xenon as fog lights and main headlights, you will need to purchase a set of legal equipment. There must be an inscription in the form of the letter D on the headlight glass. It indicates that bi-xenon lights are connected to these headlights. Consequently, everything is legal, and therefore there is no need to fear the traffic police post.
If you have xenons but have an H on your headlight glass, you will have problems. This is because such an inscription indicates that halogen lamps must be located under the glass.
Rear lights for VAZ 2110. Tuning
It is quite easy to do tuning of VAZ 2110 headlights with your own hands. However, this time we will talk about the rear lights of this model. To “repair” you will need several photos, videos, a lot of LEDs and a “car” of patience. Beautiful LED taillights on the VAZ 2110 will always and everywhere give the car special elegance and individuality.
First you need to disassemble the lights. Since the glass is soldered and not glued, you should cut off the corner of the lantern until the knife gets inside. Then we remove the glass. After this, we measure the dimensions inside and cut out the corresponding blanks from plexiglass. Then, with maximum care, we place future holes for the LEDs. We drill these holes and glue the LEDs there using superglue. Next, we solder the resistors and fill everything with silicone. Afterwards, we assemble the structure and glue it. To prevent water from seeping through, we coat the seam with silicone. Such independent tuning of a VAZ 2110 with your own hands will always stand out with its “bright” originality.
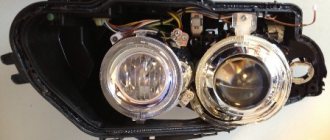
Hi all. I installed lenses in 2114. One good friend saw the whole thing, the light from the lenses, and wanted good light for himself too. In fact, I immediately suggested that he also insert the lenses (without having much of an idea of how or what), but everything worked out for us.
The goal was to keep the headlights stock look, but to have good light from it. After surfing the Internet, we read that halogen does not particularly harm lenses (we’ll wait and see)
We needed: 1. Kirzhach headlights, the car had Bosch (we took used ones) 2. Dixel h1 g5 2.5 inch lenses 3. Children's construction set (make adapters for attaching the lenses) 4. M4*60 bolts (barely found), needed for lens mounts. 8 pieces (nuts, washers for them (at least 24 nuts) 5. Sealant (put the glass in place)
International problem of burning out the eyes of motorists
I don’t understand who needs to see this. But THIS means that your high beams are on and I CAN'T SEE ANYTHING
And also, your mother, if there is no fog, turn off your fog lights!
Full light in 1999:
Probable way to fight:
Threat. The accordion meter scolded only the last picture, but it is on topic here. The main message in the first 3 films, according to them the accordion meter was silent.