From the point of view of modern environmental requirements, carburetor engines are already outdated. But cars with carburetors feel great on our roads. Yes, they do not correspond to the spirit of the times, but they work conscientiously and will continue to work for a very long time.
That is why the VAZ 2107 carburetor is a very popular unit today. Those who drive a “classic” can service and repair it themselves; there is nothing supernaturally complicated there. On modern foreign cars, stuffed with electronics, do-it-yourself repairs are no longer possible.
What carburetors are installed on the VAZ 2105
All carburetor installations equipped with the VAZ 2105 are focused, first of all, on minimizing fuel consumption. Of course, AvtoVAZ engineers throughout the history of the “five” experimented with the equipment of the car in order to identify the most effective mechanisms.
Over the years, various modifications of carburetors were installed on the VAZ 2105. All of them had both their advantages and disadvantages, which the drivers themselves often had to identify while driving.
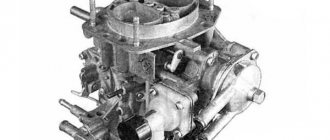
Modification of DAAZ
The Dimitrovgrad Automobile Unit Plant (DAAZ) has launched the production of carburetor units under license from Weber. The main quality of DAAZ products is ease of operation and repair. The production of all parts necessary for repair and replacement was established, so if necessary, the driver could easily buy the necessary components and independently carry out the work of adjusting the carburetor.
DAAZ carburetors provided the car with increased speed characteristics, since the new nozzle system made it possible to react as quickly as possible to an increase in speed and supply the required amount of fuel to the engine.
A significant drawback of the Dimitrovgrad Automotive Unit Plant carburetor can be considered fuel consumption. In the combined cycle, the device required at least 10–14 liters of fuel per 100 kilometers.
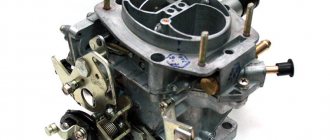
The first VAZ 2105 cars were equipped with DAAZ carburetors
Modification "Ozone"
The Ozone carburetor is considered a modified version of the device that was assembled at DAAZ under license from Weber. "Ozone" is a more advanced version of the old "DAAZ". This carburetor has higher environmental friendliness, and also significantly reduces fuel consumption per 100 kilometers.
However, not everything is so good in the Ozone design. After numerous complaints from VAZ 2105 drivers, the designers identified a major drawback of this type of carburetor. The device is equipped with two chambers, but a pneumatic valve takes part in the operation of the second chamber. It was because of this that drivers had problems, since even with the slightest contamination the valve began to work incorrectly.
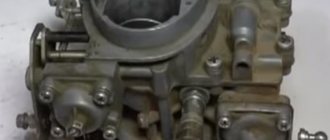
Upgraded version of the first DAAZ carburetor
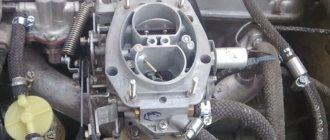
Modification "Solex"
"Solex" is one of the most modern versions of carburetors produced by the Dimitrovgrad Automotive Unit Plant. The device is as environmentally friendly as possible, has been repeatedly tested to ensure compliance with international standards, and is also characterized by productivity in operation.
Solex carburetors are the first in the DAAZ product line to be equipped with a reverse fuel supply system, which makes them as economical as possible in operation. Due to the presence of this system, the carburetor has become quite demanding on the quality of the gasoline being poured. Therefore, the driver has to clean the jets and check the operation of the device at least once a year.
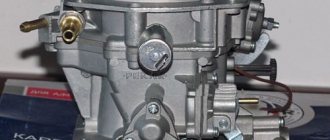
The modern DAAZ installation for Zhiguli cars differs from its predecessors
Requests from car owners
Over the more than century-long history of its existence, the automobile carburetor has turned into a highly complex device that requires extremely delicate handling. At the same time, the carburetor is a fairly reliable device, and, as a rule, it does not deserve the reproaches that are showered on it by inexperienced “masters” who are faced with problems with the engine.
Today, most cars are equipped with direct injection systems, but many automakers continue to use carburetor engines due to their simplicity and reliability. There is an opinion that repair of foreign car carburetors can be successfully performed only in a car service center, since only there there is the necessary equipment and special stands. This is correct, however, the carburetors of used cars, of which there are many on our roads, also have significant wear, which no stand can take into account. Success in this case is ensured only by the skill of an auto mechanic who is able to restore and adjust the operation of a car’s carburetor at different speeds, during cold and hot engine starts and at maximum power. Where can you find such a master? Of course - at a car service center.
DIY repair
If your carburetor suddenly becomes unusable, do not throw it away
Repairing this important “organ” of the car involves replacing faulty parts as quickly as possible. In order to determine which parts need to be replaced, you should disassemble, clean the carburetor and carefully inspect the component mechanisms.
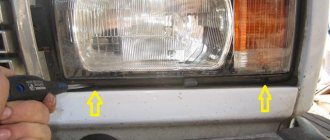
How to remove a carburetor
The carburetor is removed if a malfunction is detected in it, but there is no way to do this by partial disassembly. The carburetor is also removed to replace, adjust and clean it.
It is removed as follows:
- To begin with, all kinds of hinged parts and damper drive cables are removed.
- The air filter housing is removed from the studs. To do this, you need to unscrew all the nuts that secure it to the carburetor. The clamping nut is pulled back and the choke cable sheath is pulled out from the mounting bracket.
- The outer surface of the parts is cleaned of dirt.
- The choke drive cable is loosened and the fuel supply and crankcase gas exhaust hoses are removed.
- The hose between the economizer and the pneumatic valve and the hose of the vacuum ignition distributor are disconnected.
- Then the nuts that secure the carburetor to the intake manifold are unscrewed.
- The carburetor body is removed and the intake manifold hole is plugged with a clean rag to avoid clogging.
Don't forget to check the integrity of the sealing gasket, which is located between the carburetor and the intake manifold. Replace it if necessary.
Photo gallery: removing the carburetor from a VAZ
How to clean a carburetor
Before you start cleaning the carburetor, you need to carefully prepare: buy a special aerosol cleaner at a car shop, arm yourself with smooth, dry cloths, a tire inflator, remove the carburetor and disassemble it.
Cleaning the jets
Jets—fuel and gas supply channels—are cleaned with compressed air or a liquid cleaner under pressure. Mechanical cleaning with any fleecy or metal objects is prohibited.
When cleaning the jets with compressed air (you can use a tire pump for this), the body of the idle jets, the main metering system (air and fuel), then the valves and channels of the pump sprayer are blown out.
In case of severe contamination, the jets are placed in acetone so that the deposits soften or completely dissolve. Then they should be blown out.
Flushing the float system
To get to the carburetor float system, you must:
- Remove the air filter and fuel hose clamps.
- Disconnect the cable that controls the starting device.
- Remove the electrical connector on the solenoid valve.
- Then unscrew the fastening bolts and, without turning over, remove the carburetor cover.
It is best to clean the float compartment with a rubber bulb, carefully drawing out any remaining fuel from the chamber. You should not use fluffy rags - they can accidentally clog the jets.
To complete the cleaning, you can wipe the bottom of the float chamber with a stiff brush.
To check how well you have cleaned the float chamber, you need to unscrew the air jets and blow out the emulsion wells. If dirt appears in them, washing should be repeated and checked in the same way.
Flushing the throttle valve
It is produced using a cleaner, which can be purchased at a specialized auto store.
The throttle valve itself is washed, as well as all accessible elements, channels, valves, etc.
Particular attention should be paid to the forced crankcase ventilation channel, since it becomes clogged more often and more severely than other parts.
After this, the idle speed sensor is unscrewed and the internal elements are washed.
The procedure is repeated again.
Video: how to clean the throttle valve on a VAZ
Replacing the gasket
The gasket is located between the carburetor body and its cover. If during disassembly you find any damage to the gasket, it should be replaced.
This is not so difficult to do - you just need to dismantle the float and put a new one in place of the old unsuitable gasket. Then install the float and put the carburetor cap back.
After washing the internal elements of the carburetor, it should be blown out. An air or car compressor is perfect for this.
How to install the unit in place
You can assemble and reinstall the carburetor in the same way as you disassembled it, performing all the steps in reverse order.
- The carburetor is installed in its place, the mounting bolts are tightened.
- The pipes through which fuel is supplied are attached. The gas cable is connected to the throttle lever.
- The wiring is attached.
- A vacuum hose is connected to the ignition distributor, and the EPHH limit switches are combined.
- After installing the carburetor, it is adjusted.
Video: installing a carburetor on a VAZ
It is not so difficult to independently remove, disassemble, clean and reinstall the carburetor in the VAZ 2107 and 2106. The main thing is not to be intimidated by the huge number of hoses, valves, parts and dirt and strictly follow the instructions.
Cleaning, troubleshooting, checking the VAZ 2107 carburetor
For full service, the unit must be removed from the car. This is done by dismantling the air filter housing, disconnecting the pipes, tubes, cables and solenoid valve wires from the assembly. Afterwards all that remains is to unscrew the 4 nuts securing the carburetor to the intake manifold and remove the assembly.
The Ozone carburetor includes three parts. It is better to work with each of them one by one: remove one - disassemble, clean, reassemble and move on to the next component.
Carburetor cover
Let's start with the lid. Maintenance includes the following steps:
- Unscrew the screws securing the cover.
- Disconnect the telescopic air damper control drive.
- Remove the cover from the housing along with the trigger and float.
- Unscrew the screws securing the starting device and disconnect the rod from the damper axis lever.
- We remove the float axis and remove the float along with the locking needle.
- We unscrew the filter plug installed on the fuel supply fitting (if the plug does not unscrew, apply a few gentle blows to it with a wrench). Remove the filter element (mesh).
- We remove the gasket.
- We wash the lid from dirt. We blow out the channels in it using a cleaning agent (if you don’t have the product on hand, you can blow it with compressed air).
- We wash and blow through the filter mesh. We put it in place and tighten the plug.
- We examine the condition of the locking needle (the rubber cuff on it). We install the float with the needle in place.
- Check the position of the float (affects the level in the float chamber). This is done like this: we turn the lid over vertically (so that the locking needle closes the feed channel) and measure the distance from the float in the surface of the lid. The distance is 6.5 mm, with this indicator the level corresponds to the norm. If it doesn’t fit, we adjust and adjust the position of the float by bending the tongue.
- Check the tightness of the locking needle. To do this, turn the cap over with the float up and create a vacuum in the inlet fitting with your mouth (extract air from the fitting). If the locking needle “does not hold,” replace it.
- Using vacuum, we check the integrity of the diaphragm of the starting device (when creating vacuum, the rod of the device must move). If necessary, we repair the starting device using a new membrane from the repair kit.
- We install the starting device on the carburetor cover (replacing the sealing collar of the device), connect the rods and the telescopic drive.
Afterwards we put in a new gasket and put the cover aside.
Something else useful for you:
- How to adjust idle speed on a carburetor
- Adjusting and tuning the carburetor on a VAZ 2109
- Why the car starts to jerk when moving - the main reasons
Frame
The next stage is cleaning and troubleshooting the case:
We dismantle the vacuum drive of the second chamber damper. We disconnect the throttle body by unscrewing the mounting screws (from the bottom). Disconnect the accelerator pump along with the diaphragm. We unscrew the air and fuel jets (remember or mark where each one was located), remove the emulsion tubes installed under the air jets. Unscrew the accelerator pump nozzle. Unscrew the accelerator bypass jet. Unscrew the idle speed solenoid valve. We remove the diffusers. We inspect the jets and channels of the removed parts for contamination, and if necessary, wash them. We check the lower plane of the housing (where it is adjacent to the throttle body) for bending
If a bend is detected, replace or straighten the housing. We blow out the channels (you can simply spray the cleaning agent into all visible holes). We check the functionality of the vacuum drive of the throttle valve of the 2nd chamber. We check the tightness of the diffusers. We put the removed parts in place (it is important not to confuse their location) and auxiliary components. Replace the gasket. After these operations, put the body aside
After these operations, put the body aside.
Throttle body
The next stage is setting up the throttle body:
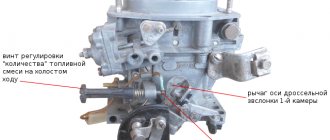
- Unscrew the “quality” and “quantity” screws;
- We thoroughly clean the housing and blow through the channels in it;
- We replace the cuffs with screws and put them in place;
After servicing each component of the carburetor, we also carefully inspect them for correct assembly. Next, we assemble the components together and install the carburetor in place, having first replaced the gasket under it and thoroughly cleaned the seating surface on the intake manifold.
Setting up the float chamber
The fuel level is regulated in the float chamber. This part of the device is the easiest to repair and configure, so it is better for novice craftsmen or car enthusiasts to start from this point. Do-it-yourself adjustment of the VAZ-2109 carburetor consists of several stages:
- It is necessary to start the engine and let it run for 2 - 3 minutes.
- After the engine has been turned off, it is necessary to remove the air filter from the Solex.
- Next, disconnect the fuel hose.
- When dismantling the carburetor cover, you need to unscrew 5 hardware. A special feature of dismantling bolts is the need to unscrew them strictly vertically. If the hardware is removed incorrectly, the floats can be damaged, which will cause serious repairs.
- Normally, the distance from the edge of the carburetor to the gasoline is 25.5 millimeters. If the distance does not match, then you need to correct it by bending the tongue of the float bracket. Since it is difficult to set the required distance the first time, the bending procedure can be repeated several times.
- While the cover is removed, experts recommend checking it for parallelism of the edges and, if necessary, restoring the correct position of the elements.
On the “nine” this work is quite easy to carry out.
One of the main conditions is to constantly maintain cleanliness and prevent various small parts from getting into the carburetor.
What is important to know about the resonator
Structurally, the pre-muffler is identical to the forward flow described above - a straight perforated pipe passes through the cylindrical body. The only difference is the partition that divides the tank space into 2 chambers.
Resonator tasks:
- dampen primary sound vibrations of large amplitude;
- facilitate the work of the main muffler and extend its life;
- remove some of the heat from the flue gases.
The resonator bank resembles a forward flow, only the part size is smaller
The VAZ 2107 car is equipped with 3 types of resonators:
- The classic option for carburetor engines, used in the first models with an injector, is a long pipe with one or two banks (depending on engine size).
- On injection models that comply with Euro 2 exhaust standards, a shortened resonator section with a flange was installed at the front end of the pipe. The catalytic converter was bolted to it.
- After the introduction of Euro 3 standards, the length of the catalyst increased and the length of the resonator decreased. The section for the injection version of the “seven”, which meets these requirements, is equipped with a front flange with 3 bolts.
When operating resonators, the malfunctions described above occur - burnouts, rust and mechanical damage. Troubleshooting methods are similar to repairing a muffler - welding or temporary sealing with a bandage. Removing the resonator section is not difficult - you need to unscrew the fastening to the gearbox, then disconnect the muffler and “pants” pipes. On a VAZ 2107 with an injector, the flange is disconnected instead of the front clamp.
Video: how to remove the resonator VAZ 2101—2107
Since the classic Zhiguli models, including the VAZ 2107, have been discontinued, the problem of purchasing high-quality spare parts arises. The market is flooded with cheap mufflers that burn out after 10–15 thousand km. Hence the final conclusion: sometimes it is easier to contact a competent welder and eliminate the defect at low cost than to purchase a new part of dubious origin.
The design of the “nine” carburetor
Experienced, and even more so, novice car enthusiasts should learn the design of the carburetor of their car - this will help solve problems that are inevitable during long-term use of the car.
The user manual describes in sufficient detail the diagram of the carburetor, the purpose of its components and systems, describes operating modes and methods for eliminating the most common problems. In other words, this manual can be called your first and main textbook, allowing you to learn the basics of repairing car parts, including the carburetor.
The only thing worth mentioning is that in this manual you will not see any detailed information and nuances regarding carburetor disassembly that you may encounter. You will have to deal with them along the way, on your own or by turning to the World Wide Web for help - on the Internet you can find answers to almost any automotive questions, especially regarding the VAZ 2109.
Cars of this family were equipped with a Solex carburetor, a domestic development adapted for VAZ classics and later production models. For this reason, if the carburetor fails, it will not be easy to find a suitable analogue - the auto-choke system is rarely present in carburetors of other brands. However, Solexes are still produced, despite the fact that the era of carburetor cars has sunk into oblivion.
Design features of the VAZ carburetor:
- it is two-chamber, between the chambers there are fuel and air jets;
- Solex has a main part and a cover connected with screws. The lid contains floats, an air damper, a starting device is located here, and a solenoid valve is installed;
- The main part includes diffusers, an exhaust system, gasoline dosages, and an accelerator pump. There was also a place for both the economizer and the heating system;
- At the top of the lid there is a fuel supply pipe, as well as a pipe for returning excess fuel to the gas tank.
The design of the carburetor was constantly improved, but the improvements did not affect the principle of operation of the main units and systems.
Signs of a fuel pump malfunction
An experienced car enthusiast can determine the malfunction of his car by its behavior or by extraneous sounds. This also applies to the fuel pump. If knowledge is not enough, it is worth considering the following characteristic signs indicating problems with the fuel pump:
- the engine does not start;
- the engine stalls almost all the time;
- the power and dynamics of the car decreases.
However, it is worth considering that power may decrease for a number of other reasons: problems with piston rings, valves, etc. If the fuel pump is completely faulty, the engine will not be able to start.
The fuel pump does not pump
There may be several reasons why the device does not supply fuel. Before you start troubleshooting, you need to make sure that there is gasoline in the tank. It happens that the level sensor shows incorrectly and the problem simply comes down to a lack of fuel. You also need to make sure that the filter elements are not clogged, but it is better to replace them, because they are inexpensive. After these steps, you can begin diagnostics.
Due to clogged fuel filters, the pump cannot supply the required amount of fuel to the carburetor.
The causes of problems may be:
- wear due to long mileage;
- diaphragm damage;
- insufficient spring stiffness as a result of stretching;
- valve contamination;
- violation of the tightness of the unit.
If the gas pump on the “seven” does not supply fuel, then there are two ways out of this situation: install a new device or disassemble the old one, carry out diagnostics and replace damaged parts.
On my car, a situation once arose that indicated a lack of fuel for the engine: there was no normal dynamics, the engine periodically stalled and would not start. There was enough gasoline in the tank, the filters were in good condition, but the car did not drive. After lengthy investigations and clarification of the reasons for this phenomenon, the problem was found: the fuel supply hose from the pump to the carburetor was swollen inside, which indicated the poor quality of the product. The internal cross-section has become very small and insufficient to pass the required amount of fuel. After replacing the hose the problem disappeared. In addition, I change fuel filters at least every 5 thousand km. mileage (preferably more often). I have them before and after the fuel pump. As practice shows, even with the installation of two filters, as well as with a mesh in the fuel pump itself and at the carburetor inlet, debris still penetrates into the float chamber. This results in the carburetor having to be cleaned periodically.
Video: VAZ fuel pump does not pump
Stops pumping when hot
One of the problems of classic Zhiguli cars is overheating of the fuel pump, which leads to a disruption in its performance - it simply stops pumping. The problem is caused by the formation of a vapor lock, which blocks the supply of gasoline. There are several ways to solve the problem: water the cooling pump with water or ride with a wet rag on it. These methods are applicable in a critical situation, but not for everyday use. The problem can be eliminated by adjusting the fuel pump using gaskets, replacing the rod, replacing the unit itself, or using higher quality fuel.
Checking the fuel pump
If there are suspicions or characteristic signs of fuel pump problems, the mechanism should be checked. To do this, perform the following steps:
- Loosen the clamp of the hose that supplies gasoline to the carburetor, and then pull the hose off the fitting. Gasoline will leak out of the pipe, so it is better to lower its edge into an empty container.
- We try to manually pump fuel using a lever.
- Gasoline under pressure should flow out of the outlet fitting. If the pump pumps, then it can be considered working. Otherwise, we continue diagnostics.
- Loosen the clamp and remove the hose from the inlet fitting of the fuel pump.
- We clamp the fitting at the inlet with our finger and try to pump it up. If you feel a vacuum (your finger is sucked in), then the pump valves are functioning. If this is not the case, the unit must be repaired or replaced.
Pump booster drive
The greatest controversy in carburetor tuning is replacing the pump amplifier drive cam. Some car owners recommend replacing it with No. 4, but many are against it, citing the following arguments:
- a significant increase in fuel consumption in urban and mixed driving modes;
- dips in dynamics when the accelerator pedal is pressed sharply;
- poor acceleration at low speeds, which is especially noticeable when trying to make a sharp start at a traffic light.
Tuning and standard cams for pump amplifier drives
Upgrading the carburetor by replacing the cam should be done with the possibility of returning it back, so you should not throw away the standard spare parts left after tuning. The result for each car is individual, so after replacement you should check the gas mileage and improvement in dynamic performance. If the ratio of these parameters suits the car owner, then you can leave the tuning spare part, otherwise you should return to the standard part.
Setting up the DAAZ carburetor on a VAZ-2107
Please note that the adjustment process will take some time. It is necessary to work slowly and strictly follow the instructions. Please note that the characteristics of your engine and its “gluttony”, and therefore your further costs, depend on the accuracy of the settings. The general operating algorithm is as follows:
— inspect the part for damage and defects;
— clean and rinse all parts from dirt and debris;
— clean the mesh filter;
— wash the float chamber;
— clean the air jets;
— adjust the XX carburetor, trigger mechanism and float system.
Now let's look at each stage in more detail:
- Restoring the mesh filter is performed in the following sequence:
— using a gasoline pump, pump fuel into the carburetor chamber until the shut-off valve closes;
— move the filter “cap” to the side and remove the valve;
— rinse the valve in solvent and dry (you can use a source of compressed air).
Please note that the presence of “dips” during engine operation, decreased power, and “dullness” of the car are often associated precisely with filter contamination.
- Clean the float chamber. For these purposes, use a special rubber bulb. After this, dry the product. Wiping the bottom of the float chambers with ordinary rags is prohibited. Otherwise, pieces of lint may remain at the bottom of the carburetor, which is likely to clog the jets and lead to a number of problems.
- Check the tightness of the locking needle. This can be done using a special pear. Make sure the floats are on top and replace the lid. Press down on the bulb and listen to see if air is leaking anywhere. If there is a leak, the valve body or needle may need to be replaced.
- Adjust the float system. For this:
— check what position the float is in. If it is displaced, then straighten it using a special holder;
— make sure the needle valve is closed;
— open the chamber “hatch” and move the float. Next, lightly pull the “tongue” of the bracket towards you;
— set the required distance between the float and the hatch gasket. The optimal parameter is 6-7 mm. If the measured value does not fall within this range, then adjustment is necessary. In case of immersion, the gap should be no more than one or two millimeters. Otherwise, the needle can be rejected;
- measure the gap that actually appears between the float and the needle. When the valve is open, this value should be 15 mm.
The above checks can be performed without dismantling or with dismantling the carburetor.
- Adjust the starting system. To do this job you must remove the air filter, start the car and pull the choke out about a third of the way. Your task is to achieve 3,200-3,600 rpm. As soon as this parameter is set, release the air damper and set the rotation to about 300 rpm less.
- Adjust idle speed. Tighten the quality screw completely, and then make 2-3 turns to the side in a clockwise direction. Check that the quantity screw is not fully tightened. Next, warm up the engine to operating temperature (the choke should be open). As soon as the engine has warmed up, remove the choke and listen to the operation of the power unit. If the engine starts to stall, then slightly turn out the quantity screw. If the speed is too high, then, on the contrary, screw the screw back in a little.
Your task is to set 900 rpm. By rotating the quality screw, achieve the minimum speed during stable operation (in this case, the speed may increase). After this, use the quantity screw to return to the 900 rpm parameter. If necessary, use the quality regulator again.
What may be useful for work
If suddenly the car owner began to notice some changes in the operation of the engine, for example, it stopped starting “hot” or there was instability in idle speed, it is necessary to correctly adjust the VAZ carburetor, as well as correctly adjust the idle speed of the car.
All settings are made in order to achieve stable operation of the power unit at idle with a minimum crankshaft speed.
To determine the crankshaft speed, you may need a tachometer. Some cars have a built-in instrument panel, among which there is a special connection for this device. In such a situation, it is advisable to use it. Otherwise, use a separate device (multimeter or autotester operating in tachometer mode). However, to take more accurate indicators, it is best to connect a separate unit. This will be much more convenient in terms of operation, in addition, all adjustments will be made more accurately and efficiently.
Experienced car mechanics, who have had their fair share of experience in this matter, can make adjustments by ear. To rotate the quality screw and the quantity screw, other craftsmen who do not have much knowledge may need a slotted screwdriver with a blade width of no more than 3 millimeters.
How to check the strainer
This is done as follows. Use manual fuel pumping and fill the float chamber with fuel, after which you will be able to see the shut-off valve close. Then move the top filter cover and remove the valve. It must be thoroughly washed in solvent, then dried using compressed air.
When the engine behaves incorrectly during loads, there are dips or loss of power, or the car “reacts poorly to the pedal,” most likely you have a problem with the fuel supply. In addition, often the cause is a faulty strainer.
The float chamber is cleaned using a rubber bulb and then dried with compressed air.
Checking the tightness of the shut-off needle is carried out using a bulb, since the pressure force that occurs during squeezing is equal to the pressure in the fuel pump. When replacing the carburetor cover, you need to make sure that the floats are in the up position. You should feel strong pressure during installation, after which you need to listen carefully to the carburetor for air leaks. If there is even the slightest leak, the needle and valve body must be replaced.
Solex carburetor tuning
Tuning, that is, improvement, modification of the carburetor is carried out to increase engine power and improve driving dynamics.
If you sharply open the throttle valve with the Solex carburetor set at the factory, the air flow speed decreases, as a result of which less gasoline is supplied to the carburetor. Because of this, power drops significantly at low speeds.
The procedure for increasing engine power by tuning the Solex carburetor:
We carefully disassemble the carburetor. We wash and blow, and divide into two halves. Pay attention to the air damper axis. There are protruding screws on this axis, which creates additional resistance while the car is moving.
Any little things are important when tuning, so these protruding screws need to be smoothed out. Remove the axle and air damper from the top. The axle needs to be sharpened. From the lower part you need to pull out the throttle valves with their axles. At this stage, using a file we make the flaps larger. We hide the screw caps inside the axle. There are screws with conical heads, you can use them. The throttle valve needs to be assembled. Now we are tuning the diffusers. To improve the aerodynamics of the diffusers, it is necessary to make the legs in the shape of wings. We also check the protrusions of the factory casting; if there are any, they need to be ground off. The accelerator pump must have 2 tubes installed in one chamber. There is an opinion among some that when I use two tubes for each camera, “dips” may appear, that is, you press on the gas, but the car does not move.
In general, the basis of tuning is smoothing, erasing protrusions and irregularities. Any unevenness in the fuel and air mixing chamber creates resistance.
Types of service
Maintenance of Ozone carburetors can be partial or complete. The first is flushing the unit without removing it from the engine. This is done using special cleaning products such as “Carb Cleaner”. We use the product according to the instructions and continue to operate the car. But the effect of partial maintenance is short-lived and does not always help. Eventually you will have to perform a full service.
Full setup of Ozone carburetors comes down to complete disassembly of the unit, cleaning of the channels, checking the functionality of the mounted units, troubleshooting parts, assembly using spare parts and subsequent adjustment.
Preventative work
This step must be performed at regular intervals, as it can extend the life of the entire device. During it, the following processes must be performed:
- Carry out a visual inspection for deformation and damage.
- Clean the surface of the system from various types of contaminants.
- Periodically clean the mesh filter and rinse the chamber where the float is located.
- Clean the air jets.
The strainer is the most important element of the carburetor; it should be checked at least once every sixty thousand kilometers wound on the car’s speedometer. How to do it:
Using manual pumping, fill the float chamber with flammable liquid. The consequence of this action will be the closure of the shut-off valve system. Move the top filter cover to the side and remove the valve. The product is washed with a solvent and dried with a stream of hot air. The float chamber can only be cleaned using a rubber bulb - rags, sponges, etc. cannot be used in this procedure.
Drying is carried out by the same supply of compressed hot air into the system. Before replacing the carburetor cap, it is important to ensure that the floats are in the up position and that nothing is obstructing their functionality.
The seal of the shut-off needle is checked using the same rubber bulb, which creates the same pressure as the vehicle's fuel pump.
After all this work has been carried out, you can begin to directly adjust the carburetor system.
How to change the gasket
Over the years, gaskets made from a wide variety of materials were installed on DAAZ: heat-resistant cardboard, paronite, metal. The main function of the gasket is to create the most reliable and tight connection between the carburetor body and the surface of the engine intake manifold. This is the only way to ensure normal operation of the power unit.
After dismantling the carburetor, it is necessary to inspect the gasket for deformations, tears or severe dents. The manufacturer recommends changing the seal after each carburetor removal.
On the left - new, in the center - when dismantling the carburetor for the first time, on the right - after 3 years of operation of the car
The gasket is selected according to the type of the old one. You cannot install a gasket made of a different material or with a change in shape - it will not be able to provide an adequate joint between the parts of the mechanisms.
The gasket replacement procedure is not difficult:
- A new gasket is placed on the carburetor mounting studs.
- Before this, you need to clean the planting site from soot and dirt.
- It is necessary to install the gasket in the same position as the old one.
- Then install the carburetor on it and tighten the fixing nuts until they stop.
Troubleshooting nodes
Measure the distance using a previously prepared piece of cardboard. The gap should be in the range of five to five and a half millimeters. If it is larger or smaller, make an adjustment. Using a flat-head screwdriver, you need to unscrew the plug on the adjusting bolt, which is located on the starter. Using a screwdriver, you need to rotate this adjusting screw to set the required gap
Please note that the width of the flathead screwdriver should be a maximum of 3.5 millimeters. But the tuning of the VAZ-2107 carburetor is not completed.
Then the damper gap in the first chamber is adjusted. To carry out this work, you will need to completely remove the carburetor. The lever, on which there are three arms, must be turned counterclockwise until it stops. In this position, it is necessary to measure the gap using a previously prepared wire. There should be no more than 0.8 millimeters from the chamber wall to the edge of the damper.
To make adjustments if necessary, you will need to rearrange the throttle and air damper drive rods. You can also bend the rod a little. All work that needs to be done on the starting device has been completed. Install the power system in reverse order. Then check the operation of the power system. But keep in mind that the VAZ-2107 ignition must be adjusted. The carburetor will function perfectly, but if the ignition timing is set incorrectly, you will not get efficient engine operation.
How does the Ozone carburetor work?
Without understanding the principle of operation of the dosing device, it is impossible to carry out serious repairs and adjustments. The maximum is to adjust the fuel level in the chamber, clean the mesh and the CXX jet screwed into the outside of the housing. To eliminate deeper problems, it is worth studying the algorithm of the unit’s operation, starting with a cold start of the engine.
- The driver pulls the trigger handle all the way, the upper flap completely closes the air flow into the primary chamber. At the same time, the first throttle opens slightly.
- When the starter rotates, the pistons draw in pure gasoline without adding air - the engine starts.
- Under the influence of vacuum, the membrane slightly opens the upper damper, clearing the way for air. The air-fuel mixture begins to be supplied to the cylinders, otherwise the engine will stall due to over-enrichment.
- As the car warms up, the driver presses down the choke handle, the throttle closes and fuel begins to flow into the manifold from the idle hole (located under the throttle valve).
Immediately after starting the engine, the membrane pulls back the flap and opens the gap for air to pass.
At idle speed, the air-fuel mixture enters the manifold through the channels and CXX jets, the main chokes are tightly closed. Quality and quantity adjusting screws are built into these ducts. When the main throttles open and the main metering system comes into operation, the position of the screws does not matter - the combustible mixture is supplied to the engine directly through the chambers.
At idle speed, the fuel mixture enters the manifold through the lower hole located under the throttle
To start driving, the driver selects a gear and presses the accelerator pedal. The fuel supply pattern changes.
- The primary throttle valve opens. Due to the vacuum, air and gasoline are sucked through the main jets, mixed in the emulsion tube and sent to the diffuser, and from there to the manifold. The idle system operates in parallel.
- With a further increase in crankshaft speed, the vacuum in the receiving manifold increases. Through a separate channel, the vacuum is transmitted to a large rubber membrane, which, through traction, opens the second throttle.
- To prevent failures when the secondary damper opens, part of the fuel mixture is supplied to the chamber through a separate channel of the transition system.
- For dynamic acceleration, the driver sharply presses the gas pedal. The accelerator pump is activated - the thrust acts on the diaphragm, which pushes gasoline to the nozzle of the sprayer. It produces a powerful jet inside the primary chamber.
After opening the throttle, the fuel mixture enters the manifold through the main diffuser
When the pedal is pressed to the floor and both throttles are fully open, the engine is additionally fed with fuel through the econostat tube. It draws fuel directly from the float chamber.
Idle speed adjustment
The second setting of the VAZ-2109 carburetor is idle speed, it can be partial or full. The first is for minor speed adjustments, the second is for adjusting the amount of air (setting CO emissions in the exhaust gases).
Partial adjustment is performed using the air-fuel mixture “amount” screw. This screw sets the opening angle of the throttle valves, which ensures that the air-fuel mixture enters the cylinders when the accelerator pedal is released. The “quantity” screw rests on the throttle valve control lever and when screwed in, it pushes the lever, causing the valves to open slightly.
Partial idle adjustment is performed with a warm engine and creating a load on the vehicle's on-board network by turning on the high beam headlights and the interior heater at full power. The adjustment is carried out with the engine running by screwing in/unscrewing the “quantity” screw until the optimal idle speed is established, which for the VAZ-2109 is 800-900 rpm (this can be tracked using a standard or plug-in tachometer).
If it is not possible to set the required speed or the motor operates unstably at it, a complete adjustment is made, which is made by two screws - “quantity” and “quality”.
The algorithm for this adjustment consists of the following stages:
- Warm up the engine and then turn it off;
- We find the quality screw (it may be closed with a plug that will have to be removed), screw it in until it stops, and then unscrew it 3-4 full turns;
- We start the engine, turn on electrical consumers (lighting and stove) to create a load in the on-board network;
- By rotating the “quantity” screw, we achieve 700-800 rpm on the tachometer;
- By turning the “quality” screw, we set the maximum possible speed (they will increase to a certain level, and then stop. The moment the speed increase stops is considered the maximum);
- We set the “quantity” screw to 900 rpm;
- Using the “quality” screw we lower them to 800 rpm;
- We slowly tighten the “quality” screw until interruptions appear in the operation of the power plant, after which we unscrew it back 1 turn;
- We adjust the speed with the “quantity” screw, bringing it to a normal value - 800-900 rpm;
After the adjustment operations, we check that they were carried out correctly. This is done by sharply pressing the gas pedal and then quickly releasing it. With a properly configured carburetor, the engine should respond quickly to pressure, without any failures or hesitations. And after releasing the pedal, the speed will drop to the idle level, without sags or instability of the engine.
Purpose of the exhaust system
Before combustion in the engine cylinders, gasoline is mixed with air and supplied through the intake manifold into the combustion chamber. There, the mixture is compressed eight times by the pistons and ignited by a spark from the spark plug. As a result of the process, 3 components are formed:
- heat and mechanical energy that rotates the crankshaft;
- gasoline combustion products - carbon dioxide and carbon monoxide, nitrogen oxide and water vapor;
- combustion under high pressure generates sound vibrations - the same exhaust sound.
The smoke at the exit from the duct is cooled to a safe temperature, you can calmly raise your hand - it won’t burn you
The VAZ 2107 exhaust system performs several important functions:
- Emission of combustion products from the chambers and ventilation of the cylinders after the next combustion cycle.
- Reducing the amplitude of sound vibrations, that is, reducing the noise level of a running motor.
- Removal and dissipation of part of the released heat in the atmosphere.
On “sevens” with an injection power system, the exhaust tract solves another important task - it cleans the exhaust from toxic gases CO and NO by afterburning in a catalytic converter.