The VAZ 2104 has not been produced for many years in a row, but is seen relatively often on the roads. The engine is started using a starter.
This part fails relatively rarely, but due to how long the machines have been produced, it has to be replaced relatively often. It is important to study possible breakdowns of this equipment in advance.
Replacing the starter on a VAZ-2104-2107
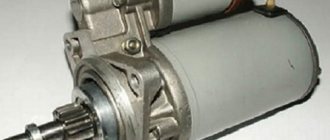
A car starter is the main element of the engine starting system, and is designed to start it by cranking the crankshaft.
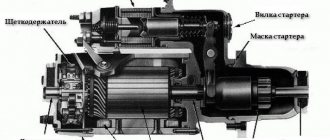
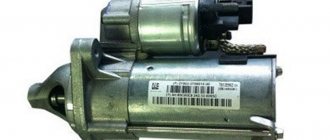
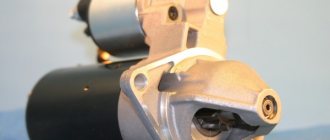
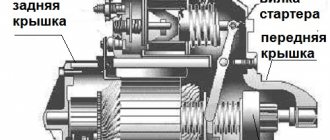
Essentially, it is a direct current electric motor driven by closing an electrical circuit by turning the ignition key. The autostarter consists of a stator, an armature (rotor), a brush holder with brushes, as well as a traction relay and a drive. In all VAZ classic models, incl. and in the “seven”, it is located at the bottom of the engine, and is attached to the clutch housing.
Preliminary work
We install wheel chocks
Performing a few simple steps related to preparing the VAZ 2107 for repair work will significantly save your time, improve the quality of maintenance and will guarantee the safety of your health.
- The place where the machine will be serviced must have good and uniform lighting. In some cases, this can only be achieved through the use of additional lighting.
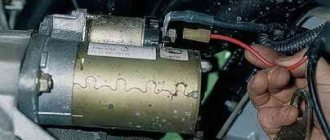
- Due to the fact that the starter in the VAZ 2107 is located in the lower part of the engine, work on its dismantling should be carried out on an overpass or inspection hole. It is not possible to remove the starter from the top.
The machine must be securely secured using the parking brake or wheel chocks. Otherwise, there is a possibility that the vehicle will start moving spontaneously.
Malfunctions
Considering that the starter is a complex electrical device, malfunctions in it can occur quite often, but most of them can be eliminated through repair. Malfunctions that cannot be repaired and require replacement of the entire assembly include:
- damage to the commutator due to brush wear or other reasons;
- short circuit or break in the stator winding;
- short circuit or break in the armature winding;
- complete wear of the armature bearing bushings.
If the above faults are detected, it is better to replace the starter with a new one. Otherwise, your car will either not start at all, or serious problems may occur in the on-board electrical circuit of the car.
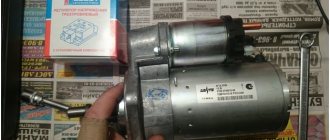
The catalog number of the original “seven” starter is 2107.3708010-01. Its price is approximately 2500-3000 rubles. You can also purchase improved models - starters with a built-in gearbox, which are very popular today.
Their advantage is that even if the battery is partially discharged, the starter, due to the gearbox, provides a sufficient number of flywheel revolutions to start the engine. The price for such models starts from 3,500 rubles. The cost of replacing a starter at a service station averages 500-600 rubles.
Replacement
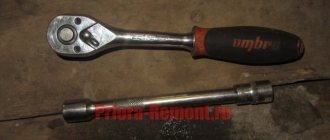
- socket wrench 10;
- socket wrench with extension 13;
- screwdriver.
Work order
- We place the car on a viewing hole or overpass and secure it with the parking brake.
- Open the hood and disconnect the ground wire from the battery.
- Using a 10mm socket, unscrew the bolt of the lower fastening of the starter heat shield.
- We dismantle the air filter housing and the warm air supply hose (for injection units, remove the fastenings of the intake pipeline).
- Using a socket wrench with a 13 mm extension, unscrew the 3 bolts securing the starter housing. It is better to unscrew the bottom bolt from the inspection hole.
- Using a 13mm wrench, unscrew the nut (on the injection engine there are two nuts) securing the starter shield. Let's take it out.
- Using a socket wrench with a 13 mm extension, unscrew the 3 bolts securing the starter housing. It is better to unscrew the bottom bolt from the inspection hole.
- Using the same tool, unscrew the nut securing the tip of the wire going to the “+” battery.
- Disconnect the start relay wire.
- We remove the starter from the rear wall of the engine compartment.
- We install a new starter in its place.
- We carry out installation work in reverse order.
Starter - removal and installation
1. Place the car on an inspection hole or overpass (see “Preparing the car for maintenance and repair”).
2. Disconnect the wire from the negative terminal of the battery (see “Battery - removal and installation”).
3. On a car with an injection system, remove the additional mud guard (see “Splash guard - removal and installation”).
10 mm socket wrench
Using an extension, unscrew the lower bolt securing the starter shield.
13 mm socket wrench
with the extension and cardan, unscrew the three bolts securing the starter to the clutch housing and move the starter forward. On the injection engine, the upper starter mounting bolt also secures the intake manifold extension, and the middle bolt secures the mounting bracket for the oxygen concentration sensor wiring harness.
6. On the carburetor engine, remove the air filter housing (see “Air filter housing - removal and installation”) and the warm air intake with an air duct (see “Intake pipe and exhaust manifold gaskets of a carburetor engine - replacement”).
7. On the injection engine, remove two stretchers of the intake pipe (see “Gaskets of the intake pipe and exhaust manifold of the injection engine - replacement”).
13
mm
socket wrench , unscrew the nut (there are two nuts on the injection engine) securing the starter shield and remove the shield.
13
mm
socket wrench, unscrew the nut securing the tip of the wire connecting the starter to the positive terminal of the battery, and remove the tip from the contact bolt.
10. Disconnect the wire from terminal “50” of the traction relay.
11. Remove the starter from the partition side of the engine compartment.
Installation of the starter is carried out in reverse order.
Source
Starter VAZ 2104
The VAZ 2104 has not been produced for many years in a row, but is seen relatively often on the roads. The engine is started using a starter.
This part fails relatively rarely, but due to how long the machines have been produced, it has to be replaced relatively often. It is important to study possible breakdowns of this equipment in advance.
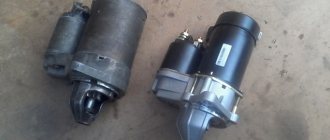
Original parts and their analogues: which is better
Purchasing a new starter is a good decision. As is the case with other parts, there is always a choice between original and analogues. Purchasing original AvtoVAZ products is preferable. Its price is not always high. At the same time, the overall dimensions and mounting holes are 100% consistent.
Characteristics of the original starter for the VAZ 2104 car:
| Manufacturer's name | vendor code | Options | Cost, rubles |
| AvtoVAZ | 2107.3708000-01 | 12V 1.2kW z=11 | From 4 900 |
There is a wide selection of different analogues. It won't be difficult to buy them. Moreover, some manufacturers produce products in quality that are not inferior to AvtoVAZ. It’s just important to remember that well-known brands are often counterfeited. That is why you need to familiarize yourself with the characteristics of such products in advance. Analogues that have proven themselves to be positive:
| Manufacturer's name | vendor code | Options | Cost, rubles |
| Bosch | 0001362059 | 12V 1.2kW | From 2700 |
| Valeo | 0001367008 | 12V 1.2kW | From 3 400 |
| Delco | 0986016200 | 12V 1.2kW | From 3 000 |
Starter replacement and installation procedure
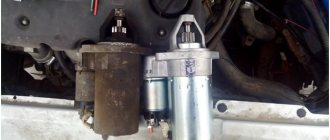
Before removing the starter, you need to figure out where this device is located. The easiest way to do this is using the photo from the manual. Dismantling this equipment usually does not cause difficulties. Removal requires only a set of wrenches, WD-40 and a little patience. The procedure usually takes no more than 1 hour. Removing the starter from a VAZ 2104 car includes the following main steps:
- it is necessary to disconnect the battery terminals - in some cases it is enough to disconnect the negative terminal;
- Next you will need to unscrew the bolt securing the starter shield - use a 10mm wrench;
- the starter itself is attached to the clutch housing using 3 bolts - you can unscrew them using a 13mm socket;
- using the same 13mm socket with an extension, you will need to unscrew a couple more bolts securing the crankcase shield;
- the terminals securing the starter wires are disconnected - the block itself is then removed.
Next, the starter is simply pulled out through the engine compartment - as in the picture below.
Installing a new starter or the old one after repair is performed in the reverse order. You need to familiarize yourself with all the subtleties and nuances in advance. It is important to note that the composition of WD-40 is a dielectric.
After unscrewing various threaded connections, it is necessary to remove it from the contact points. Otherwise, startup problems may occur. Also, threaded connections should be lubricated with graphite lubricant. This will avoid problems later when removing the starter.
Source
Removing and replacing the starter on VAZ 2101, 2102, 2103, 2104, 2105, 2106, 2107 (video)
Hello, in this article you will learn how to remove and replace the starter on a VAZ 2101, 2102, 2103, 2104, 2105, 2106, 2107. A car needs a starter to start the engine. When you turn the key in the ignition switch, voltage is supplied to the starter, it spins and transmits torque to the engine through the gearbox, thereby starting the engine. Accordingly, if the starter fails, most often the starter solenoid relay fails, then the engine will not be able to start. Without a starter, the engine can only be started with a pusher, but this is inconvenient and there is not always an assistant nearby to push. To remove the starter you will need heads 13 and 10. The cost of a new starter is around 5,000 rubles, so it will be much cheaper to either repair the starter, or buy a solenoid relay, or buy a used one. starter.
First of all, we remove the terminal from the battery for safety reasons. Then use a 10mm head to unscrew the bolt securing the starter shield
The starter is secured with 3 bolts to the clutch housing, unscrew them with a 13mm head
We also use a 13mm head to unscrew 2 more bolts securing the starter shield.
Now unscrew the nut securing the positive wire of the starter and remove the block
Then we take out the starter up from the side of the engine compartment
Installation of the starter occurs in reverse order.
Source
Starter - check and repair
To complete the work you will need a multimeter.
2. Clean the outer surface of the starter from dirt.
3. To check the traction relay, connect its terminal “50” to the positive terminal of the battery, and the starter housing to the negative terminal. In this case, for a working relay, the armature pushes the drive gear into the front cover window with a characteristic click.
4. To check the armature and stator windings, remove the rear cover of the starter and disconnect the brush assembly (see below, “Repair”).
5. By connecting one ohmmeter probe to the body, the other alternately
connect to the terminals of the stator windings, checking that they are not shorted to the housing.
If there is no short circuit, the ohmmeter should show a resistance of at least 10 kOhm.
6. Having connected the ohmmeter probes to the terminals of the stator windings, we check them for breaks.
If the resistance tends to infinity, the winding has broken.
7. Having connected one ohmmeter probe to the housing, we connect the other alternately to the armature contact plates, checking the short circuit of the armature windings to the housing.
If there is no short circuit, the ohmmeter should show a resistance of at least 10 kOhm.
13
mm
socket wrench , unscrew the nut and remove the stator winding lead from the contact bolt.
2. Using a slotted screwdriver, unscrew the three screws securing the traction relay.
3. Remove the traction relay with rod and spring.
4. Using a slotted screwdriver, unscrew the two screws securing the armature shaft casing.
5. Remove the casing with gasket, lock washer A of the rotor shaft and adjusting washers B.
10 mm socket wrench
Unscrew the two nuts securing the starter rear cover and remove it.
7. Disconnect the front cover from the body along with the tie rods and the anchor.
10 mm socket wrench
Unscrew the locking nut of the eccentric axis of the drive lever.
9. Using a slotted screwdriver, unscrew the lever axis.
10. Remove the eccentric shaft of the starter drive lever.
11. Remove the anchor from the tie rods of the body, disengaging the lever fork from engagement with the drive ring.
12. With the armature shaft resting on a wooden surface, use a suitable mandrel to press the restrictive ring off the retaining ring.
Replacing the starter on a VAZ 2101-VAZ 2107
Welcome! Starter - after all, but without it it would be difficult, because if this unit does not exist, then who will start the car? Of course, you can get out of the car, push it a little and turn on the speed and it will start, but why are such difficulties necessary? That's why a starter was invented, thanks to which the car can be started only by turning the ignition lock cylinder. But over time, this unit breaks down and therefore it has to be replaced with a new one, but not everyone knows how to replace it, and therefore we have especially prepared for you instructions in pictures on how to replace the starter on cars of the “Classic” family.
Note! To replace, you will need to stock up on: A basic set of “10” and “13” wrenches, and you will also need to take with you a screwdriver, a “10” socket and an extension for this head!
Summary:
When should you replace the starter? It needs to be changed if:
- It began to turn very poorly and therefore he began to start the engine of the car for a long time. (In this case, the starter can also be repaired; for information on how to repair it, see the article entitled: “Repairing a starter on a VAZ”)
- It also needs to be changed if it has stopped starting the car’s engine altogether and thus it is no longer subject to repair.
The starter does not turn (does not work). Main reasons
Probably the most unpleasant thing that can happen is when you get into the car with thoughts of a good trip, turn the ignition key, and in response there is deep silence. And at this moment you remember all the swear words and pour them on your car. And it’s even worse when it’s -30 outside and you’re already frozen to the bone. But let’s not talk about sad things, but let’s simply break down the main reasons for a non-working starter.
BUT! Before doing this, be sure to pay attention to other possible causes of malfunction. Since in 90% of cases, the problem of a non-working starter lies in completely different non-working elements.. First of all, you should pay attention to the following elements:
First of all, you should pay attention to the following elements:
1) Low battery.
The most common problem in this case! It is especially relevant in winter! In this case, you need to charge. replace the battery, or warm it up (if the problem occurs in winter) or light it.
The main sign of a bad battery will be the noise of the relay operating when you turn the ignition key! But if the battery is “healthy” and the noise of the relay being activated is present, then see the next point.
In general, starting the engine in winter is a separate issue. Which will be the subject of a separate article!
2) Lack of “ground” to the solenoid relay.
Pay attention to the reliability of fastening the negative wire from the battery ground to the starter solenoid relay. If necessary, clean and re-attach the ground to the starter retractor. 3) Open circuit in the ignition-starter circuit
3) Open circuit in the ignition-starter circuit
When you turn the ignition key, and in response there is empty silence, even the relay does not work, then the problem lies in the ignition contact group.
First of all, check for contact from the ignition to the starter. If everything is in order with this, then we move on to the solenoid relay.
Starter malfunctions
Above we described the most common reasons for a non-working starter. As you understand, the malfunctions described above are not directly related to the starter. Therefore, before removing and replacing the starter, carefully check all 3 points stated above again. Below we will look at the problems with the starter itself. Next we will talk about the elements of the starter itself.
4) Defective solenoid relay
There is nothing left to do but replace it (How to replace the solenoid relay?)
But first, again, pay attention to the retractor terminals. In 90% of cases, they need to be cleaned
If, when you try to start the car with the key, you hear clicking sounds, then the problem is most likely in a discharged battery, but if it is charged, then there is a problem with the relay contacts. If there are no sounds or clicks, then the relay winding has burned out (in this case it needs to be replaced).
5) The brushes do not fit tightly to the commutator
6) Severe wear on the commutator
If you still haven’t figured out what the problem is, try starting the car from a pushrod (How to start from a pushrod?) and drive to a service center.