Sometimes, after overcoming water-filled road irregularities, drivers notice that certain electronic devices of the car (headlights, wipers, etc.) stop working. This is caused by the fact that the fuse box of the VAZ 2114 has been flooded with water, which has led to the oxidation of its contacts. Today we’ll talk about what to do in such a situation and how to fix everything with your own hands.
Mounting block VAZ 2114
Fuse box diagram for an injection VAZ 2114
The vehicle's electrical circuit includes fuses.
These are compact protective devices that are designed to protect the main working elements from overload. Overload is an increased current, due to which the equipment can easily deteriorate. Due to the melting of a special insert in the fuse, the circuit breaks in a timely manner without causing harm to the equipment.
Fuses of this type first appeared back in the 19th century, but they are still widely used in the automotive industry. It is precisely these fuses or protective devices (PDs) that serve the benefit of your VAZ 2114.
Preparing electrical equipment for winter
Electrics in the VAZ 2114 are a weak point and are subject to seasonal inspection
As a rule, preparation for winter driving is limited to changing tires, checking the battery and keeping the car from freezing. But maximum summer temperature loads, high humidity in autumn, dust and dirty contacts negatively affect the performance of electricians. Cleanliness is the key not only to health, but also to the high-quality operation of the vehicle’s electrical equipment. Dirty or loose terminals often cause the car to be unable to start. The sensitivity of a car's electrics during the transition to more extreme operating conditions is a factor that many people forget about. Lowering the temperature and its changes negatively affect the insulation of wires and contribute to the formation of microcracks. Constant vibration leads to deterioration of contacts. Since, according to reviews from Lada 2114 owners, electrical equipment is not its strongest point, it, along with spark plugs, tires and battery, is subject to seasonal inspection.
A little about fuses
Chargers of this type consist of a housing. It is made mainly from specialized glass or high-strength ceramics. Plus, there is a fusible insert inside the case. The insert is made of an alloy or conductive metal.
The case has several functions:
- A fusible element is mounted inside it using a special method. If the rated current is exceeded, the insert melts or ruptures;
- A working thread is inserted into the chamber, which extinguishes electric arcs. They occur when the chain breaks;
- In the case, depending on the type of fuse, there are contacts through which the connection to the general network occurs.
On the fuse body there is information regarding the technical characteristics of the charger:
- Rated insertion current;
- The rated current of the housing at which the element is destroyed.
Depending on the performance characteristics, protective devices can be:
- Fast-acting;
- Low voltage;
- Designed for average voltage levels;
- Designed for high voltages.
In the case of cars, the first two types of fuses are used.
The determining indicator of the purpose of the charger is the current characteristic. This determines for what purposes this or that fuse is suitable.
- To protect electric motors, fuses are used that can withstand the rated current and its excess for a fairly long time, which is required to start the mechanism. They are mainly marked with the letter g - these fuses protect against overload and short circuit.
- The other type, marked "a", is used for protection against short circuits and extremely high voltage currents. They are installed only for protection against short circuits.
Depending on the nominal current of the insert, GOST provides a color designation system:
Rated current
Fuse box
The VAZ 2114 car has a total of two mounting blocks.
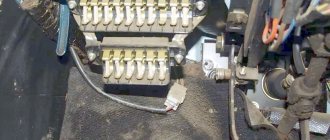
The first and main one is installed in the engine compartment above the windshield on the left. Relays and fuses are located there. Actually, largely because of this, it is often called a fuse block rather than a mounting block.
The unit cover is held in place by special plastic clips, which makes it easy to snap and remove. On the inside of the cover there is a fuse diagram, the rated current of each individual charger.
Under no circumstances should you install a charger into the mounting block whose current strength exceeds the rated values provided for in the circuit. This may lead to electrical equipment failure.
In the image above you can see that there are tweezers in the corner of the block. It is specifically included in the design, since it is used to dismantle and install new fuses.
In total, the power supply includes 17 active fuses (F1-F16) and four more backup fuses - F17-F20.
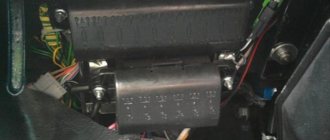
Also for the VAZ 2114 there is a second block with fuses. It is located inside the cabin under the glove compartment and shelf. This PSU includes the following fuses:
- For fuel pump. Rated current -15A;
- For fan relay, speed sensor, mass air flow sensor and oxygen sensor. All of them have a rated current of 7.5A;
- To protect the ignition unit and electronic engine control unit. Their normal current is also 7.5A.
Purpose of the memory
In order to quickly resolve issues with failed fuses, VAZ 2114 owners should figure out which charger is intended for what. This will make it much easier for you to navigate the notations. Use a special table.
Designation
Rated insertion current
Rear fog light bulb protection
Turning lamps of the left and right side, hazard signal lamp, relay-breaker of turning lamps and hazard lights
Protection of light bulbs inside the passenger compartment and trunk, on-board computer circuits, ignition suspension, brake lamps, Check Engine lamps
Switch fuse in the trunk door glass heating circuit, carrying contacts
Horn and switch circuit protection, cooling fan motor
Protection of the power window circuit and its switches, contacts
COMMON MALFUNCTIONS
In the mounting block, the cooling fan fuse often blows, as well as the cigarette lighter fuse on the VAZ 2114. The cigarette lighter on this VAZ model often shorts out on its own; you can call this a factory defect. Another reason for burnout is the installation of various devices of higher power in the cigarette lighter socket, for example, a compressor for inflating tires. But before changing the fuse for the VAZ 2114 cigarette lighter, you need to check the condition of the cigarette lighter socket itself. Often a device is inserted into the socket by twisting the plug, and the cigarette lighter block begins to dangle and short out. In this case, the wire going to the cigarette lighter may fray or break, and for this reason the fuse will constantly blow.
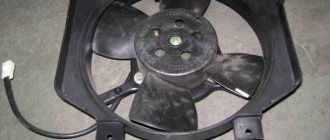
The fuse link (20A) of the cooling fan is also loaded with an audio signal, so you can determine a blown fuse F5 by the absence of a car horn. Another fuse link, responsible for the operation of the fan, is installed in the car interior next to the engine ECU under the dashboard. Fuses can blow due to a short circuit in the fan motor - standard fans are not very reliable and often fail.
Contacts often burn out and tracks on the mounting block burn out due to a short circuit in the electrical circuit. When moisture gets on the connector pads, the contacts oxidize. The power supply unit in the VAZ 2114 model is considered a rather weak element and requires repair or replacement. It should be noted that the mounting block 2114 is quite problematic to repair, so if a malfunction occurs in it, you should think about replacing it. The cost of a power supply unit for a front-wheel drive VAZ ranges from 2 thousand to 3 thousand rubles. But it’s better to replace a burnt-out unit than to go through the hassle of restoring it.
Often the central locking on VAZ 2113-2114-2115 cars refuses to work normally, and many drivers cannot determine the cause of the malfunction. The thing is that the central locking fuse is very cleverly installed in the electrical circuit of the car. In the area of the steering column on the wires there are two fuses in a holder, one of them responds to the activation of the central locking (15A). The contact in this clip oxidizes and the central locking system does not work. If an old-style cylindrical fuse-link is installed there, it is better to immediately change it to a new type of flat one.
Keep the mounting block clean, always close the protective cover!
Replacing the memory
If the engine becomes unstable, electrical problems arise, light bulbs burn out, or electrical appliances stop working, the first step is to check the effectiveness and integrity of the fuses.
To do this, the following activities are performed.
- Determine the location of fuses that may fail. You already know the diagram, the designations are also familiar to you. Therefore, it remains to be understood that the charger should be looked for under the hood or in the block inside the cabin.
- Be sure to turn off the power to the car. To do this, simply remove the negative terminal from the battery.
- Remove the plastic clips that hold the plastic cover of the mounting block in place. This is how you can easily remove the block.
- Remove the tweezers from the mount, which are located directly inside the mounting block next to the fuses and relays.
- Use tweezers to grab the device that you suspect is broken and pull it out.
- Now you really need to make sure that the fuse is blown and not working. To do this, visually inspect the fusible element. If it comes off or is deformed, it means that the protection has worked, and therefore the fuse will have to be replaced.
- But it is not always possible to detect a memory failure using the visual method. In this case, you will have to use a tester.
- Having reached the truth, that is, having determined that the protective device has failed, it will be enough to replace it with a new one.
Safety regulations
Now a few more safety rules:
- Under no circumstances insert homemade devices and jumpers in place of broken chargers;
- Never install fuses whose rated current exceeds the values indicated on the housing cover. This may result in a short circuit and fire in the vehicle;
- Do not use metal screwdrivers or other metal tools when working with the mounting block. This even applies if the car is de-energized, that is, the battery is disconnected.
Source
Repair and diagnostics
All possible malfunctions of the mounting block are divided into:
- fuse failure;
- relay malfunction;
- damage to conductive paths;
- contact damage.
Blown fuses are the most common reason for a car owner to begin examining the contents of a black box. Before changing the fuse, it is necessary to determine the cause of the blown. The circuit is “ringed” for a short circuit and the end devices are checked. After diagnosing the circuit and eliminating the breakdowns, the old fuse is replaced.
It must be taken into account that the fuse being replaced must have the same ampere value as its predecessor. Installation with a higher rating is possible. A lower reading of the electric current on the fuse causes its immediate blowout and, as a result, the lack of protection of the electrical circuit.
Relay failures are diagnosed by replacing fuses. Installing the relay into the mounting block on the connectors does not require soldering, and replacement is quite simple.
With conductive paths everything is a little more complicated. Possible damage is not always obvious. Modern plastic blocks require exquisite soldering skills, which are difficult to work with even for experienced electricians. Soldering wires is only permissible if separation of printed circuit boards is not required. Sometimes it's easier to buy a new unit.
There are a great many contacts in the mounting block. Corrosion or normal contamination does not always allow one to determine the functionality of the contact. The most common way is to clean the contacts with sandpaper or a regular knife. If the contact breaks off, you can try to solder it, but unsuccessful experiments with soldering lead to the need to replace the block.
The fuse being replaced must have the same ampere rating as its predecessor.
Before starting to work with electricians, it is necessary to disconnect the negative terminal from the battery. It is undesirable to use metal screwdrivers and check the circuit for a spark, because this sometimes leads to short circuits and burnout of current-carrying paths.
Despite all attempts by manufacturers to simplify the work of diagnosing and repairing the mounting block as much as possible, the abundance of parts and all kinds of wires require basic knowledge of electrical engineering. If there are none, and if you have no experience working with a soldering iron, the best option is to contact a professional auto electrician.
Why are fuses needed?
Fuse links are required in the on-board network as a protective element. Each line provides a small safety margin, but in case of a short circuit this is not enough. In the event of a critical power surge, the wires or powered part may melt or ignite, which leads to serious consequences for the car.
Fuse links are calibrated by the factory to a certain threshold. When the mark is exceeded, the thin element is destroyed and the circuit opens, which “saves” the entire machine from fire.
Afterword
Car owners whose cars keep melting fuses should be sure to check all installed wiring at the first opportunity.
Very often this problem is evidence of serious damage in one or more circuits. To do this you will need detailed:
- electrical circuit;
- pinout;
- tester.
If you lack the necessary knowledge, it is better not to undertake repairs yourself, but to entrust this task to professionals. The fee for their services, of course, can be quite high, but eliminating the consequences of unqualified intervention will cost much more.
Where is the main and interior fuse box of the VAZ 2114 located?
The car is equipped with two main mounting panels. The first part is installed inside the engine compartment. You can find the module on the left side in the direction of travel of the car. It is distinguished by a black or orange plastic cover. You can get to the fuse links and relays by opening the protective cover. This is done by pressing two latches.
The second part is mounted inside the cabin under the dashboard. To access the panel, you will need to open the service hatch in the front passenger's feet on the left side of the heater casing. Unscrewing 4 screws opens the panel itself. Here are relays and fusible links that control the operation of the main components of the machine.
Location of VAZ 2114 fuses in the main block
On the fourteenth Lada model, in 90% of cases two types of mounting blocks are used. The location of the internal parts and the pinout of the fuses of the VAZ 2114 are not significant, but they are different. Therefore, it is most convenient to consider both options separately.
Note!
Some modifications of the vehicle may be equipped with other module designs. You can find out the name of the variety on the inside of the lid.
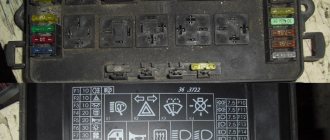
Fuses for VAZ 2114 injector (block 3722010-60)
The module contains fuse links and automatic circuit breakers. All elements are marked in order.
Main unit relay
- 1 – Head optics wiper switch;
- 2 – Contact insert breaker of the turn signal and hazard warning signal mechanism;
- 3 – Responsible for the proper operation of the windshield wipers;
- 4 – Fuse for monitoring stop lines and vehicle lighting;
- 5 – Power supply to electrical accessories (window regulators);
- 6 – Horn control, main circuit;
- 7 – Power line for heating the aft glazing;
- 8-9 – respectively, control of high and low beam head optics.
Decoding the fuse diagram of the VAZ 2114 head unit
- F 1 – fog lights at the rear of the car;
- F 2 – control circuit for turn signals and hazard warning switch;
- F 3 – power supply to the interior and luggage compartment lamps, also ignition indication, ECM;
- F 4 – fuse for the aft wind window heating relay circuit; the portable lamp contact is also energized here;
- F 5 – fuse for the signal of the VAZ 2114 and the head fan of the cooling system;
- F 6 – is fully responsible for the electrical package circuit;
- F 7 – standard fuse for the VAZ 2114 heater, also responsible for electric drives for the windshield washer, glove compartment lighting and headlight wipers;
- F 8/9 – fusible links responsible for the front fog lights;
- F 10/11 – backlight for the left and right sides, respectively, also responsible for illuminating license plates, cigarette lighter, instrument panel;
- F 12/13 – light fuse for VAZ 2114 for low-range mode on the right and left sides, respectively;
- F 14/15 – similarly for the long-range lighting mode on both sides of the car separately;
- F 16 – VAZ 2114 instrument panel fuses are responsible for indicating sensors and device status.
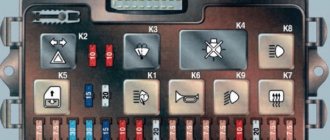
Main relays and fuses for VAZ 2114 in block type 3722010-18
A more modern modification, installed on cars since 2010. Here the arrangement of elements and fusible links is more thought out. Thanks to a more logical layout, individual elements are easier to access.
At the same time, not only the location of the fuses is different, their functionality and area of responsibility are also changed.
Head relays
- 1 – optical wipers;
- 2 – is responsible for the switch for turn signals and emergency lights;
- 3 – cleaners for the front part of the car glass;
- 4 – module for serviceability of lighting elements and backlight;
- 5 – control of the electrical package circuit;
- 6 – horn power supply;
- 7 – power conductors for heating the rear window;
- 8-9 – circuit breakers for high and low beam head optics, respectively.
Deciphering the VAZ 2114 fuse box diagram
- F 1 – headlight cleaner contact connectors, also refers to the sprinkler tank motor activation valve;
- F 2 – turns and opens the alarm when activated;
- F 3 – interior lighting, power supply circuit for side lights at the rear of the vehicle;
- F 4 – cigarette lighter fuse for VAZ 2114, overload protection for the heating element of the rear window, this also includes a portable lamp;
- F 5 – VAZ 2114 fan fuse, which is responsible for cooling the antifreeze, is also responsible for the horn;
- F 6 – power supply for windows and electrical accessories;
- F 7 – control lines for the front and rear sets of headlight and windshield washers – a complete circuit of equipment, this also includes the glove compartment lighting;
- F 8/9 – front fog lights for the right and left sides, respectively;
- F 10 – fuse for the lighting of the VAZ 2114, the cigarette lighter, the instrument panel indication, the engine compartment lighting, also the left side of the side light;
- F 11 – separately for the right side of the side lights;
- F 12-15 – power supply for head optics, complete lighting set;
- F 16 – fuse for VAZ 2114 instruments, also coolant temperature indicators, voltmeter.
Removing the head unit
In some situations, it may be necessary to remove the mounting block. This is usually caused by voltage surges or part of the circuit burning out. Also, if fuses burn out on a VAZ 2114, the reason may be hidden in oxidized or melted tracks or connecting terminals.
When asked how to remove the fuse box on a VAZ 2114, you must follow the simple dismantling instructions:
- open the negative terminal on the battery;
- from the inside of the cabin, you will need to disconnect the five main connectors of the wiring harnesses;
- dismantle the cover of the mounting block by clamping two terminals;
- the sixth pin connector is disconnected on the top side of the module;
- using a key No. 10 with an adapter, you need to unscrew the fastening of the main module;
- lift the mounting diagram with a screwdriver;
- remove the last terminal blocks from the bottom side;
- remove the mounting device.
Reinstallation is performed in the opposite order. The simplicity of the procedure is due to the fact that all terminals are different from each other and it is impossible to confuse their location.
Crash test results
The differences between the VAZ 2114 and its predecessor, the Nine, mainly affected the safety of the vehicle interior. The test result was a disappointing 3.7 points for the “nine” and an even more sad 3.2 for the 2004 VAZ-2114 out of 16 possible points. As it turned out, the “fourteenth” protects the driver in a frontal impact no better than the “nine”.
However, the concern’s pricing policy, availability and cost of consumables have made the VAZ 2114 the most popular car in the Russian fleet for police officers.
VAZ 2114 fuse blown, what to do
Periodically, voltage surges or other failures occur in the vehicle's electrical circuit. This leads to an overload in the circuits and the fuse link is destroyed.
If the breakdown is caused by a momentary failure, it is enough to replace the damaged element and everything will be fine. In the case of a larger defect, the new element will burn out as soon as the car starts. To fully diagnose the system and troubleshoot the problem, you will need to look at the entire line from the fuse to the consumer.
Important!
It is recommended to remove the fuses of the VAZ 2114 injector 8 valves only with special pliers or tweezers. From swinging to the sides, the thin legs of the part may break off.
Knowing the source of the problem will help make the search easier. Failure of the fuse element only occurs when there is a serious increase in voltage within the network, which is caused by a short circuit or system failure of the ECU.
The sequence of actions looks like this:
- remove the damaged element from the socket;
- find the corresponding wire on the back of the diagram;
- move along the highway to the consumer;
- detected damage must be eliminated; if the powered unit itself is damaged, replacement is carried out with a known good one.
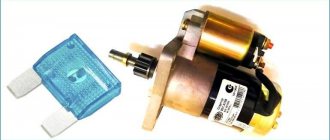
How to understand that the solenoid relay is faulty
There are certain “symptoms” by which the driver can understand that the relay is faulty:
- When the ignition is turned on, there is no characteristic click accompanying the movement of the armature back to its extreme position. That is, in the words of the drivers, the starter does not spin, the engine does not start.
- A click is heard, but the trigger mechanism does not function.
- The engine is started by the starter, the relay works, but does not turn off.
If one of the listed situations occurs when you turn on the ignition, you urgently need to figure it out and eliminate the cause. Sometimes the problem is not too serious and can be dealt with quickly.
When you cannot hear a click, you should check the voltage. It may not exist. Or the problem is in the pull-in winding. First check the wiring in the car. It is necessary to examine the positive wire that goes to the relay. Then inspect the ignition conductor.
If you hear a click, but the starter does not turn, you should look for the problem in the starter. The shields may wear out or the winding may break. In this case, further diagnostics should be carried out only after dismantling the structure. If you can’t figure out the system yourself, it’s better to contact a specialist. There are times when you have to buy a new starter. Its price is from 3 to 5 thousand rubles.
If the relay starts and the engine runs, but does not want to turn off, you need to look for the problem in the winding itself or in the relay mechanism. Often such a malfunction is caused by a broken spring. It tends to stretch, weaken, and stops pushing the anchor properly.