The crankshaft position sensor on VAZ 7 series vehicles is designed to synchronize the fuel injection process with the ignition system. Failure of this part leads to unstable engine operation and incomplete combustion, and hence to fuel overflow. The engine does not reach full speed or does not start at all. The article describes the reasons for the malfunction of this unit, its design, testing methods, as well as the process of removal from the engine.
Crankshaft sensor - design and principle of operation
The crankshaft position sensor or DPKV on the VAZ 2107 ensures engine operation (not stable, but overall). With its help, the ECU knows what position the crankshaft is in. From this, the control unit knows the location of the pistons in the cylinders, which directly affects fuel injection through the injectors, and the occurrence of a spark to ignite the fuel assembly.
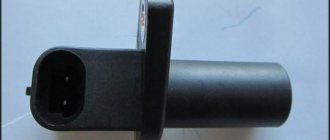
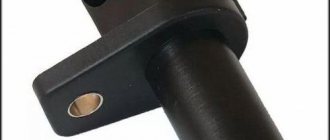
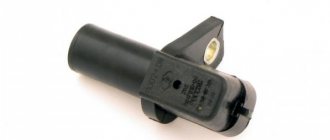
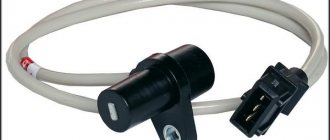
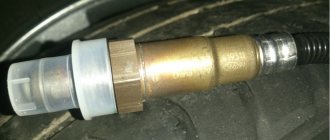
The device in question has a simple design. The sensors installed on the seven work on the principle of inductance. The part consists of a metal cylindrical base with a wire wound on the surface (coil). The top of the coil is covered with a permanent magnet. The operation of the device is associated with a ring gear, which is attached to the crankshaft. It is with the help of this ring gear that the sensor records signals and transmits them to the computer. The principle of operation of the device is as follows: when the crown tooth is located at a level with the steel core of the DPKV, an electromotive force is induced in the winding. A voltage appears at the ends of the winding, which is detected by the ECU.
The gear wheel consists of 58 teeth. Two teeth on the wheel have been removed to determine the starting position of the crankshaft. If the DPKV fails, which is extremely rare, then starting the engine and its operation is simply impossible. The marking of the sensor, which is installed on the VAZ 2107, is as follows - 2112-3847010-03/04.
The engine control unit
All injection Ladas have a special unit that reads and processes readings from all sensors in the car system. This block is a small part made of plastic and metal, inside of which there is a microcircuit with many radio components. It is this block that sends signals to the fuel pump, injectors and ignition module, and also forms the ignition timing, controls the operation of fans, etc. This is a kind of car head unit.
Location
In all Lada models it is located in the cabin, in classic Lada models it is located under the glove box, in front-wheel drive Ladas the ECU is located under the center console. The location of the ECU can be called a problematic place in Lada Granta and Kalina cars, since the ECU is located under the heater radiator, which quite often exposes it to getting wet with antifreeze and disabling it. Many owners of these cars move the ECU under the glove box.
Symptoms of a problem
The unit does not have a malfunction as such; its failure may be associated with the failure of any of the sensors. For example, if one of the cylinders fails, the problem may lie not in the ignition module or coil, but in the key located in the ECU. Often a radio component that burns out inside the unit can affect the operation of any of the sensors.
Signs of sensor malfunction
The malfunctions described below may be signs of breakdowns in other components or mechanisms. However, if at least one of them appears, it is necessary, among other things, to check the functionality of the crankshaft position sensor; fortunately, this is not difficult to do.
So, signs of DPKV failure include :
- a decrease in the dynamic characteristics of the car (this is expressed in poor acceleration and acceleration, this is most noticeable in low gears);
- “floating” engine speeds, including idle (although this factor can also occur while driving, which is unfavorable when the car is moving evenly);
- increased fuel consumption;
- there is a risk of detonation during the development of significant dynamic loads;
- If the crankshaft position sensor is completely out of order, it is impossible to start the engine.
The described reasons, among others, are consequences of the special design of the DPKV, which is described below.
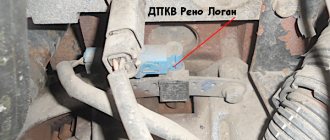
Location
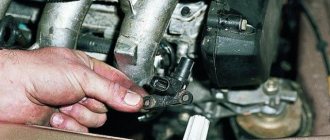
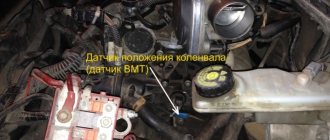
On the VAZ 2107, the DPKV is located on the cylinder block body; there is a special ebb point for it, in the ear of which it is installed, and the control circuit connector is connected to it. You can see the sensor by looking under the hood; the sensor is located near the crankshaft pulley between the engine and the radiator cooling fan.
Sensor check
In order to make sure that the crankshaft position meter is working properly, it is necessary to check it. On injection VAZ-2107 cars, the crankshaft position sensor is located on the camshaft cover bracket.
There are 3 ways to check.
- The first way to check is to measure the resistance of the inductor. To do this, the sensor must be removed, having previously set marks that determine its correct position. Using a multimeter, you need to measure the resistance at the coil terminals. A resistance of 500 to 700 Ohms indicates the serviceability of the part. Lower resistance is a sign of failure.
- The second method will require measuring the inductance of the coil itself. To do this, you need a multimeter with a similar function. The measurement is carried out similarly to the resistance measurement. The performance of the part will be indicated by a value from 200 to 400 Gn.
- The third method is the most difficult, but also the most reliable. To check you will need an oscilloscope. The oscilloscope can be used either analog or digital. But for digital you will need a computer with accompanying software. The check is carried out while the engine is running. The test contacts of the oscilloscope must be connected in parallel to the coil leads. A straight line on the oscilloscope screen will indicate proper operation. Jumps, interruptions or waves on the screen will indicate a sensor malfunction.
A quick check can be done using a screwdriver and a multimeter. Connect the probes of the device to the coil terminals. Set the measuring device to the “continuity” position. Place a metal screwdriver in front of the magnetic core. While the screwdriver is in front of the core, the multimeter will show the moment the contacts open.
It is important to remember that before removing the part, you must disconnect the “-” terminal of the battery. Don't forget about setting tags. This will help you easily install the sensor and start the engine.
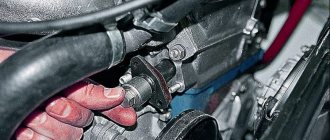
Replacement
Replacing the sensor is quite simple; for this you do not need to have a higher education as a mechanic or extensive experience in car repairs, you just need to follow the instructions provided below.
- For convenience, it is better to remove the corrugation of the air box;
- Then remove the connector from the sensor;
- Unscrew the sensor mounting bolt;
- We take out the sensor and install a new one in the reverse order;
As you can see, there is nothing difficult about this, you just need the desire to fix your car yourself.
https://www.youtube.com/watch?v=H2jCWTwcb5Q&t=10s
Knock sensor for VAZ 2107 car injector
Detonation is the explosive combustion of a mixture in internal combustion engines. To combat this phenomenon, a knock sensor is provided for fuel-injected VAZ-2107 vehicles. Earlier models without an electronic ignition system were not equipped with such components. The article contains information about where this node is located, what it is responsible for, and on what principle it operates. Methods for detecting and eliminating malfunctions in the knock sensor will also be given.
see also
The article will talk about the VAZ 2107 hall sensor, the advantages of using it, and most importantly, diagnostic and replacement methods. This is an electronic component that is used in the ignition systems of modern cars. Of course, they can be called modern rather conditionally, since Hall effect sensors in the ignition system are used only on carburetor engines. If we are talking about injection systems, then you will find a similar design in them only in revolution and speed sensors, or in alarm systems.
What is the knock sensor on the VAZ 2107 responsible for?
Detonation is an extremely undesirable phenomenon. During normal operation of a vehicle engine, the flame front moves at a maximum speed of up to 30 m/s, and when the fuel detonates, the speed sometimes reaches 2000 m/s.
As a result of the impact of such force on the pistons, as well as the cylinder head (cylinder head), there is a high probability of serious damage after the car has driven 6,000 km.
Due to detonation, first of all, the gas distribution mechanism of the car (timing mechanism), as well as the piston group, suffers. To prevent this from happening, a knock sensor is used. The fuel mixture should begin to ignite before the piston reaches the top position. The ignition process must end when the piston returns.
During detonation, premature combustion begins before the moment when a spark occurs between the electrodes of the car spark plug. There is a strong impact on the piston, as a result of which the engine loses power, while fuel consumption increases significantly.
In the case of forced engines, detonation occurs at high speeds and can damage the engine in just a few seconds.
Detonation occurs for several reasons. Of them:
- the octane number of the fuel does not correspond to the recommended one;
- failure to comply with operating conditions;
- failure of the knock sensor.
Detonation sometimes occurs even when the ignition is turned off. The engine continues to run even though the spark supply has stopped. The reason for this phenomenon is the strong heating of the parts of the CPG, or, more simply, “glow ignition”.
Read, it may come in handy: Tuning the ignition of a carburetor VAZ-2107 - comparing Sonar IR and BSZ
A feature of an engine with an injector is the ability to change the advance angle using a distributor. All modern cars are equipped with injection engines.
Purpose
The crankshaft position sensor in the seventh Zhiguli model is used to determine the position of the crankshaft and, accordingly, to determine the position of the piston at top dead center. The sensor is involved in the spark formation process, namely, it determines the moment when and into which cylinder it is necessary to supply a spark and fuel.
DPKV is one of the sensors, without which the car engine will not be able to operate, since the ECU will not be able to determine what position the pistons are in at a given time.
Video - causes and consequences of detonation
VAZ injector detonation is measured using an electronic system, the readings of which are displayed by a sensor (DS) on the dashboard. The main goal of DD is to control the detonation process in the vehicle cylinders. Inside the device there is a plate made of piezoceramics and a small resistor. Both elements of the VAZ-2108 or 09 are connected by a connecting block. The structure of the sensor is characterized by a broadband structure secured to a stud with a nut. Its diameter is 22 mm.
Symptoms of malfunction and performance check
The design of the knock sensors is almost the same; they are also identical in principle of operation. As mechanical stress increases, energy production increases. If the sensor operates normally, small electrical impulses are generated that are not passed by the resistor installed in the sensor design.
The cost of this element is usually low. The price differs depending on the quality of the sensor and the manufacturer. On average, it costs between 250 and 500 rubles.
Sensor malfunctions are quite capable of affecting the performance of the entire engine. If the sensor is faulty, the control unit immediately switches the engine to emergency mode. In order to identify a malfunction in time, you need to know the main signs of a breakdown:
- unstable engine operation when driving;
- reduction in power unit power indicators;
- increased fuel consumption;
- Difficulty starting the engine.
Signs of a faulty knock sensor on a VAZ-2107 are similar to all VAZ cars. Therefore, before replacing, it is necessary to check its performance.
To check and subsequently replace this element, you need to know exactly where the sensor is located, and also learn how to determine its serviceability.
In the VAZ-2107, the knock sensor is located near the exhaust manifold, structurally designed as a massive washer that is attached to the car engine with a bolt.
The knock sensor can be checked in two ways:
- technical
- mechanical.
Verification method Actions to be performed
| Technical | Measuring the sensor resistance with a device. If it is working properly, the indicator should be no more than 2 kOhm. |
| Mechanical | It is more efficient. To do this, you need to start the engine, then you need to take a small hammer and lightly tap the sensor. If the sensor is fully operational, a decrease in engine speed should be observed, since the control unit will interpret these actions as detonation. |
Replacing the sensor yourself is quite easy. You need to use a wrench to unscrew the bolt that secures the sensor to the engine, first disconnecting the wiring. After this, a new sensor should be installed in place of the old one.
As a result, it should be said that in order to prevent such a phenomenon as detonation in a VAZ-2107 car, you should periodically check the performance of the knock sensor (like all other sensors) and, in case of failure, immediately replace it with a new one. This way you can protect yourself from unnecessary financial costs.
Design features
To check and replace the sensor, you need to know what it looks like. It wouldn’t hurt to talk a little about its internal structure at the same time. The design of this device is very simple. But it varies somewhat depending on the purpose of the sensor and the installation location. For example, digital ones turn out to be more complicated; they have a semiconductor crystal built into the sensitive part. Between the semiconductor crystal and the small circuit (responsible for switching) there are short sections of connecting conductors.
The semiconductor crystal in the VAZ 2107 Hall sensor must occupy a special position. The magnet is positioned so that its field lines are perpendicular to the plane of the crystal. It is due to this that induction (magnetic) occurs. In this case, some current passes through the crystal. Under the influence of a magnetic field, an electromotive force is generated and supplied to the switching circuit.
Coolant temperature sensor
A coolant temperature sensor is necessary to transmit readings about the temperature of antifreeze or antifreeze. It also participates in the formation of the fuel mixture necessary for engine operation. Creates a richer mixture while the engine warms up. This can be noticed by paying attention to the engine speed during the warm-up period.
Located between the cylinder head and the thermostat.
Signs of malfunction:
- There are no high speeds when warming up;
- Difficulty starting the internal combustion engine;
- High fuel consumption;
Idle speed control
To regulate idle speed on Lada cars, an idle speed regulator (IAC) is used. It is an electric motor operating on direct current and a voltage of 12 V. The IAC has a worm gear, which is very unreliable and often fails. The role of the sensor is to open or close the idle speed channel. The IAC is only involved when the engine is idling and the throttle valve is closed. In modern Ladas, starting from 2012, the sensor was no longer used due to the transition to an electronic throttle unit.
Location
The idle speed control is located on the throttle body and is attached to the body with two screws. Between the regulator and the throttle body there is a rubber sealing ring, which very often wears out and begins to leak air.
Symptoms of a problem
If the sensor breaks down, the idle speed begins to drop to low values until the engine stops. Most often, the IAC becomes contaminated, after which it ceases to perform its functions.
How to replace an adsorber on a classic
Removal: 1) At the beginning of the operation, remove the negative terminal from the terminal of the battery to which it is connected, if you do not know how to do this, then read the article called: “Replacing the battery on a VAZ”, in this article find the first paragraph, everything is described in detail in it .
2) Now disconnect the wiring block that is connected to the canister purge valve as shown in the photo under number 1 and then, taking a screwdriver in your hands, completely unscrew the hose that connects to the pipe that comes from the purge valve (see photo 2).
Note! If you are unable to remove the hose from the pipe, then you can remove the purge valve itself, to do this, pry it from the edge as shown in the figure, thereby it will come out with the tendrils that are present on it (indicated by a red arrow) from engagement with the holes (indicated by a blue arrow ) into which these antennae rest!
When the valve is removed, start rotating it clockwise or counterclockwise (as is convenient for you) and thereby remove the hose from it at this time and move it aside so that it does not interfere with the removal of the adsorber itself from the car!
3) Then, using the same screwdriver, you will need to loosen the clamp and remove another hose, but only this time you will have to remove the vapor supply hose, which is located just below the hose that you previously disconnected from the purge valve.
4) After this, take a wrench and use it to unscrew the bolt of the clamp clamp that secures the adsorber itself (This means that it is secured by the clamp clamp, not the bolt) and when the bolt is unscrewed, remove the adsorber from the car by pulling it out through the top of the car.
Installation: This unit is installed in its place in the reverse order of removal.
How to check the functionality of the canister purge valve?
Checking the absorber valve
In order to notice and correct problems in time, regular checks of the adsorber valve are necessary. In this case, a breakdown can be identified by certain indirect signs. When the engine is idling or in cold weather, the vapor absorption system makes characteristic sounds, like the canister valve clicking. Some people confuse this sound with a faulty timing belt, rollers or other parts. You can check this by sharply pressing the gas pedal. If the sound has not changed, it means the canister valve is clicking. Experts can explain what to do if the canister valve knocks too loudly. To do this, you need to tighten the adjusting screw, and first it is cleared of epoxy resin.
The absorber valve can be adjusted.
The screw turns approximately half a turn. If you tighten it too much, the controller will generate an error. This adjustment of the adsorber valve will make its operation softer and the knocking noise quieter. However, how to check the adsorber valve for damage? Valve failure can be determined using an error diagnostic system or mechanical testing. Electronic error codes are stored in the controller's memory and indicate electrical damage. To check the valve, it is recommended to pay attention to errors generated by the controller, such as “open circuit of the canister purge valve control circuit.” Signs by which a malfunction of the adsorber valve can be mechanically determined:
- The appearance of dips at idle speed of the engine.
- Very low engine thrust.
- There is no sound of valve operation when the engine is running.
- A hissing sound when the gas tank cap is opened indicates a vacuum in the system. This is a sure sign of a malfunction in the adsorber ventilation.
- The appearance of a fuel smell in the car interior. However, its appearance can also be caused by other reasons.
Read, it may come in handy: Engine tuning of the seventh model: a complete guide with photos and videos
How to disable or remove the adsorber on a car and do you need to reflash the ECU?
You need to understand that when the adsorber is removed, the solenoid valve is turned off, which is directly connected to the controller and controlled by the latter.
What is the disadvantage of such a shutdown?
This will lead to error p0443, which we already mentioned above. The tubes are also muffled, in particular the one that goes to the intake manifold. The fact is that through the tube that goes to the intake manifold, air is constantly sucked in, even in idle mode, the so-called small purging of the adsorber occurs. At high speeds from 1500 – 2000 and above there is a lot of purging.
In the ECU firmware, constant air leaks and the flow of fuel vapor are taken into account when forming the air-fuel mixture, despite the fact that all this goes past the mass air flow sensor, the causes of the malfunction of which can be found out by clicking on the link.
If you plug the pipe, which many people do, a certain amount of air will not flow into the intake manifold bypassing the ECU, but the latter still takes them into account.
That is, the controller takes into account one volume of air, but another (smaller) one actually enters. As a result, the amount of fuel is generated by the ECU based on more air than is supplied. This leads to an over-enrichment of the air-fuel mixture.
As a result, the engine does not work correctly, because the mixture is constantly over-enriched where it is and is not needed, and fuel consumption increases.
It is also worth talking about the transient mode of operation of the engine, which can manifest itself when approaching an intersection, a traffic light, lying to a policeman, at the moment when the gas is released.
At this moment, a failure may occur - a decrease in speed below idle. The engine seems to choke, it doesn’t have enough air, the reason is an over-enriched mixture. After a few seconds, the situation is resolved electronically.
Therefore, it would be correct to disable the adsorber in the following ways:
- After removing the device, install a nozzle with a diameter of 1 mm into the tube that goes directly past the mass air flow sensor. This will, at least partially, solve the problem, since only air without gasoline vapors will be supplied in doses.
- The ECU is being reflashed (difficult). If it is impossible to remove the Check error, you may need engine chip tuning, which is expensive.
- Dismantling the entire system except the solenoid valve, which operates idle.
- By installing a resistor (valve emulation) in the electrical circuit at 200 - 250 Ohms and 2 watts. To do this, bend the legs of the resistor and insert them into the valve chip. We secure everything with electrical tape. But this doesn't always help.