Individuality for a car has always been highly valued. However, the desired result cannot always be obtained quickly, efficiently and relatively inexpensively. To stylishly change the appearance of their favorite car, owners often use tuning body kits. Such decorations can not only make a car stand out from the crowd, but also protect it to some extent.
After all, it’s unlikely that anyone would covet a conspicuous car to steal it. It is easy to spot on the streets or parking lots. Therefore, by attaching a purchased bumper or installing a spoiler with your own hands, the owner not only makes the car stylish, but also hangs a kind of amulet on it.
Why is this necessary?
A spoiler installed on the rear of a car is also called a wing.
With proper installation and certain calculations, the body kit part improves the aerodynamic properties of the car.
It also helps to slightly reduce fuel consumption; power is added by reducing air resistance.
Video master class “Origami boat”
How to make an origami boat with your own hands?
For full work you will need one A4 sheet. Fold the sheet in half (short side to short side). Align and iron. Fold it in half again. We iron it carefully. And we do this because origami is an art form that requires precision in the fold line. We unfold it, it turns out to be a kind of little book. The boat should open downwards. Take the right corner and move it to the middle. We bend the second corner in the same way. We bend the upper protruding half up. We wrap the corners around our triangle.
Turn it over to the other side and fold the free strip up. The folds must match. On one side the corners are bent. On the other hand, we leave them unbent. Now we take the workpiece and unfold it and turn it into a square with one fold. We carefully smooth everything out and now take the bottom corner and bend it so that it does not reach the top corner by 1-1.5 cm. We turn it over and in the same way, already aligning it along the bottom line, bend the second side. Now we turn the figure inside out. There should be triangles on the sides. We take them with our hands, pull them “towards ourselves” and get a finished boat. Don't forget to make the fold lines clear and expressive.
Step-by-step manufacturing algorithm
To shape the wing, it is necessary to make a matrix. It will initially outline the contours of the product. Then the entire future structure is given rigidity. At the next stage, a primer, paint and a layer of automotive varnish are applied to the product. After manufacturing, the finished product is installed.
Foam spoiler
We will tell you step by step how to make a spoiler with your own hands. One of the most common frame bases for such a body kit is a strip of galvanized iron. Two L-shaped bends are made along both edges at 90 degrees. In the future, the entire structure will be fixed on such “legs”.
Step 1. Making a metal frame Step 2. Gluing the foam Step 3. Applying carbon fiber Step 4. Painting and varnishing Step 5. Installing on the car
After this, the metal “skeleton” should be overgrown with foam “meat”. The white, lightweight material can be easily processed with any fine-tooth saw and polished with sandpaper.
After preparing the matrix, you will need to fix it with carbon fiber.
It is advisable to apply at least three layers. This will provide high-quality texture and additional rigidity to the product. It is advisable to take short breaks between laying layers to allow the resin to polymerize. In some cases, you can use an industrial hair dryer to speed up the process.
Installation of LED signal lighting is performed at this stage.
This way the wires will not be visible, they can be covered with layers of texture, and the LEDs can easily be mounted in any area.
sedan car
A square sheet of paper (20x20 cm) - cut in half.
We unfold and bend these sides again to the line in the center. Unfold and repeat.
We turn the same corners at all four corners. We measure by eye.
Now on each resulting triangle we bend small elements.
Cut the whole piece in half again. We bend a small part inward at the top.
On the opposite side we retreat a few centimeters and make an oblique cut a couple of centimeters.
Now we hide the part from the cut and the edges inward - we form the hood. For convenience, you can slightly bend the cut part.
Well, the last step is to draw windows, doors and any tuning that your imagination desires. Alternatively, you can make two cuts and get a different car model, or simply bend a larger corner inward.
For another passenger car you will need a square piece of paper.
We bend him in half.
Unfold and bend the bottom part towards the center.
We bend two corners on the bent strip. And on the parts below we bend the small corners.
We bend the upper part upward, but not in half, but so that there is about 2 centimeters from the first central fold to this.
We lower the corners on the left and right.
Turn the workpiece over and the machine is ready!
Using the same scheme you can make a car and truck. To do this, you only need to bend one corner.
These were all flat models, but the origami technique allows you to create three-dimensional cars.
Prepare a square sheet of paper. Fold it in half diagonally, unfold it and fold it again, connecting the other pair of corners.
Unfold and fold in half and repeat again
Unfold and fold two opposite sides toward the center.
We unfold the lower part and fold its outer part in half again.
We unfold it and now connect the bottom edge to the top fold.
We repeat the same steps on the other side. As a result, our entire workpiece is divided into identical rectangles.
We turn it over and again repeat everything with opposite sides. Now we have the entire workpiece divided into equal squares.
Turn the sheet over so that the fold grooves are at the bottom. At each corner we bend triangles onto a square of 4 small squares.
We turn out all the corners. And on one side we bend the part down 1 square wide.
We divide the left tip of the bent strip into 3 equal parts. We do not iron the fold completely over the entire strip, but only a couple of centimeters from the edge.
On the outermost strip we bend a small triangle.
Now we lift the bottom strip up and iron the fold along the entire length.
Slightly turn over the right edge of the strip and bend another small triangle.
We turn to the left and on this side we bend a strip as thick as the previous one. We repeat this action with the other sides.
We unfold everything to its original state - a square. And fold the strip up along the second fold.
Turning clockwise, bend the strips on all sides.
At each corner, slightly unfold the workpiece and bend the triangle. Then we open it and flatten it. We now have a rhombus covering the triangles.
Now fold the small square in half diagonally. Iron the diagonal on the square well. Fold the square on the corner next to it in the same way.
The next diagonal should be next to the second and create an angle with it.
We form the same angle near the first diagonal.
Now we connect the sides of the triangles. Iron all folds gently but well.
Make folds from the center of the connection of the sides of the triangles to the edges.
Now we bend the corner of the workpiece upward so that the corner of the outer square meets the strip on the right. We get another line in a small triangle. We repeat the same thing on the other side.
On the same side we turn up a thin strip along the already marked line. The diamonds at the edges must be raised.
We bend the same strip on the opposite side.
Iron the two stripes on the center squares well along the center line and the next one down from it.
We return to the triangles and connect them again.
Carefully connect the inside of the square with a line that comes from the center of the connection of the rectangles.
Repeat the fold from the diagonal of the square and above. And now we connect the outer part of the square with the same line. Accordingly, on the other side we perform the same actions. Iron the folds well and hide the excess elements inside.
Now we work on the other side of the workpiece. We make a diagonal fold from the corner of the square on both sides to the width of the bent part. And we connect the sides of a small triangle on the strip.
We bend the diagonal from the square to the top of the workpiece. From the top point of the diagonal, a line descends downward and must be connected to the diagonal. Accordingly, on the other side we do the same.
The squares have turned into diamonds and now we bend them upward along the upper right line.
Now we connect the lower right part of the diamond with the bottom of the folded strip. And we do the same with the opposite side.
Carefully unscrew each square and fold a small triangle inside - flatten it and fold it in half.
We turn the squares slightly and bend the thin strips inward on the wide ones on both sides.
On the front of the car we also bend a thin strip inward, but from below. At the same time, keep an eye on the folds that need to be hidden underneath.
Now we bend the strips on the sides and underneath. Please note that on one side the corner will open and fold in half, and on the other it will bend over the part.
We form wheels - on each square we bend the corners inside out.
Iron all the main folds well and the machine is ready!
Making your own spoiler
Of course, now in stores there are enough ready-made solutions for every taste, however, it is not a fact that you will be able to choose something for your car so that it is really appropriate. All models differ in weight, colors, style and fastenings; you often have to deal with the fact that the required solution is available from the seller only when placing an order. Experience shows that such a thing can end up being disproportionately expensive, so it is quite possible that you will want to do without purchasing a finished product and make the spoiler entirely yourself.
Of course, at first glance this may look like a slightly dubious undertaking, however, we can say with confidence that this task is not so difficult if you approach the matter with all responsibility and pay attention to the wide experience of many folk craftsmen who have already tried their hand at manufacturing of such parts. Making, for example, a spoiler for the trunk lid is a matter of several hours, provided that you already have experience in working with such things, and car repair is not something remote and unfamiliar to you. Here you will have to drill a little, saw and chop - without this there is no way.
What is a car spoiler
A spoiler is one or more special elements designed to change the aerodynamics of a car body by redirecting air flows. The main purposes of installing this part are:
- reduction of aerodynamic drag;
- increased downforce;
- combating vehicle body pollution.
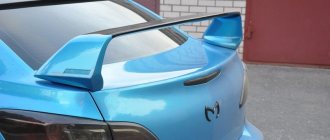
It is worth mentioning that many install a spoiler as a decorative (tuning) element. Its mounting can be done in front, behind, on the roof or on the side of the car. With an individual approach, you can make a custom-made spoiler, which will allow even a production car to stand out in traffic.
An original spoiler from a tuning studio will make your car stand out on city streets.
Pros and cons of installation
The spoiler gives the car the following qualities:
- attractive appearance;
- improved dynamics;
- increased adhesion to the canvas;
- reducing fuel consumption;
- increasing braking efficiency.
It should be clarified that the positive qualities of the element in question appear at speeds above 100 km/h.
Installing a spoiler on a car gives it a number of advantages, but they appear at speeds above 100 km/h
The disadvantages include:
- high cost of structural elements;
- increased fuel consumption due to incorrectly selected form or installation;
- fragile material of manufacture (plastic).
DIY spoiler: contents of the process
There are significant benefits to choosing the craftsmanship route rather than spending money on a finished product. They lie in the fact that the appearance and materials used in such a situation are limited only by your imagination. This way, you can create a unique creation that will look optimal on your car.
The question of how to make a spoiler with your own hands worries many, but not many delve into the essence of the process and take up this specific activity. Here we will try to outline a fairly typical recipe, which by design should be quite good, provided that you are ready to follow the instructions. In this way, a spoiler can be made for both the bumper and the glass, it all depends on your goals.
- You need to roughly estimate the width of the planned part and cut out a strip of hardboard corresponding to the dimensions. Now it needs to be given a special shape, that is, some convexity upward. This is done quite simply: an arched strip is cut out and screwed on from below. The spoiler bends, acquiring the desired shape; accordingly, this curvature can be made different.
- You can temporarily fix the part to the body during fitting using plasticine or sealant. In this state, an extremely convenient opportunity is provided to adjust the position and tilt of this element, understanding in what form it looks most adequate. Now a pair of posts are cut from the same hardboard to support the finished product. Everything is again held together and only now can this workpiece be glued, covering it with pieces of fiberglass.
- After a couple of hours, the base can be removed, note that there will be no deformations on it; the technology, although simple, is very well thought out. The surface of the hardboard should be left clean, but the edges should be treated with plasticine so that they can be given the appropriate shape using a construction spatula. The appearance of the side areas should ultimately resemble the contours of the support of the finished product. Initially, it is quite difficult to join the process when you need to sculpt the symmetrical surface of a three-dimensional object, however, it is somewhat simpler than it seems. If you work carefully, you'll quickly figure out how best to approach this tricky process once you get started. The contours need to be aligned in the right places, so that the outline of the device finally matches the design of the finished part.
- Next, we form the matrix: we smear the whole thing with resin and aluminum powder, lay a layer of glass mat on top, then for strength you can also add glass matting. The underside of the spoiler is treated with fiberglass. Now you can drill holes for the bolts.
- The edges are filed with a grinder and then sanded. Now we need to open the matrix of the product, it’s terribly inconvenient to do this, but the plasticine should slowly delaminate, and in the end we will get an excellent ready-made solution in the form of two halves, which now only needs to be finalized.
- The remaining plasticine can be cleaned off with a scraper; in principle, this does not present any difficulty. It is recommended to clean the inside of the matrix using sandpaper: it is unlikely to be perfectly smooth, however, but you will achieve the desired effect. Now the matrix is coated with gelcoat. After it hardens, it will need to be lightly cleaned. Polyester porridge is also placed here, which forms a finished product inside.
- The procedure is completed by removing the spoiler from the matrix, processing the edges and polishing, as well as painting. Now the part can be attached to the car; in general, it differs little from an ordinary store-bought spoiler.
Car tuning options
Today you can choose a spoiler for almost any car, regardless of body type: from a sedan to a minibus. To make the choice easier, you need to understand in more detail the criteria by which this tuning element is classified:
- at the installation site;
- by installation method;
- by material;
- according to form.
You can secure the spoiler using double-sided tape, but only if the part is small in size
The main location for installing the spoiler is the rear of the roof or trunk lid. This depends on the body type, as well as the size of the spoiler and its shape. You can attach a tuning element:
- using double-sided tape. This option is appropriate for small spoiler sizes;
- bolted fastening. Many motorists do not like this method because of the need to make holes in the body part;
- fastening with staples. This option is suitable for those cars that have a certain shape of the rear cover and a gap between the body.
What material is suitable for tuning
As for the material for making the spoiler, the most common are:
- ARB plastic;
- ordinary plastic;
- fiberglass;
- polyurethane;
- aluminum.
To give preference to a design made from one material or another, it is first necessary to consider each of them in more detail, taking into account its chemical and technical characteristics.
Which form to choose
Spoilers can be quite varied in shape. To conclude whether this option is suitable or not, you need to see the part in front of you. There are cases when the shape of an element complements a part of the body, but generally spoilers are represented by the most non-standard designs. With their help, you can give your car not only exclusivity, but also aggressiveness.
Spoilers can also be classified by design:
- custom - represented, as a rule, by a single copy;
Custom spoilers are produced in single copies, which allows you to make the car unique - factory - the part is produced on an industrial scale and looks appropriate.
A spoiler bought at a car store will decorate the car, but will significantly lighten the pocket of its owner
other methods
Despite the fact that the presented manufacturing option is one of the most optimal in terms of costs and requirements for product quality, other methods are often used. Popular approaches are when the part itself is cast from plaster and covered with epoxy resin and fiberglass. Each material has its own difficulties in processing, so it is important to think through all the steps in advance. In this case, the gypsum must be poured into a prepared mold, usually made from foam plastic; it is not so easy to carve it, but you will get the hang of it. The resulting workpiece is not very strong and therefore requires delicate work.
Also, some make such parts from polyurethane foam. It is poured into a mold that approximately corresponds to the solution of the planned product, and then it is ground with all possible tools. Of course, this is not an easy task, but many can appreciate this rather simple method in its essence. The finished product can be sanded and painted in any color.
We hope our tips were useful, and through trial and error you figured out how to make and install a spoiler yourself. If you did everything correctly and took into account the operating features of such a product, it will serve you for many years.
How to make a foam spoiler at home
The procedure is simple, but requires care to avoid damage to the bodywork.
Before applying foam, protect the surface of the trunk lid with plastic film or masking tape.
Polyurethane foam is applied to the prepared surface, which should preferably be moistened for better hardening.
When the foam hardens, use a knife to form the future spoiler
To impart rigidity to the structure, fiberglass is used, which covers the product in several layers.
The matrix can also be made from plasticine. The process is similar to the described sequence of actions for making a foam spoiler. Regardless of the chosen method, care must be taken to ensure sufficient rigidity of the structure. In addition, fastening such a tuning element should prevent its loss, ensuring reliable fixation.
Not only foam plastic, but also plasticine can be used as a material for making the matrix.
Video: installing a “duck tail” on a VAZ 2109
Anyone can make a spoiler for their “iron horse” if they wish. To do this, it is enough to select the necessary materials and tools. It doesn’t matter which car is being tuned - Niva Universal or Mercedes Benz ML. If you scrupulously follow the step-by-step instructions, you can make the car much more attractive, and also significantly improve its technical characteristics.
Source
What can a body kit be made from?
- Fiberglass;
- ABS plastic;
- Polyurethanes (foamed or rubberized);
- Carbon.
Aerodynamic body kit made of fiberglass
- Low price.
- The quality of the finished fiberglass product is not much lower than ABS plastic or polyurethane, provided that the manufacturing technology has been followed.
- Fiberglass is a lightweight material.
- Simple repair.
- When physically impacted, it is able to return to its original form.
- Not a simple technology for manufacturing fiberglass parts. Failure to comply with it makes the finished part of poor quality (breaks, crumbles in the cold, etc.).
- Toxicity.
- Requires adjustment of parts during installation.
Aerodynamic body kit made of ABS plastic (ABS plastic)
- Low price.
- Good performance in terms of impact resistance and flexibility.
- With minor deformations, it is able to restore its original shape.
- Good adhesion (ability to hold paint).
- With minor non-compliance with manufacturing technology, the product becomes brittle at low temperatures.
- Requires adjustment of parts during installation.
Aerodynamic body kit made of polyurethane
- Has very high quality.
- High impact resistance, and the presence of rubber makes the material very flexible.
- Able to return to its original shape even after severe deformation.
- It cannot be broken, it can only be chopped or cut.
- High precision of molding of finished products. The finished product does not require adjustment during installation.
- High adhesion.
- High price.
Aerodynamic carbon fiber body kit
- Very high quality.
- Carbon is 40% lighter than steel and 20% lighter than aluminum.
- Maximum strength with minimum weight.
- Original appearance.
- High price.
- Carbon doesn't stretch.
- Carbon is afraid of targeted strikes. In order for a carbon product to be of high quality, you must follow the technology described in the “carbon tuning” category.
Toyota Mark II 44 Logbook 1GZ-FE V12 5L
xn--2111-43da1a8c.xn--p1ai
Origami tank made of cardboard
If you are a fan of military equipment, then you will definitely want to make an origami tank out of paper. This craft is perfect for a personal collection, as well as a gift for both a little boy and an adult man. Thanks to the low level of complexity, even novice origami masters can handle it. And the small amount of time required to assemble a tank allows you to make several models in a short period of time.
Fold a standard sheet of A4 paper in half lengthwise.
Next, fold the corner from the fold to the outer edge.
Unfold and repeat from the outer edge to the fold.
We unfold and do the same on the other side of the workpiece. As a result, we get a rectangle with two outlined triangles.
Now we hide the side triangles inside and cover them with the top triangle with the base - the short side of the rectangle. We repeat the same thing on the other side. We get the basic shape - a double triangle.
Carefully bend the long side of the rectangle towards the center. Please note that we do not bend the upper triangle, but work underneath it.
Now we bend it from the center to the edge. We turn the workpiece and repeat the same steps on the other side.
Cover everything with triangles.
We rotate the workpiece and raise the corners of the triangle to the top.
We turn the workpiece over and connect it as follows: carefully fold in half (but do not iron!) the triangle that has not yet been folded and pass it between the folded triangle.
Next, we bend and hide the lower corners of the triangles under the small ones. We repeat the action on the other side. Carefully level all the parts, forming the tracks round.
To add a tank barrel, take a small rectangle of paper that color and fold it into a tube. The end can be secured with glue for reliability. We insert the barrel into the tower. If the trunk is long, the excess must be cut off with scissors.
The tank is ready for battle!
We are sure you liked it. Then you won’t be able to resist and will definitely make another model - a high-speed origami tank. It’s a little more complicated, but if you really want something, then all obstacles can be overcome. As always, it all starts with a standard sheet of A4 paper. Fold it in half lengthwise
Next, fold the long side toward the fold.
Turn over and repeat on the other side.
Unfold to get the basic shape of the door. Place the cut side towards the top and bend the corners towards the center.
Now we bend the long side towards the cut in the center and bend it in the opposite direction. We repeat the same steps with the other long side. Do not forget that the final result depends on the quality and accuracy of the bends.
We turn our workpiece over and bend it 2 times, but not in half, but so as to connect it to the base of the tank.
We connect the parts of the tank: carefully tuck the paper from the bottom under the top strip with small triangles.
To make the caterpillars, carefully straighten the paper with your fingers and squeeze it forward.
We form the second caterpillar in the same way.
Now you need to bend the two small triangles on the tower. To make the trunk, prepare a rectangular sheet of paper. It must be rolled into a tube diagonally, starting from the corner.
Cut off the sharp tip of the paper, and now glue the smooth edge so that the trunk does not unfold. The finished tube also needs to be cut off on one side so that the trunk is even. Insert the barrel into the turret and you're done!
Master class “Origami boat”
Today we will make a boat. It is a good alternative to the good old boat. A boat made using the origami technique is quite simple to make, so I suggest you don’t hesitate and get to work. We use A4 sheet. In this case, we have a pink leaf. It all depends on your imagination. You can even make it out of white paper, and then give room to your creativity, or involve your child in participating.
Fold the right edge towards the left side to form a triangle. We bend the other side in the same way. We bend the working part along the center line. We focus on the sides of the fold. We turn it over again and bend the double triangle. We bend the lower part to the base of the double triangle. Bend small triangles. Turn the sheet over and fold it in half. Opening up the inner side. We bend the right and left edges to the center fold line.
We bend the outer triangles inward. But we crush the side coals before reaching the center. Then bend it in half along the center line. Now we have a “stencil”. We bend the second side along the lines of the first. The sides should be symmetrically bent.
We have come to the most interesting moment. You need to turn the paper inside out. In this case, the extreme corners should not turn around. Otherwise, the craft will have to be redone. Having bent our boat, be sure to straighten all its sides. There is paper left at the bottom of the boat, which should be given a rounded shape. It will serve as glass for the boat and separate the deck space from the entire boat.