About the rake
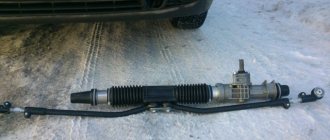
The steering mechanism on Lada cars, starting with model 2108, has a steering rack. It is designed to move steering rods along a horizontal plane, which helps turn the car's wheels.
The design of the slats is quite simple and reliable, with the exception of one small drawback - a plastic bushing.
This bushing is made by the manufacturer from low-quality plastic, which soon leads to play in the rasp in it and the appearance of an unpleasant knock when moving on paving stones.
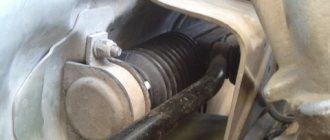
There is a rail between the engine and the passenger compartment, perpendicular to the exhaust manifold and attached with two brackets to the engine shield.
Design
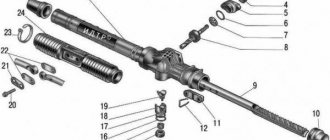
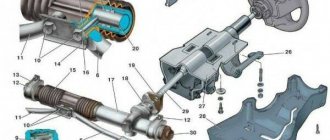
Steering rack design: 1 – shaft boot, 2 – cover mounting bolts, 3 – Belleville washer, 4 – worm shaft oil seal, 5 – worm gear cover, 6 – sealing collar, 7 – thrust bearing, 8 – worm shaft with bearing, 9 – rasp, 10 – left boot, 11 – binoculars, 12 – binocular bracket, 13 – nut plug, 14 – thrust nut, 15 – thrust spring, 16 – locking collar, 17 – thrust piston collar, 18 – thrust rasp piston, 19 – piston liner, 20 – steering rod bolt, 21 – stopper, 22 – plate, 23 – plastic clamp, 24 – steering rack boot, 25 – left side boot, 26 – steering rack pipe.
Signs of play in slats
When driving over small irregularities such as a gravel road, shocks and knocks in the suspension are clearly audible and are transmitted to the steering wheel. These signs will not always refer to play in the rack. Similar impacts to the steering wheel can occur due to broken steering ends or a broken crosspiece of the steering mechanism. Before you begin repairing the rack, you must exclude the tips and steering cross from suspicion.
Signs:
- Impacts to the steering wheel when driving over bumps
- Creaking sound when turning the steering wheel
- Biting the steering wheel in different positions
- The steering wheel does not return to zero position
Checking for play
Checking for play is done by rocking the swing arms up and down. To do this, we find the steering rods under the hood and pull each of them up and down; there should be no play or knocking. If any, then the rack should be maintained.
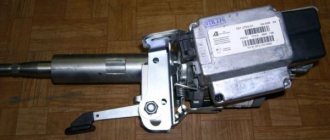
Electric booster repair on a Priora: faults and their symptoms
Undoubtedly, the electric booster is a more reliable unit than a device running on hydraulics, but malfunctions also appear in the power steering. If they are detected, repairs must be carried out immediately, since the safety of the driver, his companions and other road users depends on the operation of the amplifier.
Complete failure of the EUR
As practice shows, this unit does not have many faults; breakdowns occur in the same parts. The first thing worth considering is the complete failure of the ESD. When you turn off the amplifier, you need to check the on-board computer screen; most likely, you will see a code there indicating a malfunction in the unit. But sometimes it is possible to determine when an amplifier is turned off only in practice.
We perform the following actions:
- Turn off the engine and turn the steering wheel in different directions several times;
- We repeat these steps, but with the engine running;
- Has the steering effort changed? This means the node has completely shut down.
Even with the ESD not working, you can continue driving, but this is not recommended. The driver needs time to get used to driving with the help of an amplifier. It is better to immediately begin diagnostics and determine which component requires repair or replacement.
Sometimes the amplifier and speedometer stop working at the same time. The cause of this defect is a speed sensor that has failed. Taking a look at the electrical diagram, you will understand that these three elements are connected. The torque sensor supplies data to the control unit, it compares it with speed and determines the force. If the cause is the speed sensor, then the repair consists of checking the wiring that leads to this element. It is also worth checking the wires connecting the sensor to the speedometer and power steering. If there are no breaks in the switching, then the sensor should be changed.
Low voltage in the car network can also lead to the ESD turning off. Faults should be looked for in the wiring insulation. If it is damaged, short circuits will appear in the network. Also, violations in insulation lead to malfunction of the generator. To troubleshoot the problem, check the wiring and generator. The torque sensor contains many contacts, which, if heavily soiled, help turn off the power steering. In this case, repair means disassembling the unit and cleaning the contacts of the torque sensor.
Unpredictable steering behavior
The driver is driving on a flat road, the position of the steering wheel does not change, and suddenly the car turns to the side. Such unpredictable behavior of the power steering requires urgent diagnosis, since at the most inopportune moment the electric power steering of the Lada Priora can send the car to the side of the road or into the oncoming lane. In such a situation, you should stop driving and turn off the amplifier. To do this, we need to remove the fuse, which is responsible for supplying voltage to the amplifier.
Lift
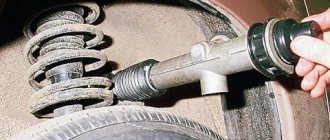
If knocking is detected in the steering wheel, it can be tightened, but tightening will be effective only if there is knocking from the worm gear. If the knocking noise comes from a broken plastic bushing, then tightening is useless.
As is known from practice, the worm mechanism is quite reliable and is very rarely the culprit of knocking. Most often the bushing is to blame.
You can determine the culprit of the knock by pulling the steering rods one by one.
- If there is a knocking sound when applying forces to the right link, then the bushing is to blame.
- If there is a knocking sound when you apply force to the left linkage, then the worm gear is to blame.
In the first case, a lift is not advisable. Since the tightening nut only tightens the worm mechanism. To eliminate the knocking noise, it is necessary to remove the steering rack from the car and have it repaired.
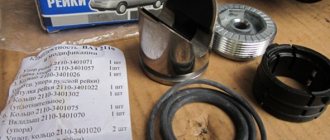
Repair kit
In a Priora with an EUR, a rack from Kalina was installed with catalog number 11183-3400010 20. Therefore, the repair kit must be purchased specifically from Kalina.
Steering rack number
The repair kit includes a large number of parts necessary for repairs.
The price of a new rack starts from 5,000 rubles and higher, depending on the manufacturer, but new does not mean good, and the cost of a repair kit varies from 500 to 1,000 rubles, which is almost 10 times cheaper than a new rack.
Tips for use
A complete replacement and repair is a series of actions, for the implementation of which you need to have not only special knowledge, but also a considerable amount of free time, so if the car owner does not have either the first or the second, it is preferable to go to the nearest service station.
At the same time, in order not to become their regular guest, you should know some secrets for operating the steering rack, which can significantly extend its service life.
- We strongly do not recommend “jumping” your car on curbs, or driving at high speed on rails, since each such trip causes cracks to appear on the rack itself, as well as deformation of the shaft that is part of the steering mechanism.
- It is not recommended to frequently turn the steering wheel all the way. Of course, in this case it will be very difficult to demonstrate your maneuvering capabilities, but this will significantly increase the life of one of the most important parts of the machine.
- Carefully monitor the condition of the protective anthers, which must maintain their tightness. Replacing anthers is several times cheaper than replacing the entire rack.
- It is also worth monitoring the level and condition of the hydraulic fluid, since its decrease or change in color is associated with problems in the vehicle’s hydraulic system, which can result in rack failure.
From time to time you need to undergo a full maintenance, which will allow you to eliminate faults in advance, which can cause irreversible consequences, injury to yourself, your loved ones and other road users. And also, if problems are detected in the operation of the car, it is better not to take risks and go to the nearest car service center as quickly as possible.
Source: autozam.ru
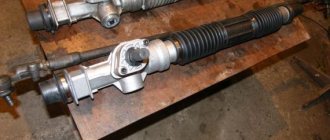
Steering rack removal and repair
Removal work must be carried out with the necessary tools. Such as:
- Ratchet;
- Head at “13”, “15”, “17”;
- Key to "14";
- Hexagon at "6";
- Screwdriver "-";
- Hammer;
- The beard is blunt;
- Wrench for tightening the steering rack;
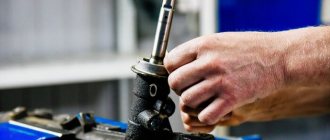
- Steering wheel end remover;
- Mount;
- WD-40 lubricant;
- Lubricant "Litol - 24";
- Steering rack repair kit;
Steering wheel removal process
- We align the steering wheel exactly in the center.
- Raise the left side of the car with a jack
- We unscrew and unscrew the steering end nuts, then use a puller to squeeze them out of the strut bipod.
- We unscrew the steering cardan in the car with a head on “13”, and forget the screwdriver into the slot of the cardan without damaging the splines. This is necessary for its easy removal from the rack splines.
- Remove the steel washer retainer from the tie rod bolts and unscrew the left steering arm from the rack and pull it out into the left window of the tie rods
- Unscrew the steering rack mounting brackets with a head on “13”
- Using a pry bar, move the rack to the side and remove it into the left window of the steering rods
The withdrawal process is completed
The process of disassembling the rack
- We unscrew the steering rods with a head at “15”
- We remove the anthers by biting off the plastic clamps with side cutters. We pull out the central steering boot to the right side without damaging it.
- We remove the “binoculars” from the rasp.
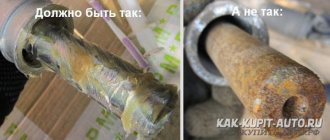
- Place a mark as shown in the picture and unscrew the nut securing the rack pipe using a punch and a hammer
- We take out the pipe
- We unscrew the steering tightening nut using a special wrench (don’t be afraid to turn it very tightly), take out the rubber ring and the pressure piston.
- To remove the pressure piston, you need to hit the back of the rack and the piston will fall out.
- We take out the rasp
- We unscrew the two bolts with a hexagon “6” and carefully remove the “worm” cover without damaging the oil seal.
- We clamp the worm shaft into the yew through a block and remove it by hitting the body of the rack
- Next, remove the old plastic sleeve from the pipe using a screwdriver
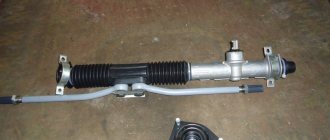
The rail is disassembled, we proceed to the assembly process using new parts
Assembly
- We install rubber rings on the bushing and insert it into the rack pipe
- We wash the worm shaft from the old grease, lubricate it with new and insert it into place, put a plastic bearing on it.
- Place a disc spring into the worm cover, and then a thrust washer on top. Lubricate well and close the lid.
- We lubricate the rasp and insert it into the worm mechanism, and then insert the pipe into the mechanism body and tighten the nut, aligning the previously placed marks.
Centering the steering rack
When assembling the steering wheel, it is necessary to follow a certain rule, which in the future will not lead to the rearrangement of the steering wheel on the splines.
- When the rasp is placed in the rack body, it is necessary to set it to “zero”, that is, the position in which the steering wheel will stand exactly in the center. To do this, you need to measure 235 mm from the right end of the case and put a mark with a marker. This will be “zero”. Next, you need to align the center of the rasp with this mark. The center of the rasp will be the recess under. We combine this notch with the previously installed mark.
- It should also be noted that when combining these marks, the worm shaft should face the flat to the right side at an angle of 90 degrees to the rack body.
- To combine all these parameters, you need to rotate the worm shaft with a key at “14” until all the parameters are combined.
Attention: the rack pressure piston should not be installed when the marks are aligned.
After the marks have been set, we continue assembling
- We install the pressure piston with the cuff on it into the “worm” body. We insert the cuff into the body, then the pressure spring, the nut and tighten it with a little force.
1 - thrust nut, 2 - thrust piston, 3 - collar, 4 - needle bearing, 5 - left side of the rack housing.
- We insert the binoculars onto the rasp, put on the anthers and secure them with clamps
- Then we screw the right swing arm to the rack and install the rack in place.
- We carry out assembly in reverse order.
- It should be noted that the easiest way to install the steering universal joint is by removing it from the steering wheel. Using a key set to “13”, unscrew the nut and remove the bolt, and then the cardan itself.
When installing, make sure that the steering wheel is centered.
- After the rail is installed, it is necessary to tighten it. To do this, tighten the nut until it stops, and then loosen it 90 degrees.
The rack nut has a left-hand thread, but when it is installed on a car, the nut must be tightened counterclockwise. Because the nut is pointing up.
- When turning or turning, the steering wheel should return to the zero point on its own.
The steering rack repair process is complete.
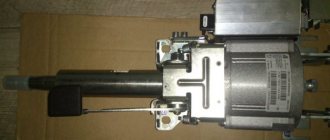
Repair of the electric booster on a Priora, replacement of the EUR
So, you need to replace the electric booster on the Priora or simply check the condition of its contacts. In any case, repair involves complete removal of the unit. Prepare the necessary tools:
- Chisel and hammer.
- Deep head for 8 and 13.
- Extension and ratchet, alternatively you can use a wrench.
It’s quite easy to remove the amplifier itself with your own hands, but in order to get to its mounts and the control unit, you will need to remove many parts of the dashboard: the steering wheel along with the airbag, the casing and the ignition switch. Once these components are removed, repairs to the amplifier can begin.
Step-by-step instruction
- We take the “eighth” head, put on the ratchet and remove the contact group, as shown in the photo below;
Now you can study the contacts in detail and, if necessary, make repairs. If you know that the main components (control unit, motor) have failed, then you need to replace them. Installation of a new device occurs in the reverse order. The DIY repair is complete.
Source: remontvazov.com