The accessory drive belt is more commonly known as the alternator belt. It is important to understand that this belt, in addition to the car’s generator itself, also powers the power steering, air conditioning, etc. It is quite obvious that if problems arise with the drive belt, malfunctions in the operation of the mounted units will also inevitably appear.
For this reason, the said alternator belt needs to be checked and replaced periodically. The belt needs to be changed both when necessary (for example, in case of premature wear) and according to regulations (based on time and mileage), depending on what comes first. In turn, the Niva Chevrolet alternator belt is no exception.
Next, we will look at when to change the Chevrolet Niva alternator belt, what signs indicate the need for replacement, and also how to replace the Chevrolet Niva alternator belt with your own hands.
Chevrolet Niva
To check the belt tension, press your finger on the belt in the middle between the generator and coolant pump pulleys.
To check the belt tension, press your finger on the belt in the middle between the generator and coolant pump pulleys.
With a pressing force of about 8.0 kgf, the belt deflection should be 12 ± 1 mm.
To adjust the belt tension, remove the rubber hoses for supplying air to the throttle assembly.
Why adjust the alternator belt?
A tightened belt makes a whistling sound during operation. In this case, the bearings wear out faster than expected. In addition, the belt overheats, which means it wears out quickly.
It would seem that the tension can be loosened, but an under-tightened belt wears out even faster. The reason is increased vibration.
Please note: the cooling system pump hangs on the alternator belt. These are the features of the VAZ-2123 internal combustion engine. Stopping the pump will not necessarily lead to overheating. But the engine cannot be operated without it.
Causes of whistling: incorrect adjustment, high degree of wear. Draw conclusions.
Source
Chevrolet Niva
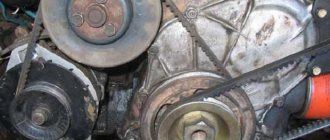
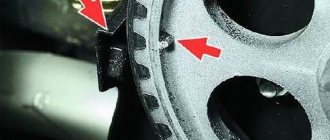
Location of the accessory drive belt and tension roller bracket mounting nuts (for clarity, shown with the engine cooling system radiator removed).
Location of the accessory drive belt and tension roller bracket mounting nuts (for clarity, shown with the engine cooling system radiator removed).
Replacing rollers lada 2123 (vase 2123)
The alternator belt on a Chevrolet Niva performs a connecting function between the engine and the generator, helping the latter produce the necessary energy. However, there is a special roller between the crankshaft pulley and the generator pulley, which helps the belt to be in the required tension and not slip out of its place of fixation.
Over time, this connecting element may need to be replaced. This procedure is quite simple and you can do it yourself, without any help.
Why does the roller fail?
Before inspecting the roller for damage, you need to know why it breaks:
- A foreign body has entered - traces and marks on the roller body will indicate this.
- The belt adjustment is not performed correctly - this applies to both too weak and too strong belt tension.
- Entry of a foreign body. This is indicated by impact marks on the body and marks on the flat side of the belt.
- Incorrect belt tension - it is overtightened or weak. This negatively affects both the tension roller and the insufficient outgoing voltage from the generator.
- The part works in a skewed state - this will cause belt marks on the body.
How to identify a faulty belt tension roller?
The presence of extraneous noise or increased vibration may indicate that you should start replacing the rollers; first of all, they may appear during engine operation. Also, replacement will be necessary during a visual inspection if:
- Part backlash.
- Mechanical damage to the body.
- Damage to the bearing or bracket.
- There is difficulty when turning the shaft.
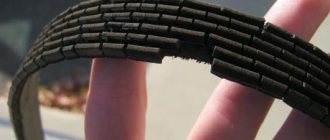
You should also inspect the belt for cracks, delamination, cuts and, if any are found, it must be replaced.
Step-by-step procedure for replacing a Niva Chevrolet
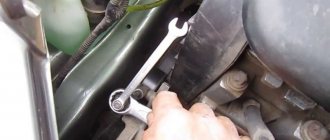
First of all, it is necessary to prepare all the tools so that dismantling is quick and easy. You must have keys for “10” and “17” on hand.
- So, in order to dismantle the roller, you need to loosen and remove the belt. And to do this, you need to loosen the tension roller along with the landing pad, where you need to unscrew the three nuts to “10”. However, such work is not necessary, and if not necessary, you can only loosen its central bolt with a key set to “17”.
- When the belt is “thrown off”, it is necessary to engage first gear, thereby blocking the crankshaft from turning.
- Unscrew the nut on the roller and remove it along with the spring washer.
- When starting to dismantle the generator roller itself, you must first remove its protective cap.
- Then, using a wrench set to “17”, remove the central nut.
- And after that we remove the spacer ring, which prevents the rollers and the motor housing from aligning.
Installation of new parts
- Before installing a new, working roller, you must first mount the ring, then the roller itself.
- Next, using a washer with a spring mechanism, tighten the bolt.
- After this, put on the belt and tighten the tension roller so that the belt is pressed no more than 1 centimeter from its position.
Thanks to such a well-coordinated and precise procedure, it is possible to replace the alternator belt rollers on a Niva Chevrolet quickly and in the shortest possible time.
Such checks should be carried out every 30 thousand kilometers, thereby eliminating the possibility of new malfunctions.
In the Dimavto.com online store, any car enthusiast customer can choose and buy drive belt rollers for the Lada Chevrolet Niva with a 1.7-liter engine capacity from such manufacturers as INA, RUVILLE.
If you have questions, or they appeared during the selection process, and this prevents you from making a final decision, our support service will come to your aid.
This will help you choose the right parts that match your car model.
The success of finding the required part in our store is due to the widest range of spare parts supplied to us from manufacturers from different parts of the world.
Our store's policy is based on careful checking of the quality of the spare parts we sell and their compliance with the highest standards. All products sold by us are of original origin.
Each buyer buying drive belt rollers for Niva Chevrolet 2123 selects a spare part according to the search pattern from a huge catalog that suits him best.
Spare parts search options:
- By product code;
- By car manufacturer and model.
- With tips from a parts specialist.
The selected product can be immediately picked up in the cart on the website online, or you can call 096 258 29 80 or 093 630 27 55 and place an order in person.
Using the catalog, our customers can not only find the product they need, but also read its characteristics. Here you can see a detailed image of the product from photographs and videos. Our pricing policy is always transparent and accessible.
To make it easier for you to understand the features of spare parts Drive belt rollers and their compatibility with Niva Chevrolet 2123 by year of manufacture, modification and type of car, it is better to play it safe and clarify the nuances with our managers.
Before purchasing drive belt rollers (tensioner, bypass) for replacement, it is better to consult with specialists. Taking precautions will help you easily replace an old part with a new one the first time. To do this, our managers are guaranteed to help you with your choice and quickly complete your purchase with delivery.
Replacing the drive rollers of VAZ-2123 auxiliary units
The condition of the belt tension rollers should always be checked when removing or replacing the drive belt. When rocking and rotating the rollers by hand, there should be no play, jamming, or noise in the roller bearings.
- In many cases, noise when the roller bearing wears out is observed when the engine is running.
- We carry out the work on an inspection pit or on a lift.
- Remove the accessory drive belt. For this:
- Remove the mudguards from the engine compartment.
Chevrolet Niva
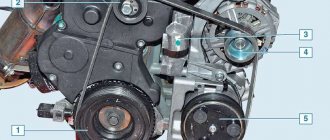
Using a 13mm wrench or socket, rotate the adjusting bolt clockwise, tensioning the belt.
Using a 13mm wrench or socket, rotate the adjusting bolt clockwise, tensioning the belt.
Tighten the nuts securing the tension roller bracket. We start the engine, stop it and check the belt tension again.
Attention! Do not overtighten the belt! Excessive belt tension leads to premature failure of the alternator belt and bearings, coolant pump and power steering pump.
We replace the drive belt for auxiliary units when cracks, ruptures and detachments of rubber from the fabric base are detected on it. On a car with air conditioning, remove the air conditioning compressor drive belt.
Loosen the nuts securing the tension roller bracket (see above) and rotate the adjusting bolt counterclockwise, loosening the belt tension.
Installed a new Chinese generator on Shevik
As it turned out, the generator jammed and because of it the belt broke. Why did this happen? Most likely (my version) - when replacing the pump, the service center tightened the belt too much, because we couldn’t tighten the same one at all. As a result, during the hellish “tightening”, the old gene grunted; the bearings could not withstand such abuse. Therefore, it is better to do everything yourself or in a trusted service. Well, tighten it correctly, you could press the samples with your finger by 1 cm.
How did they even manage to tighten the 1885 belt? I can't imagine))
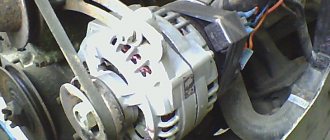
First I'll tell you about the generator
I took the old one, they completely disassembled it, looked at it and said that it had come to an end. The bearings were torn, and the rotor was worn out to such an extent that repairs would cost 2,500 rubles. And a new one costs 3100. It’s Chinese, but the warranty is 3 months, we checked it at the stand - everything works.
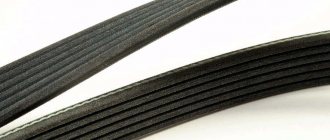
Therefore, it is better to take a native gene with the same width of the roller and with the correct number of rivulets (grooves). That’s why the belt is called a ripple belt, because the grooves must match, it turns out something like rails.
I wanted to buy a 100 Amp Pramo, but I couldn’t find it anywhere in the city; the original genes cost 4,000 rubles. So I decided to try Chinese))
How to remove a generator from a Chevrolet Niva
First you need to loosen the belt, which if tense, cannot be easily reset. So, our task is to loosen the tension roller; it is held in place by a platform with three nuts. You will need a 10mm wrench, it is very advisable to have a ratchet with the same head, preferably an elongated one, because the third nut is located directly under the belt and it is better to approach it from the side.
How to connect an additional pump on Lada Kalina
Most modern cars have two water pumps installed at once. This ensures the highest quality engine cooling in any operating conditions. You can also install a second (additional) pump on the Lada Kalina, and this work takes a little time and effort. The most difficult thing is to get to the place where the pump is fixed, since you will have to disassemble many engine compartment parts.
In order to install the second pump on the Kalina, you will need:
- new pump;
- hoses of different lengths;
- fasteners (depending on where exactly it will be easier and more convenient to screw the pump);
- sealant.
The essence of the work is to organize a small circle of coolant circulation throughout the system.
Doing the work yourself
The first step is to assemble the assembly itself from the materials that are at hand. The pump is connected to two hoses (the short one will provide fluid removal, and the long one will provide supply). The hoses are attached to the two ends of the pump with clamps. Then follow the following procedure:
- The coolant will need to be drained. You can simply empty the expansion tank without draining the entire volume of antifreeze.
- Near the bottom of the car, find two hoses (one leads the antifreeze to the stove, and the other takes it away from it). Disconnect the outlet hose and instead attach the assembled structure with an additional pump.
- After this, attach the pump to the gearbox housing. Depending on the availability of fasteners, you can place the device on brackets or secure the pump with metal clamps.
In this case, the hoses are connected with clamps, and the pump itself is mounted on a metal bracket
At the end of the work, you will need to plug all hoses and plugs and fill in new antifreeze.
What are the signs to recognize a malfunction?
A number of signs indicate the need to replace old rollers with new ones. They appear both directly while driving, in the form of extraneous noise, and during visual inspection.
- mechanical damage on the surface of the rollers;
- noticeable play;
- grinding noises when turning. This is a clear sign that the car needs repairs;
- damaged bracket or bearing;
- leaking oil;
- high temperature during operation;
- strong vibration during operation;
- difficulty in turning the shaft.
It would also be a good idea to check the serviceability of the belt. It should not have cracks, cuts or delaminate. If it has defects, it must be replaced.
Checking installed parts
After this, a final check of all mechanisms is carried out and the elements are collected in the reverse order.
If the belt is tight and the force is not enough to loosen or tighten it, there are several ways:
- You can put the car in 4th gear, put the belt on the roller and push in the direction of rotation of the crankshaft. When it starts to turn, you need to pull the belt onto the generator pulley, and it will fall into place on its own.
- In the same way, you can not push the car, but lift the wheel and spin it, or spin the generator itself.
This makes it easy and quick to replace the Chevrolet Niva generator belt rollers. You should regularly diagnose the moving parts of the car in order to prevent possible breakdowns in time and replace faulty parts.
We recommend replacing the bearings and belt every 40 thousand kilometers.
When to change accessory drive
The manufacturer recommends installing a new gear every 50,000 km. Some items may go through more, so periodic inspection of the product is important. To check the technical condition of the rubber drive, you need to perform the following steps:
- Mark the starting point of the inspection with chalk.
- Set the gear selector to neutral position.
- Brake the car with the parking brake.
- Rotate the crankshaft and at the same time inspect the condition of the belt drive making a full revolution.
- Rotate the shaft a few more times.
- Check the outside of the part.
The belt must be replaced if:
- signs of wear;
- cuts;
- porosity;
- delamination;
- traces of oil;
- dishevelment.
In addition to external examination, manifestations of a malfunction in the form of an extraneous whistle are also possible when the electrical circuits are at maximum load or the warning light of the battery discharge comes on.