Lada Largus clutch adjustment
If the Lada Largus clutch fails, we recommend replacing all its elements at the same time (driven and driven discs, clutch release bearing), since replacing the clutch is labor-intensive, and the service life of damaged clutch elements has already been reduced, so if they are installed again, they may need to be reinstalled replacing the clutch after a relatively short mileage.
Reviews about replacing the friction clutch yourself
Largus owners who changed the clutch themselves note the following:
- It is difficult to do the work yourself; it is better not to try without the skills, conditions, tools and knowledge.
- You can't do it without helpers. But even in this case, it may take all day to replace.
- As long as the clutch works and does not cause concern, there is no point in changing it.
Judging by the reviews, it is better to entrust clutch replacement to specialists, especially since the price of the issue is not so high. Conscientious craftsmen provide a guarantee for their work and bear financial responsibility for it. If you replace it yourself, all actions are performed at your own peril and risk.
Source
Hydraulic Clutch Actuator - Bleeding
If the following malfunctions occur, it is necessary to check the hydraulic clutch drive system for fluid leaks and remove air from the system:
— the appearance of free play of the clutch pedal;
— the clutch pedal is in the middle or depressed position;
- Difficulty shifting gears.
Possible consequences of contamination entering the hydraulic clutch system
The hydraulic clutch drive is very sensitive to contamination. The entry of contaminants into the system can lead to the following consequences:
— inability to change gears;
— damage or complete failure of the hydraulic clutch;
— leaks from the hydraulic clutch drive.
To remove air from the hydraulic clutch drive, use the following equipment:
— installation for removing air from the hydraulic drive system through a brake fluid reservoir type OMA 883 f. "OMA" (Italy);
— a syringe for removing air through a fitting located on the clutch slave cylinder.
Hydraulic Clutch Bleeding Procedures
If parts of the hydraulic clutch are removed
Perform bleed operations using a bleeder through the brake fluid reservoir or a new syringe through the bleeder located on the clutch slave cylinder (brake fluid).
If the clutch hydraulic parts are not removed
Perform air bleeding operations with a syringe only by injecting brake fluid through the air bleeding fitting on the clutch slave cylinder.
Place the vehicle on a two-post lift, apply the parking brake and turn off the ignition.
Remove the engine crankcase protection (see here)
Bleeding procedure if there are no removed hydraulic drive parts
Bleeding using a unit to remove air from the hydraulic drive system
Secure the clutch pedal in the up position using a strap attached to the steering wheel to ensure hydraulic integrity during the bleeding operation.
Connect the installation for removing air from the hydraulic drive system to the brake fluid reservoir (installation for removing air from the hydraulic drive system type OMA 883 f. "OMA", Italy).
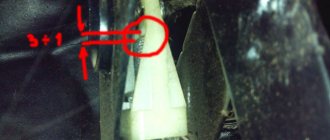
Remove plug 1, Figure 8-1, from the air bleeder fitting on clutch slave cylinder 4.
Connect the transparent tube to the air removal fitting, lowering the other end into an empty vessel located above the air removal fitting (transparent process tube, process vessel).
Press the lock 2 and pull out the pipeline 3 one click to open the air bleed hole.
1 — plug of the fitting for removing air; 2 — clamp; 3 - pipeline connecting the main and slave cylinders of the clutch drive; 4 — clutch slave cylinder; 5 - gearbox
Open the system between the bleeder unit and the brake fluid reservoir.
Wait until the brake fluid flows out without bubbles.
Relieve pressure in the clutch hydraulic drive by turning off the air bleeder.
Press the lock and install the pipeline into the working cylinder until it clicks.
Disconnect the transparent tube from the air bleed fitting and install the plug on the fitting.
Disconnect the bleeder unit.
Add brake fluid to the master cylinder reservoir and bring the level to normal. The brake fluid level should be between the “MAX” and “MIN” marks on the master cylinder reservoir.
Press the clutch pedal twenty times quickly.
Check the functionality of the clutch. If necessary, repeat the air removal operation.
Pumping with a syringe
Secure the clutch pedal in the up position using a strap attached to the steering wheel to ensure hydraulic integrity during the bleeding operation.
Remove the plug from fitting 1, Figure 8-1, to remove air from clutch slave cylinder 4.
Attach a transparent tube to the air removal fitting so that it takes the same height position as the tank (technological tube).
Press the lock 2 and pull out the pipeline 3 one click to open the air bleed hole.
How to adjust the clutch on Renault Logan (Sandero, Largus, Duster)? | myLOGAN.info
When the car is equipped with a mechanical system, the Renault Logan clutch is adjusted using two open-end wrenches 10, an open-end wrench 7 and a measuring tool. The manipulation area is pre-cleaned of contaminants.
On a car that comes off the assembly line, the clutch drive is installed in accordance with two criteria:
- 86 mm from gearbox bracket to clutch fork;
- 60 mm from the bracket to the crimped part of the cable end.
The permissible variation in indicators is 5 cm up or down. After putting the machine into operation, only the second parameter is subject to adjustment. This is what needs to be measured before starting the adjustment.
Tightening or loosening the cable is required if the measurement result is outside the range of 55–65 mm. First of all, manipulations affect the locknut. It is loosened to begin changing the location of the adjusting nut. The process is performed with two keys of 10.
After this, the length of the cable changes. Here, using a 7 key, you need to fix the hexagon to hold the tip of the element. And use a 10mm wrench to turn the nut that provides adjustment. To tighten the clutch on a Renault Logan, you need to tighten the nut. In this case, the pedal position will become higher. To achieve the opposite result, you should loosen the nut. As soon as the indicators enter the acceptable limit, the manipulations stop.
All that remains is to fix the new position of the nut for adjustment with a lock nut and check the achieved result. The position of the clutch pedal is assessed. Its level should match the brake pedal or be slightly higher. Seizing usually occurs approximately halfway through. And engaging reverse gear should occur without difficulty, eliminating crunching and other noises.
If the difficulties that arose could not be corrected by adjusting the clutch, the problem lies deeper. If it is associated with wear of the driven disk or release bearing, the entire system must be replaced. At Renault Logan, such repairs are performed every 200,000 kilometers. However, specific uses may require the procedure to be performed earlier.
If the car has a hydraulic clutch, then problems with the pedal are eliminated by removing air from the system. The clutch is bled according to the following scheme:
- place the vehicle on a pit or lift;
- remove the oil pan protection;
- disconnect the brake fluid level sensor;
- remove the plug from the hydraulic reservoir;
- to remove air from the space between the tank and the fitting, you must fix the pedal in a high position;
- the hydraulic drive reservoir is filled with liquid;
- connect the device;
- remove the plug;
- install a bleeder fitting;
- press the latch, avoiding its tension;
- pull out the clutch pipe until it clicks to get an opening for air to escape;
- turn on the pump;
- wait until there are no bubbles in the drained liquid;
- close the hole, completing the action by pressing the clutch pedal 10 times;
- fix the hydraulic drive pipeline;
- to clear air from the container between the fitting and the cylinder, an empty syringe must be connected to the system;
- press the latch without influencing it in the direction of tension;
- pull out the hydraulic drive pipeline;
- turn on the pump, fill the syringe with liquid, releasing it into the system;
- repeating the operation three times, you need to close the hole, returning the elements to their places;
- If necessary, you need to add working fluid to the tank.
Having considered the question of how to adjust the clutch on a Logan, let’s summarize: this procedure is required as a preventive measure after reaching a certain mileage or replacing clutch elements. It allows you to eliminate a number of malfunctions.
A small set of tools is required to make the adjustment. The work does not require much knowledge. It requires the ability to measure correctly, as well as an understanding of which way to turn the nut to achieve the desired value. Correcting the pedal travel on a hydraulic clutch involves gradually removing air from the system.
It is worth remembering that not all clutch problems can be solved by adjusting the pedal. If the reconfiguration has no effect, you should check and, if necessary, replace other clutch elements.
To increase clutch life, it is important to use the clutch correctly. It needs to be pressed in completely, and then smoothly released in first and second gears. The driver should avoid slipping and changing gears without using the clutch. Thus, the wear of system elements will be reduced.
After this, the length of the cable changes. Here, using a 7 key, you need to fix the hexagon to hold the tip of the element. And use a 10mm wrench to turn the nut that provides adjustment.
To tighten the clutch on a Renault Logan, you need to tighten the nut. In this case, the pedal position will become higher. To achieve the opposite result, you should loosen the nut.
All that remains is to fix the new position of the nut for adjustment with a lock nut and check the achieved result. The position of the clutch pedal is assessed. Its level should match the brake pedal or be slightly higher.
Seizing usually occurs approximately halfway through. And engaging reverse gear should occur without difficulty, eliminating crunching and other noises.
Quite often, Renault owners are faced with the problem of a squeaking clutch pedal, as well as wear and tear of the entire mechanism. Often, in order to carry out preventive maintenance and repair of the clutch mechanism, owners of Renault cars turn to a specialized car service, thereby spending very large sums of money.
Questions (24)
- Most useful
- The newest
Hello! I have a 2013 Largus. The problem is this: not immediately, but after about 20,000 km, a knocking sound of valves appeared (a feature of our VAZ engines). But I have K4M. The mileage is already 145,000 km. I can’t say that the car doesn’t pull or drive. But this knocking sometimes bothers me. As if the valves are not adjusted. What could be the reason? Dmitriy.
Alexey Revin
, editor of the magazine “Behind the Wheel” (automotive information department):
— If the nature and frequency of the knock is similar to the sound produced by large gaps in the valves, then this is the knock of hydraulic compensators. On the K4M engine, the valves are driven by rockers with rollers. And the gaps are compensated by hydraulic supports of the rockers. Although more often they say hydraulic compensators. Since you have been driving with the defect for a long time, of course there is no talk about the fact that the devices are not pumped. Most likely, one or more hydraulic compensators are faulty. The seal of the working volume is broken, and they do not hold the rocker in the desired position. A gap appears, which generates a knock.
I advise you to prepare a valve cover gasket sealant, flushing fluid and find a company where you can purchase hydraulic compensators. I recommend replacing the timing belt at the same time, since it still needs to be removed.
Having removed the cylinder head cover, we try to press the hydraulic compensators by hand. Those of them that are pressed easily are faulty. By raising the camshafts, you can remove the rockers and remove the hydraulic compensators. Then they can be washed or replaced immediately. Hydraulic compensators are quite reliable, and if problems arise with them, then perhaps you once filled in bad oil or installed a fake filter. Dirt particles jammed the hydraulic compensators.
For someone who likes to do everything themselves, the operation will take a whole day. The service will charge from 4,500 rubles for such work. One hydraulic compensator costs from 350 rubles.
Throttle valve adaptation for VAZ LADA LARGUS
Useful tips for do-it-yourself car repairs.
Recommendations from car service specialists and experienced car owners.
Useful tips on car repairs for ordinary drivers and professionals. All the necessary information about repairing and maintaining your car is available in e-books
and
regular printed publications
. Electronic manuals are convenient to use on a computer, smartphone or tablet. They will always be at your fingertips.
The procedure for adapting the throttle valve zero on Lada Vesta and XRAY
The procedure for adapting the throttle valve zero on LADA VESTA and XRAY sometimes helps solve problems...
Replacing the throttle sensor on LADA Largus
Issue No. 5 is devoted to replacing the throttle sensor on LADA Largus (2013, engine size 1.6). Having looked…
Renault Duster, throttle valve adaptation
During the operation of your car, in addition to emotions, you also experience wear and tear on the car’s components….
We solve problems with floating idle and knocking wipers on the Lada Kalina Cross
Due to a dead battery, due to the light being left on, the speed began to fluctuate - the brains forgot the correct...
Lada Largus - Cleaning the throttle, replacing spark plugs
The process of cleaning the throttle valve, replacing spark plugs on a Lada Largus car with eight valves...
Bosch Auto Service Podolsk. Lada Largus. Diagnostics. Throttle valve repair.
How to check the damper on a Lada Largus (RENAULT engine)
IAC CLEANING. Regulator training. Cleaning the throttle. REFILL. | Video lecture #2
Cleaning the IAC idle speed controller, also called the idle speed sensor, cleaning the throttle valve...
Solved the problem of Lada Vesta jerking
I solved the problem of jerking of the Lada Vesta St. Cross 1.8 internal combustion engine by optimizing the throttle valve. DETAILS: After...
THROTTLE LEARNING
Throttle training using the example of a Nissan Tiida. The best DVRs 2022 https://ali.pub/2…
Lada Priora float speed repair electronic gas throttle potentiometer part 2
VAZ Lada Priora 2012, electronic gas pedal. Engine speed fluctuates. The problem turned out to be the suction...
Watch the video “Adaptation of the throttle valve of the VAZ LADA LARGUS”.
We share our experience of car repair. A large selection of video clips on the topic “Adaptation of the throttle valve of the VAZ LADA LARGUS”.
You will find more detailed information about repairing and maintaining your car in
e-books
and
regular printed publications
.
For those who are accustomed to using regular printed publications, we recommend buying car repair manuals in the online store of the Legion-Avtodata publishing house
Automotive literature stores:
krutilvertel
— Electronic books of printing quality in PDF format
autodata
— Online store of the publishing house Legion-Avtodata
Signs of a bad clutch
It's not every day that a clutch breaks. It happens that you don’t immediately realize that the clutch on Largus is failing. This can be easily understood by the following signs:
- When you press the clutch pedal or in the neutral position of the gearshift knob and release the pedal, you hear an extraneous noise - grinding, squeaking, howling or rattling
- Some gears are difficult to engage or do not engage at all
- The clutch does not completely disengage when the pedal is pressed, the clutch moves
- The clutch slips and does not fully engage when the pedal is released and the gear is engaged
If the clutch engages at the very beginning or end of the pedal travel, then the clutch pedal free play may need to be adjusted. Our master can do this. He will also inspect the clutch and be sure to let you know if it needs to be replaced.
Most often, the release bearing disappears due to poor lubrication. It happens that the petals of the diaphragm spring weaken and sag, or critical wear forms at the point of their contact with the bearing. Over time, the damper springs or friction linings of the driven disc may become loose.
We are preparing to replace the cable, removing all unnecessary
Of course, the car must be stopped before replacement. Next, remove the filter bellows (Fig. 1). On a 16-valve valve, the corrugation is held in place by a clamp, but it will also be easy to remove.
Then, if we talk about 16 valves, it is better to remove the "intake muffler". The plastic box, when there is no corrugation, can be immediately moved to the side (Fig. 3).
The box is the “muffler”.
The cable ends with a tip-rod on which a weight is attached. This detail was hidden from us by the corrugation.
We will unscrew the nuts:
- Take two “10” wrenches and unscrew nut 1, holding nut 2. If the thread is “sour,” clean it with a solvent;
- Unscrew nut 2, holding the pressed part of the tip with a “7” wrench.
Now the weight will be easy to pull out of the slot.
Know that replacing the clutch cable on a Renault Logan can be done without unscrewing anything. The cable is pulled towards itself, the lever with the slot is pushed back, etc.
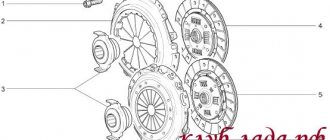
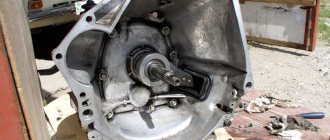
Replacing the friction clutch
Repairing the Larugsa clutch, like any other car, does not make sense; all worn parts must be replaced. To work, you will need a standard set of tools, amplifiers, a hammer and a new set of spare parts. First, the car must be placed on a lift or its front part raised on jacks above the inspection hole. The front wheels and engine protection are removed. After unscrewing the screws, you need to remove the left shield under the bumper. This will give you access to the shield fasteners in the wheel arch, which must also be removed.
The gearbox oil is drained into a suitable container; to do this, first unscrew the plastic and then the metal plug. Do not remove the reservoir until maximum oil has been drained. Dismantle the brake caliper and put it aside along with the pads.
Features of the JH3 gearbox
The JH3 gearbox on the Lada includes a clutch housing, gearbox, and rear crankcase cover. Thanks to the clutch with a bearing located in the box, the clutch in the box is turned on and off. When changing speed modes, no extraneous noise is created. The Lada Largus gearbox provides the ability to accelerate quickly. The average working life of this box is approximately 250,000 km.
The gearbox control drive includes a rocker and a lever. It should be noted that there is a bevel differential. There is a drain plug at the bottom of the crankcase. It is controlled by a rigid rod. Its body is made of aluminum alloy. The JH3 540 version can be found in the five-seater Largus, which has an 8-valve engine.
First adjustment method
There are two ways of regulation. Let's look at the first one:
- Pick up the tip and pull it forward as far as it will go.
- Arm yourself with a caliper and measure the distance from the fork to the leash. The norm is 27 mm, no more, no less.
- If a problem is still observed, adjust the length of the cable by tightening the thread.
- Press the clutch pedal three times and make sure everything is working properly.
Repeat the operation until the pedal travel is normal and the clutch operates optimally. You also need to take repeated measurements using a caliper. The distance between the extreme points should be no more than 146 millimeters. If you notice that the distance is still greater than the specified value, you will have to install a new cable (therefore, we advise you to keep a spare one on hand).
The simple procedure goes like this.
- Disconnect the release fork fastening.
- Using a 10mm wrench, unscrew the adjusting nut mounting bracket.
- Using “dancing with a tambourine”, unscrew the screw connecting the cable to the pedal inside the cabin. The second way is to dismantle the frill and wipers to gain access to the inspection hatch. From here the entire line can be easily removed.
- The next step is to remove the entire line through the interior.
- Installing a new cable is performed in the reverse order.
Specialization : Graduated from the State Automobile University, worked for 20 years at GAZ-56, now I drive a Zhiguli.