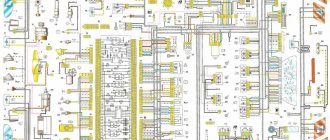
Present to your attention signal connection diagram for VAZ-2110, VAZ-2112 and VAZ-2111
Note that the signal is powered through the same circuit as the engine cooling fan, the power consumption of the standard audio signal does not exceed 4 amperes, and there is no relay provided in the signal connection diagram from the factory. Fuse F7 protects the signal and cooling fan circuits ; you can read more about the fuses and the circuits they protect in the material about the VAZ-2110, 2112 and 2111 fuse box
So, having read about installing sound signals from VOLGA
for
VAZ 2111, 2110, 2112
and having seen enough of how they sound, it was decided to
find / buy / and install
))
I won’t write much about the installation itself, but whatever)) I won’t at all, because... I said everything in the video)) so for about 30 minutes. Let's look, evaluate...
Sound signal test at the end of the video link >>
All cars have a device for producing sound signals (horn), but its sound does not always suit the owner. This is the main reason for replacing the standard horn with alternative options (for example, with a sound signal from the Volga). Let's look at this improvement in detail.
Nowadays, horns are usually used in pairs. One with a high tone, the other with a low tone. This provides strength and beauty of sound.
Will need to buy:
- A couple of sound signals from GAZ 3110 (article number for high tone - 22.3721, for low tone - 221.3721), approximate price 500 rubles;
- 4-pin relay 75.3777-10;
- Relay socket;
- Mounted fuse 10-15A;
- Single-core wire;
- Corrugation for wires;
- Terminals;
- Brackets/brackets for mounting sound signals (optional).
Installation and connection of a sound signal from the Volga is shown using the example of the Lada Vesta sedan. On other cars (for example, Lada Largus, Granta, Kalina, Priora, Niva 2121 or XRAY) all actions are performed in a similar way.
Alternative sound signal VAZ 2110
Before buying alternative sound signals, make sure that the signal level is not higher than 120 dB, otherwise you will not pass MOT. How to make the sound signal of a VAZ 2110 louder? Well, of course, replace the standard sound signals with louder ones or install additional horns under the hood.
Sound signal from Volga to VAZ 2110
- Signals Volga-3110 (22.3721/221.3721) (high, low tone). Price 270 rub.
- Signals Volga, RAF S302/303D (high, low tone). Price 430 rub.
Sound pressure level 105-118 dB.
Installing Volgov signals in a VAZ 2110 with a simple replacement will not work. The thing is that two wires go to the standard signal: “Minus”, which is supplied from the button on the steering wheel, and “Plus”, which is constantly suitable (which also powers the radiator fan ). And for the Volgov signals to work, only one wire is needed - “Plus”, since “Ground” is supplied through the body (from attaching them to the car body).
In addition, we are talking about different current consumption:
- Standard signals according to the passport consume no more than 5A (in measurements no more than 3.5A)
- Volgov signals 8A each (Total 16A)
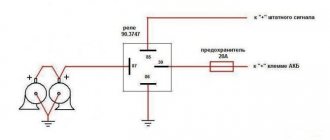
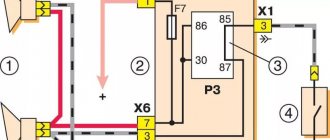
That is why, in order to connect signals from the Volga to the top ten, you need to use a 4-pin relay (for example, 904.3747-10)
- Inside the cabin in the fuse box.
- Under the hood (in this case the relay must be insulated to prevent moisture from entering)
Let's look at both connection options using an example:
Installing a relay inside the cabin
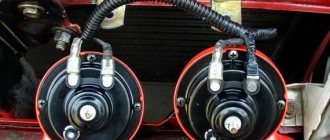
Because Volgov signals are slightly larger than the VAZ 2110 signals, so they will have to be installed in places different from the standard ones and preferably through brackets, so that vibration during the signal does not affect the sound quality.
It is most convenient to install the relay in a free cell in the fuse box.
I connected a wire to pin “85” of the relay from the 6th connector of the 13-pin relay (this is the horn switch on the steering wheel). In the diagram it is gray-black, in the photo it is white). And in the vacant space I inserted the wire from the “87” relay contact.
To apply “Plus” to the relay, you need to run a wire from connector “Ш5-6” to “30” contact of the relay, and through a jumper to contact “86”. From contact 87, when you press the signal button, (via a gray wire with a black stripe ) plus is applied to the signals.
Because the red-white wire for the signals is not used and “Plus” is constantly supplied to it, then it must be insulated!
Advantages of this method:
- The relay is located in the mounting block, that is, we exclude moisture from entering.
- Standard wiring under the hood
- “Plus” we take separately, and not from the radiator fan
Installing a relay in the engine compartment
It is better to place the relay where there is the least chance of moisture getting in. Before doing this, it is good to insulate the relay or wrap it in a bag.
The installation procedure is approximately this:
- Using the “8” key, unscrew the 2 bolts securing the radiator grille and unsnap the 2 lower latches, remove the grille!
- Removing the standard sound signal
- Assembling the wiring according to the diagram
- We isolate all connections, and put the wire that connects the signals to each other into a corrugation (so as not to rub against the radiator)
- We attach the relay in a suitable place
- Putting back the radiator grill
Video signal from Volga to VAZ 2110
Standard sound signal along with a signal from the Volga
We fix the sound signals from the Volga in any convenient place, for example, to the side walls. And we assemble the wiring according to the diagram, just like in previous methods, we isolate all connections well from dirt and moisture.
Alternative sound signals on the VAZ 2110
Example, setting GMP alarms
Example, setting Hella sound signals
Possible malfunctions: signs and causes
There are several signs of a malfunctioning sound signal on a VAZ 2110 or 2112:
- The sound signal has disappeared. The driver presses the steering wheel or the corresponding button located on it, but there is no beep.
- The beep appears and disappears. When the driver presses the steering wheel, the signal may start to work, but then immediately disappears.
There may be several reasons why the horn refuses to function:
- One of the most common reasons is the failure of a safety device. In this case, the integrity of the horn itself will not be compromised, which greatly simplifies the repair procedure.
- Failure of the horn itself. If after replacing the safety device the sound does not appear, you can try to check the functionality of the horn by dismantling it and directly connecting it to the battery. If the device is working, then when connected to the battery it will begin to emit a corresponding signal.
- The reason may also be a short circuit in the vehicle's on-board network.
- Another cause of the problem may be worn out clamping contacts located on the steering column. This problem often occurs in the cars of our compatriots. In any case, the clamping contacts wear out over time due to use; this cannot be prevented. As an option, you can try to increase the service life of the contacts; to do this, they need to be treated with graphite lubricant from time to time.
- Worn slip ring on the steering wheel. As stated above, there is no escape from wear and tear, so sooner or later every car owner will face such a problem. As in the previous case, you can try to increase the service life of the slip ring by applying graphite lubricant to it.
- Oxidation of contacts on the steering wheel. With prolonged use, deposits will begin to accumulate on the internal contacts, which makes it impossible to transmit the impulse to activate the horn.
We set an alternative powerful sound signal
The standard sound signal on tens is not very loud, and sometimes it is not enough for you to be heard and your car to be noticed. For this reason, many car owners install alternative options instead of the standard signal. For example, they set a signal from a Volga car. But before installing a new horn, you should make sure that its level is not higher than 120 decibels, otherwise it will be difficult to pass inspection. There are two options for modifying the horn: completely replacing the standard horn or installing additional horns in the engine compartment of the car.
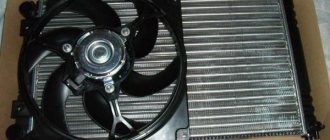
You can also install a signal from the Volga using various methods; you just can’t replace them. The problem is that there are two wires, plus and minus, going to the standard horn. The ground goes through the body, the wire with the plus sign supplies voltage constantly. In addition, the radiator fan is also powered through this wire.
For the signal from the Volga to function normally, only one positive wire is needed; the ground will be powered through the body of the car. But the current consumption is different: on VAZs the horn takes 5 amperes, on the Volga 8A. Therefore, we will need a 4-pin relay, which can be mounted either in the engine compartment or inside the passenger compartment.
If you decide to install it inside the cabin, you will need a 4-pin relay itself (30A), an audio signal, a wire (single-core), a wide female terminal and a relay block. Since the Volga signal is larger in size than the standard one, it is best to install it using brackets so as not to degrade the quality of the supplied signal and sound.
It is better to install it in the fuse box in a free cell. There is a horn switch (13-pin relay) on the steering wheel. We need a wire, which is indicated in the diagram in gray and black; it needs to be connected to the 85th pin. We connect the wire from pin 87 to the free space.
Now you need to connect the wire with the plus sign. To do this, you need to pass the wire from connector Ш5-6 to the 30th contact of the relay, and then through the jumper to contact 86.
It turns out that the plus will be supplied through contact 87 when the signal button is pressed. We will not use the red-white signal wire, although voltage is also supplied to it, so the wire must be insulated. What's good about this method? The relay is located in the mounting block, where moisture does not enter. The standard wiring is located under the hood, we take the voltage separately (that is, not from the radiator fan).
Now let's look at how to install the relay in the engine compartment. This option differs from the first method in that all modifications will be made in the engine compartment. We will use the same materials, but we will also need 8 female terminals, a hanging fuse and a plastic tube (about 2 m). We install the signal itself in a convenient place and connect it according to any of the above diagrams (see above).
In the first circuit, the voltage is taken from the fuse box. The second plus is supplied directly from the battery through a separate 20A fuse. If you are installing signals from the Volga, then it is preferable to use the second scheme. The relay must be placed in a place where moisture rarely gets in. It is also advisable to wrap it with insulating tape or cover it with at least a plastic bag.
Now that we’ve figured out the connection diagrams, let’s move on to installing the horns themselves. Using a size 8 wrench, you need to unscrew the two bolts that secure the radiator grille, then unclip the two lower latches. After this, you can safely remove the grille. After the standard signals have been dismantled, we connect new ones according to the given diagram. All connections must be carefully insulated, and the wire that connects the signals to each other must be placed in a corrugation. After the relay has been placed in a suitable place, we put the radiator grill back and&hellip, enjoy the result!
Methods for troubleshooting
If the horn circuit is broken and the horn stops working, then there are several options for solving the problem:
- First you need to diagnose the safety device. If this part is burnt out, then you just need to replace it with a new one; the device is located in the mounting block. The replacement process will not take much time; any car enthusiast can cope with this task. If replacing the fuse gave results, but after some time the horn stopped working again, then most likely the reason lies in voltage surges in the on-board network. Overload contributes to accelerated burnout of the fuse element, so you will have to look for the source of the load and solve the problem. To do this, use a multimeter or seek help from an electrician.
- If the horn itself malfunctions, the device must be replaced. If diagnostics by direct connection to the battery do not produce results, then most likely the reason lies in the device itself, which needs to be changed.
- Short circuit. To diagnose, you will need a multimeter and a little experience. Using a tester, you can find a short circuit, but if you have never encountered such a problem before, it is better to seek help from specialists.
- If the clamping contacts or slip ring are worn out, then the failed elements must be replaced. It is not a fact that you will be able to buy new contacts or a ring, so most likely you will have to change the horn assembly.
- Another reason why the horn does not work is oxidation of the internal contacts. Over time, as mentioned above, dirt and deposits accumulate on them, which leads to the obstruction of sound. You can try to disassemble the steering wheel of the car, then clean the internal contacts and assemble the steering wheel (the author of the video is the channel Alexander Amochkin Kolomna AAK).
If you are faced with the problem of a non-working horn, then you will probably be wondering how to replace it:
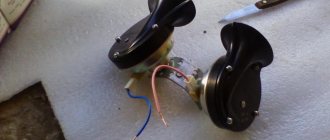
- First of all, you need to remove the steering wheel. To do this, remove the trim and unscrew the bolts that secure the steering wheel.
- After the steering wheel is removed, you can clean the contact tracks, perhaps this will help solve the problem. Make sure that the wire contacts in the column are as clean as possible .
- Unscrew the two screws located under the plastic cover. After dismantling the cover, you will be able to see the contact plate; there is a possibility that the problem lies there. Clean the contacts and check the signal functionality. If the horn does not work, then using a 24mm wrench you will need to unscrew the nut, but you do not need to unscrew it all the way.
- Next, the steering wheel itself must be pulled towards you; this will require some effort. You can try to move the wheel by tapping it from different sides. When you feel that the steering wheel has given way, the nut is unscrewed completely.
- After dismantling the steering wheel, we proceed to removing the horn. There is a module located under the grille of the radiator unit; it must be removed; to do this, unscrew the nut to 13 and disconnect the connector.
- Install a new one, replace the steering wheel and check the operation of the horn.
Installation of sound signals from Volga
Many owners of VAZ 2109, 2108 are not satisfied with the sound of the standard horn of their car. An excellent replacement for the standard nine signal can be the option discussed here for installing a sound signal from the Volga. Many, including the author, have already completed this not at all complicated installation, and do not regret the time and money spent, especially since this modernization is more than compensated by the awareness of the fact that his car has become a little closer to ideal, and is ready for it immediately show it to everyone!
Self-installation of a signal from the Volga on a VAZ
Most models developed by VAZ, including the VAZ 2108, VAZ 2109 and VAZ 21099, which are still widely used today, are equipped with not very euphonious sound signals, which often confuses the owners of these cars. Meanwhile, nowadays there are quite a lot of quite worthy replacements for the standard VAZ signal and, in particular, the option of installing an excellent sound signal from the Volga can be an excellent alternative.
So, to implement such a not too expensive idea, we will need the following equipment and related materials:
- Conventional “Volgov” dual signals with ground output to the housing;
- Relay type 90.3747 together with a block and mounting flange;
- Set of wide terminals;
- 20A fuse together with mounting block;
- Multi-core insulated wire with a cross-section of at least 2.5 mm. sq.;
- Heat-shrinkable tube or electrical tape;
- A piece of aluminum or steel angle.
Practical implementation of the modification
As always, before working with the car’s electrical circuit, you should disconnect the “negative” power wire terminal from the battery, thereby protecting yourself from accidental short circuits.
Next, in order to gain access to the standard signal, it is necessary to completely remove the radiator grille, after which it becomes possible to dismantle the sound device (along with the mounting bar). Don't forget to also disconnect the signal ground wire.
Having assessed the installation location of the standard signal, we modify the mounting of the signals from the Volga using a purchased corner on which we drill holes in accordance with the markings at the installation site. If our corner is made of steel, we cover it with a layer of paint to protect it from corrosion. When attaching signals to the corner, we take into account that one of the mounting bolts will serve as a mass, which means it must be of the appropriate length to ensure reliable contact with the metal part of the car body.
Why do you need a relay?
The seller persistently sold me a relay for 40 rubles, saying that I couldn’t live without it. But in the end, it worked out without him.
What is the point of a relay?
First version (MYTH) The point is that the VAZ and Volgov circuits for connecting sound signals are not the same. Volgov's horns take ground from the body, while VAZ's horns take ground from the connected wire. According to the sellers, when we press the beep, we close the ground (-) and not (+). Therefore, if you connect without a relay, the horn will work constantly. But in reality, everything turned out quite the opposite, which made the work easier. Therefore, we proceed as follows.
Second Version (more real). Volgovsky buzzers consume a current of 14A, and a standard buzzer 5.5A. Due to excessive load, the fuse may melt, and if you set its rating higher, the tracks on the board will melt.
If you want to install a relay, install it, but I didn’t install it, because... The loads applied to the beep are not constant and short-term.
The feasibility of self-repair
So does it make sense to repair the horn yourself? If we take into account the recommendations described above, then the repair is advisable only if the car owner is as careful as possible when performing it. After all, during the repair work, there is a high probability that an inexperienced car enthusiast will damage the wiring in the unit or connect the contacts incorrectly. Therefore, if you have never encountered a repair procedure before, it is better to entrust this matter to specialists or simply replace the horn assembly.
How to install Volgov signals?
- Open the hood.
- Remove the black decorative trim (by unscrewing 4 screws) between the bumper and the TV.
- Having gained access to the standard horn, remove it by unscrewing the screw with a key set to “13”.
- We cut off the plug of the old wiring, find the positive wire, connect it to the plug of the new horn and short the horn to ground. If there is no signal, but appears only after pressing the button, then this connection method is correct. If you decide to install a relay, I have attached a connection diagram, which in principle makes everything clear.
- Having removed the old beep, two plates remain free, so we will install new signals on them.
- We install the signals, connect them to a common positive wire, and carefully isolate everything (including the mass of the cut plug).
Important! The “snails” need to be installed with the mouthpiece facing down so that water does not flow into them, and if it does flow, it flows out immediately.