The safety of the driver and passengers of the vehicle directly depends on the performance of the braking system. After a certain mileage, its components wear out, one of which is the caliper. Nevertheless, it is quite possible to repair the brake caliper, although most often it fails due to the process of souring of the guides or pistons.
Why is this dangerous in practice? If this unit malfunctions, the brake pads begin to wear unevenly. The same goes for brake disc wear. As for the pads, increased wear may be observed, for example, on the outside compared to the inside. Uneven wear indicates that the pistons are putting too much pressure on only one of the pads, while the other does not take part in the process. Urgent repair or replacement of the caliper is required, without waiting for it to completely jam.
About the reasons for caliper failure
This brake system component can break down due to improper maintenance or due to insufficient quality. The main reasons why caliper repair may be required are as follows:
- improper operation, which is associated with filling the guides with poor-quality lubricant - because of this, the boot swells and later “sours”;
- in the future, repair of the brake calipers may be necessary due to moisture getting on the guide, which leads to a breakthrough of the boot;
- Another reason is the piston itself, the body of which is also vulnerable to moisture getting inside;
- low-quality working fluid (brake) can corrode the piston from the inside if the concentration of water in it exceeds the norm.
Video tip for DIY caliper repair:
Tips and Strategies for a Successful Replacement
Whether this is your first time working on your car's braking system or you're already familiar with it, check out these tips. They will help you make a smoother repair job.
- When cleaning the brake assembly, use a parts cleaner.
- When disassembling the wheel brake assembly, keep the parts in order and use the opposite assembly as a reference if you forget how to put everything together, or better yet, capture everything on camera at the same time.
- Replace the pads and caliper if the thinnest side of the pad is as thick or thin as the backing plate.
- If you haven't replaced your hoses in the last 10 years, consider replacing them now. Old hoses begin to peel off from the inside, blocking proper flow of brake fluid and can cause the caliper to seize.
- Replace brake calipers in pairs (front or rear) if they have more than 200,000 kilometers. This will help maintain the quality of the braking system.
- If possible, install new fastening hardware - heat weakens fastening material after many miles of work and can cause the new caliper and pads to rattle or squeak.
- If your brake system configuration differs slightly from the configuration described here, refer to the repair manual for the specific make and model of your vehicle.
Replacing a brake caliper is not a routine repair unless there is excessive wear, damage to the bore or piston body, the brakes are not seating (in some cases), or there is a brake fluid leak. However, this project is not difficult and is often the best alternative for rebuilding a caliper. If all this seems very complicated to you, it is better to go to a car service station in your city, where auto repair specialists will provide you with a high-quality and quick replacement of calipers.
How do you like the article?
Repair of caliper guides
They are not difficult to detect - these are special bolts that are attached to the ears of the case. They need to be changed as soon as pockets of corrosion become noticeable. The repair process will look like this: unscrew the old guide and insert a new one in its place.
The main thing is not to forget about high-quality lubrication, and also check the condition and tightness of the anthers - there should be no cracks or tears on them.
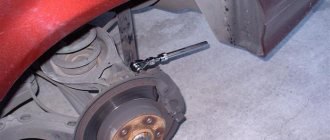
Do-it-yourself caliper repair - preliminary inspection
The return movement of the piston in this unit is ensured by a cuff. Firstly, it creates a tightness, and, secondly, it acts as a kind of spring. When the piston moves, it undergoes a slight deformation, but then returns to its previous state, slightly pressing it into the body. Determining the malfunction is quite simple - if you hang the wheel, it should rotate freely as soon as you press or release the brake pedal. There should be no signs of overheating on the discs themselves, otherwise you will need to repair the caliper yourself.
When conducting a visual inspection, we must make sure that there is no noticeable difference in the thickness of the outer and inner pads. The piston should move so that when pressed it easily sinks into its body. Its surface should not have noticeable traces of dirt or corrosion particles. You also need to conduct a superficial inspection of the boot and ensure its integrity.
Helpful information
Brake fluid is corrosive and can damage the finish of your vehicle. If this liquid gets on a painted surface, quickly wipe it with a clean cloth and then wash the area with soap and water and you should be fine. The brake system should always be flushed and bled when working on the brakes to prevent rust from forming due to moisture. Every time the brake system is opened, the brake system must be bled.
SPONSORED LINKS
DIY caliper development procedure
Let's move on to a description of the repair itself. The algorithm will be something like this:
- First you need to lift the car using a jack and unscrew the wheel, locking the steering wheel in the extreme position.
- The mounting spring is removed, and the surface near the brake hose is thoroughly cleaned. To do this, you can blow it with compressed air.
- The brake hose must be clamped with a clamp to prevent leakage of working fluid.
- We continue to repair the caliper ourselves. After this, unscrew the bolt that secures it and remove the hose itself to the side. It is necessary to ensure that dirt particles do not penetrate inside it.
- After this, the caps on the guides are removed, and they themselves are unscrewed using a 7 mm hexagon.
- Using a screwdriver, we recess the piston, moving its body away from the disk to a sufficient distance. You can begin dismantling the old caliper.
- First, take it out of the case and check for moisture. We take the piston out of the housing. To do this, you can remove it from the disk without disconnecting the caliper from the hose. Just press the brake pedal and it should fall out on its own. How to clamp a brake hose? Any tight clamp will do, you can even use the one that is used to secure caps to wheel rims at a tire shop. You can use a vice in which to firmly clamp the body, and remove the piston itself with pliers. Or use compressed air, making sure that the part is not damaged during removal.
- We take out the old cuff, first removing the remaining working fluid. We thoroughly clean the surface in which the protective cover was located and the cuff seats. We rinse and blow with air, after which you can install a new cuff.
- When repairing the front caliper, lightly water the working surfaces of the piston with brake fluid. The piston itself is laid strictly vertically and slightly recessed. We put a protective cover on top. In this case, you need to make sure that the rubber band does not jam.
- Now the piston can be recessed completely, but you need to be careful to prevent the boot from twisting.
- We unscrew the brackets that are equipped with the caliper. We clean the surfaces on which the pads move. Care must be taken not to damage the threads in which the guides are attached. The bracket is screwed into its original place.
- We lay the block, making sure that it has taken its position and is not stuck anywhere. The guides must be cleaned of the slightest particles of dirt. The caliper is put on the bracket, and its guides are tightened with your fingers. We put on the caps and fix the springs. Don't forget to put grease under the brake pistons boot and remove any excess grease from around it.
- All that remains is to put the hydraulic fluid hose back in place and bleed the entire system with a few presses of the brake pedal. We lower the car to the ground using a jack and check the level of working fluid in the tank - refill if necessary. This completes the caliper rebuild.
Save the brakes: everything about caliper maintenance
They don’t brake, they jam, they get hot... At some point, the brakes, which previously pleased with the precise operation, begin to throw up unpleasant surprises. This is due to the fact that most motorists begin to deal with this unit only when problems arise, although this should be done much more often, our expert today is convinced. For obvious reasons, he asked not to give his first and last name, but he promised to clearly demonstrate what brake maintenance is in his understanding.
The main enemy is corrosion
— Let's not forget that brakes, in principle, work in very harsh conditions. During active braking, the discs can heat up to 600 degrees! The rest of the caliper parts get less, but they also constantly experience heating/cooling, and besides, disc brakes are exposed to water, dirt, salt, sand...
It is clear that the caliper working cylinder is initially protected by a boot plus an O-ring (cuff). But over time, corrosion may appear on both the cylinder itself and the piston. Yes, one of the reasons is water and dirt that enter through a damaged boot (we don’t check the rubber bands often). But due to constant heating/cooling, condensation may occur, and the protruding edges of the cylinder and piston may also begin to corrode. Like here - do you see this “fungus”? In general, for one reason or another, corrosion occurs and the surface of the cylinder is damaged.
At first, the piston begins to move with noticeable effort; over time, this problem progresses, which affects the quality of operation of the entire system. You press the brake pedal, but it is tight, you press harder, but “there are no brakes,” or they work normally every other time. The cylinder here is in very good condition, so in this case I will limit myself to running rust remover in there, then apply a special lubricant, and everything will be fine. But it is not always possible to resolve the issue this way, with little bloodshed.
Replacement or restoration?
If the problem starts, the piston generally gets stuck in the cylinder, and here you won’t get away with replacing the repair kit, which essentially consists only of rubber bands (boots and cuffs) - you need to somehow restore the surface of the cylinder, change the piston. The solution to the problem depends on the design features of the caliper, the car model, and the neglect of the issue. At a minimum, you will have to get (buy or grind) a new piston; at maximum, you will have to restore or buy a used or new caliper.
The last option is the most expensive. As a rule, people prefer to look for a used one or turn to workshops to repair or restore their parts - this turns out to be much cheaper. This is understandable: a new original or good licensed caliper for an inexpensive mass-produced model like the Opel Astra H will cost 3-4 million rubles, a used one will cost about 0.5 million, but will still require a rebuild and installation of a repair kit, so restoration is all it will still be cheaper.
By restoring a caliper, you get a new part. Pistons, guides, boots and cuffs are changed, and only the body remains old, which has been thoroughly cleaned (as a rule, they prefer to sandblast) and a new protective coating has been applied.
There are nuances...
Everything can look beautiful: pads, discs, and calipers - but the brakes “stick”! You start to figure it out and you find the reason.
If the mechanic at the station, when replacing the pads, did not carry out a complete cleaning procedure (on both sides!) of these “guides,” then it turns out that the pad simply jams in a certain position and does not brake. In order for the pad to press against the disc, you need to create additional force on the pedal - much higher than what was initially required.
I use a screwdriver so confidently now, because I have to change the disks anyway. Why? They are warped and hit when braking. And I suspect why.
There is an interesting point with some cars: the right disk is different from the left, and accordingly they have different numbers. Whoever knows this orders one right disk and one left one. Well, those who don’t know, choose any of them and order two identical (right or left) disks.
These discs are ventilated, the air channels in them are located at a certain angle. If we place the right disk on the left (and vice versa), then there will be no cooling provided, and overheating can easily occur during hard braking. And then they start saying: bad parts...
Now let's take new discs, clean them of grease with a special agent - and everything will be beautiful! There are no special nuances when installing a disk on the hub; the main thing is that the mating plane is smooth and clean.
The main thing is lubrication!
Why do caliper guides turn sour? As with cylinders, torn boots allow water and dirt to get inside. And also because the old lubricant develops its properties, or instead of a special high-temperature lubricant, a regular one, for example, graphite, was used. In a good way, you need to service the brakes at least once every six months: disassemble them, clean the guides and re-lubricate them - don’t wait until the pads run out.
Here the caliper is in good condition: it is clear that the car has been looked after. I also pay attention to the presence of cracks, corrosion, and the geometry of the brackets, because sometimes people drive with “crooked” brakes in the truest sense of the word! Due to heavy loads during braking (for example, on commercial vehicles driving with overload), the bracket moves and the guides begin to jam. They are sharpened, well lubricated, but the bent bracket itself must be replaced in a good way!
First, I completely remove the grease: on the fingers - just with a rag, from the guides themselves - using “chemistry” (rust solvent), and also clean with a special brush. I don’t regret the liquid and time: everything needs to be cleaned.
And we start fiddling around, getting all the old grease and dirt out of there. This all needs to be cleaned in such a way that the brush or rag remains clean. Then we take the remover and use it to wash and at the same time degrease the surface. Everything here has been cleaned.
For the guides I use a special high-temperature grease. Exactly this kind, and not graphite, as some mechanics use. We remember at what temperatures the brakes operate, right? Regular lubricant will not withstand them, and as a result we will end up with “rooted” guides and jammed brakes even faster.
We remove excess lubricant - they are of no use here. The lubricant is hygroscopic: like brake fluid, it accumulates moisture over time. And this, as we remember, is a source of corrosion.
It's the brakes!
Now we will process the bracket with a file, and then clean the brake pad guides. I have already said why this is important.
Often the block wears out unevenly, for example, due to the fact that the lower guide jams, because all the dirt flows onto it and it gets stuck. And it begins: the lower part stops moving, the block is pressed only by the upper part.
Accordingly, we get uneven wear at an angle. When the lining is completely worn out, the block begins to saw the disc with metal - that’s it, it needs to be replaced, since boring it in this case is useless. This is not my whim: if the metal part of the pad begins to cut the disc, according to technical operating conditions it must be replaced.
Well, now we’re putting everything together - what did we get? The same operating principle applies to the rear brakes: disassemble, clean, lubricate, adjust the handbrake. There are small nuances, but overall everything is the same.
"Soda" won't work
After replacing the pads and discs, we bleed the system. And the first 200 kilometers must be driven carefully. It is clear that efficiency will appear in a kilometer or two. But it is important that all the working parts, figuratively speaking, fall into place, the pads get used to the discs.
Brake fluid should be replaced every two years. And this is the maximum interval! If the car is used harshly, the brakes are often loaded, it is better to generally reduce the period to a year. And if the brakes have overheated at least once, definitely replace them! If the liquid boils, it becomes like soda - with tiny air bubbles that cannot be removed. In normal modes, this may not be so noticeable and will not affect the operation of the system. But if you have to brake sharply, you will be surprised to find out that you don’t even have brakes! You will press the pedal as hard as you can, but the car will somehow stop!
Afterword
When a car comes from Europe, the brakes always work equally well. And then you drive here for a while, change pads and discs, and this clarity disappears somewhere. And everyone points to bad parts. And everything is much simpler: you need to work on the brakes periodically!
I have never seen so much fuss with the brakes at any station. Only when the pistons in the cylinders or the guides are specifically wedged, then they are thoroughly taken care of. If everything on the larger side more or less works, then no one really touches them: they changed the pads, checked that everything seemed to be working, and oh well.
It just seems like you're wasting your time and money. But let's think about it this way. Firstly, you always have brakes that work efficiently, reliably, in any weather. Secondly, if we talk about fast cars with powerful brakes, calipers cost good money. It is cheaper to come every six months to develop brakes than to then have to replace calipers due to jammed cylinders. It's better to drive with working brakes!
Listened and recorded by Ivan KRISHKEVICH Photo by the author and Sergei BOYARSKY ABW.BY
find the necessary spare parts for repairs by using the search aggregator site BAMPER.BY. Here we have collected more than 310,000 offers from various Belarusian sellers with photographs and the price of each item. Search for any spare part in three clicks.
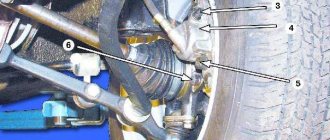
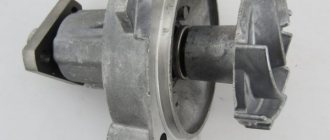
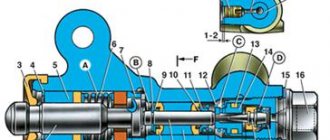
The design of this brake element
There are two types of disc calipers - front and rear, their design and repair method are slightly different, but their main elements are the same:
- The housing in which the piston (cylinder) is mounted.
- Bypass valve.
- Sealing ring.
- Piston (cylinder).
- Cylinder boot.
- Retaining ring.
- Frame.
- Pressure bar.
- Pads.
- Guide boot.
- Guides.
- 14. Fastening bolt.
- Brake hose.
The difference between the rear disc caliper is the presence of a parking brake.
Therefore, the piston (4) has a special thread through which it is screwed onto the parking brake rod (1). Thanks to this, it can operate under the influence of two drives - mechanical (parking) and hydraulic.
What is included in the front brake caliper repair kit?
They produce two types of repair kits - for one and two wheels. The difference between them is only in the number of parts. Typically they consist of:
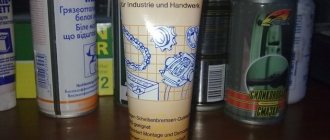
- lubricants - one or two types (for lubricating the piston of the working brake cylinder and the guides of the caliper bracket), depends on the make and model of the car, as well as the manufacturer of the repair kit. Some inexpensive repair kits do not include it at all, so you will have to buy it yourself;
- cuffs (seals) of the pistons of the working cylinders (one for each caliper);
- boots of working brake cylinders (one per caliper);
- guide boots (two pieces per caliper);
- spare piston (not included in all types of repair kits).
Causes of failure
The caliper as an element of disc brakes is subjected to significant temperature loads, as well as exposure to external adverse factors: dirt, dust, moisture, chemicals. All this happens due to the fact that his device does not allow him to be protected from these negative phenomena. If there is significant overheating, as well as if the boot ruptures, the lubrication of the guides may disappear.
Improper maintenance of the guides, in which some craftsmen manage to stuff inappropriate lubricant into their boots: graphite or similar, leads to their swelling and souring, after which they jam or knock when suddenly activated.
A rupture of the piston boot causes dirt and moisture to enter it. After which it stops working - it starts to jam or, conversely, knock.
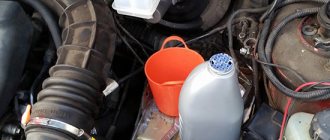
How to minimize brake fluid loss
- Open the hood and use a rag to thoroughly clean the brake master cylinder. The master cylinder is attached to the booster, a drum-like component mounted on the driver's side called the brake booster.
- Unscrew the cap of the master cylinder reservoir and place a piece of clean plastic elastic sheet over the hole, I usually just put a thick bag and tighten it well with the lid, so that there is a vacuum in the reservoir and when removing the brake hose, the fluid does not flow onto the floor.
- Then place the cap on the top of the plastic sheet and tighten the cap. This will create a vacuum and help prevent significant fluid loss when the brake line is disconnected.
Repair kit
Replacing a caliper is a drastic measure; often you can limit yourself to repairing and replacing its components. Basically, the standard repair kit includes rubber elements:
- cuffs,
- anthers,
- protective rubber bands of the fitting,
- piston sealing rings.
But depending on the necessary repairs, they may include:
- retaining rings,
- clamping brackets,
- guides,
- directly the pistons themselves.
Thanks to the repair kit, you can significantly save and improve the operation of this brake system unit.
Signs of trouble
The breakdown of the caliper components and their impending repair can be understood by some signs that occur during braking:
- The car pulls and pulls to the side when braking.
- It feels like when braking you have to put more force on the pedal or, conversely, less.
- The brakes rattle or knock when driving over bumps or when stopping.
- The brakes are jamming, which will be indicated by possible skidding.
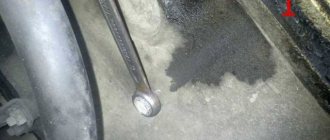
- The appearance of brake fluid leaks on the wheel.
- Feedback in the pedal, expressed in a strong pulsation when pressing the brake.
If these symptoms appear, you should not delay repairing faulty caliper elements. You must first figure out why this happened and make repairs immediately. You can learn more about the signs and causes in the attached videos at the end of the article.
Design and principle of operation
Mandatory elements of any caliper are:
- Pad guides. They can be of different types, more complex for floating structures and relatively simple for fixed ones. Their task is to transfer the braking force from the linings pressed to the disc to the car chassis.
- Hydraulic cylinders that convert the increase in pressure in the brake drive system into the pressing force of the friction linings against the disc.
- Brake pads consisting of a durable metal substrate onto which linings made of a special heat-resistant material with a guaranteed coefficient of friction against steel or cast iron discs are glued.
After pressing the brake pedal, pressure increases in the system, which is transmitted to the working cylinders. The pistons begin to extend and clamp the disc on both sides through the pads.
A large amount of thermal energy is released, but thanks to the size of the disc and its ventilation system, it is successfully dissipated, simultaneously cooling the pad material.
However, the temperature of the caliper increases and to prevent boiling, special measures are taken to remove heat and the composition of the fluid itself.
This is interesting: Why do you need an adsorber in a car, device and principle of operation
When the pressure is removed, the pistons stop putting pressure on the pads, and due to the elasticity of the sealing cuffs on them, they move back a very small distance, on the order of tenths of a millimeter.
This is sufficient to prevent surface contact on one side and ensure high braking readiness on the other. The shorter this distance, the faster the brake will work the next time you press it without unnecessary free play of the pedal.
To remove air from the system, each cylinder block has a special bleeder fitting. It is usually located near the connection point of the flexible working pressure supply hose.
If the brakes rattle
This type of brake has pressure springs or floating calipers.
They are responsible for securing the pads to the caliper body. The reason for their failure is metal fatigue or poor quality. As a result, they lose their elasticity and stop pressing the pads against the body. Because of this, the pads rattle at the slightest passage of irregularities and may come into uneven contact with the disc, which will lead to the appearance of a shoulder or grooves on it. Also in this case, the staples themselves may rattle.
What should you do when your brake calipers or pads rattle? If it is not possible to replace them, then you should try to loosen them with your own hands using pliers to make them more rigid. To do this, you need to pull them out of their seats, unclench them and insert them into place, after which they will stop rattling for a while.
How much does it cost. ?
When doing brake work, replacing the brake caliper is a common way to do it. Many repair shops will recommend replacement based on the age and condition of the brake system. In other words, if the car has a lot of miles on it, then the caliper has a good chance of leaking, but if the car has low miles, they'll probably let it slide to save a couple of bucks for the buyer. Most replacement brake calipers are rebuilt, which cost between $35 and $70 each, some including pads. If you're doing shop work, expect to pay between $390 and $450 for two people.
The piston (cylinder) is faulty
Poor quality of brake fluid, the appearance of rust on the surface when the boot of at least one piston (cylinder) ruptures or as a result of prolonged downtime of the machine entails its partial jamming.
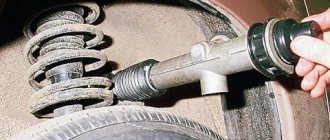
This will initially be heard when its operation is delayed, when the pads begin to knock on the disc. In order to make the repair yourself in this case, you need to disassemble the caliper and pull out the rusty piston; this must be done after the guides have been unscrewed and the boot and retaining ring have been removed.
If the cylinder still moves even slightly, you can squeeze it out using a compressor by inserting a hose into the hole for supplying brake fluid. This can also be done without first disconnecting the housing from the brake system; you just need to press the pedal, after which the created pressure will squeeze the cylinder out of its seat. If it is tightly jammed, then a preventive measure can be soaking it in gasoline and other similar liquid.
It is worth considering that the rear caliper piston cannot be removed, but is simply unscrewed along the threads with pliers or a similar tool. After this, you need to wash the cylinder seat and clean it of dirt and rust. It is also worth doing with the piston (cylinder) itself. Next you need to insert the cylinder into place. It would be useful to replace its boot with a new one during assembly. You can see this in more detail in the attached video.
How to extend the life of brake system components
Due to their difficult operating conditions, brakes owe their durability solely to preventive measures:
- it is necessary to replace the brake fluid with established regularity, using only that recommended by the manufacturer;
- each time the pads are replaced, the caliper should be disassembled, the guides should be cleaned and lubricated, and, if necessary, the repair kit or at least the sealing parts should be replaced;
- Do not overheat the brakes by frequently and unnecessarily braking from high speeds; on descents it is better to use engine braking;
- the pads must be changed on time, without waiting for the wear limit indicator to activate;
- the same applies to discs; bringing them to a minimum thickness not provided for by the design causes excessive output of the pistons from the cylinders and wear of the seals.
A particularly dangerous effect will be the appearance of a difference in braking of the left and right wheels of the car due to different degrees of wear of the mechanisms.
Such driving is unacceptable, since during emergency braking the car can turn around and be thrown out of the lane.
Guide faulty
The main problem if the brake does not work can be jamming and souring of the caliper guides.
Repairing this malfunction with your own hands will not be difficult. By the way, in this case there is no difference when disassembling both the front and rear calipers. To do this, you need to unscrew and pull out both guides. Clean them from dirt or poor-quality lubricant, remove and replace the torn boots with new ones, after filling them with special grease for calipers.
Signs of a faulty caliper
Signs of a faulty brake caliper:
- increased braking distance;
- difficulty rolling;
- the car pulls to the side when braking;
- pedal vibration when braking;
- grinding noise in the caliper area when driving: it is worth noting that the reasons can be different, from a trapped stone to banal wear of the pads, but wear of the pads can be caused by a faulty caliper;
- characteristic signs of overheating on the brake disc;
- uneven wear of pads from one caliper;
- excessive heating of the disk.