4/5 — (81 votes)
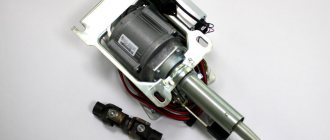
Steering gear VAZ 2101
Do you need to replace the VAZ 2101 steering gear, but don’t know how to do it correctly? Then this article is for you. The fact is that the gearbox, consisting of a worm mechanism, wears out over time, and the free play (play) of the steering wheel increases many times. For this reason, it is necessary to replace the VAZ 2101 steering gear, or make adjustments if possible.
Steering gearbox - removal and installation
We remove the gearbox for replacement.
An assistant will be required to complete the work.
1. Place the car on an inspection hole or overpass (see “Preparing the car for maintenance and repair”).
2. Unscrew and remove the steering shaft turnbuckle bolt (see “Steering shaft - removal and installation”).
3. Disconnect the steering rods from the bipod of the steering gear reducer (see above “Steering rods - replacement”).
19 mm socket wrench
unscrew the three nuts securing the gearbox to the left side member of the car, holding the bolts from turning with a wrench of the same size. Holding the gearbox, remove the bolts.
Adjusting washers are installed between the spar and the gearbox. Remember or mark their location. When installing the gearbox, install the washers in place.
5. Turn the gearbox bipod until it stops at eye A
gearbox housing. This will make removing the gearbox easier.
6. Remove the gearbox shaft from the turnbuckle.
7. Turning, remove the gearbox upwards from the engine compartment.
1. Orient the gearbox bipod so that the line drawn through the centers of the bipod holes is at a distance of 27.5 mm from the gearbox mounting plane (middle position of the gearbox roller).
2. We insert the gearbox shaft into the steering shaft coupling, orienting the depression made on the splines of the steering shaft turnbuckle to the protrusion of the steering gear gearbox shaft (see “Steering shaft - removal and installation”).
3. We fix the gearbox with bolts to the body side member, installing the adjusting washers in place.
4. Install and tighten the turnbuckle bolt.
5. Connect the steering rods to the bipod.
6. After installing the new steering gearbox, pour oil into its crankcase (see “Steering gearbox - checking the oil level”).
Source
Replacing the steering gearbox on a VAZ 2101, VAZ 2102, VAZ 2103, VAZ 2106
Welcome! The steering gearbox is an integral part of any car, because only thanks to this thing the forces from turning the steering wheel are transmitted to the wheels. But like any other unit, the steering gear wears out over time, which makes it necessary to replace it. You can find detailed instructions for replacing the steering gearbox below.
Note! To replace the gearbox, you definitely need to take a set of tools for its removal and installation, the set of tools should include: A basic set of wrenches, as well as pliers, and you will have to buy a special puller for pressing out the pins of the ball joints, otherwise removing the steering gearbox will be difficult without it!
Summary:
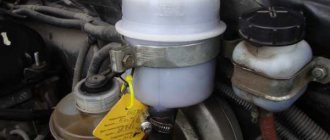
Where is the steering gear located? It is located in the engine compartment of the car, so after opening the hood you can immediately see it, but to get an approximate orientation, the brake master cylinder is located just above the gearbox, and the gearbox itself is indicated by an arrow in the photo.
When should the steering gear be replaced? When it breaks down, control over the car is immediately lost; in other words, the control simply fails. But how can you understand an impending gearbox failure? We will answer this question!
The first signs of gearbox wear include:
- The appearance of various kinds of sounds or so-called squeaks in the steering gear, which are especially audible when turning the steering wheel.
- And also more serious defects of the gearbox include the appearance of large play when turning the steering wheel in the right direction.
Note! But the backlash can also be caused by a loose adjustment screw, which can be treated simply by tightening this screw to the required point. (For information on how to tighten the adjusting screw, see the article: “Adjusting the steering wheel play”) If adjusting the screw does not produce results, then most likely you will have to replace the entire steering gear!
Methods for checking car steering
Checking the car's steering by ear
Drive your chosen car on flat and dirt roads, turn off the music, close the windows and listen to all the sounds. Extraneous rattles, noises, clanging, tapping, squeaks, crunches indicate machine malfunctions. If the steering is loose:
- the knocking of the rack is clearly audible - the front suspension parts are wearing out and becoming loose due to the poor quality of the roads;
- noise appears when turning the wheels - as a rule, the driver immediately repairs the steering elements, because it is impossible to drive with such a malfunction; if you find noise when inspecting the car for sale, this is a reason to think about your trust in the seller;
- noise due to a running pump (for cars with hydraulic boosters installed) means that the end of its service life has come.
How to replace the steering gear, also known as the steering mechanism, on a VAZ 2101, VAZ 2102, VAZ 2103, VAZ 2106?
Note! Before starting the operation, remove the front driver's wheel from the car!
Removal: 1) First you will need to remove the steering shaft from the car. (For information on how to remove the steering shaft, read the article: “Replacing the shaft”)
2) Next, disconnect the middle and left side tie rods from the bipod, and after disconnecting, move both rods to the side. (For information on how to disconnect both rods, see the article: “Replacing steering rods on a VAZ”)
Note! You can watch another interesting way to disconnect rods in the video clip located at the very end of the article! (For disconnecting the rods or, as they say, knocking them out, see “0:00 to 5:10 min”)
3) Now take a wrench in your hands and, at the bottom of the car, use it to unscrew all the nuts of the bolts that secure the steering gear to the car body. (The operation is performed with the fender liners removed, so remove them if they are installed on your car)
Note! Unscrew the nuts carefully and use two wrenches, one of which will hold the bolt itself from turning, and with the other, unscrew the nuts themselves. There are washers underneath all of these nuts, so be careful not to lose them!
4) When the nuts are unscrewed, holding the steering mechanism itself with your hand, remove all the bolts and remove all the nuts, and then try to release the steering gear as it will hang on the car body.
Note! Adjusting shims can also be installed on the bolts, thanks to which the ratio of the two shafts is set, so if you have these shims, then be sure to mark them and when installing a new shaft, install them in the same places where they were before!
5) Then stand up and then move into the engine compartment of the car, and there remove the steering mechanism by grasping it with your hand and pulling it upward towards you.
Installation: 1) Installation of the new steering shaft is carried out in the reverse order of removal, but in order for the installation of the new shaft to be successful, you need to know a few things:
- When you tighten all the bolts and nuts, do not tighten them all the way, just screw them on and that’s it.
- After this, get into the car and turn the steering wheel first to the right by 2-3 turns, and then by the same amount to the left, thanks to which the shaft and the mechanism itself will take the correct position.
- But after the operations have been completed, tighten all the bolts and nuts until they stop and then install all the remaining parts in the reverse order of removal.
How to easily and safely replace the steering wheel?
The operation of replacing the steering wheel is not particularly difficult, but safety precautions must be observed. The basic steps on how to remove the steering wheel have been described above, but in some cases the following tips may be needed:
Method #1. If the steering wheel sits firmly on the shaft and cannot be removed, then it is necessary to loosen the steering wheel nut as much as possible, but leave it one turn (to protect the teeth, nose and other parts of the face). Then sit in a chair and sharply and evenly hit the steering wheel with your palms from below, upward along the steering axis. After several such impacts, the steering wheel should fly off the shaft.
The main thing is to remember to leave the nut on one turn!
Method #2. To remove the steering wheel, you can use an old Zhiguli jack. The base of the jack needs to be rested against the steering shaft through a wooden spacer, wrap a rope around the steering wheel and throw it over the top of the jack. A piece of cloth (rag) should be placed at the point where the rope comes into contact with the steering wheel so as not to scratch the steering wheel. Next, gradually pull with a jack and remove the steering wheel. Do not forget to completely unscrew the steering wheel fastening nut, since in this case the steering wheel itself will gently “come off” from the shaft.
Replacing the VAZ 2101 steering gear: how to do it yourself
Do you need to replace the VAZ 2101 steering gear, but don’t know how to do it correctly? Then this article is for you. The fact is that the gearbox, consisting of a worm mechanism, wears out over time, and the free play (play) of the steering wheel increases many times. For this reason, it is necessary to replace the VAZ 2101 steering gear, or make adjustments if possible.
- What is needed to carry out the replacement?
- Replacing the VAZ 2101 steering gear
- Adjusting the VAZ 2101 gearbox
- conclusions
To repair the VAZ 2107 steering gear or replace it you will need:
- set of wrenches;
- beard;
- screwdriver;
- hammer;
- vice;
- mandrel or similar-sized pipe section;
- rags.
Independent work is completely justified economically, since as of March 27, 2022, replacing a unit in car services costs an average of 2,400 rubles. Plus 450 rubles for adjustment. So the work costs as much as a new gearbox.
But you should start working only if the car owner clearly understands how to repair the unit. Below is the sequence of operations in the text.
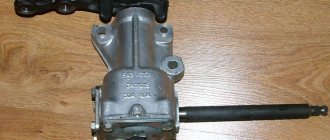
Removing the steering gear
If the adjustment did not help solve the problem or it reappeared after a short period of time, then it is time to repair the steering gear. This is a complex process and first you need to purchase a repair kit, which will include oil seals, bushings, O-rings and other components. Repair is divided into the following stages: dismantling; disassembly, cleaning, replacement; installation back. The main problem and difficulty is removing the steering gear from the engine compartment. Remember, you should not try to remove the bipod from the gearbox while it is under the hood, it is sometimes tightened so that it breaks the keys. It is better to remove it together with the bipod, knocking out the steering rods.
And already at the workbench, punch it with a hammer and easily remove it. To remove the tie rods, you first need to remove the front wheels. Then turn the steering wheel to the extreme left position and knock out the right rod with several blows of a hammer, then turn the steering wheel to the extreme right position and knock out the left bipod. You need to hit not from above, but from the side of the bipod. For easier knocking out, soak everything with WD-40 the day before work. But it’s better to use a puller, it will simplify the task. Don't forget to loosen the nut a little. Next, unscrew the bolt on the steering column so that it comes out of the splines. Now you can unscrew the nuts on the steering gear and pull it out.
Replacing the steering column of a VAZ 2107
Despite its simple and reliable design, the VAZ 2107 steering column is subject to wear, like any car parts and mechanisms. Over time, malfunctions may appear, of which creaking when turning the steering wheel is the most harmless. If problems are not identified and corrected in time, they may get worse. It may all end with the car stopping responding to turning the steering wheel. The probability of an accident in this case is almost 100%. Therefore, you should monitor the condition of the steering column and, if necessary, repair or replace it to ensure the absolute performance of this unit, which is critical for traffic safety.
- Steering column device
- Malfunctions of the steering column of VAZ 2107
- Replacing the steering column of a VAZ 2107
- Remove the steering shaft housing.
- Remove the wire block from the ignition switch.
Remove the ignition switch. - Remove the steering column switches.
- Remove the steering shaft clamped in the column.
- Using a 30mm socket and a powerful wrench, unscrew the steering column mounting nut. The tightening force here is significant, so the knob must be a fairly long lever. If you can’t unscrew it, you can lengthen the knob by putting a piece of pipe on it.
- Unscrew the 3 bolts securing the column to the body. The procedure is not easy - the distance between the parts and the body is too small, the bolts are difficult to keep from turning. A handle with a ratchet will come in handy here, which will speed up the process.
- Remove the column from the shaft. To do this, you need to knock the column off the tie rod splines using a pry bar. This must be done in jerks, resting your feet on the body.
- Unscrew and remove the shaft seal installed at the bottom of the column.
After dismantling the old column, it is necessary to clean the seat from dirt. Before installing a new column, you should check the condition of its hinge joints and needle bearings. If everything is in order, you can begin installation, which is done in the reverse order of removal.
When installing a new VAZ 2107 steering column, you must pay special attention to ensure that all fastening bolts and nuts are well tightened. Considering how important this unit is for driving a car, play, and even more so, slippage of the steering column splines can lead to tragic consequences.
When installing the steering wheel, pay attention to the position of its spokes.
After completing the installation of parts and connecting the wire block to the ignition switch, you can connect the battery. Column replacement is complete.
Symptoms of faulty steering rods VAZ 2101 - 2107
- A knock from the front suspension is a rather unpleasant symptom, especially noticeable when driving over small bumps at moderate speeds. Although the appearance of a knock from the front suspension may indicate a malfunction of other suspension elements - ball joints, stabilizer struts, silent blocks, etc.
- Increased free play of the steering wheel. Here I think it’s clear that this is visible when the wheels remain motionless when turning the steering wheel. This also makes it difficult to control at high speed; you often have to steer while maintaining the course.
So how can you determine if the steering rods are faulty? I will not consider the special devices that professionals use when diagnosing a malfunction; we will consider the old but true methods. The first of them is to place the car on a flat area, preferably in a hole, just take the rod with your hand and turn it along the axis - if you can turn the rod with your hand, then quickly replace the rod. Another method is to turn the steering wheel back and forth and at the same time rest your foot on the wheel - if the tips are faulty, you will feel clicks and gaps, this is difficult to explain, you have to try. The last method I know of is with an assistant, the assistant rocks the steering wheel in both directions, and meanwhile you take the joint being tested with your hand and feel the presence of a gap - adjacent rods do not move synchronously. If there is a gap, then the tips need to be replaced.
Replacing tie rod ends for VAZ 2101 - 2106
Replacement is not a very difficult operation, but requires certain skills. You can go two ways: use a factory puller; knock out cravings using improvised means. The puller is designed to make it easier to remove the steering tip pin from the swivel wheel bipod, which sticks and is clamped very tightly in the cone during prolonged driving.
Tie Rod End Puller
Using the puller is quite simple - it is put on the head of the tip and by screwing in the bolt, the pin of the steering tip is squeezed out. This process can be facilitated by pre-treating the joint with a liquid like VD-40 or by tapping the bipod through a powerful attachment at the point where the finger enters with a hammer.
The second option is to load the steering rod with force using a crowbar and sharply hit it with a hammer (possibly with an attachment, as it suits you) on the bipod of the steering knuckle. Do not overdo it, there is a possibility of damage to the bipod.
Hit here with a hammer
This knocks out both the inner and outer tie rod ends. After the rod is removed from the car, the necessary measurements must be made to avoid the need to adjust the wheel alignment.
Necessarily! It is necessary to measure accurately!!! the distance from the coupling to a certain point on the tip chosen by you, also, as an option, you can count the number of threads to the coupling. The main criterion is to ensure the same measured lengths on both the old tip and the new one.
Measuring tips
After measuring the tips, you can disassemble the rod, release the coupling clamps, and unscrew the tip from the coupling. To facilitate this process, you can pre-treat these connections with lubricant. After removing the tip from the coupling, a new one is screwed in its place, do not forget that it must be screwed in until the previously measured size is obtained. The second one is replaced in the same way.
After completing the replacement of the tips, you must carefully and tightly tighten the clamps, install the rod in place, tighten the nuts with the required torque and tighten them.
Mechanism design
To repair the steering column on a VAZ 2107, you first need to understand its structure, as well as the principle of operation.
The seven is in many ways similar to the “penny”. Therefore, the device and design received minor changes. The structure includes:
In turn, the steering mechanism consists of:
- Composite shaft with cardan transmission;
- Steering wheel (steering column together with a steering wheel with a diameter of 520 mm);
- Worm gearbox of the VAZ 2107 steering mechanism.
The control system has the following components:
The outer rods include two parts, which allows you to change their size by adjusting the toe angle.
Tie rod/end set for VAZ 2107
The operating principle of the steering mechanism looks like this:
- The driver begins to rotate the steering wheel, the wheel size of which ensures that this task can be performed quite simply;
- By means of a composite shaft, a worm gear is activated, which reduces the speed;
- The steering mechanism is lubricated with special oil (TAD 17) poured into the gearbox;
- The worm gears rotate, which causes the double ridge roller to move;
- This, in turn, causes the secondary shaft to rotate;
- The tray mounted on the secondary shaft makes a turn and pulls the rod system behind it;
- These components influence the levers that synchronously rotate the wheels to the required angle specified by the driver.
Steering column repair
Due to constant friction in the steering mechanism, elements wear out, which indicates the need not only for adjustment of the unit, but also for possible repairs.
How to remove the gearbox
To dismantle the steering column on the “seven”, you will need the following tools:
- a set of keys;
- knob;
- heads;
- steering rod puller.
After preparing everything you need, perform the following step-by-step actions:
- The car is placed on a lift or inspection hole.
- Clean the steering rod fingers from dirt.
- The rods are disconnected from the gearbox bipod, for which the cotter pins are removed, the nuts are unscrewed and the pin is squeezed out of the steering gear bipod using a puller.
Video: replacing the steering column using the example of a VAZ 2106
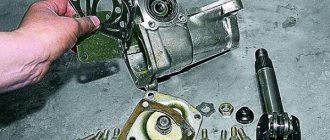
How to disassemble the gearbox
When the mechanism is removed from the vehicle, you can begin to disassemble it.
Tools you need to prepare:
The work is carried out in the following order:
- Unscrew the bipod nut and use a puller to press the rod off the shaft.
After disassembling the steering gear, it is troubleshooting. All elements are pre-cleaned by washing in diesel fuel. Each part is carefully inspected for damage, scuffing, and wear. Particular attention is paid to the rubbing surfaces of the worm shaft and roller. The bearings must rotate without jamming. There should be no damage or signs of wear on the outer races, separators and balls. The gearbox housing itself should not have cracks. All parts that show visible wear must be replaced.
Oil seals, regardless of their condition, are replaced with new ones.
Assembly and installation of the gearbox
When the faulty elements have been replaced, you can begin assembling the unit. The parts that are installed inside the crankcase are lubricated with transmission oil. Assembly is performed in the following order:
Comments
steering column
guys! That's the problem I have! I rebuilt the steering column myself and apparently I installed the shaft a little wrong. And that’s why my steering wheel turns to the right with a very small radius, and to the left with a large radius. Tell me how to install the shaft correctly, preferably in photographs.
Login to leave comments
And what’s important is mandatory
And what is important, be sure to lubricate the cardboard gasket, which is placed under the cover with the adjusting screw, with sealant.. You may also encounter the problem of worm play after tightening the side cover; the metal plates have different thicknesses
Login to leave comments
Gearbox
The bipod is stuck to the shaft like a dog, the puller flies off, that is, I sewed it with a hammer and a sledgehammer, the effect is 0, only the metal breaks. Do you think it’s possible to cut it down carefully?
Login to leave comments
Replacing oil seals
If an oil leak is detected in the machine components, it is necessary to replace the VAZ 2107 gearbox seals.
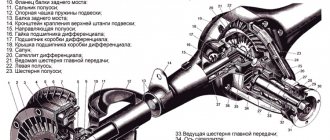
Replacing the cuff of the drive gear of the rear axle gearbox of a VAZ 2107
Rear axle malfunctions due to oil leakage:
| Malfunction | Elimination method |
| Continuous increased noise when the rear axle is running | The oil level is restored and the seals are checked for leakage. If necessary, replace the rear gear oil seal on a VAZ 2107 |
| Noise occurs when accelerating the car | The oil level is restored and the seals are checked for leakage. If necessary, the rear gearbox seal of the VAZ 2107 is replaced. |
| Damage to sealing gaskets leading to oil leakage | On a VAZ 2107, replacing the rear gearbox oil seal in other components of the vehicle. |
To replace the VAZ 2107 gearbox seal on its drive gear you will need:
- Wrenches for “13” and “24”.
- Screwdrivers.
- Calipers.
- Torque wrench.
- Dynamometer.
- Mounting blade.
- Durable cord.
Instructions for removing the cuff
- Replacing the oil seal in a VAZ 2107 gearbox begins with draining the oil from the crankcase mounted on the rear axle . After this, the plug on the oil drain hole is screwed back on.
- Both axle shafts are removed from the beam on the rear axle.
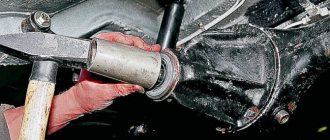
- The four nuts are unscrewed and the bolts connecting the universal joint flange and the drive gear flange are removed. To fix the cardan (see VAZ 2107 repairing the cardan on your own) from turning, it must be held with a mounting blade.
- The flanges are separated using a screwdriver.
- A strong cord is wound around the drive gear flange. To do this, you need to make several revolutions of the shaft. Then, while winding the cord using a dynamometer, check the moment of resistance when turning the drive gear. Its meaning is remembered. This is very important when replacing the rear axle gearbox seal on a VAZ 2107
- The nut holding the drive gear flange, which is secured with a special key, is unscrewed and the flat washer is removed.
Fixing the flange when unscrewing the nut
- The flange is removed.
- The drive gear oil seal is removed from the crankcase neck of the assembly, for which it is pryed off with a screwdriver.
Removing the oil seal from the crankcase neck of the unit
Installing a new oil seal
- The seat is cleaned of traces of corrosion.
- Litol-24 lubricant is used to lubricate the working surfaces of the crankcase of the new cuff.
- The oil seal is put in place and pressed into the gear housing through a mandrel with light blows of a hammer. The oil seal must not be skewed. The pressing depth is 1.7 - 2 millimeters from the end of the crankcase.
Tip: If there is no mandrel, you can use a piece of pipe or a ring of a faulty bearing of a suitable diameter.
- After the oil seal on the VAZ 2107 gearbox has been replaced, the drive gear flange and washer are installed.
- The flange is held with a special wrench and the nut securing it is tightened. The tightening torque depends on the moment of resistance of the drive gear to turning, and is equal to 117 - 254 Nm. It is necessary to start tightening with a smaller torque, periodically checking the resistance moment of the nut being tightened.
Replacement
This must be done in the following sequence:
- We disconnect the negative terminal of the battery just in case.
- Carefully, using a screwdriver (preferably the screwdriver slot is small), pry up the “Lada” badge in the middle of the steering wheel, which is a plug, and pull it out. As a result, we see a 24 nut inside.
- We put the steering wheel in a position so that the wheels “look” straight.
- We take the head of the required size, insert it into the extension, and then put it on the nut. We insert the crank into the extension, rest our knees on the steering wheel so that it does not turn when unscrewing the nut, and with a sharp movement of the crank counterclockwise we try to twist the nut. I don’t recommend unscrewing the nut completely, because... The steering wheel sits firmly on the shaft and, if removed abruptly, can hit you in the chest painfully.
- Then we take the steering wheel in both hands and rock it, from side to side, pulling it up. Moreover, it is desirable that the range of movements be frequent. When our steering wheel hits the nut, unscrew it completely and completely remove the steering wheel from the shaft.
With these simple manipulations and using a simple tool, you can remove the steering wheel on a VAZ-2107.
After removing the steering wheel, you need to inspect the copper horn contact located on the steering column. If necessary, clean it and bend it.
If your horn does not work, you must first remove the steering wheel in the sequence indicated above, and only then unscrew the screws on the back of the steering wheel to remove the panel along with the fasteners and contact plate, placing the steering wheel on the workbench.
Because it is easier to do this in the public domain than to look for holes by touch in the limited space of the car interior. And, as a rule, the sound signal does not work precisely because of the contact that is located on the steering column, so it may not be necessary to completely disassemble the steering wheel.
Good luck to everyone and safe driving!
We recommend: How to repair car air conditioning pipes with your own hands
Repair of VAZ 2104 steering
Withdrawal. Disconnect the wires from the battery and remove the signal switch by carefully prying the three tabs from the bottom through the windows with a screwdriver.
Remove the steering wheel. Remove both halves of the steering shaft cover.
Note. If it is necessary to remove only the steering gear housing, unscrew the bolt securing the lower end of the intermediate steering shaft to the worm shaft and the bolts securing the housing to the body side member.
Remove the instrument panel and disconnect the plug blocks of the three-lever switch from the plug blocks of the wire harness.
Disconnect the wires from the ignition switch terminals and, by unscrewing the fastening screws and pushing in the lock latch, remove the ignition switch. Loosen the clamp securing the housing of the turn signal switch, headlights and windshield wiper and remove it.
The basic principle of the steering rack, its types
The simplest design consists of a gear mounted on the steering shaft, a steering rack and tie rods connected to it. However, the design of the steering in modern cars varies, it depends on the presence of amplifiers. The following options are installed in modern cars.
Mechanical steering rack device
This is the simplest configuration of the mechanism, in which the steering wheel moves only due to the driver’s efforts. The main components of such a mechanism:
Their task is to limit the movement of the rack from the right edge to the left. Source
Design and principle of operation of the steering gear
All gearboxes have a housing made of cast iron or welded steel. The housing contains transmission elements - gears, shafts, bearings, etc. Sometimes the gear housing may contain devices for lubricating bearings and gears.
Today, there are many types of gearboxes known. They can be classified: by type of transmission (worm and gear); by type of gears (bevel, cylindrical, bevel-cylindrical); by the number of stages (single-stage, two-stage, etc.); depending on the features of the kinematic scheme (with a deployed coaxial scheme or with a bifurcated stage); depending on the location of the shafts in space (horizontal, vertical).
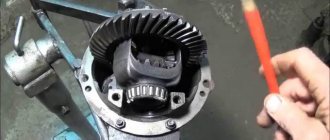
With all the variety of designs, cars are most often equipped with worm gearboxes. Such gearboxes transmit torque using a worm gear, the main elements of which are a worm screw and a toothed worm wheel. Worm gears are used in all steering gears today.
The worm is a special screw made of durable materials and having a trapezoidal thread profile. A worm wheel is very similar in appearance to a regular gear wheel, but the threads on such a wheel are carefully adjusted to the shape of the threads of the mating worm. Typically, gears for heavy-duty worm gearboxes are made from two different materials. The raw material for the core is any inexpensive and at the same time durable steel (or ordinary cast iron), and the teeth are made of high-strength anti-friction materials. Due to its design, the worm gear is effective in applications that require high torque combined with low angular velocity.