What does it consist of?
The starter is an electrical machine with a fairly large power consumption. When starting, it receives power from the battery and is the main consumer that can quickly discharge it.
The starter has a common design with a brush-type DC motor.
Its main parts are: stator, rotor, brush holder and brushes, bendix, solenoid relay.
All of them are involved in the operation of the starter and the failure of one element will lead to its complete stop.
Photo gallery
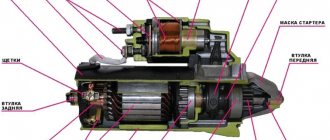
As we promised at the beginning of the article, we present to your attention a more detailed diagram of the device indicating all the components of the design.
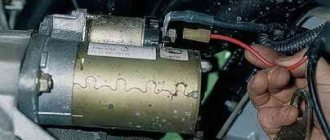
Photo 1. Design with designation of components
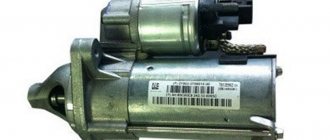
Photo 2. Designation of component parts
Photo 3. Designation of component parts
Principle of operation
- When you turn the ignition key, voltage appears on the coil of the solenoid relay, which attracts the core.
- The core pulls the bendix out of the starter housing and engages it with the flywheel.
- As soon as the bendix engages the flywheel, a short circuit occurs, voltage is applied to the brush holder and causes the starter rotor to rotate.
- The rotor begins to rotate the bendix through the gearbox, thereby rotating the engine crankshaft and starting it.
- As soon as the engine starts, you release the ignition key, the voltage disappears on all elements of the starter and the retractor, under the influence of the return spring, disengages the bendix from the flywheel.
Removal
Before work, the car should be placed on a lift (possibly on an overpass).
- We disconnect the on-board network by removing the terminals from the battery terminals.
- Now we achieve the position of the piston located inside the first cylinder at top dead center. To do this, we rotate (as the clock progresses) the crankshaft, grasping the bolt of its pulley with a suitable wrench. Reaching TDC is checked by matching the marks present both on the surface of the shaft pulley itself and on the back side of the timing cover.
- Now both shafts (camshaft with crankshaft) should be fixed so that the achieved position of the piston is not disturbed.
- Removing the protective cover of this unit is carried out using a “10” key.
- We also dismantle the generator belt drive pulley.
- We move on to the tension roller and loosen its nut using a wrench set to “17”.
- The timing belt can be removed along with the indicated pulley. Let's do it.
Important! When traces of uneven wear are found on the working surface of a dismantled belt, this indicates the need to replace the roller itself along with its pin.
Basic faults
The starter has several basic faults that occur quite often.
- Battery;
- Solenoid relay;
- Brushes;
- Bendix;
- Rotor and stator windings;
battery
If the starter does not rotate or clicks appear when you turn the ignition key, then the battery is most likely discharged. If the battery is charged, you should check the condition of the marks on it. Poor contact or oxide on the stamps will interfere with starting the car, since the starter requires a large current to rotate the engine, and weakening the contact of the stamps or their oxidation will increase the resistance, which will make it impossible to start the internal combustion engine.
Retractor
If, when you turn the key, the starter rotates but does not start the engine, then the culprit is most likely the solenoid relay. The main culprit for relay failure is a break in its winding.
Brushes
Brushes are the most common starter element that fails. If they wear out, starting the engine is impossible, since they do not provide contact with the rotor commutator. When the brushes are worn down to 4 mm, they must be replaced.
Bendix
The Bendix is a type of overrunning clutch that engages the gears with the flywheel. Its failure is a mechanical failure of the starter. It is impossible to repair it, just replace it with a new one.
Windings
The winding fails due to increased currents generated when the engine starts in cold weather or when the bendix jams. The wire wound on laminated steel simply cannot withstand such current surges and breaks. This can be solved by replacing the rotor or stator, and best of all the starter.
Lada Priora starter relay and fuse where is it located?
No one will definitely like to sit and try to start a car for a long time. To prevent this from happening, it is important to regularly inspect and prevent the machine, that is, to fully care for it. The Lada Priora is no exception.
Every experienced car owner understands that timely prevention does not always protect against trouble. When a power unit refuses to start, this is always an alarming signal that indicates a breakdown of some system.
The car owner should know how the engine starts, and this will help reduce the risk of failure to start to a minimum. Among other things, this will save your time in identifying the cause of the breakdown and save your money in case you decide to contact the service for diagnostics.
Article and price
Below is a table with the article number and cost of the original starter and its analogues.
| Factory models | |||
| Manufacturer | Power, kWt) | vendor code | Price (Rubles) |
| AvtoVAZ | 1,4 | 21100370801002 | Up to 4000 |
| AvtoVAZ | 1,8 | 5702370815 | Up to 4100 |
| Good analogues of factory models | |||
| Lauber | 1,4 | 221182 | Up to 6200 |
| Bosch | 1,4 | 986023780 | Up to 7300 |
| Bosch | 1,8 | 1108203 | Up to 11000 |
| Motorherz | 1,8 | STB1182WA | Up to 4800 |
Installation of a new belt on Lada Largus
- First, we put the new component on the crankshaft pulley.
- Now we hang (pulling by hand) the timing belt on the toothed pulley of the cooling circuit pump.
- Next, we move to the camshaft and hang the timing belt on the pulley in the same way.
- We wrap the remaining section along with the slack behind the tension roller.
Now you need to tension the belt drive.
- To do this, turn the roller itself in a counterclockwise direction and fix it with a bolt.
- We fix the indicated bolt of the generator pulley in place. We rotate the crankshaft until the marks on it and the camshaft coincide.
After making sure that the installation procedure is correct, we install the protective casing.
DRL on Largus
Replacement
Work on removing and installing the starter can be carried out without a higher education as a mechanic. Using the step-by-step instructions below, anyone who has ever held a key in their hands can cope with the task.
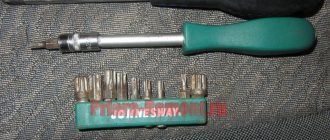
Necessary tool
- Phillips and flat head screwdriver
- Ratchet, extension and socket for “13mm” and “15mm”
- Open-end wrench for “10mm” and “13mm”
- Penetrating lubricant (WD-40)
- And the desire to repair your own car with your own hands.
Step-by-step replacement instructions
Work can be carried out both from the inspection hole and from above. We will consider the option of doing the work from above, as it is simpler and more convenient. And not everyone has an inspection hole.
- First of all, disconnect the negative terminal of the battery and remove the air filter housing along with the mass air flow sensor.
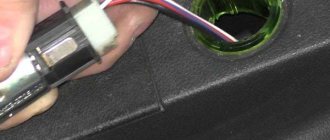
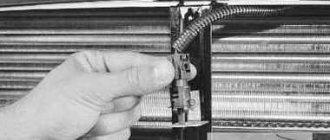
- Then, on the solenoid relay, use a 13mm open-end wrench to unscrew the power wire and remove the “mother” chip from the relay (marked with red arrows in the picture).
- Using a ratchet with a 13mm socket and an extension, unscrew the two starter mounting nuts. Below and above.
- Next, we remove the starter from the engine compartment and inspect it.
- We install it in the reverse order and check its functionality by test running the car.
Replacement from under the bottom of the car is similar to the instructions outlined above, but only to carry out work from an inspection hole or overpass it is necessary to remove the engine crankcase protection.
Starter device VAZ 2110 injector 8 valves
Lada 2110 8v tweet.
VAZ 2110 8 valve 2010.
VAZ 2110 engine injector for 14,500 rubles.
Advertisement for the sale of 8 valve engine VAZ 2110 / 2111 / 2112 in Saratov…
Logbook Lada 2110 is no longer stock). I decided to change the engine)
The ignition system of the 2110 engine is an injector.
Turbo VAZ 2110 8 valves.
VAZ 2110, 2002, 72 thousand km, 5500 USD
Buy injectors for VAZ 2110 8 valves.
The engine is in perfect condition, mileage after replacing rings and consumables is 234...
Lada 2110 8 valve.
VAZ 2110 2001 buy in Stavropol.
...VAZ 2109 Mechanical 2000 95000 km 1499 l 68/5600 Avito buy engine...
Buy VAZ 2110 1.6 8-valve Price 6300 USD
VAZ 2110 engine.
Control points of the VAZ 2110 body.
Photo VAZ 2110 8th grade.. engineer.
Selling very urgently VAZ 2110 16-cl injector overhaul of the engine in... mechanical...
Repair of VAZ 2110 8 valve engine with your own.
Selling VAZ 2110 1.5 engine 8 cl.
Repair of VAZ 2110 8 valve engine with your own.
VAZ 2110 8 class. 2005.
Replacement of valve oil seals for VAZ-2110, -2111 engines.
Do-it-yourself VAZ 2110 engine repair 8 valves injector video.
Selling a VAZ 2110 Injector, 8 valve in good condition.
Lada 2110 8 valves.
How to remove the ceiling trim on a VAZ 2110.
The VAZ 2110 engine is in excellent condition.
How to remove the belt?
- Before performing actions, we determine the position in which the camshafts are present.
- For this purpose, we dismantle the air intake manifold resonator and remove the plugs that are present in special openings on the left end of the block head. It is convenient to remove the plugs using a screwdriver.
- Now, by rotating the crankshaft, we reach the position of the camshafts when their marks on the ends of the gears coincide with the upper plane of the head surface (viewed from the end of the engine).
- To immobilize the camshafts, we use a device installed in the corresponding grooves on the designated shafts.
- To check the correct position of the crankshaft, we resort to the hole located under the oil pressure monitoring sensor inside the unit. In normal mode, this hole is closed with a plug.
- After turning the protective plug into the hole, we screw a control bolt, the length of the threaded part of which is 75 mm, and the size and type of the thread itself is “M10”. If the crankshaft is in the correct position, then we see the possibility of completely screwing in this bolt, which will subsequently rest against the surface of a special pad located on the shaft. This action will also help secure the shaft from the risk of turning during repair operations.
- Now we loosen the tension on the belt drive. For this purpose, we “arm ourselves” with a size 13 wrench and loosen the nut securing the tension roller. We relieve tension in the belt by turning the designated roller against the clock.
- The loose belt is completely removed from the LADA Largus.
- Next, we take advantage of the opportunity to remove the tension mechanism and support roller (we also replace them). To dismantle the roller itself, we use a Torx wrench with size T50 in our tool kit.
Belt attachment in a 16-valve Largus unit
We carry out installation using the reverse algorithm.
- The roller paired with the tension mechanism, as noted, is replaced with new analogues.
- We hang the belt on all the pulleys. Note that the last step will be to attach this consumable to the tension roller.
- The tensioning component is installed on the stud of the LADA Largus cooling pump. To do this, insert the bent edge of the device bracket into the corresponding groove made on the pump body.
- Now it’s time to unscrew the control bolt from the previously marked hole and remove the locking bar with which we previously locked the camshafts.
- We rotate the crankshaft a couple of full revolutions until the grooves made on the end sections of the camshafts align.
- We check the correct position of the shaft again by screwing in the control screw. If everything is correct, then remove the bolt and close the hole opening with the indicated plug.
- We proceed to the installation of all previously removed components and parts.
We remind you! When hanging a belt, we use hints in the form of arrows printed on the product, because they are oriented along the clock, which is very important.
The procedure for installing a belt on a 16-valve K4M engine can be viewed in this video:
Required Tools
In order to remove or install the starter on a Priora, you will need the tools from the table below.
Table - Tools required to replace the front strut
| Name | Note |
| Spanner | "at 13", "at 15" |
| open-end wrench | "at 13", "at 15" |
| Pliers | Can be replaced with pliers |
| Screwdriver | With a thin flat blade |
| Silicone Grease | If you plan to remove the air filter |
| Head | "at 13" |
| Vorotok | With extension and ratchet |
| Penetrating lubricant | For example, WD-40 |
| Rags and wire brush | To clean dirt |
Replacing the starter on a Lada Priora can be carried out without access from the bottom. If you don’t want to remove the air filter and the wires going to the sensors, then you can dismantle and install the unit from underneath. In this case, you will need an inspection hole, overpass or lift to access the place where the starter is located.
How to replace in the 16-valve version?
The preparatory process is similar to the previously discussed procedure.
- After hanging the car and de-energizing the on-board network, we dismantle the crankcase protection.
- We install a suitable support under the LADA Largus engine.
- Using a 19-size wrench, we dismantle the right engine mount.
Let's act carefully! The bolts of this support have different lengths, so we remember their original position in order to prevent confusion during assembly.
- We remove both timing belt protection covers.
- We resort to the need to block the crankshaft.
Recommendation! The locking itself can be accomplished by activating the 5th gear of the transmission unit while simultaneously pressing the brake pedal assembly. Sometimes you can remove the crankshaft sensor and insert a flat-head screwdriver into the window that appears on the gearbox housing, which with its “sting” will rest against the flywheel between its teeth.
- The auxiliary drive pulley is dismantled by simply unscrewing the bolt. You will need a key for “18”.
- Before directly removing the belt drive, we install the piston inside the first “boiler” in the traditional TDC position. To do this, you will need to rotate the crankshaft by grasping the bolt of its pulley.
Attention! The “K7M” and “K4M” motors have a numbering for their “pots”, which starts from the flywheel, and not traditionally from the timing drive unit.
Engines
The designers have provided three power units for installation on this car, these are two eight-valve VAZ 11189 and K7M from Renault, as well as a 16-valve French engine K4M. The working volume of these engines is 1600 cm3, which is considered optimal for this class of cars. The power of the VAZ engine is 87 horses, the French engine can produce up to 90 hp. With. Both power units have an injection power system and comply with Euro-5 environmental standards.
K7M
This French engine began to be installed on domestic cars after Renault acquired shares in an automobile plant in Tolyatti.
This engine became the next in a series of modifications to the K7 series engines; its piston stroke was increased, rocker arms were added to the valve mechanism, and the diameter of the clutch and flywheel was increased. Average fuel consumption is approximately 7.2 liters per hundred kilometers.
Manufacturers declare a service life of 400 thousand km, but repairs often occur at 350 thousand km. The motor is combined with a manual gearbox having 5 stages.
VAZ 11189
This is a higher quality and modified VAZ 11186, which is installed on other VAZ passenger cars. It also has an injection power system and can deliver up to 87 hp. With. Its cost is lower than that of a French engine, which is why it is installed on most cars.
The average fuel consumption of the VAZ 11189 is slightly higher, it is equal to 8.2 l/100 km. As a disadvantage, experts note the shorter service life compared to the French engine, it is equal to 200 thousand km. Both engines bend the valves when the timing belt in the timing drive breaks.