- The fuel gauge shows either a full tank or an empty one.
After starting the engine, after 5-10 minutes the revolutions begin to fluctuate.
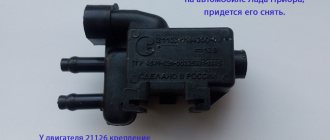
The valve is very cheap. Therefore, it is possible to change if signs of improper engine operation are detected. You can also replace the adsorber filter element with your own hands: disassemble it, pour out the old coal, pour in new coal in large granules.
What happens if you remove the fuel vapor absorber valve
Is it possible to remove the valve completely? Some people do this, thinking that because of the valve, fuel consumption increases and the car accelerates more slowly.
In fact, if the adsorber and valve are working properly, then the internal combustion engine, on the contrary, works like a clock and the consumption is at the optimal level. The savings are not as noticeable from burning off the remaining fuel vapor, but there is also less choice for the atmosphere.
To the question, is it possible to remove the absorber valve completely? Answer: yes, you can. The engine is not affected by its presence or absence. It only affects if it is installed and faulty.
Disadvantages of a car without a valve and absorber:
- the smell of gasoline in the cabin;
- environmental pollution;
Advantages of a machine without valve and absorber:
- there is more space under the hood (this may be important to some);
- no need to change the absorber and valve.
Owners of carburetor cars, I think, remember how the car’s interior often smelled of gasoline, which is why some people get headaches. For this alone, it is better not to remove the valve and absorber, but to replace them in a timely manner in case of breakdowns.
Video
In this video, the VAZ 2107 adsorber: disassembly, malfunctions, removal. What happens if you remove the adsorber using the example of a VAZ 2107 injector. Adsorber in a car: why is it needed, how to check. Fuel consumption has increased. The reason is the purge valve. Mazda Demio canister valve (Mazda Demio).
Crankshaft sensor - design and principle of operation
The crankshaft position sensor or DPKV on the VAZ 2107 ensures engine operation (not stable, but overall). With its help, the ECU knows what position the crankshaft is in. From this, the control unit knows the location of the pistons in the cylinders, which directly affects fuel injection through the injectors, and the occurrence of a spark to ignite the fuel assembly.
The device in question has a simple design. The sensors installed on the seven work on the principle of inductance. The part consists of a metal cylindrical base with a wire wound on the surface (coil). The top of the coil is covered with a permanent magnet. The operation of the device is associated with a ring gear, which is attached to the crankshaft. It is with the help of this ring gear that the sensor records signals and transmits them to the computer. The principle of operation of the device is as follows: when the crown tooth is located at a level with the steel core of the DPKV, an electromotive force is induced in the winding. A voltage appears at the ends of the winding, which is detected by the ECU.
The gear wheel consists of 58 teeth. Two teeth on the wheel have been removed to determine the starting position of the crankshaft. If the DPKV fails, which is extremely rare, then starting the engine and its operation is simply impossible. The marking of the sensor, which is installed on the VAZ 2107, is as follows - 2112-3847010-03/04.
EVAP system components
The main components of the fuel vapor recovery system are:
Fuel tank
Has some expansion room at the top to allow fuel to expand on a hot day without overfilling or leaking the EVAP system.
Fuel cap
Typically contains some type of relief valve for ventilation on older vehicles (pre-OBD II), but is completely enclosed (no vents) on newer vehicles (1996 and newer).
Gas tank separator
Located on top of the fuel tank or part of the expansion tank. This device prevents liquid gasoline from entering the adsorber.
Gas tank separator
Liquid gasoline should not be sent directly to the canister because this would quickly overload its ability to store fuel vapor. The separator is relatively problem-free. The only problems that can occur is that the fluid return becomes clogged with debris such as rust from the fuel tank.
Some separators use a slightly different approach to prevent liquid fuel from entering the canister vent line. A float is installed inside the separator. If liquid enters the device, the float rises and the valve closes the tank vent.
If there is a blockage in the separator or in the vent line between it and the adsorber, the fuel tank will not be able to “breathe” normally. Symptoms include fuel starvation or a warped fuel tank.
If you hear a significant "poof" sound when you open the gas cap, suspect poor ventilation. You can check the tank venting by opening the cap and then disconnecting the fuel tank vent line from the canister. If the system is clear of any blockages, you should be able to blow through the vent line into the fuel tank.
Blowing out with compressed air can sometimes clear the blockage. If not, you will have to inspect the vent line and possibly remove the fuel tank to diagnose the problem.
Ventilation valve
The ventilation valve controls the flow of outside air into and out of the adsorber. In some vehicles it is called the Canister Closing Valve (CCV).
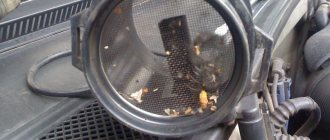
One side of the ventilation valve is connected to the adsorber. The other side is connected to a ventilation hose that has a filter or mesh at the end and is attached to the body or frame of the car.
On some vehicles, the vent valve is attached to the canister. In others, it is installed separately.
Ventilation valve
The ventilation valve is controlled by the engine control unit. Normally the valve is open. It closes when the controller checks the EVAP system for leaks.
Signs of sensor malfunction
The malfunctions described below may be signs of breakdowns in other components or mechanisms. However, if at least one of them appears, it is necessary, among other things, to check the functionality of the crankshaft position sensor; fortunately, this is not difficult to do.
So, signs of DPKV failure include :
- a decrease in the dynamic characteristics of the car (this is expressed in poor acceleration and acceleration, this is most noticeable in low gears);
- “floating” engine speeds, including idle (although this factor can also occur while driving, which is unfavorable when the car is moving evenly);
- increased fuel consumption;
- there is a risk of detonation during the development of significant dynamic loads;
- If the crankshaft position sensor is completely out of order, it is impossible to start the engine.
The described reasons, among others, are consequences of the special design of the DPKV, which is described below.
Sensor check
In order to make sure that the crankshaft position meter is working properly, it is necessary to check it. On injection VAZ-2107 cars, the crankshaft position sensor is located on the camshaft cover bracket.
There are 3 ways to check.
- The first way to check is to measure the resistance of the inductor. To do this, the sensor must be removed, having previously set marks that determine its correct position. Using a multimeter, you need to measure the resistance at the coil terminals. A resistance of 500 to 700 Ohms indicates the serviceability of the part. Lower resistance is a sign of failure.
- The second method will require measuring the inductance of the coil itself. To do this, you need a multimeter with a similar function. The measurement is carried out similarly to the resistance measurement. The performance of the part will be indicated by a value from 200 to 400 Gn.
- The third method is the most difficult, but also the most reliable. To check you will need an oscilloscope. The oscilloscope can be used either analog or digital. But for digital you will need a computer with accompanying software. The check is carried out while the engine is running. The test contacts of the oscilloscope must be connected in parallel to the coil leads. A straight line on the oscilloscope screen will indicate proper operation. Jumps, interruptions or waves on the screen will indicate a sensor malfunction.
A quick check can be done using a screwdriver and a multimeter. Connect the probes of the device to the coil terminals. Set the measuring device to the “continuity” position. Place a metal screwdriver in front of the magnetic core. While the screwdriver is in front of the core, the multimeter will show the moment the contacts open.
It is important to remember that before removing the part, you must disconnect the “-” terminal of the battery. Don't forget about setting tags. This will help you easily install the sensor and start the engine.
Knock sensor for VAZ 2107 car injector
Detonation is the explosive combustion of a mixture in internal combustion engines. To combat this phenomenon, a knock sensor is provided for fuel-injected VAZ-2107 vehicles. Earlier models without an electronic ignition system were not equipped with such components. The article contains information about where this node is located, what it is responsible for, and on what principle it operates. Methods for detecting and eliminating malfunctions in the knock sensor will also be given.
Engine diagnostics
Accurate identification of an engine malfunction and its elimination depends on the reliability of the data obtained. For this you will need good equipment. This includes:
- Engine testers;
- Scanners;
- Gas analyzers.
Reading the error code from the ECU is not everything. It is worth remembering that the data obtained may be unreliable . A sensor malfunction shown by the ECU does not mean that it really is. The problem also occurs due to wiring, poor contact. Therefore, the scanner can only read ECU information. Moreover, the scanner can be implemented as software; in addition, you will need a special adapter, and, of course, a computer.
What is the knock sensor on the VAZ 2107 responsible for?
Detonation is an extremely undesirable phenomenon. During normal operation of a vehicle engine, the flame front moves at a maximum speed of up to 30 m/s, and when the fuel detonates, the speed sometimes reaches 2000 m/s.
As a result of the impact of such force on the pistons, as well as the cylinder head (cylinder head), there is a high probability of serious damage after the car has driven 6,000 km.
Due to detonation, first of all, the gas distribution mechanism of the car (timing mechanism), as well as the piston group, suffers. To prevent this from happening, a knock sensor is used. The fuel mixture should begin to ignite before the piston reaches the top position. The ignition process must end when the piston returns.
During detonation, premature combustion begins before the moment when a spark occurs between the electrodes of the car spark plug. There is a strong impact on the piston, as a result of which the engine loses power, while fuel consumption increases significantly.
In the case of forced engines, detonation occurs at high speeds and can damage the engine in just a few seconds.
Detonation occurs for several reasons. Of them:
- the octane number of the fuel does not correspond to the recommended one;
- failure to comply with operating conditions;
- failure of the knock sensor.
Detonation sometimes occurs even when the ignition is turned off. The engine continues to run even though the spark supply has stopped. The reason for this phenomenon is the strong heating of the parts of the CPG, or, more simply, “glow ignition”.
Read, it may come in handy: Description of the fuel pump on the VAZ 2107
A feature of an engine with an injector is the ability to change the advance angle using a distributor. All modern cars are equipped with injection engines.
Video - causes and consequences of detonation
VAZ injector detonation is measured using an electronic system, the readings of which are displayed by a sensor (DS) on the dashboard. The main goal of DD is to control the detonation process in the vehicle cylinders. Inside the device there is a plate made of piezoceramics and a small resistor. Both elements of the VAZ-2108 or 09 are connected by a connecting block. The structure of the sensor is characterized by a broadband structure secured to a stud with a nut. Its diameter is 22 mm.
Symptoms of malfunction and performance check
The design of the knock sensors is almost the same; they are also identical in principle of operation. As mechanical stress increases, energy production increases. If the sensor operates normally, small electrical impulses are generated that are not passed by the resistor installed in the sensor design.
The cost of this element is usually low. The price differs depending on the quality of the sensor and the manufacturer. On average, it costs between 250 and 500 rubles.
Sensor malfunctions are quite capable of affecting the performance of the entire engine. If the sensor is faulty, the control unit immediately switches the engine to emergency mode. In order to identify a malfunction in time, you need to know the main signs of a breakdown:
- unstable engine operation when driving;
- reduction in power unit power indicators;
- increased fuel consumption;
- Difficulty starting the engine.
Signs of a faulty knock sensor on a VAZ-2107 are similar to all VAZ cars. Therefore, before replacing, it is necessary to check its performance.
To check and subsequently replace this element, you need to know exactly where the sensor is located, and also learn how to determine its serviceability.
In the VAZ-2107, the knock sensor is located near the exhaust manifold, structurally designed as a massive washer that is attached to the car engine with a bolt.
The knock sensor can be checked in two ways:
- technical
- mechanical.
Verification method Actions to be performed
| Technical | Measuring the sensor resistance with a device. If it is working properly, the indicator should be no more than 2 kOhm. |
| Mechanical | It is more efficient. To do this, you need to start the engine, then you need to take a small hammer and lightly tap the sensor. If the sensor is fully operational, a decrease in engine speed should be observed, since the control unit will interpret these actions as detonation. |
Replacing the sensor yourself is quite easy. You need to use a wrench to unscrew the bolt that secures the sensor to the engine, first disconnecting the wiring. After this, a new sensor should be installed in place of the old one.
As a result, it should be said that in order to prevent such a phenomenon as detonation in a VAZ-2107 car, you should periodically check the performance of the knock sensor (like all other sensors) and, in case of failure, immediately replace it with a new one. This way you can protect yourself from unnecessary financial costs.
Knock in the transfer case of the new Chevrolet Niva. Direct from the factory
If leaks occur, replace damaged consumables.
Domestic SUVs perform quite well on roads with different surfaces. But quite a lot of problems can arise with them. For example, a knock in the transfer case of the new Chevrolet Niva. This problem is not uncommon. Therefore, every owner of such a car should know the causes of this problem. Let's look at popular reasons When communicating with car owners, you can often hear the question of why the speed on the Chevrolet Niva does not drop. Operating the engine in this mode is undesirable for any car model; high speeds not only have an unpleasant effect on the hearing, but also lead to increased fuel consumption. Such a problem can arise suddenly, everything seemed to be working perfectly, and then suddenly a high idle appeared. Many drivers, both experienced and beginners, are very puzzled by this problem.
Why the speed on the Chevrolet Niva does not reset will be discussed in this article. Let's analyze all known variants of such a problem and ways to solve it. Many car owners, after such a malfunction occurs, seek help from specialists, but in most cases the malfunction can be fixed with your own hands. We will tell you what needs to be done for this in this article for everyone interested in this issue. Why do you need a properly set idle speed?
When it comes to a car, the concept of idling can be attributed to the operation of the engine when the gear is off or when the clutch pedal is depressed. In such cases, the engine runs without load, that is, there is no transmission of torque from the power plant to the drive wheels.
For different engines, idle speed can range from to rpm. If their indicator is less than the recommended value, the engine will stop when the clutch pedal is pressed. An increase in their number, in addition to a significant increase in gasoline consumption, leads to accelerated wear of engine parts
This is why it is so important to keep their number within the recommended range.
Idle speed adjustment is carried out by several components and assemblies installed on the vehicle. These include an injector, a fuel pump, and various sensors, which can be mechanical or electronic. This also includes the throttle valve, fuel pressure regulator and some other devices. The number of revolutions is greatly influenced by the opening angle of the throttle valve, which regulates the amount of air entering the engine power system.
The idle air valve also takes part in mixture formation, which is needed to provide air supply bypassing the throttle valve. In some cases, an increase in their number may be caused by an incorrectly adjusted gas pedal drive. Why the speed doesn’t drop There are quite a lot of reasons for the appearance of such an unpleasant phenomenon, let’s try to understand this issue together and decide how to get out of this situation.
Most often, in injection engines, speed reduction does not occur due to the fault of the throttle assembly, in which contamination occurs.
Coolant temperature sensor
A coolant temperature sensor is necessary to transmit readings about the temperature of antifreeze or antifreeze. It also participates in the formation of the fuel mixture necessary for engine operation. Creates a richer mixture while the engine warms up. This can be noticed by paying attention to the engine speed during the warm-up period.
Located between the cylinder head and the thermostat.
Signs of malfunction:
- There are no high speeds when warming up;
- Difficulty starting the internal combustion engine;
- High fuel consumption;
How to replace an adsorber on a classic
Removal: 1) At the beginning of the operation, remove the negative terminal from the terminal of the battery to which it is connected, if you do not know how to do this, then read the article called: “Replacing the battery on a VAZ”, in this article find the first paragraph, everything is described in detail in it .
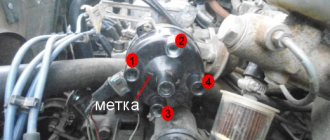
2) Now disconnect the wiring block that is connected to the canister purge valve as shown in the photo under number 1 and then, taking a screwdriver in your hands, completely unscrew the hose that connects to the pipe that comes from the purge valve (see photo 2).
Note! If you are unable to remove the hose from the pipe, then you can remove the purge valve itself, to do this, pry it from the edge as shown in the figure, thereby it will come out with the tendrils that are present on it (indicated by a red arrow) from engagement with the holes (indicated by a blue arrow ) into which these antennae rest!
When the valve is removed, start rotating it clockwise or counterclockwise (as is convenient for you) and thereby remove the hose from it at this time and move it aside so that it does not interfere with the removal of the adsorber itself from the car!
3) Then, using the same screwdriver, you will need to loosen the clamp and remove another hose, but only this time you will have to remove the vapor supply hose, which is located just below the hose that you previously disconnected from the purge valve.
4) After this, take a wrench and use it to unscrew the bolt of the clamp clamp that secures the adsorber itself (This means that it is secured by the clamp clamp, not the bolt) and when the bolt is unscrewed, remove the adsorber from the car by pulling it out through the top of the car.
Installation: This unit is installed in its place in the reverse order of removal.
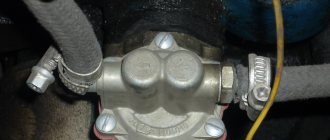
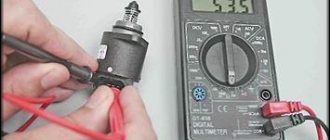
How to check the functionality of the canister purge valve?
Checking the absorber valve
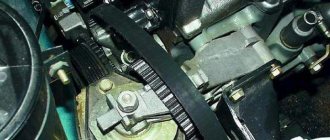
In order to notice and correct problems in time, regular checks of the adsorber valve are necessary. In this case, a breakdown can be identified by certain indirect signs. When the engine is idling or in cold weather, the vapor absorption system makes characteristic sounds, like the canister valve clicking. Some people confuse this sound with a faulty timing belt, rollers or other parts. You can check this by sharply pressing the gas pedal. If the sound has not changed, it means the canister valve is clicking. Experts can explain what to do if the canister valve knocks too loudly. To do this, you need to tighten the adjusting screw, and first it is cleared of epoxy resin.
The absorber valve can be adjusted.
The screw turns approximately half a turn. If you tighten it too much, the controller will generate an error. This adjustment of the adsorber valve will make its operation softer and the knocking noise quieter. However, how to check the adsorber valve for damage? Valve failure can be determined using an error diagnostic system or mechanical testing. Electronic error codes are stored in the controller's memory and indicate electrical damage. To check the valve, it is recommended to pay attention to errors generated by the controller, such as “open circuit of the canister purge valve control circuit.” Signs by which a malfunction of the adsorber valve can be mechanically determined:
- The appearance of dips at idle speed of the engine.
- Very low engine thrust.
- There is no sound of valve operation when the engine is running.
- A hissing sound when the gas tank cap is opened indicates a vacuum in the system. This is a sure sign of a malfunction in the adsorber ventilation.
- The appearance of a fuel smell in the car interior. However, its appearance can also be caused by other reasons.
Read, it may come in handy: Why does the VAZ-2107 twitch - let’s understand the operation of the “distributor”
Complete removal of the adsorber from the power system
Gas distribution mechanism (timing): device, purpose and principle of operation
Some VAZ 2114 owners decide to completely remove this part from their car for reasons of savings and to prevent future malfunctions. There are two ways to do this.
Method 1. After completely removing the adsorber from the VAZ-2114, the hose leading to the throttle valve assembly is closed using a plug. A fuel filter from any VAZ carburetor engine is inserted into the hose running from the gas tank to the adsorber.
Method 2. The adsorber is removed along with the support. The hoses previously connected to it are closed using plugs. A small hole (1-2 mm) is drilled in the standard gas tank plug to connect the cavity to the atmosphere. You can also use the cap from a carburetor “eight” or “nine” to depressurize the fuel tank.
After upgrading the power system, it may be necessary to update the firmware of the engine control unit, since it will perceive the absence of an adsorber as a malfunction in the engine and switch to emergency operation. This threatens to significantly reduce the traction qualities of the car.
The adsorber in the VAZ-2114 is an important element in the engine power system, which allows you to slightly reduce fuel consumption and eliminate the smell of gasoline in the cabin.
This adsorber has been bothering me for a long time, not because it got in the way or spoiled the aesthetic appearance. But it simply fell into disrepair, buying a new one in my opinion is a waste of money, especially since there was excess pressure in the tank, which indicates a problem in the gasoline vapor circulation system. Replacing the separator and valves did not lead to a satisfactory effect, although it became a little better. In winter there is no smell at all, only when opening the fuel filler cap there was a splash. In the warm season, the pressure increases and the smell of gasoline appears in the cabin. There is a simple way to solve this problem
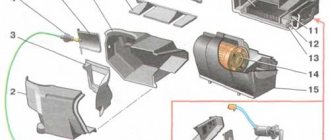
; Drill a hole in the lid to bleed air or do not screw it in completely. But this is all for the lazy, and I went a different route. Let's first figure out how the factory fuel circuit works
The diagram shows how a hose comes out of the tank to the separator (9)
from it to
the safety valve (8)
and
the gravity valve (7)
.
Further through the tube the route goes to the two-way valve (5)
and
the adsorber (4)
. The reason for the smell of gasoline is precisely a malfunction of the 9,8,7 system. Replacing the latter does not always lead to an improvement in the situation. Now we know that if we disconnect the adsorber, the problem with the smell will not go away; for this we need to redo the valve ring around the separator. After the modification, my system will look like this
In my opinion, this is much more correct than simply disconnecting the adsorber and attaching a heated filter from the carburetor fuel system to the hose.
Now to the point, the last photo for memory (when the work began the sun was shining, but this is no longer important)
Adsorber, a term coined from English, denoting a part of a vehicle responsible for absorbing combustion products by liquid (solid) bodies in a special container. The VAZ 2114 adsorber (some call it an absorber) uses activated carbon as an absorbing element, which is what the domestic model is filled with.
The adsorber is a complex mechanical joint, sold and installed on the car, according to the kit, from the following elements:
- the adsorber itself;
- purge valve;
- gravity valve;
- vapor separator;
- tubes: steam line, valve, adsorber;
- fuel drain pipe;
- additional hoses.
How to disable or remove the adsorber on a car and do you need to reflash the ECU?
You need to understand that when the adsorber is removed, the solenoid valve is turned off, which is directly connected to the controller and controlled by the latter.
What is the disadvantage of such a shutdown?
This will lead to error p0443, which we already mentioned above. The tubes are also muffled, in particular the one that goes to the intake manifold. The fact is that through the tube that goes to the intake manifold, air is constantly sucked in, even in idle mode, the so-called small purging of the adsorber occurs. At high speeds from 1500 – 2000 and above there is a lot of purging.
In the ECU firmware, constant air leaks and the flow of fuel vapor are taken into account when forming the air-fuel mixture, despite the fact that all this goes past the mass air flow sensor, the causes of the malfunction of which can be found out by clicking on the link.
If you plug the pipe, which many people do, a certain amount of air will not flow into the intake manifold bypassing the ECU, but the latter still takes them into account.
That is, the controller takes into account one volume of air, but another (smaller) one actually enters. As a result, the amount of fuel is generated by the ECU based on more air than is supplied. This leads to an over-enrichment of the air-fuel mixture.
As a result, the engine does not work correctly, because the mixture is constantly over-enriched where it is and is not needed, and fuel consumption increases.
It is also worth talking about the transient mode of operation of the engine, which can manifest itself when approaching an intersection, a traffic light, lying to a policeman, at the moment when the gas is released.
At this moment, a failure may occur - a decrease in speed below idle. The engine seems to choke, it doesn’t have enough air, the reason is an over-enriched mixture. After a few seconds, the situation is resolved electronically.
Therefore, it would be correct to disable the adsorber in the following ways:
- After removing the device, install a nozzle with a diameter of 1 mm into the tube that goes directly past the mass air flow sensor. This will, at least partially, solve the problem, since only air without gasoline vapors will be supplied in doses.
- The ECU is being reflashed (difficult). If it is impossible to remove the Check error, you may need engine chip tuning, which is expensive.
- Dismantling the entire system except the solenoid valve, which operates idle.
- By installing a resistor (valve emulation) in the electrical circuit at 200 - 250 Ohms and 2 watts. To do this, bend the legs of the resistor and insert them into the valve chip. We secure everything with electrical tape. But this doesn't always help.
Part 3 of 3: Check the car in motion
After you have successfully replaced the evaporative purge valve, you will need to test drive your vehicle. Hopefully you have a good memory of the symptoms that led to the replacement of the component, because the goal of the upcoming test drive is to make sure they disappear. In fact, after such a repair, a short trip is enough, since if the symptoms remain, they will appear when the engine starts or when it is idling.
The notes below are intended to help you perform a test drive or determine whether you have done the right job to replace a faulty part.
- Start the car engine. Let it warm up to the required temperature.
- Check the gauges on the dashboard. Make sure the check engine light is no longer on. If it still lights up, turn off the engine and perform a diagnostic scan. The error code should clear after performing this procedure on most vehicles.
- Turn off the engine. Once the check has shown that no warning lights are illuminated anymore, turn off the engine.
- Remove the fuel tank cap. This is done to check whether a vacuum is created in the tank. If, when removing the tank cap, a large amount of vacuum is detected underneath, then it is necessary to check that the hoses are connected correctly. Perhaps they were switched places.
- Take a test drive, namely 15 km on the road. When you return home, make sure the check engine light and other warning lights are off.
This job is fairly simple to perform, but since it involves the EVAP and fuel systems, it can be a bit tricky. If after reading these instructions you still do not feel confident to make this repair, please have a certified mechanic replace the canister solenoid valve and remove the fuel fumes.
Vote, did you like the article?