This part is one of the main ignition systems for gasoline engines. Great importance is attached to the coil because the air-fuel mixture, compressed by high pressure, can only be ignited by a spark from a spark plug. To break through the spark gap, a high voltage must be applied. Its value is more than 30 thousand volts. This voltage is generated by the ignition coil.
As the design of the car improved, changes occurred in vehicle ignition systems. Several types of coils have been developed and are successfully used to produce high-voltage voltage, but they cannot be called interchangeable.
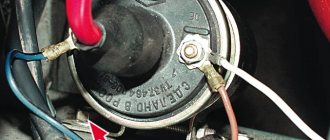
The photo shows a reel of Moskvich cars. A special feature of the product is the presence of an additional resistance connected in parallel to the primary winding. Used in contact ignition systems.
Increasing the power of the power unit required increasing the engine compression ratio, and this entails an increase in high voltage. Therefore, the spark generation system, including the coil, has changed. Further modernization of the product led to the appearance of products with four terminals of high-voltage wires, double, individual samples.
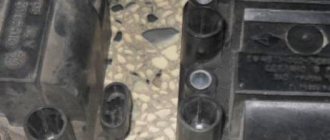
The appearance of the device of the VAZ 2108 family of cars shows the difference from the previous design.
Evidence of faults
It happens that this part creates problems for the driver and the car. There are two main signs of failure: misfire and inability to start the engine. Experienced drivers identify signs with their ears; they say the engine is “troubling.” Modern cars with an on-board computer signal a malfunction to the driver.
Misfire makes it difficult to get to the nearest service center, but in the event of a complete failure, this is only possible with a tow truck or tow truck. True, in cases where the motor serves several coils, if one of them fails, continued movement is possible, but you will have to forget about fuel economy and high speeds.
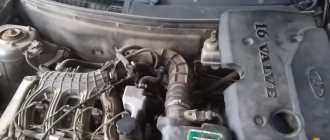
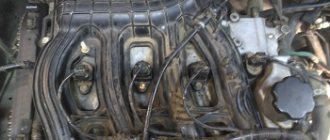
Replacing the coil with a 16-cl. engine
I think that there is no need to talk about the fact that VAZ 2110, 2111 and 2112 engines come in both 8 and 16 valves. In previous articles we have already looked at the process of replacing a module with an 8-cell one. motor. Today we’ll look at the example of another power unit - 16V.
On the one hand, this is convenient, and if one of them fails, you don’t have to change everything. On the other hand, maintenance is more expensive when replacing all these parts at once.
It’s quite easy to do the replacement yourself and for this you will need:
- socket head 10;
- extension;
- ratchet handle.
What to do in this case
The simplest thing is to replace the faulty part. There are drivers who carry such a part in the trunk; replacing it with your own hands is quite simple. In some cases, the ignition coil is repaired, but only if there is no interturn short circuit or winding breakage. Before replacing or repairing, you need to check the ignition coil.
This is done with a multimeter, a car tester, and a test light. A break in the windings, an additional resistor, or a short circuit in the turns is detected by measuring the resistance. An insulation breakdown or high voltage leak to the ground of the vehicle can be seen. Let's take a closer look at eliminating such problems.
When checking the serviceability of the high voltage source of the contact ignition system, you must not leave the ignition system on. This can lead to failure of the coil, since it receives a significant current.
About the repair of such parts.
Old models suffer from a problem when the additional resistance burns out. Such “grief” can be corrected with our own hands. To repair it, it must be dismantled; before doing this, you should remember the location of the suitable wires. The burnt-out additional resistor is rewound. A St0 steel wire with a diameter of 0.4 mm and a length of approximately 140 cm is used.
It should be wound on a core with a diameter of 0.5 mm. The finished spiral is riveted to the contact plates, placed in the groove of the ceramic plate, and filled with liquid glass or epoxy resin. A current flows through it, heating the spiral, so it is filled with compound. The winding resistance is checked with a multimeter; it should have a value of 1.25 - 1.4 Ohms.
What else can I recommend?
Modern products also fail and are also restored. The symptoms of breakdowns are the same; they can be determined visually or with a multimeter. Most often, high voltage breaks through. This problem can be easily fixed with your own hands. You need to buy a piece of heat-shrinkable tube with a diameter of 23 - 25 mm from a radio parts store. The faulty device should be degreased and the tube put on. Next, heat it in an accessible way to shrink it, then repeat the same with the second layer.
Many drivers wonder why sometimes a new part, for which a decent sum was paid, quickly fails. It’s difficult to give a definite answer, but it happens. As soon as symptoms of malfunctions appear, you have to take a multimeter and check the functionality. It is necessary to measure the resistance between the screen (ground) and the terminal for the wire or spark plug tip. The resistance in this place should be within 1.2 MΩ.
If it is less than or significantly more than the specified limit, the high-voltage pulse current will not pass. This problem is especially common on individual coils. You can try to fix the problem yourself. The contact location for the wire or spark plug is deep, but you have to get to it. Using a metal hacksaw, carefully cut off the plastic tip near the influx.
Next, using a file, you need to remove the plastic in the contact area until a layer of epoxy resin, usually yellow, appears. After this, the resin is again removed with a file until a nickel and a contact wire appear. Signs of failure are visible to the naked eye; this is the lack of contact between the winding wire and the contact pad. It should be thoroughly soldered and then put back together.
Test your device yourself
How to fix a weak mechanism with your own hands if there is no current or voltage flowing to it, or another malfunction has occurred with the coil? First of all, you need to make a diagnosis yourself.
There are several checking options:
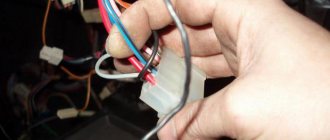
- The easiest option for diagnosing it yourself is to try disconnecting the connectors from the mechanism one by one at the moment when the engine starts to shake. By disconnecting the connectors from the functioning mechanism, you will be able to hear how dips in speed appear, and some cylinders begin to operate unstably. If, when you disconnect it from a non-working engine with your own hands, the operation of the internal combustion engine does not change, then this weak element needs to be repaired.
- If it is possible to dismantle a weak device, you can try to measure the resistance level on the windings. Measurements are taken directly between the contacts, as well as between the contacts and the spark plug connector. The resistance level on the primary winding should be about 6-8 kOhm, sometimes this figure can increase to 15 thousand Ohms, this is an exception. As for the resistance of the secondary winding, this indicator varies around 0.4-2 Ohms. As practice shows, for faulty mechanisms such indicators will vary greatly.
- Sometimes you can identify the malfunction of a weak coil by self-diagnosis of the car. In some cases, the error code may indicate a specific cylinder that is not working.
Design
The failure of this extremely valuable element of the on-board electrical circuit does not bode well. The car becomes motionless because the engine does not start, the stove does not provide heat, and the lights do not work. A complete, high-quality repair of the ignition coil and tip is required. To do it yourself, you need to study the structure of this unit.
The coil consists of the following components:
- insulator;
- frame;
- insulating paper;
- primary winding;
- secondary winding;
- insulating layer between windings;
- output contact of the primary winding;
- contact screw;
- central contact;
- lid;
- output contact of the primary and secondary windings;
- center contact spring;
- core of the secondary winding;
- outer insulating layer of the primary winding;
- bracket for attaching the coil;
- external magnetic circuit;
- core.
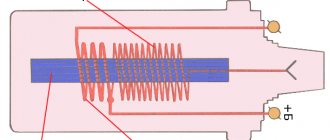
This part is a transformer with a metal core. The primary winding is located on top of it, and the secondary winding is located below it. The steel body is hermetically sealed. Oil is poured inside along with the core.
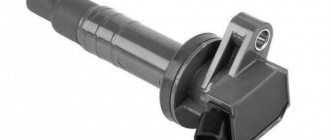
To make it possible to service the transformer, there is a plastic cover. It successfully withstands high voltage. The coil is installed in a contactless electronic ignition system with low-voltage and high-voltage circuits.
Manufacturers and cost of analogues
- “FENOX” (Fenox) - IC16003O7 - KZ VAZ 2110-2112 16kl. + controller M7.9.7 2112-3705010-03 – from 916 rub.
- “France Car” (FranzKar) - FCR220807 - KZ 21120-3705010-10 - from 814 rubles.
- “STARTVOLT” (Startvolt) - SC 0110 - Module for VAZ-2110i-2112i (1.6 l engine, 16 cells) (IKZ) - from 711 rubles.
- “ZOMMER” (Zoomer) - 2112-3705010-12 - KZ 2112, 2170 1.6 16 cl. ZOMMER – from 1100 rub.
- "AVTOVAZ" - 21120-3705010-13 - KZ - from 987 rubles.
- "DELPHI" - 2112-03705010-11 - MODULE 2112 engine, 1.6l
16 valves, engine - from 1000 rubles.
“France Car” (Franz Car) - FCR20V014 - KZ 21120370501011 - from 789 rub. "AVTOVAZ" - 21120-3705010-11 - KZ - from 987 rub. “ELKAR” - 2112.3705010-11 - KZ V-2110.12 (16 valves) - from 1397 rub. “QUARTZ” (Quartz) - QZ21705010 - KZ 2112, 2170, QZ21705010 - from 816 rubles.
“Francecar” fcr20v014 parts are of good quality, it’s worth paying attention to this brand and it’s possible to install it in your car
Definition of failure
If the ignition coil is faulty, the car either does not start, or the running engine stalls, stalls, and brings a lot of inconvenience.
Checking the part: turn off the ignition, disconnect the battery terminals, remove all wires from the coil. An ohmmeter measures the resistance value between terminals 1 and 4, 2 and 3. If the resistance on these pairs is not 5–6 ohms, the part being tested is faulty.
If you don't have an ohmmeter, you need to remove the coil from a known-good car. If after this the car starts with a quarter turn, therefore, there is a breakdown of this part, it must be replaced. Another way to determine a non-working coil and a high-voltage wire tip. With the engine running, remove the wires from the spark plugs one by one and short them to ground.
If there is no spark on one of the wires, or it is significantly smaller than the others, there is a problem with the coil or high-voltage wire. You need to try with a different, working cable. It turned out well, the cable is to blame. If the same thing happens, the ignition coil needs to be replaced.
Repair
Finding a new ignition coil today is not particularly difficult. In order to repair a broken bobbin, it is not at all necessary to buy the entire reel. Auto parts stores sell quite a lot of repair kits, among which you can easily choose an option for your car.
Note. When selecting a bobbin repair kit, you should pay attention to the number of motor valves.
On the other hand, in remote areas of the Russian Federation, sellers are in no hurry to sell spare parts in the form of repair kits, preferring to sell assembled reels, which is beneficial for them in all respects.
One repair kit costs no more than 150 rubles. This also includes the spark plug well insulator and seal. If the car engine is 4-cylinder, then you need to take 4 repair kits at once.
Cleaning
After washing the engine, driving in heavy rain, after winter parking, ignition breakdowns appear and the engine tunes up. Motorists have to carry out preventive cleaning of the ignition coil, tip, and conductive cables with their own hands.
- You need to stock up on alcohol, a small file, and cotton swabs.
- The rubber insulator boot is carefully bent off the tip of the ignition coil.
- The springs and radio interference suppression resistor are removed.
- Springs and resistor tips must be aligned with the crimping force. If this is not the case, they bend slightly.
- Everything is cleaned of dust, dirt, oil, rust, and wiped with alcohol.
- The tip springs need to be slightly stretched.
Location of the ignition coil VAZ 2106
The VAZ 2106 ignition coil is mounted in the upper front corner under the windshield frame
Location of the VAZ 2106 ignition coil under the hood
Externally, it is a cylinder enclosed in a metal shell, having three terminals at the outer end.