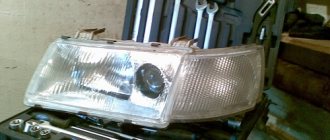
Headlights are an essential element of any modern car. They are used day and night. Violation of the integrity of the headlight housing can lead to serious consequences. This is not only a traffic police fine, but also problems with electrical wiring, failure of lighting fixtures, and so on.
Broken car lights are not uncommon. This happens as a result of accidents, accidents, when hitting obstacles, at the hands of vandals, and so on.
Of course, you can purchase a new tail or front light and replace it. But it's quite expensive. That's why they practice restoring lanterns.
Why does the headlight sweat from the inside?
Natural process
Not all car owners are aware that car headlights figuratively “breathe.” In other words, the air in the headlight is exchanged with the environment. The exchange occurs through the breather. These vents are a must.
When the headlights are turned on, the temperature inside the headlight begins to rise. As a result, the air expands and needs to find a way out. And when the lamp goes out, the headlight begins to cool down, and cold air enters the headlight through the breather.
For example, when entering a warm and damp parking lot (garage), especially if the headlights were not turned off before, the air inside the headlight will certainly pick up some moisture. The same effect can be observed when leaving a warm garage into the cold. The temperature difference will ensure air movement inside the headlight.
Previously, headlights were made in a square or rectangular shape, but now it is completely different. Large, deep and pointed headlights are increasingly common. And, as usual, the lower pointed part will fog up.
Modern lamps (LED, xenon) spend very little energy producing light, and accordingly the headlight no longer heats up so much. Thus, air exchange is carried out in very small volumes.
The headlight is sweating , what should I do if it’s new and there are no defects? The main thing is that you should panic because of this, because... this is a natural process.
The headlight sweats as a result of damage
Let's consider what could be the reasons for fogging of headlights that are not related to the natural process:
- Microcracks;
- Damage to the headlight housing;
- Violation of tightness;
- Violation of internal air circulation.
Microcrack on headlight glass. Even through an unnoticeable crack, water penetrates, and that’s where fogging occurs.
Depressurization of seams. The sealant tends to lose its elasticity and may crack; as a result, water penetrates into the headlight through microcracks and the condensation process begins.
This problem most often occurs in cars of domestic manufacturers. Therefore, the topic “ the headlight on a Priora or Kalina is sweating” is often discussed in various forums.
Depressurization after an accident. Fogging of car optics is often observed after the car has been in an accident. Even if the optics appear intact upon external inspection, structural damage may occur.
It may also happen that you accidentally pressed the headlight; as a result, glass or plastic can easily move away from the body, and air and water will penetrate through the gap formed.
Light bulb sockets are leaking. Often there is a loose connection where the light bulb is connected. If the fog lamp sweats , then the reason will be the same - depressurization.
The breather is clogged. The forums have a valve that allows air exchange. With its help, the headlight dries itself. Over the years of operation, they can become heavily clogged with debris and dust, resulting in no ventilation. Condensation will accumulate inside the optics and settle on the glass.
If the headlights constantly sweat from the inside and the moisture does not leave at all, then you need to contact a specialist to fix the problem, or find the place where the air is leaking and seal it. Read on to find out how this is done.
Causes of fastening failures
Insufficient plastic thickness is the most common cause of fastener failures. To reduce the cost of the production process, low-quality materials are used. As a result, the reliability of the structures suffers.
Fasteners often fail due to the low level of rigidity of the plastic.
Cases in which breakdowns occur:
- Impact aimed at the front of the car. Often occurs during minor accidents and can lead to through-and-through damage.
- A strong vertical impact when hitting deep holes, rails, or artificial bumps at speed.
- Prolonged exposure to vibration when driving over rough terrain.
How to repair car headlights with your own hands?
The housing and headlight are repaired using a hair dryer in the following sequence:
- We arrange the fragments in the desired order. If some parts are lost or cannot be repaired, use spare parts from previously repaired optics.
- We heat each piece one by one with a hairdryer and attach it in its place.
- We weld the resulting seams on both sides to ensure strength.
- The irregularities resulting from welding are first removed with a file and then with sandpaper.
- After this, we carefully grind and polish the restored optics using a felt wheel.
Broken pieces of headlights can be glued using special glue. The repair procedure is similar to the above sequence. If you lack the necessary parts, you can make them yourself from plexiglass. All seams must be treated with hardener on both sides.
Restoring headlights
If the glass optics are damaged and it is impossible to replace a new one, you can make a similar headlight from plexiglass:
- We are preparing a template. We put the destroyed optics in parts, replacing the lost elements with ordinary plasticine. Then we make a gypsum matrix.
- We cut a piece of plexiglass to the required size.
- On tracing paper we draw a template for the internal glass pattern using a caliper.
- Using a milling machine on a plexiglass blank, we reproduce the optics design with maximum accuracy.
- After this, we place the plexiglass on a gypsum matrix and pack it in a heat-resistant vacuum bag.
- We heat the resulting packaging until the plexiglass is completely softened and, using a compressor, give it the shape of a gypsum matrix.
Rear optics repair
Repair of rear lights is carried out in a similar manner. First, the parts of the destroyed optics are laid out on the table. Then, in the required sequence, we glue the existing elements together using glue.
As a rule, some parts after an accident will be lost or destroyed beyond repair. Therefore, it is necessary to prepare spare parts from a similar flashlight. First, we prepare a template for the missing element and use it to accurately cut out a piece of the desired shape. Glue it and prepare the next element in the same way. After gluing, all seams must be carefully sanded and polished.
Visual video on restoring rear optics
Repairing cracks
Headlight cracks are repaired using an adhesive:
- We drill the edges of the cracks with a drill.
- We wash and dry the surface.
- We install the injector strictly above the crack and apply glue.
- After filling the crack with glue, we remove the injector and check that there are no air bubbles in the polymer composition.
- To make the glue harden faster, you can dry it using an ultraviolet lamp.
- After the adhesive has completely dried, we remove any unevenness with a file, and then grind and polish the lantern.
After sealing cracks, it is recommended to treat the seams with a hardener.
Polishing after repair
First wash the headlight and then dry it thoroughly. First, rough grinding is carried out in several stages with a gradual increase in the grain size of the wheel. It is not recommended to press hard to avoid overheating the plastic. The time of one procedure should not exceed 3 - 4 minutes.
After rough sanding, we begin polishing. To do this, use napkins and polish. A small amount of the mixture is applied to a napkin and the surface is polished manually for 6 - 8 minutes. Plastic headlights can be processed using a grinding machine. In this case, you should use low speeds and avoid overheating the surface.
REPAIR OF CAR LIGHTS. BONDING POLYCARBONATE OR Plexiglas
The process of dismantling the headlight for a specific car model is described in more detail in the instructions. But you'll almost certainly have to remove the grille first. After unscrewing them, disconnect the wires from the device and slightly pull the headlight towards you. Do not force it, otherwise the headlight may crack in your hands. Most likely, it’s just stuck somewhere and therefore doesn’t give in. Scrape off the gunk that's holding it in and gently tug on the headlight again. A simple and affordable way to glue plastic glass for car taillights and other plexiglass and polycarbonate materials.
What types of auto glass repairs do we perform?
In addition to light damage to the glass (scratches, dents), which can be eliminated by simple polishing, there are more serious ones: chips and cracks.
- The chip can have different shapes (swirl, star, bull's eye, etc.) and usually has a "core" of damage - the place where the outer layer of glass is broken.
- A crack is a break in a layer of glass into two parts. May arise from a small chip.
Both types of damage are dangerous because they gradually expand, often quite quickly, so you should immediately contact a repair shop.
You can repair a chip or crack in your windshield if only the outer layer of glass is damaged. If the inner layers are affected, the glass needs to be replaced.
In other cases, repairing windshield cracks and chips in our workshop will stop their expansion, and will also make the defects visually completely invisible. You will be able to calmly control the situation on the road again without interference. In addition, such repairs are significantly cheaper than replacing glass.
We repair plastic parts ourselves - 3 simple ways
Manufacturers love relatively cheap, pliable and lightweight plastic. And car owners have a reason to love it - parts made from this material can be repaired very well. This means there is no need to regularly go broke on replacing damaged parts.
Before we tell you how to repair plastic products, let's pay attention to some of their features. Today, manufacturers use various types of plastics, including ABS plastic, polypropylene, polyurethane, polyvinyl chloride and others. They all have different properties, so before starting repairs you need to find out what material you are dealing with. Marking will help you - it is on any part. Trying to weld two parts from different plastics, you will waste your time: the connection, for example, of polypropylene with ABS plastic will be fragile, and therefore extremely short-lived.
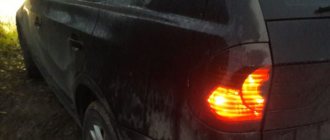
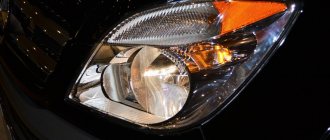
Why does moisture appear inside the car optics?
First, let's look at the design of modern head lighting. The headlights of the car are a single body with polycarbonate glass glued in with sealant. Inside there are reflectors, diffusers, and an adjustment mechanism.
Moisture affects all components of the optics
There are options with built-in lenses, including for gas-discharge lamps. In the case of standard xenon, there may be electronics inside the housing: control units and high-voltage lamp ignition units.
Contrary to the statements of some “experts,” the headlight housing is not sealed. The holes for installing lamps and bushings for electrical wiring are sealed with silicone or rubber gaskets. But when the lamp heats up, the air inside the housing expands and requires a hole to escape. For this purpose, any modern headlight is equipped with ventilation valves-breathers. They are located in strictly designated places, provide normal ventilation and are protected from accidental ingress of moisture.
It is better to disassemble lensed headlights according to the manual
Important! If the headlights are sweaty inside and condensation is forming, first check the breathers
- Ventilation holes clogged with dirt or blocked by the owner. Due to the temperature difference, condensation forms inside the case, and there is no ventilation.
- Cracks in glass or case. Unusual openings lead to direct water ingress and disrupt natural air circulation.
- Poor quality glass sealing after disassembling/assembling the headlight. For example, after unprofessional tuning.
- Fogging of headlights usually occurs during rain, car washing or at low air temperatures. In the first two cases, water enters directly through the damage; in the latter, condensation forms.
Condensation can accumulate both outside and inside
Glass replacement
Deep scratches cannot be removed by polishing, and large cracks spoil the appearance and compromise the integrity of the structure. You can repair broken optics by replacing the glass.
To do this, you will need to remove the headlight or fog lamp and disassemble it as follows:
- Place the part in a cardboard box with a pre-cut hole of small diameter.
- Use an industrial hair dryer to warm up the headlight housing.
- After 10-15 minutes of heating, remove the part and carefully pry off the glass with a screwdriver or sharp knife.
- Cut off the old sealant and thoroughly clean the internal parts from dust.
When removing glass, you should use gloves to avoid burning your hands or cutting yourself on the broken glass.
Replacement masks are sold in auto parts stores or on Internet pages with built-in catalogs.
When reassembling, car owners often wonder how to glue the glass to the body. For such tasks, black sealant is produced, and transparent options are also available. DoneDeal offers various compounds that are suitable for glass and plastic headlights.
How to repair a plastic headlight
Repairs can be done in a variety of ways, but the simplest method to remove defects from a plastic headlight is to weld it using hot air. In this way, the broken parts of the optics can be returned to their place (the gluing method in this case is not very effective).
headlight repair: before and after
During the work process, you need to remember one important detail - you can only weld one type of plastic. Failure to comply with this condition may result in the repaired headlight not serving for more than a couple of weeks.
Repairing a headlight mount is a much more complicated procedure and it is better to entrust the work to professionals. Welding this area will be ineffective and soon the headlight will become unusable again, so experienced craftsmen recommend repairing the headlight housing using prosthetics. Some metal parts are replaced with others and the headlight finds its location.
A headlight can be repaired if it has lost its transparency by polishing and grinding. The dullness of headlights is acquired due to the mechanical action of particles that rise from the road surface during vehicle operation.
As a result, not only cloudiness can form, but also chips. At the manufacturing plant, polycarbonate is often used in the production of automotive optics. This material is very durable, but its distinctive feature is that it is not resistant to mechanical stress and ultraviolet radiation.
Therefore, it is additionally covered with a special protective layer on top, which for some time protects the optics from the effects of negative environmental factors. During the headlight repair process, it is very easy to damage this layer, and after removing it, after a couple of months, the headlight will need to be additionally polished due to the rapidly appearing defects on it.
Therefore, during the work process, it is necessary to use fine polishing, which practically does not harm the protective layer of the optics. To remove deep chips and scratches, you have to remove the protective layer applied at the factory yourself, since it is simply impossible to do the work any other way.
Polishing
This method of exposure is considered more effective for plastic car headlights, but in addition to masking tape and sandpaper, it requires a machine with a special attachment and polishing paste.
Motorists select any abrasive product that is suitable not only for repairing headlights, but also for removing scratches on paint. It is not necessary to buy a polishing machine; sometimes the device is rented or replaced with a screwdriver.
The drill is not suitable due to high speeds; it can damage the coating. A polishing wheel is purchased separately; it is fixed like a regular drill. Inexperienced car enthusiasts are advised to use medium-hard nozzles.
Repair of car headlight housings and glasses
The housing of headlights or lanterns is repaired by welding with hot air injection. For these purposes, a special soldering iron is used, which is “powered” by compressor air. Using a hair dryer, the pieces of the body are returned to their place and attached. It's common to repair cracked or broken headlights, so the pieces may not be enough. In this case, spare parts for headlights that have been repaired before will come in handy.
The seam should be welded both from the outside and from the inside in order to provide the headlights with the required strength. Before you begin work, you should find out what kind of plastic the case was made of. It could be ABC plastic or polypropylene. If it is ABC plastic, then it can be repaired using the “cold welding” method, but polypropylene can only be welded
Please also note that these materials cannot be combined! If you weld one to the other, you will get a very weak connection
It happens that the glass in the headlight is completely destroyed, and it is not possible to replace it with a new one. In this case, plexiglass comes to the rescue. Before starting this work, it is necessary to reproduce the shape of the damaged glass. The lost parts at this stage are replaced by plasticine. As a result, you should have a template form on your table. This is what the gypsum matrix is made from. Then you should cut a piece of plexiglass to the desired size. Typically, a headlight requires transparent glass up to 6 mm thick, and for sidelights or fog lights - no more than 5 mm.
Next, you need to take tracing paper and draw the internal pattern of the old glass. To measure everything very accurately, use a caliper. Taking a template, the design is reproduced on plexiglass using a milling machine. This allows you to maintain the luminous flux almost at the same level and achieve minimal error.
After these steps, both the gypsum matrix and plexiglass are packaged in a vacuum heat-resistant bag. The next stage will cause difficulties for many, but it only seems so. You should find a special machine or workshop where you will be allowed to use this device to heat the envelope until the plexiglass softens. At the same time, the compressor helps create a vacuum in the glass. As a result, the pressure of the outside air gives the glass the shape of plaster. Please note that these steps only help to make the front part of the headlight, but the “sides” are made separately and attached later.
Chemical restoration of headlights
There are a variety of chemical headlight restoration kits sold online. Most often these are Chinese goods, however, you can find a couple of Russian companies that offer a similar kit (perhaps the same thing, just under their own label). Typically, the kit includes a container with liquid of 600 or 800 ml. (transparent or bluish), evaporator (heating mug or as the Chinese write Anodizer / anodator) with a power supply, plastic cover with a tube for steam release, funnel, masking tape, sanding paper (from P180 to P1200), respirator.
You can also find kits containing a sander (not an orbital sander and, in my opinion, not effective and even useless for the restoration process) and a sanding block. All this wealth is usually located in an aluminum case. You can also purchase all components separately.
Do-it-yourself repairs
Car headlight glass repair is more common than other types of restoration - stones and other debris at high speed cause serious damage to the glass, which impairs the performance of the headlights and reduces the light transmission.
Headlight glass repair
Self-restoration of car headlights is carried out in case of cracks and chips.
Car optics repair involves performing the following sequential steps:
- Thoroughly clean the area of the crack, wash and dry until completely dry.
- In the central part of the defect, install an injector to supply the adhesive mixture.
- Fill the crack with adhesive, preventing air bubbles from forming.
- Dry the glue by first removing the injector (drying is done with a UV lamp).
- Cover the repaired defect with hardener to secure the result.
- The final stage is polishing with sandpaper or a grinder.
At this point, the restoration of the headlights is considered complete. This is just a small part of the work that an ordinary car enthusiast may encounter. Often it is necessary to restore the headlight reflector. The following methods are used for this:
- Pasting the pre-degreased reflector with metallized tape.
- Painting headlight reflectors with chrome paint. Complete restoration of headlight reflectors using this method occurs 1-2 hours after painting.
- Restoring a headlight reflector with your own hands using metal foil or film. The film strips are fixed with a hair dryer, and the corrugated elements are painted with chrome paint.
Sometimes restoring a headlight reflector is impossible due to serious damage - partial or complete melting under the influence of high temperatures of the lamps. In this case, you can make a reflector with your own hands or purchase a finished product in a specialized store
It is important to select a model recommended by the manufacturer, and when making it yourself, carefully monitor compliance with this compliance
Repairing a headlight washer often involves cleaning the mechanism from accumulated dust and dirt - for these purposes, WD-40 or oil with similar properties is used. You can reduce the likelihood of washer failure by using it regularly, preferably at speed.
Corrector restoration
The headlight hydraulic corrector is designed to change the direction of the light beam. Failure of the device limits the possibility of adjustment, so repair of the headlight hydraulic corrector should be carried out immediately after the malfunction is detected. If repair of the headlight range control is impossible, it must be replaced:
- Remove the hydraulic corrector handle and remove the main cylinder, which is secured with a fastening nut (must be unscrewed).
- Remove the lining, scale and light guide by unscrewing the elements with a screwdriver.
- Remove the scale illumination lamp that prevents the corrector from being removed.
- Disconnect the working cylinders from the car headlights.
- Remove the hydraulic corrector in its entirety.
Installing a new device is performed in reverse order.
How to repair cracks in car glass using regular superglue
No car owner can be insured against the appearance of cracks or chips on the glass of his car. This not only does not decorate the vehicle, but also spoils the view, which can lead to an accident. Since the cause of such cracks cannot be eliminated, you should learn to correct the consequences yourself. Even regular superglue can help with this.
Causes of cracks
Often the size of the damage is insignificant at first and is not paid attention to. However, over time, a small scratch can create a whole network that covers most of the glass.
And this is not without reason. This is due to several reasons:
- Vibration that occurs when a car is moving.
- Temperature changes due to heating in the sun, frost, heating system inside the car.
- Gusts of air caused by strong winds.
- Gradually increasing, the crack can cause the glass to simply burst.
PLEASE REMEMBER: glass defects may be one of the reasons for problems passing technical inspection. Moreover, State Traffic Inspectorate employees have every right to issue a fine of 500 rubles if they consider that this damage may interfere with the normal level of visibility.
To avoid all these problems, you should take timely measures. To begin with, immediately after discovering a problem, you should seal it with tape on both sides with some material so that the glue from the tape does not get inside.
What to use and what to do
- Photopolymer UV glue . Transparent, especially durable, with a long service life and the ability to work at non-standard temperatures.
- Acrylic glue. A very popular look. Shows resistance to chemicals. environments, moisture, and is also non-toxic. When working with glass, transparent glue is used. One of its disadvantages is that it takes a long time to dry.
- Glue balm. It is based on resin, resin. Can be called a glassy mass with the addition of a solvent.
- Balsam. Durable, dries quickly, does not lose properties at high temperatures. However, after use, a yellow stain appears.
- Balsam M. It is an improved version of the previous glue. Another advantage is the transparency after use.
However, to solve the problem yourself, glue alone will not be enough. A number of other tools may be required.
For example:
- an injector to fill the void;
- electric drill, to relieve surface tension;
- applicators for fixing the injector;
- A UV lamp is necessary for drying;
- scriber to remove excess glue.
But you can get by with the simplest option with a minimum of effort! First of all, you should clean the crack from dust and rubble. And then carefully and slowly apply glue into the fracture cavity. A regular syringe can help with this.
You may need to heat the glue with a hair dryer until it becomes more liquid. Now you should leave the glue until it dries, and then remove the residue with a solvent.
In some cases, this will be enough to correct the problem, for example, if the crack is small. However, it would still be much safer to contact a car service center.
There are professionals who can solve the problem in the best possible way. And the cost to fix a crack will be much lower than buying new glass.
Self-recovery methods
To get to the reflector, the headlight removed from the car must be disassembled. The first option involves repeatedly passing the hot air of a hair dryer over the seam. The second option involves leaving the headlight in an oven preheated to 100°C for 20 minutes. After opening, all parts are cleaned of sealant residues, washed without using alcohol-containing liquids and dried.
Using metallic tape
Let's start with how to restore the reflector on a headlight using tape foil. All you need is metallized tape, purchased at a hardware store for about 30 rubles. Its adhesive base copes well with high and low temperatures, and the aluminum film is very wear-resistant.
Advantages of the method: durability, low cost, ease of implementation.
Disadvantages: when gluing, irregularities and seams remain, which impair the properties of the reflector.
Using metal foil
Aluminum foil is highly reflective, which allows it to be used in the restoration of headlight reflectors . You will also need some epoxy resin. To maintain a perfectly smooth surface of the foil, the entire pattern is made from plain paper. Then the parts are duplicated from aluminum sheet, a thin layer of resin is applied to the reflector and glued, removing excess resin.
Disadvantages: being between the metal foil and the plastic base, epoxy glue lacks air and takes a very long time to dry. It is almost impossible to remove dried glue. Therefore, such a reflector is not suitable for repeated restoration. With the advent of tape foil, this method is practically not used.
Using chrome paint
Headlight reflector repair using chrome paint is the most popular. No need to cut and glue anything. Paint is sprayed onto the degreased surface of the reflector from a can of white chrome until a uniform, uniform layer is obtained. After painting, the headlight is dried according to the instructions on the can.
Disadvantages: does not tolerate high temperatures. You should try to find heat-resistant chrome paint.
Using mirror film
No less effective is the restoration of the reflector by applying a metallized self-adhesive film of the Oracal brand. Films from the Oracal 351 and Oracal 352 series can withstand temperature changes from -40 to +120°C and, according to the manufacturer, can be used outdoors for two years without deterioration in performance. Since the headlight is a hermetically sealed space, the service life of the self-adhesive film increases.
It is necessary to make templates from paper or ordinary tape that exactly replicate the shape of the reflector. Then cut out the polyester film of a similar shape. Using a hairdryer, glue it onto the prepared surface of the reflector, smoothing it out and preventing the appearance of bubbles. The joints and edges can be additionally treated with chrome paint.
Advantages: reliable manufacturer, excellent reflective effect.
Disadvantages: the price of 1 m2 starts from $5.
As you can see, restoring headlight reflectors is a simple procedure and quite feasible in a garage. Considering the fact that auto repair shops charge an order of magnitude more money for similar work, it always makes sense to try to return the headlight to its previous brightness with your own hands using one of the proposed methods.
Proper cleaning and assembly
- disassembled headlight from dust and dirt. Glass and reflectors must not be washed with aggressive detergents or hot water. The best solution is a solution of laundry soap and a soft, lint-free rag. Don't rub!
- Then the washed components should be rinsed generously with distilled water and left to dry naturally.
- Assembly is carried out using clean cotton gloves. A special sealant for headlights is applied to the seam (at this stage you need to work carefully and avoid breaking the lines of the composition).
- The glass is connected to the body and dried at room temperature for 24 hours.
- Then you can check the tightness. To do this, the headlight is immersed with glass in water and held for several minutes. In this case, water should not get into the holes on the back wall.
How to get rid of problems if headlights sweat: video about cleaning ventilation ducts
You can eliminate fogging of the head optics yourself. The main thing is to take your time and choose the right materials. Prevention is even more important. You should periodically check that the breathers are clogged. Try not to drive at high speed through puddles with your headlights on, and let the headlights cool down before visiting a car wash. Then the headlights will fog up less often and you won’t have to remove them for drying.
What will help in correcting the situation
Fogging seems like a simple phenomenon that you can deal with on your own. But first you need to thoroughly dry and clean the headlight from dirt. Now we carry out the same step with the drainage and ventilation system, if there is one. After these stages, fogging should stop; if this does not happen, you will have to remove the optics from the vehicle and understand the problem in more detail.
Due to the fact that the headlights sweat from the inside, you need to remove them from the vehicle to diagnose the problem. To carry out this procedure safely, you must first disconnect the battery so as not to receive an electric shock, and only then proceed to dismantling the flashlight. After cleaning the internal space of the optics, the tightness of the structure is checked. To detect the smallest cracks, you can resort to colored gas.
Fogging due to depressurization can be eliminated using improvised methods. For example, use a soldering iron or a hair dryer without removing the optics. Do not try to fix the problem with glue or electrical tape; this will not help at all, because the headlights are made of a special plastic that cannot be held together using standard, household methods. It is not uncommon for materials used in vehicle lighting to include silicone sealant to help keep dirt and dust out, but over time the layer breaks down and liquid gets into the gaps, creating a foggy area. To solve, renew the sealant. If the reason lies in the ventilation valve, then clean it of dirt; they cannot be purchased separately, so you will have to thoroughly clean it yourself.
Timely replacement of filters will help avoid fogging of headlights!
Silica gel
In the CIS regions the question is “how to remove moisture?” solve in an original way using silica gel bags. They can be found in new shoe boxes or at the market. The chemical absorbs liquid well and will effectively attach the bag to the back of the optics. This will cause small fog particles from the headlight to begin to attach to the silica gel, without accumulating on the glass and important technical parts. The downside is that this does not guarantee a complete solution, but only speeds up the drying process and the silica gel blocks will need to be changed regularly.
Silica gel is a good absorbent, which not only saves shoes from moisture, but also, if placed correctly, will relieve the headlight from fog. The main thing is to change the chemical on time!
Brake fluid
Another way to dry a foggy headlight is to pour a little brake fluid into it. But this can cause the glass to become cloudy over time.
Vented plugs
If, when examining the car’s lights, no defects or damage were revealed, but the headlights still fogged up, then the service center technicians recommend using the following method. You need to remove the plugs from the headlights and make 4 holes in them with a 5mm drill. We insert polyester material through these holes so that they act as ventilation pipes. Lubricate the edges of the polyester with strong glue or sealant.
Xenon optics and worn sealant
Why does a xenon headlight sweat? The reason is due to the use of low-quality silicone in the factory assembly. How are they made? At the moment of connecting the headlight unit, a large amount of silicone is poured. The oil takes on a solid form and at the same time releases oil and harmful fumes that settle inside the glass. When light is used, the deposited material heats up and evaporates, then the particles accumulate in the cool part of the internal structure of the optics. If the ambient temperature is low or there is active precipitation, then the degrees in the optics drop faster and the vapor settles more actively. The difference between water vapor and silicone vapor is that the first accumulates into droplets, and the second condenses in the form of a thin film on the inner surface of the glass. At above-zero temperatures, the opposite effect begins - silicone particles wander and gravitate towards cold coatings. This wandering is one of the options why the headlight sweats.
- dry, clean the optics from dust and dirt;
- All microcracks are identified, damaged areas are degreased, coated with glue and treated with sanding paper;
- to avoid recurrence of problems with headlights fogging, make drainage holes at an angle to prevent water from getting inside;
- treat all joints with high-quality sealant;
- install the bumper back.
Types of headlight repairs
Repair of plastic optics
First of all, you should select a material whose composition is similar to the material of the damaged auto prism. This will help to qualitatively weld the fragments to the headlight being restored.
The sequence for restoring damaged optics is as follows:
- wash the headlight thoroughly and let it dry thoroughly, paying special attention to the damaged area;
- fill existing chips, cracks, voids with a glue gun;
- Use a UV lamp to dry the areas to be glued;
- use a grinding machine to treat the damaged area (you can use the entire headlight);
- Thoroughly polish the surface of the headlight until shiny.
Repair with dichloroethane
Dichloroethane, also called molecular glue, is a good adhesive. After heating dichloroethane with a soldering hair dryer, fill all cracks and chips with it and, after complete drying, sand the surface. It glues headlight fragments together well, fills voids, and is highly durable.
Types of automotive optics
Headlight glasses are an important element of the lighting system; auto prism can be made from:
- Glass;
- Polycarbonate;
- Acrylic (plexiglass).
Glass
Among the advantages: beautiful appearance, ideal light transmittance, long service life.
Glass has a number of disadvantages: with the slightest impact it can easily crack, and it is also easy to scratch.
For protection, a special film is glued to the surface of the headlights.
Polycarbonate
This optics is resistant to various types of mechanical damage, it is 200 times stronger than glass , and can withstand temperature changes well.
However, polycarbonate becomes cloudy during use, and it can also lose its quality characteristics under the influence of acid-containing products.
Plexiglas
Optics made of acrylic (plexiglass) are more practical. Acrylic and polycarbonate are similar materials, but compared to polycarbonate, plexiglass is more transparent, but with temperature changes, cracks and chips may appear on it.
Fighting headlight fogging and repairing the entire car lighting system
Moisture getting under the plastic leads to such unpleasant and even potentially dangerous consequences as:
- deterioration of light output, decrease in lamp brightness, reduction in lighting range;
- accelerated corrosion of the reflector (in this case, only replacing it will help, so it is much more practical to eliminate fogging of the headlights in advance);
- intense oxidation of contacts, damage to electrical equipment;
- premature burnout of light bulbs.
Technicians do everything to eliminate fogging of headlights
. Maintenance begins with dismantling the bumper and depressurizing the lighting fixture. After inspecting the part, specialists perform the following types of work:
Dichloroethane is a toxic and poisonous substance. Therefore, beware of getting it on the skin of your hands, ensure a flow of fresh air into the room, work only with gloves and, preferably, glasses.
Repair with epoxy glue
Epoxy glue also glues headlight fragments well and fills voids well. The glue consists of two components: in one bottle there is epoxy resin, in the other there is a hardener. When these two components are mixed, a viscous consistency is formed, which when dried is a very strong composition.
Using epoxy resin is no different from using dichloroethane glue: cleaning and treating the surface of the headlight, gluing the fragments by applying glue to the joints and chips. After drying, the glued headlight is carefully processed with a grinding machine using sandpaper of varying degrees of grit.
Soldering damaged headlights
A damaged autoprism can be repaired by soldering with a technical hair dryer. Cracks or joints of collected fragments are heated until they are completely glued. After gluing, the surface is also sanded.
Replacing headlight glasses
If the headlight cannot be repaired, you will have to buy a new one. Installation is carried out only with fresh sealant after removing the old one.
Instructions for use
In order to properly glue the headlight glass, it is important to follow the instructions indicated on the package with the sealant and prepare the surface.
All sealants are applied to a previously degreased surface, otherwise the glass may peel off and the lights may fog up. For better bonding, some manufacturers complete the kit with a special liquid that acts as a primer.
For better sealing, different compounds are applied using a special technology:
- The liquid gaskets are distributed by a dispenser onto the body, then the headlight glass is pressed down.
- The roll is placed in a special groove and pressed against a transparent part. The thickness of the layer is adjusted by stretching the material by hand.
- When working in a cool room, the sealant should be heated to 18...20 °C.
The strength of the adhesion of parts to each other, the appearance of the lights and the machine itself depend on the quality of removal of the old sealant.
Before using the material, you should carefully read the instructions, remember the hardening time and compatibility with plastic or glass. If the remaining sealant is used as a gasket on the pan, then it is important to clarify the reaction when interacting with oils and fuel.