To ensure a high level of safety when operating a vehicle, it is necessary to completely transfer all processes that can be automated to this mode of operation. The reverse sensor (hereinafter referred to as RSD) of the VAZ 2115 automatically turns on the lighting when the vehicle moves in reverse. This part can also be classified in this category, because no human intervention is required to activate the lights, which are necessary when the car is moving in the opposite direction.
The features of operating and replacing the reverse sensor of a VAZ 2115 car will be discussed in detail in this article.
Removing and installing a rear light on a Priora
So, first of all, we open the trunk lid, and on the inside we find a special technological window with Velcro that needs to be opened. It is through this that you can get to the flashlight mounts.
It is worth noting that from the inside it is not mounted with bolts, but with special plastic screws that secure the lamp to the car body. There are three of them in total, of course, each of them must be unscrewed. After this, we move the lantern to the side from the outside, as is clearly shown in the photo below.
If it is necessary to replace the rear light, then each of the lamps should be pulled out of the light housing from its rear part. More on this below.
Reasons for repair
As we have already found out, repairing the body of a VAZ 2101 with your own hands begins with getting rid of illusions about its good condition.
The fact is that the car body is constantly in an aggressive and hostile environment, where, in addition to a significant temperature difference, it is also affected by road reagents and humidity. As a result, sooner or later, in addition to eliminating local deformations and pitting corrosion, you will have to undertake a complete restoration. When calculating repairs, first of all you need to find out how much body parts for the VAZ 2101 cost, and whether they are available at all. The fact is that on a “penny” the body is a load-bearing element, that is, it literally “carries” all the other equipment of the car, and its price is almost half the cost of the entire car. So, the instructions for the VAZ 2101 “Do-it-yourself body repair” consists of two parts:
- Elimination of deformations of the body and its elements;
- Elimination of corrosion and restoration of elements affected by it.
Replacing the brake light, tail light, turn signal lamp on a Priora
Now, in the same way, we take the lamp itself, and turning it counterclockwise relative to the socket, we remove it.
Replacing the lamp is carried out in the reverse order. It is worth keeping in mind that when installing new bulbs in the Priora's taillight, you must adhere to the same rules as with the front headlights. That is, you should not touch the glass of the lamp with bare or dirty hands, otherwise this will lead to a decrease in its service life.
Turn
The turn signal signal is located the highest (in relation to the hood), and to remove it you don’t even have to wrap your hand under the hood.
- Remove three screws and a self-tapping screw from the plastic cover, pry it up with a flat-head screwdriver and remove it;
- Turn the cartridge strictly counterclockwise;
- Remove the cartridge;
- It is easy to press down on the lamp and rotate it counterclockwise until it begins to fall out of the socket.
When choosing a turn signal PY21W (Voltage 21 W), you should be careful - a lamp with a similar marking - P21W - will not have orange, but colorless glass, and will not be suitable as a turn signal.
Replacing the brake light bulb, tail lights and turn signals on Priora Hatchback and Sedan
Installing LED tail lights on Priora
As for LED tail lights for Lada Priora cars, their prices are of course a little higher. Namely, a set of such lighting equipment can be purchased for around 3,200 rubles. As for installing a flashlight instead of a standard one, there is absolutely nothing unusual here.
It is necessary to disconnect the power connector for the flashlight, which is standard for all types of Priora, and then, after removing the old flashlight, install a new one with LED lights in its place. There is no need to perform any additional actions or manipulations. And the result of the work done can be seen in the photo below:
If you have any questions about the material provided, or have something substantive to add, please write below in the comments.
In each car, the headlight bulbs are changed differently, so it is almost impossible to create the same type of instructions. This article will discuss replacing taillight lamps in a Priora.
AvtoVAZ designers did not provide for the possibility of changing lamps without dismantling the lamp itself and it must be removed before replacement. Therefore, it would be more correct to first talk about its removal, and then about removing the lamps.
Description of IAC
What is the IAC in the Four with an injector, what signs of malfunction are typical for it, where is the device located? You will find answers to these questions with photos and videos below; first, we recommend that you familiarize yourself with the basic information regarding this regulator.
Installation location and purpose
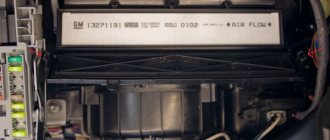
In VAZ 2114 and VAZ 2115 cars, the XX regulator is a device whose purpose is to stabilize the speed of the power unit at idle. The IAC is used to regulate the amount of air flow supplied to the fuel system when the throttle is closed. Accordingly, the engine speed is automatically adjusted. This regulator is located on the throttle body. The device is fixed in the seat using two bolts.
Operating principle
When you turn the key and turn on the ignition, the rod on the IAC extends to the end, as a result of which it rests against the calibration hole on the throttle line. After this, the regulator begins to count steps and returns the valve to its initial state. The position of the original valve directly depends on the firmware of the VAZ control unit. For example, in a car with a January 5.1 control unit on a fully warmed up engine, the number of steps is 120, and in a Bosch it is about 50.
When the power unit is warmed up, at the time of adjustment the IAC is located at around 30-50 steps. When the number of steps increases or decreases, the volume of air flow that passes through the technological opening changes regularly. When the rod extends, the number of revolutions increases, and when it retracts, it decreases. The stroke of the rod is about 250 steps. A certain volume of air is supplied to the motor, which is needed for optimal functioning of the power unit.
The amount of supplied air is regulated by the mass air flow meter in accordance with the volume, the control module supplies a certain amount of fuel to the engine through the injectors. This ensures an optimal ratio of air and fuel when forming a combustible mixture. If the engine is not warmed up, the control module increases the speed thanks to the IAC, which allows you to use the car for driving without warming up the internal combustion engine.
Which regulator is suitable for VAZ 2114 and 2115?
As for the most suitable regulator for the “Four” and “Fifteen”, judging by the reviews, the best option is the IAC Omega. The catalog number of these devices is 2112-114830. In addition, in practice, devices from the manufacturer KZTA, number 2112-1148300-04, have proven themselves well. When purchasing, be sure to pay attention to the mark (in this case 04, but IACs with marks 01, 02, 03 are also produced) on the old and new regulator, they must match.
If the marks do not match, the regulator will not be able to work. You can use 01 instead of 03, and also 02 instead of 04 and vice versa. When buying a regulator, you need to measure the distance from the rod head to the flange; it should be no more than 2.3 cm . Find out how to distinguish a fake IAC from the original from the video published by the AutoLife channel.
Possible malfunctions and ways to eliminate them
What are the symptoms that indicate that the device has failed:
- the number of engine revolutions is not controlled; it can spontaneously increase and decrease,
- the power unit may randomly stall for no reason at idle,
- on a cold engine the driver cannot increase the speed,
- when additional equipment (optics, heater, wipers) is turned on, the engine speed drops significantly, in particular, if the car is idling,
- The speed of the power unit may be increased, this is due to the development of the sensor cone.
If problems arise in the operation of the IAC device, the device must be cleaned or replaced.
Removing and installing the flashlight
The rear light is accessible from the luggage compartment of the Priora. To directly get to the lamp, you need to pull back the trunk trim.
The process of removing the rear light
- We open the trunk and fold back the upholstery in the rear part of the wing.
- Then you can see 3 wing nuts that hold the flashlight on. We unscrew them while holding it on the other side.
- Next, pull the flashlight towards you and remove it from the rear fender.
- Removing the lamp socket is done by turning it counterclockwise and pulling it towards you.
- Installation is carried out in reverse order.
What is tuning a VAZ 2105
In society, the word “tuning” is understood as improving a car in every possible way. But quite a long time ago, among the younger generation, there was a tendency towards a kind of competition among themselves in terms of the number of “bells and whistles” in a car. This is explained by the desire of every person, and especially young people, to express and manifest their individuality. Most people, oddly enough, manage to make something truly beautiful, because this car is simply created for experimentation.
Perhaps every car enthusiast dreams of carrying out external tuning of a VAZ 2105 with his own hands, because it is much cheaper than salon service. To do this, you will need special tuning accessories, a little imagination and a lot of free time.
Replacing lamps
After the lamp is removed, you can begin replacing the lamps.
- To do this, unscrew the lamp socket by turning it counterclockwise.
- We take out the cartridge. The lamp should be removed from the socket by slightly pressing it and turning it counterclockwise 90 degrees. After this, the lamp should come out of its seat.
- Install new lamps in reverse order.
Self-diagnosis of the clutch disc
- Clutch not disengaging.
- Clutch slipping.
- The occurrence of vibration and extraneous sounds when the clutch is disengaged.
- The clutch pedal fails (does not return).
If the pedal does not return (falls through), the VAZ-2107 clutch cylinder may need to be replaced.
Replacing the clutch can be done in several ways. The first requires dismantling the power unit, the second requires removing the gearbox, which requires an inspection hole, a lift or an overpass. In the first case, it is necessary to use special equipment in the form of a lift. To remove the engine, you will also need to completely drain the coolant, disconnect the pipes from the radiator, and in the end you will spend a lot of time disassembling the parts. Therefore, it is advisable to use the second method, during which you can avoid all unnecessary operations. Let's look at how to replace a VAZ-2107 clutch step by step.
Removing the gearbox
After this, the starter is removed; as a rule, it is secured with three bolts. Before performing this task, you must disconnect the terminals from the battery. Finally, we dismantle the lever in the cabin, the cable on the speedometer and the brackets securing the exhaust pipe. After completing these operations, to dismantle the box itself, you need to unscrew the 4 bolts on the power unit casing.
Removing the disk
Installing the disc
We insert the new clutch disc in place of the old one. When installed correctly, the large protrusion should press against the release bearing. After making sure that the part is installed correctly, perform all the above operations in reverse order. You can use the gearbox input shaft as a guide. If you don’t have one, you can make one; it won’t take much of your time. The main rule is that the manufactured shaft can be easily pulled out by hand after installing the part. Finally, we screw the clutch basket, focusing on the previously made marks.
https://youtube.com/watch?v=rrO-5EmSUUo
Sources
- https://luxvaz.ru/vaz-2110/58-zamena-trosika-scepleniya.html
- https://remontavtovaz.ru/vaz-2110/zamena-i-regulirovka-trosa-scepleniya-vaz-2110.html
- https://vipwash.ru/stseplenie/zamena-stsepleniya-i-diska-na-vaz-2107
What kind of lamps are installed in the Priora headlamp?
The Priora's rear light has 4 lamps, which are responsible for turning on the turn signal, dimensions, reverse, brake light and PTF. They are almost the same, but have some differences.
- The turn signal lamp is marked PY21W and is orange; when installing a regular white lamp, the turn signal will blink white.
- The size and brake lamp has two spirals, which are responsible separately for braking and illumination.
- The reverse lamps and PTF lamps are the same.
Tail light lamp marking table
| Purpose of lamps | Marking | Peculiarities |
| Reverse | P21W | White |
| Turn signal | PY21W | Orange color |
| Brake light and dimensions | P21/5W | Two spirals for dimensions and a brake signal |
| Rear PTF | P21W | White |
How to install angel eyes
Angel eyes Lada Priora with DRL controller.
Angel eyes on the Priora are LEDs that are installed inside the front unit, along the perimeter of the lenses and in the rear light. To do this you need to purchase:
- Electric wire of moon-white color. Type SH; diameter 2.6 mm;
- Receiver (Operating voltage – 12 Volts).
After everything is ready, you can begin active actions:
- Raise the hood, remove the battery (this will make it easier to work).
- Dismantle the block, remove the substrates.
- First secure the wires in place with tape (lightly) or clothespins - this is done to fix their position. Then fix them with epoxy resin.
- Wait for the resin to dry, secure the substrates and seal all the gaps with sealant so that the glass does not fog up. We carry out the installation.
Replacing brake light bulbs and parking lights
With the release of the restyling of Priora 2, a large number of details have changed in it. The rear lights are especially noticeable; they have become LED. Now the dimensions have become lower, which gives the car a wider appearance in the dark. To achieve this effect, it is not at all necessary to buy and install LED lights.
To do this, just swap the backlight from the top position to the bottom. We don’t touch reverse and turns!
After such a replacement, when you press the brake pedal, the brakes will light up where the side lights and fog lights were previously illuminated. And the dimensions and rear PTFs will glow from the bottom of the lamp.
VAZ-2106 suspension repair
When repairing the body, special attention should be paid to the thrust cups of the shock absorbers, front and rear. There are two problems here: the cup itself is completely torn out and the entrance to the rod is broken
But the advantage of all this is that these parts are located in accessible places. The reason for this may be the driver’s inattention to his vehicle, because such a car needs to be listened to carefully and at the slightest extraneous sound, drive it onto an overpass. If a dull knock is heard quite loudly near the upper shock absorber mount, then most likely the problem is the wear of the bushing. You need to replace this part in time, otherwise the hole for the rod will break and you will need to weld on the washer.
Video on replacing lamps
Alexei:
Which lamp should I put in the brake light of Lada Priora 21/4 or 21/5?
Teddy Bear E:
Sandro, thanks for the video! Helped!
Mag Aliev:
helped a lot
Meirkhan Michon:
thanks to the author
stason73rus:
but my stop lights are not on in Priority and the rear window is on Brake light, fuse is ok. What could be the reason? blogging in advance.
Marina Korshikova:
Sandro, good, I watch your videos regularly, they help a lot. I’m just sorry for your viburnum, how many experiments you have put into it.
Andrey M:
Thank you, this video was very helpful today!
radio controlled models:
sell me the speakers
Dennis Dennis:
Remove the Faro to change the bulb!
Gray matter:
bulbs, how can you not touch them with your hands? or am I confused
Makarov Alexander:
Kalina1 sedan too
Video on this topic
how to remove rear lights on Lada Priora
Lada Priora station wagon: replacing the foot in the headlights
I'll show you how to change light bulbs in the headlights of a Priora station wagon.
Removing the Priora station wagon lamp
Removing the tail of a Priora station wagon VAZ 2171.
how to remove epiphany on Lada Prior, Everything is done quite simply. Fold the gasket on the removable side.
Previous LED, reverse lamp replacement
P21W Reversible LED lamp.
Lada Priora station wagon: replacing paws in headlights
I'll show you how to change the headlights of a Priora van.
Installing LED rear lights on Priora
Online store EXELET.RU Tolyatti, st. Officers 12B, office 206 Tel https://exelet.ru PRIORA on Drive2.
Spare flashlight for Priore
Spare flashlight for Priora.
How to replace the brake light in the rear of a Priora hatchback |
Our group is in contact. JUST THINK https://vk.com/ProstoeMnenie Become a YouTube partner https://youpartnerwsp.com/join?9658 In the video.
Replacing rear light bulbs on a Priora | How to change turning lights and brake lights on a Priora
Replacing light bulbs for turns, markers, brake lights, and rear lights on a Priora. Take the Priory Lada with a burn.
Replacing rear lights with Priora
Learn how to change the brake light, rear dimensions and rear angles of a hatchback.
Replacing a lamp with a stopper, rear size and inclusion of an accelerated hatchback and sedan
Video review on how to replace rear lights on a Lada Priora hatchback.
Lamps in the rear combination lamp
Note: The following describes how to replace the bulbs in the rear combination lamp on the left side. Replacement on the right side is carried out in the same way.
1. Disconnect the wire from the negative terminal of the battery.
2. Open the tailgate.
3. Inside the luggage compartment, bend the two flaps of the upholstery, covering the three wing nuts of the studs that secure the combination light.
Note: Shown below with luggage compartment trim partially removed for clarity.
4. Unscrew the two wing nuts of the combination light mounting studs, shown below.
5. Holding the taillight with one hand, unscrew the remaining third wing nut with the other.
6. Remove and move the rear combination lamp slightly to the side to gain access to its lamps.
7. Now you can replace the burnt out lamp(s). As an example, let's replace the side light and brake signal lamp (all lamps in the rear combination lamp are changed in the same way).
8. Take the lamp socket and turn it counterclockwise.
9. Remove the socket with the lamp assembly from the flashlight body.
10. Pressing the lamp, turn it all the way counterclockwise and...
... remove the lamp from the socket. Dispose of the burnt-out lamp as waste.
11. Take a new lamp with similar characteristics (markings) and install it in the socket all the way in the reverse order.
Note: When installing the lamp, two protrusions located asymmetrically relative to the axis of the lamp must fit into the corresponding grooves of the socket.
12. After replacing the lamp(s), install the rear combination lamp on the car in the reverse order.
VESKO-TRANS.RU
AutoNews / Reviews / Tests
- Home
- Auto garage
- Tuning the VAZ 2105 Salon with Your Own Hands Video
Tuning the VAZ 2105 Salon with Your Own Hands Video
Tuning VAZ 2105
Nowadays, most car owners do their own tuning. Especially if they are owners of domestic cars. Tuning VAZ 2105 is no exception.
In 1980, a car with serial number 2105 went into extensive production. This, of course, is the VAZ 2105. Just 35 years ago, no one thought that it would be possible to modernize so many things in this car. In those days, only manufacturing plants could improve something in the machine’s mechanisms. Ordinary people were simply afraid of damaging the car.
Video review of the procedure for replacing lamps in the rear combination lamp of Lada Priora (sedan, hatchback)
When purchasing a book in PDF
1. You will be able to download the book immediately after payment.
2. The book will be downloaded in PDF format, and you can download it to any device.
1. All books are of ideal quality, since we work with publishers directly.
2. Electronic books are in no way inferior to paper books and are their complete analogue.
3. Our company has offices in Ukraine, Russia and Poland, you can always contact us at a specific address.
4. All payments on the site are maximally protected and are made using global payment systems.
The book is not intended for sale in your country.
You can place an order for the paper version of this book on the website autoinform96.com.
Payment for goods and downloading of the book in electronic form (PDF format) is made on the website.
To do this, you need to find the book you are interested in and click on the “Buy” button. The price of the book is indicated on the button.
For convenience, the price on the website for residents of Russia, Belarus and Kazakhstan is presented in rubles.
For residents of Ukraine in hryvnias, and for all other countries - dollars.
After clicking on the “BUY” button, a payment window will open where you can select a payment system with which you can pay for the selected book using any bank card (Visa, MasterCard, MIR, etc.)
When you click on the “Pay by bank card” button, the Portmone payment system will open, which is the easiest way to make a payment.
In addition, the website offers four payment systems for payment:
- Yandex (payment from any bank cards, Yandex Money account, QIWI Wallet, terminals, etc.);
- Portmone (payment from any bank cards, Portmone account);
- PayPal (payment from any bank cards, PayPal account);
- WebMoney (payment from any bank cards, payment from WebMoney wallets).
Part two. Corrosion
Causes of corrosion and sources of its damage Corrosion is the process of self-destruction of a material in the process of interaction with the environment. In our case, metal corrosion occurs due to:
- Winter “urban” operation;
- Cheap body restyling, under which all kinds of dirt accumulates;
- Storing the car in damp, unventilated areas.
Places of the VAZ 2101 body that are most susceptible to corrosion
As the experience of most car owners shows, the parts of the VAZ 2101 body that are most susceptible to corrosion are located in hard-to-reach places where moisture does not evaporate for a long time (gaps, bends, flanges), namely:
- wheel arches;
- hinged elements and places of their attachment (hood, trunk, doors, sills, fenders).
And if no measures are taken, then it can move to other, more significant power elements (spars, joints of the sub-engine frame, central pillars, etc.). Depending on the degree of surface destruction, it depends on how we will restore the damaged part.
Stage one
The oxidation process is in the initial stage (chips, scratches), only a slight color change has occurred. At this stage, you can get by with small losses - cleaning the surface with a fine abrasive wheel and then polishing the surface.
Stage two
Both the color of the paint changes and its swelling occurs, that is, the destruction process occurs evenly over the surface of the element.
Corrosion of the rear wheel arch of a VAZ 2101
This type of corrosion is not so terrible; it most often occurs due to poor preparation of the element for painting. It can be relatively easily cured by repeated stripping and subsequent filling with cold-set epoxy mastic. This type of mastic has high strength, sufficient adhesion, and is easy to apply to the damaged area. It contains plasticizers and hardeners, which increase the plasticity of the resin and its impact strength, as well as fillers that reduce the shrinkage of the resins and ensure that the coefficients of thermal expansion of the metal and the resins are brought closer together.
Payment via Yandex Cashier
After selecting payment via Yandex, the Yandex Cashier payment system will launch, where you need to select a convenient payment method (bank card, QIWI, Yandex Money account, etc.)
After specifying payment details and confirming payment, payment for the goods will occur.
If you have a bank card in a currency other than the ruble, then the money will be debited from the card at the rate of the Central Bank of Russia at the time of the purchase.
This payment method is optimal for residents of Russia, Kazakhstan and Belarus.
Official website of the Yandex Kassa payment system https://kassa.yandex.ru
Payment via Portmone
After selecting payment through Portmone, the payment system will launch, where you need to select the payment method: bank card or Portmone account.
The price in the Portmone payment system is converted into dollars at the exchange rate of the Central Bank of the country where you are located.
If you have a bank card in a currency other than the dollar, then the money will be debited from the card at the rate of the Central Bank of your country at the time of the purchase.
After specifying payment details and confirming payment, payment for the goods will occur.
Official website of the Portmone payment system https://www.portmone.com
Payment via PayPal
After selecting payment via PayPal, the PayPal payment system will launch, where you need to select the payment method: bank card or PayPal account.
If you already have a PayPal account, then you need to log into it and make a payment.
If you do not have a PayPal account and you want to pay using a bank card via PayPal, you need to click on the “Create an Account” button - shown with an arrow in the picture.
PayPal will then prompt you to select your country and provide your credit card information.
After specifying the information required to make the payment, you must click on the “Pay Now” button.
Official website of the PayPal payment system https://www.paypal.com
Payment via WebMoney
After selecting payment via WebMoney, the payment system will launch, where you need to select the payment method: bank card or WebMoney wallet.
If you already have a WebMoney wallet, then you need to log into it and make a payment.
If you do not have a WebMoney wallet and you want to pay in another way, you need to select any of the methods that WebMoney offers and make the payment
After specifying payment details and confirming payment, payment for the goods will occur.
Official website of the WebMoney payment system https://www.webmoney.ru/
Downloading a book
After successfully completing the payment (by any method) and returning to the KrutilVertel store from the payment system website, you will be taken to the successful payment page:
On this page you need to indicate your e-mail, where access to download the book will be sent.
If you are already registered on our website, then simply follow the link to your personal account.
The book you purchased will be in your personal account, from where you can always download it.
Please note that after making the payment, you need to return back from the payment system website to the KrutilVertel website.
If for some reason you did not return back to the site and closed the payment system tab with a message about the successful completion of the payment, please let us know - we will send you a letter indicating access to download the book.
Improved body characteristics
Many car enthusiasts start tuning the VAZ-2105 from the body, but make a lot of mistakes during this work. So, what is better not to do:
Don't rush to install side skirts, bulky spoilers and air intakes. These improvements are absolutely unnecessary, but provided that no powerful parts of the power unit were attached before. Lowering the body is considered a fashionable trend today, which is often used when tuning a car. Cars with low ground clearance have better handling, but at the same time speed parameters are reduced.
Also, the lower elements of the body are at great risk, especially if we take into account the condition of our roads.
What to do?
- Attach additional body parts. Bumpers and other body kit options will allow you to change its shape.
- Tint the windows and repaint the body. This DIY tuning of the VAZ-2105 makes it possible to significantly change the appearance of the car.
Problems when paying with bank cards
Sometimes difficulties may arise when paying with Visa/MasterCard bank cards. The most common of them:
- There is a restriction on the card for paying for online purchases
- A plastic card is not intended for making payments online.
- The plastic card is not activated for making payments online.
- There are not enough funds on the plastic card.
In order to solve these problems, you need to call or write to the technical support of the bank where you are served. Bank specialists will help you resolve them and make payments.
That's basically it. The entire process of paying for a book in PDF format on car repair on our website takes 1-2 minutes.
Types of headlights
The headlight unit on a VAZ can have two design options:
Outwardly they are very similar. Experts distinguish them by small details - the shape of the blender arches or the rotation diffuser. Kirzhach has a long, narrow reflector with a partition and no top wall. Bosch has walls on all sides, and the reflector is short. For an inexperienced person, it is easier to distinguish these designs by the shape of the plug on the back of the headlamp - Bosch products have one and are made in the form of an oval. These subtleties are not accessible to everyone, but only to experienced car enthusiasts.
Important! They have no fundamental difference in design, but installing one instead of the other will not work. Therefore, you should know which headlights will fit the body of a given car, so as not to find yourself in a difficult situation when purchasing
In addition, Kirzhach headlights are more difficult to disassemble than Bosch.
There are also Chinese analogues of headlight units for the VAZ 2114. They can have any shape, since they are not subject to general standards. Purchasing such products is a big risk. You can, with equal probability, get suitable headlights, or have lighting fixtures that do not match the shape of the sockets.
Removing the rear light, replacing lamps on Lada Priora (VAZ-2170)
We carry out the work when replacing lamps in the rear light or replacing the light itself.
The work is shown on the left lantern.
To replace the lamps in the rear light, simply unscrew the nuts that secure it without disconnecting the light's wiring block from the rear wiring harness block. Inside the trunk...
...we bend the flap of the upholstery... ...and by hand unscrew the three fastenings of the flashlight (two nuts are located under the upholstery and are not visible in the photo).
Location of the rear light fastening nuts (shown with the light removed for clarity)
By turning the side light and brake light bulb socket counterclockwise...
...remove the lamp socket from the flashlight body. Pressing the lamp, turn it all the way counterclockwise...
...and remove the lamp from the socket.
The combination parking light and brake light have two protrusions located at different levels. When installing a new P21/4W parking light and brake light bulb, its protrusions must fit into the corresponding grooves in the socket.
We carry out the operations for replacing the remaining lamps in the same way.
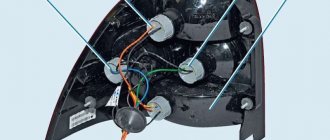
Each lamp socket, in addition to the black “mass” wire, is connected to other wires of different colors.
In order not to confuse the lamp sockets when installing them, the corresponding wire colors are indicated on the lamp body.
For example, on the light housing next to the fog light lamp socket there is the inscription “red”, which corresponds to the red wire of the lamp socket. Next to the turn signal lamp socket there is the inscription “blue”, and next to the reversing light lamp socket it is written “green”. The exception is the socket for the side light and brake signal lamps, next to which there is no inscription.
To remove the rear light...
...squeeze the clamps of the rear wiring harness block... ...and disconnect it from the flashlight wiring block.
Using your hand, push the rubber sealing cover of the wires out from the hole in the body. Unscrew the three plastic nuts securing the rear light (see above).
We remove the lamp by pulling the wires with the block through the hole in the body. There are sealing gaskets installed on the three mounting threaded rods and two plastic mounting pins of the lantern.
If the gaskets are torn, replace them with new ones. Install the rear light in the reverse order.
Video on the topic “Lada Priora. Removing the rear light, replacing lamps"
Replacing taillight lamps on a Priora Lada Priora station wagon: replacing the tabs in the lamps How to remove the taillight and change all the lamps on a Lada Priora.
DIY electrical equipment repair
The most common type of repair of the electrical system of a VAZ 2104 car is replacing the fuse. If an electrical appliance fails, first check the fuse. Whether it's a light bulb, an actuator, or an indicator, start with the fuse.
Read also: Starter current when starting the engine
On the VAZ 2104 in the first years of production, finger fuses were installed. They were dielectric cylinders with metal contacts at the ends and a fusible element inside the cylinder. The design was not very reliable. The contacts got hot and the fuses failed.
Subsequently, fork-type fuses were used on the VAZ 2104. A fuse of this type consists of a plastic body, on which the rated current is color-coded and numerically marked, and two contact flat electrodes connected to each other by a fusible jumper. Through the window in the upper part of the case you can see the condition of the fuse element.
The fuse box is located in the engine compartment on the right side. The block is closed on top with a lid on which symbols for the purpose of the relay, fuse numbers and the circuits they protect are printed, which is convenient for repairs. Most of the circuits of the VAZ 2104 car are protected by fuses installed in the mounting block.
By removing the fuse that protects the circuit of the failed device, make sure that it has failed. Insert new one. It is not recommended to use “bugs” made from individual strands of stranded copper wire for repairs. Is it dangerous. Remember that replacing a fuse does not eliminate the cause of its blown and often only provides a temporary reprieve. After replacing the fuse, go to the workshop as soon as possible, determine the cause of the failure and make repairs.
A supply of fuses of three ratings for repairing a VAZ 2104 should accompany you on every trip.