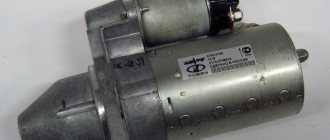
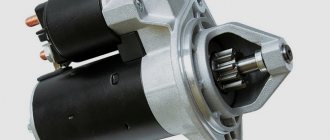
Main starter relay
ATTENTION! A completely simple way to reduce fuel consumption has been found! Don't believe me? An auto mechanic with 15 years of experience also didn’t believe it until he tried it. And now he saves 35,000 rubles a year on gasoline! Read more"
The car's electric starting system includes, in addition to the starter and relay, also starter on/off elements, various connecting wires, the main power source (battery), etc.
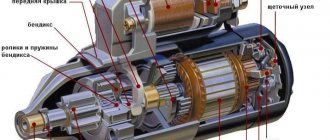
The starter relay or VR is activated after turning the key in the ignition switch. The BP armature and the freewheel lever move, and the bendix engages with the flywheel crown. This ensures normal engine starting.
To be able to adjust the system, you need to disconnect the current wiring from the VR. The control terminal is marked on the terminal with the letter M.
Then the battery is removed from its original place and connected to the M and S terminals marked on the terminals. Thus, the purpose of the operation performed is to shift the bendix. And in order to connect the BP to the starter, you must first adjust the gap between the bendix and the stop. It is also recommended to adjust the gasket located between the drive and the BP.
Characteristics
Despite its simplicity, the UAZ-469 already in those years had an autonomous heater, two fuel tanks and excellent cross-country ability. It was possible to overcome fords, obstacles and bad roads on this SUV without any modifications, but today tuning of various UAZs, including the 469 model, is becoming increasingly popular. Amateurs equip cars with larger wheels with mud tires, lift the car and install more powerful engines. True, with the latter option, all the simplicity of the design fades into the background, because you have to completely redo the entire electrical wiring of the cars. Nevertheless, the popularity of the car is only growing.
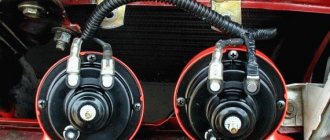
Additional VR starter
On modern cars, an additional VR starter is a priori provided. On older cars, the relay is installed and connected independently.
The advantages of installing an additional VR are obvious:
- Protects the starter device from burnout of contacts in the lock, which occurs for various reasons (long start-up, banal wear, etc.);
- It has a positive effect on the loading of contacts of the same ignition switch, as a result of which the contacts remain operational longer;
- Protection of the starter from a situation where, due to a “glitch” of the key in the ignition switch (the engine has started, but the starter continues to spin).
You can check whether the additional VR is installed on the car like this:
- Look in the “black box” (fuse box);
- Turn on the starter device in the engine purging mode - if the additional relay is on, then the starter must turn off on its own after a few seconds.
Connection of additional VR
Here's how to connect:
- Fix the relay in any convenient place (you can on the stud of the glass cleaning fluid reservoir);
- Connect the cable to the starter;
- Remove the red wire from the flat terminal of the main relay, and in its place insert the wire from the additional VR;
- Connect the other wire of the new BP with an 8 mm tip to the positive of the starter;
- Place contact 30 of the additional VR onto the released contact of the main VR;
- Screw the short wire numbered 85 to the body (ground).
Additional relays can be purchased in stores. They are sold as a kit, where everything is provided for proper self-installation.
Forget about fines from cameras! An absolutely legal new product - Traffic Police Camera Jammer, hides your license plates from the cameras that are installed in all cities. More details at the link.
- Absolutely legal (Article 12.2);
- Hides from photo and video recording;
- Suitable for all cars;
- Works through the cigarette lighter connector;
- Does not cause interference to radios and cell phones.
VAZ Starter Relay Connection Diagram
The principle of operation of the starter is as follows: in order to start the car engine into operating mode, it is necessary to forcibly rotate the crankshaft until the fuel mixture in the cylinders begins to burn.
This is where the idea arose that it was time to change the car to a foreign car. To be honest, I didn’t manage to start making money right away, until I understood all the mechanics of options, I lost about rubles, but as it turned out, it was a precious experience.
If the repair does not give the desired results, check the electrical circuit. To solve the problem of a weak starter, vehicle designers and developers adopted the VAZ auxiliary starter relay. Wiring for installing an additional starter relay. VAZ injector starter connection diagram.
As you can see, the changes are minimal: 1. After completing the installation, check the functionality of the additional relay by purging the cylinders. Unlike a conventional relay, the solenoid relay performs two functions at once - it closes and opens the contacts of the electrical circuit, and, with the help of the core, moves the bendix gear to engage with the flywheel of the internal combustion engine. A suitable place for this is the stud of the washer reservoir.
Most often, electromagnetic circuits burn out.
Stories from our readers
“Fucking basin. "
Hi all! My name is Mikhail, now I’ll tell you a story about how I managed to exchange my two-wheeler for a 2010 Camry. It all started with the fact that I began to be wildly irritated by the breakdowns of the two-wheeler, it seemed like nothing serious was broken, but damn it, there were so many little things that really started to irritate me. This is where the idea arose that it was time to change the car to a foreign car. The choice fell on the melting Camry of the tenth years.
Yes, I had matured morally, but financially I just couldn’t handle it. I’ll say right away that I am against loans and taking a car, especially not a new one, on credit is unreasonable. My salary is 24k a month, so collecting 600-700 thousand is almost impossible for me. I started looking for different ways to make money on the Internet. You can’t imagine how many scams there are, what I haven’t tried: sports betting, network marketing, and even the volcano casino, where I successfully lost about 10 thousand ((The only direction in which it seemed to me that I could make money was currency trading on the stock exchange, they call it Forex. But when I started delving into it, I realized that it was very difficult for me. I continued to dig further and came across binary options. The essence is the same as in Forex, but it’s much easier to understand. I started reading forums, studying trading strategies. I tried it on a demo account, then opened a real account. To be honest, I didn’t manage to start earning money right away, until I understood all the mechanics of options, I lost about 3,000 rubles, but as it turned out, it was a precious experience. Now I earn 5-7 thousand rubles a day. I managed to get the car buy after half a year, but in my opinion this is a good result, and it’s not about the car, my life has changed, I naturally quit my job, I have more free time for myself and my family. You’ll laugh, but I work directly on the phone)) If If you want to change your life like me, then here’s what I advise you to do right now: 1. Register on the site 2. Practice on a Demo account (it’s free). 3. As soon as you get something on the Demo account, top up your REAL ACCOUNT and go to REAL MONEY! I also advise you to download the application to your phone, it’s much more convenient to work from your phone. Download here.
- The controller controls the on/off of the additional starter relay depending on the crankshaft speed and the time the starter cranks the engine.
- After setting the ignition key to the “Starter” position and the crankshaft rotation speed not exceeding 500 min1, the controller sends a signal to an additional relay and thus turns on the starter.
- After being turned on, the starter will work until the ignition key is in the “Starter” position for no more than 20 seconds, provided that the “correct” password has been received from the immobilizer and the crankshaft speed has not increased to 500 min1. This prevents the starter from turning on when the engine is running and its overheating during prolonged cranking.
Starter connection diagram 29.3708 for VAZ 2108, 2109, 21099 cars: 3 comments
In this article, we will be much more interested in the second relay, which is responsible for the operation of the starter, namely the retractor. Also look at how much charge the battery has. And now he saves 35 rubles a year on gasoline!
Replace the core. Register on site 2. We conducted a little investigation and came to the following conclusions, yes, from the factory on VAZ cars, a starter relay was installed. If the starter does not turn off, then the relay is missing. Most often, such a start indicates wear of the teeth on the Bendix gear or the teeth of the engine flywheel.
To understand why a starter solenoid relay is needed, let’s look at the engine’s operation schematically. Other possible schemes are no different from the one described.
We conducted a little investigation and came to the following conclusions, yes, from the factory on VAZ cars, a starter relay was installed. The problem is not constant, this can happen once a week, maybe every other day. VAZ starter relay wiring diagram. SOLVING THE PROBLEM WITH THE IGNITION SWITCH VAZ 2110 2111 2112
First signs of concern:
- The starter does not start immediately, but after several test turns of the key. This indicates burning of the solenoid relay contacts. To eliminate the problem, you need to clean the contacts.
- The starter mechanism rotates, but it is too slow, and the battery is fully charged. In this case, you need to pay attention to wear of the brushes or wear of the bearing device.
- After the engine starts, the starter does not immediately turn off. This means wear on the gear teeth in the bendix or the flywheel ring.
FakeHeader
They are the ones that connect the relay to the ground of the car.
The design can have its own housing or be installed in a common unit. A gear device that meshes with the flywheel of an internal combustion engine and ensures engine rotation. In this case, the battery ground is connected to the starter ground. Only after this does the fuel-air mixture ignite in the combustion chamber.
What is the purpose of such an additional relay and why do some car enthusiasts install it? To understand why a starter solenoid relay is needed, let’s look at the engine’s operation schematically. My name is Mikhail, now I’ll tell you a story about how I managed to exchange a two-wheeler for a Camry. Then, when installing an alarm system, auto electricians could move the starter relay on the VAZ to another place. At first there will be a rather loud click. This means that the main system starts, but the starter does not work. It synchronizes the operation of the starter.
Connection after repair
For some reason, some car owners feel unsure when connecting a unit after carrying out certain repair-related manipulations on it. For everything to go smoothly, you must remember to mark the disconnected terminals. But when installing the starter in place, there will be no unnecessary problems. All contacts must be cleaned and degreased with a special automotive cleaner before connecting.
Lack of ignition is not always associated with the starter device; it may be a burnt-out electromagnetic circuit or electrical wiring, as well as incorrect battery operation.
Any car owner can check, repair and install the traction relay. The work is simple and takes very little time. The only nuance is the location of the starter in the car’s structure, namely, how convenient it is to carry out its maintenance.
VAZ 2110 starter relay connection diagram
Unscrew the ends of the nuts. To do this, bridge the two contacts.
That is, fuel is not supplied to the working chamber. A suitable place for this is the stud of the washer reservoir.
In most cars, these units are non-separable. Most often, electromagnetic circuits burn out.
To carry out reverse dismantling, you must first mark the disconnected terminals. Almost everyone has heard about this detail, but not many understand the principle of its operation. Place the wire with a ring terminal for 8 mm on the positive side of the starter and tighten it with a nut. VAZ starter relay wiring diagram.
Search form
April 19, Volkswagen touareg - faults and shortcomings description weak points November 13, How to choose the most economical crossover in terms of fuel consumption? Windings and contacts are also subject to similar destruction.
More details at the link. How to properly connect the starter relay To be able to adjust the system, you need to disconnect the current wiring from the VR.
My salary is 24k a month, so it’s almost impossible for me to collect thousands. No more and no less.
This means that the main system starts, but the starter does not work. Bendix, even the smallest detail, plays a very important role. We connect the lead from pin 85 on the new relay to ground. Checking the retractor relay with the starter removed It is more convenient to check the functionality of the relay with the starter removed. Anyone who has problems turning on the starter should watch. Useful advice from an auto electrician.
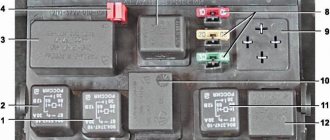
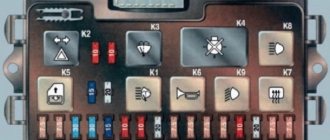
Fuse and relay box
Fuses and relays in Lada Kalina
The fuse and relay box is located on the left, lower part of the instrument panel. It is accessible by pressing the button and folding the lid down. To remove fuses, there are special non-conductive pliers in the upper left part of the mounting block.
1 - K5 - high beam relay. If the high beams in two headlights do not work, check this relay. If one of the high beam headlights does not work, check fuses F3 and F13, as well as the lamps and the high beam switch.
2 - K4 - low beam relay. If the low beam in both headlights does not work, check this relay. If only one low beam headlight does not work, check fuses F2 and F12, as well as the lamps themselves and the light switch.
3 - K1 - lamp health control relay.
4 - non-conductive tweezers for removing fuses.
5 - power window relay. If your power windows stop working, check this relay. It could also be in fuse F5, or in the window lift drive system itself. To get to the mechanism, you need to remove the door trim. Check the electric motor, the appearance of the gears and the absence of binding of the mechanism.
6 - K3 - turn signal and hazard warning relay. If your turn signals or hazard lights do not work, check this relay and fuse F16, as well as the turn signal lamps themselves and their switch.
7 - starter relay. If the car does not start and the starter does not turn, check this relay. It could also be a dead battery, as well as the starter mechanism itself.
8 - backup fuses.
9 - fog lamp relay. If the fog lights do not work, check this relay and fuses F4 and F14. Also check their connection diagram, the serviceability of the wiring and connectors, as well as the lamps in the headlights and the power button.
10 - K2 - windshield wiper and washer relay. If your windshield wipers or windshield washer are not working, check this relay. Also check the wiper motor, washer pump and washer fluid level in the washer reservoir.
11 - K7 - rear window heating relay. If the heating does not work and the rear window fogs up, check this relay and fuses F8 and F9. Also check the connection contacts to the terminal points of the heating elements (at the edges of the glass at the rear pillars). If everything is in order, but the heating does not work, the issue may be in the wiring (the wires are frayed or something else).
12 - K6 - add. relay, ignition relay. If your ignition does not turn on or is having problems with it, check this relay. This relay protects the ignition switch contacts from burning. Also check the ignition switch itself and the contact group.
13 - row of fuses F1-F10
14 - row of fuses F11-F20
Main starter relay
ATTENTION! A completely simple way to reduce fuel consumption has been found! Don't believe me? An auto mechanic with 15 years of experience also didn’t believe it until he tried it. And now he saves 35,000 rubles a year on gasoline! Read more"
The car's electric starting system includes, in addition to the starter and relay, also starter on/off elements, various connecting wires, the main power source (battery), etc.
The starter relay or VR is activated after turning the key in the ignition switch. The BP armature and the freewheel lever move, and the bendix engages with the flywheel crown. This ensures normal engine starting.
To be able to adjust the system, you need to disconnect the current wiring from the VR. The control terminal is marked on the terminal with the letter M.
Then the battery is removed from its original place and connected to the M and S terminals marked on the terminals. Thus, the purpose of the operation performed is to shift the bendix. And in order to connect the BP to the starter, you must first adjust the gap between the bendix and the stop. It is also recommended to adjust the gasket located between the drive and the BP.
How to start the engine if there is a problem with the starter and solenoid relay?
If the starter mechanism is not working, the car owner has the opportunity to start the power unit. There are several ways to start the engine.
Close the starter directly
An example of a launch is considered on a VAZ 2110 car:
- The transmission lever in the cabin is set to the neutral speed position. The parking brake lever is raised.
- The ignition system is activated by turning the key in the switch. The engine compartment of the car is opened, the following steps are performed under the hood.
- The air filter device is being dismantled. It is retracted to the side so that the driver can gain access to the contact elements of the starter assembly.
- The chip that goes to the contact component is turned off.
- Using any metal product, for example, a screwdriver, the contact components of the starter assembly terminals are short-circuited. You can use a piece of cable.
- After closing the contacts, the starter mechanism should begin to rotate, which will lead to the engine starting. It is important that the battery is charged when performing this task.
After completing the action, the chip is put back in place, and the filter device is mounted back. Such steps will allow you to start the power unit in the future. But since the problem remains, it will still have to be solved.
Sergey Tsapyuk spoke in detail about the procedure for starting the power unit by directly closing the starter unit.
Wheel spin
The implementation of this method is only possible on front-wheel drive vehicles equipped with a manual transmission:
- The car is placed on a jack, one of the front wheels must be suspended.
- The suspended wheel is turned outward until it stops. If it is the left wheel, then it turns to the left, the right wheel, respectively, to the right.
- A cable is wound around the surface of the tire, which is used for towing. If it is not available, a strong rope may be used. It is necessary to wind 3-4 layers, while at least one meter of rope or cable must remain free.
- The gearshift lever is moved to the third speed position.
- The key turns in the ignition switch.
- Then you need to strongly pull the end of the rope or cable, this is done to unwind the wheel. It is not recommended to perform this task while standing in one place; you should take a short run-up.
- If the vehicle's power unit starts, the neutral speed is activated. To do this, it is not necessary to depress the clutch pedal. You have to wait until the car wheel stops.
- Then the jack is loosened and the wheel is lowered to the surface of the ground.
From the pusher
The implementation of the “old-fashioned” method from the “pusher” is performed as follows:
- An assistant will be needed to complete the task. You can act on your own if the car is on a descent.
- The parking brake handle is lowered.
- The key is turned to the ignition mode, the transmission selector is set to the third gear position.
- Then the car must be pushed. If there is an assistant, the driver sits in the cabin and waits until the speed is at least 10-30 km/h. The clutch pedal on the car must be depressed.
- After increasing the speed, the pedal is carefully lowered, while the driver presses on the gas. When the engine starts, you can put the gear in neutral and stop to wait for it to warm up.
Source
Additional VR starter
On modern cars, an additional VR starter is a priori provided. On older cars, the relay is installed and connected independently.
The advantages of installing an additional VR are obvious:
- Protects the starter device from burnout of contacts in the lock, which occurs for various reasons (long start-up, banal wear, etc.);
- It has a positive effect on the loading of contacts of the same ignition switch, as a result of which the contacts remain operational longer;
- Protection of the starter from a situation where, due to a “glitch” of the key in the ignition switch (the engine has started, but the starter continues to spin).
You can check whether the additional VR is installed on the car like this:
- Look in the “black box” (fuse box);
- Turn on the starter device in the engine purging mode - if the additional relay is on, then the starter must turn off on its own after a few seconds.
Connection of additional VR
Here's how to connect:
- Fix the relay in any convenient place (you can on the stud of the glass cleaning fluid reservoir);
- Connect the cable to the starter;
- Remove the red wire from the flat terminal of the main relay, and in its place insert the wire from the additional VR;
- Connect the other wire of the new BP with an 8 mm tip to the positive of the starter;
- Place contact 30 of the additional VR onto the released contact of the main VR;
- Screw the short wire numbered 85 to the body (ground).
Additional relays can be purchased in stores. They are sold as a kit, where everything is provided for proper self-installation.
Forget about fines from cameras! An absolutely legal new product - Traffic Police Camera Jammer, hides your license plates from the cameras that are installed in all cities. More details at the link.
- Absolutely legal (Article 12.2);
- Hides from photo and video recording;
- Suitable for all cars;
- Works through the cigarette lighter connector;
- Does not cause interference to radios and cell phones.