The car starter is an electric motor that is powered by the battery. The starter's job is to engage the flywheel of the internal combustion engine to turn the crankshaft and then start the engine. During engagement with the flywheel (braking torque), the car starter takes on an electric current of about 350 A.
This device is designed for short-term operation; prolonged rotation of the starter significantly reduces its service life. Note that a fully serviceable engine starts from the starter almost immediately, without the need to rotate the crankshaft for a long time. In the cold season, up to 2 attempts to start the internal combustion engine from the starter are allowed.
Types and design of electric starter relay
There are three types of starter relay:
- blocking (preventing the device from starting when the engine is running);
- unloading (converting lower currents into stable 12 V);
- retractor (traction), which is attached directly to the starter.
The first two are certainly important, but they are not installed on every car, unlike the “traction” one, without which the engine will not start.
The traction electromechanical relay is responsible for:
- The bendix is thrown into engagement with the flywheel.
- Closing and holding the bridge between the “plus” of the relay and the starter.
- Stable power supply to the brush assembly of the electric starter.
- Timely shutdown of the trigger mechanism.
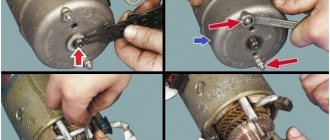
Starter solenoid relay diagram
Inside, it is arranged simply: under the metal body there is a two-winding coil with a core. On the one hand, the body has a protruding rod (the pulling end of the armature), on the other, an ebonite cover with three terminals (2 powerful contact bolts and one “pin”). The lower bolt is connected to the plus of the electric starter by a power wire (oblique). The armature - a metal core - “walks” longitudinally inside two windings (coils): “retracting” (VO) and “holding” (CU). When retracted, it presses on a movable electrode, at the end of which a spring-loaded copper contact plate is attached. At the end of the armature (core) stroke, the plate is pressed against the “nickels” of the bolts, closing a short circuit - from one to the other, and then to the electric starter brushes.
The edge of the core is connected to a fork lever that moves the Bendix gear forward. In the non-working position, it protrudes far from the body, and when current is supplied to the pulling coil, it goes under it, “pulling” the upper edge of the “fork” behind it. Swinging on the axis, its lower edge moves forward - carrying out, through the driving clutch, the Bendix (gear with a freewheel) into engagement with the teeth on the flywheel crown. When this happens, a metallic knocking or clicking sound is heard.
Working principle of VR
A constant plus is supplied from the battery to the upper power bolt of the “traction” bolt. In the free state, the contact plate does not touch the “nickels” of the power bolts in the cover. Both windings – the pull winding (VO) and the holding winding (CU), are connected with one terminal to a small “control” terminal, which receives the starting pulse from the ignition key (plus). The second output - a more powerful VO - goes to the jumper with the lower power bolt (plus of the starter electric motor), and the OU - to the “ground” (housing).
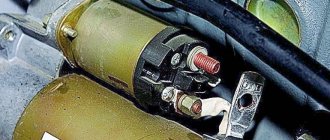
Starter connection diagram
As soon as the ignition key closes the power supply circuit to the VO, the current in it will create a magnetic field, under the influence of which the core will move inside the housing, push the bendix forward, and press the plate to the terminals. The plate will create a “short path” for high voltage current - from the top bolt, to the bottom and to the starter brushes. When the current flows through it, the “minus” disappears from the traction winding. Now only the holding one starts working, which is still energized (and will be as long as the ignition key remains in the “Start” position).
Connection diagram
The starter is controlled remotely from the vehicle's cabin. The connection diagram may differ, but the main elements of the circuit are the same.
The unit is equipped with a powerful electric motor (1). The negative terminal is the internal combustion engine. The positive wire from the battery is connected to the solenoid relay (6). When it is turned on, the contacts communicate the positive wire from the battery and the windings of the electric motor.
Voltage from the battery (2) is supplied to the coils of the solenoid relay from the ignition switch (3). To prevent the appearance of carbon deposits on the ignition switch contacts, modern cars are equipped with an intermediate relay (5), which supplies voltage to the retractor. Its control contact is connected to the ignition switch.
Why does the relay click but the starter does not turn the engine?
A single click “indicates” that the retractor winding is working, the bendix is “out.” If after this the gear does not turn, either the car starter itself is faulty, or the freewheel has failed. If the retractor often “shoots” with the bendix, it means that the problem is in the holding coil, which is unable to “pick up” the core when the pulling coil has already turned off.
In order for the car engine to start, the Bendix needs to spin with good force, while being in clear engagement with the teeth of the flywheel ring.
The force is fully provided by the electric starter motor, but the relay “opens the way” for it, so the stable operation of the devices is interconnected. If the starter clicks, the problem is definitely not in the retractor winding.
Possible breakdowns:
- The battery is dead or the terminals are not tightened.
- There is no stable “mass” for VO.
- Starter armature short circuit.
- Loss of conductivity on nickels.
- The brushes crumbled.
- The general “mass” (battery) has come off.
To quickly check one problem unit - with a screwdriver or a wrench - tap 2-3 times (shortly, sharply, but not hard) on the solenoid relay body, closer to the cover. Loss of conductivity often occurs from misalignment of the plate that closes the heels. This will force her to return to her place.
We close the starter “in French” (special cases)
Access to the starter is always open from under the bottom - you just need to remove the crankcase protection. An example is in the photo below.
Under the bottom of Renault Megane 2
It is difficult to reach the starter from the engine compartment. In the best case, it is closed by a filter (VAZ), in the worst case, by a battery. You can remove the filter, but what about the battery?
Starter installation location (circle)
Everything is done so that the starter can be changed, repaired, but not short-circuited.
What does terminal S look like?
On Renault cars, the terminal looks like a threaded outlet. The nut screwed onto it is “white”, although it itself is made of copper (see photo).
Starter Renault Logan, phase 1
We have already talked about the VAZ - they use a plug. If you remove it, you can see the “petal”.
The starting method using a screwdriver is not the best. The problem is limited access.
50 Amps
The pull-in relay on the “Ten” consumes 50 Amps. For budget Lada models the current is 30 A, for many foreign cars it is higher. This means that a current of 40-50 Amps will flow from terminal B to terminal S. Think about the dangers of this.
We are going to short-circuit the starter with a screwdriver, but at the connection points where the current will flow, it may “stick”. In this case, without unnecessary panic, remove the negative terminal from the battery.
To remove the minus terminal, you need a 10mm open-end wrench. Keep it with you.
A malfunction in which the retractor has nothing to do with it
The situation when the starter turns, but the engagement between the teeth of the Bendix gear and the flywheel ring does not work, happens often. Especially after repairs with the replacement of the bendix, or in cars with over two hundred kilometers.
Worn bendix gear
Despite the fact that a click was heard, signaling that the bendix had come out, the length of its stroke was not enough for full contact, and the motor would spin the clutch idle. With this malfunction, you can hear the characteristic buzz of a working starter, vigorous, but ineffective. Neither from the second nor from the tenth start will it be possible to get rid of the problem - you need to remove the electric starter, check the pushing force of the “traction”, the condition of the teeth on the bendix and the starter ring of the flywheel.
Typical solenoid relay malfunctions and their symptoms
Open or short circuit in the control circuit. They can happen on any segment - from the ignition switch to the terminal on the VR housing. This category includes: wear of the contact group of the lock itself, a blown fuse, a closed locking relay, a short circuit in the wiring harnesses, oxidation of the terminals in the blocks. Failure manifests itself in different ways. More often - a complete lack of response from the device to startup attempts. Sometimes the starter only clicks at first until the battery runs out.
Burning of the contact group inside the device, due to which a large current does not flow to the brushes of the electric motor, and it does not rotate. Loss of conductivity due to carbon deposits, oxidation of the coins, a broken plate or a plate that has moved out of place is the second most common problem with the starter relay. With such malfunctions, the starter sometimes clicks, but does not turn the gear.
Burnt wires and oxidized contacts of the retractor relay
A break in the holding winding at the point where it is attached to the body - due to which, instead of one operation, a whole “cascade” of useless clicks is heard. Bendix does not have time to engage with the teeth of the flywheel - it is immediately thrown back. At the same time, the car gives a clear picture of short “idle” clutch activations with knocking, howling, crackling or buzzing. The case does not quite fit the definition: “the relay clicks, but the starter does not turn,” but refers purely to the breakdown of the solenoid relay.
VO short circuit - with this breakdown, the starter clicks, but cannot completely push out the bendix and supply power to the lower power bolt (to the brushes). The malfunction is detected only when removed from the car and the coils are checked one by one.
Popular brands:
Infiniti QX80
How to check the solenoid relay
You can check the VR in two ways - without removing it from the car and after removing it together with the starter. If you suspect that the signal from the lock is lost somewhere in the circuit, first carry out a regular test on the car, then, based on the results, the unit can be removed and checked more accurately - with a multimeter.
Check without removing from the car:
- Put the car on the handbrake, make sure it is in neutral gear.
- Turn on the ignition and leave the key in the lock.
- Remove the connector (thin wire) from the control terminal BP.
- Using a screwdriver, close the terminal with the upper power bolt (plus from the battery).
If after this the car starts, the problem is in the control circuit (the pulse from the lock does not reach the terminal). If the starter continues to click but does not turn, check the devices separately. To do this, the “traction” needs to be disconnected from the starter housing (it’s easier to remove them from the car together, and then separate them).
Check after removal:
- Turn the multimeter into audible dialing mode.
- Connect one probe of the device to the control terminal.
- The second one has a lower power bolt (terminal for brushes).
- If there is a signal, the pull-in winding is intact.
- Leaving the first probe on the terminal, attach the second one to the body.
- If there is a signal, the holding coil is also intact.
- Install the device vertically, on the anchor, with the terminals facing up.
- Place the feeler gauges on the bolts - one on the top, one on the bottom.
- Press the relay, pressing the armature all the way.
- If there is sound, the power terminals are closed correctly, the plate is working.
- If there is no sound, but the display displays numbers, it does not work. The reason is external resistance.
Checking the solenoid relay with a multimeter
If at least one breakdown is detected, the part is replaced with a new one or a known good one. If both coils are intact, and the plate closes the “nickels” normally, all that remains is to test the force with which the spare part moves the armature plunger. To do this, first measure the free play of the plunger by inserting the relay into place in the housing until the loop tightly touches the fork lever, and use a ruler to measure the distance between the electric starter housing and the retractor itself. Pull out the part, push the plunger in until it touches the spring, now set the resulting distance on the plunger from the edge of the body. Mark (with marker or awl).
From the equipment you will need: a charged battery, three pieces of wire with a cross-section of 2 squares, with alligator clips and a plug for the control terminal (connector 50).
Strength check:
- Fix two wires with one end to the “ground” (body) of the part.
- Connect one of these wires to the negative terminal of the battery.
- Place the third wire with the plug on the positive battery.
- With one hand, press the part to the surface, “squeezing” the plunger to the mark.
- Place the plug on connector 50.
- Touch the end of the free wire (from the housing) to the lower power bolt.
- If the core overcomes the resistance and retracts, there is no problem, the retractor relay is working.
To evaluate the force, you need to securely fix the device (by the loop on the anchor) on a flat, solid base. The surface should not conduct current - for example, a wooden or cardboard-covered table.
battery
Since the starter receives power from the car’s battery, we first check the battery. Perhaps it is discharged or its service life has simply reached the end. Checking the performance of the battery is very simple:
- Insert and turn the vehicle ignition key. If at the same time there is not only no “response” from the starter, but also the instrument panel goes out, then the most likely cause is the battery. It's also worth trying to turn on the high beam headlights. If the lights on the panel dim, the battery is low.
- We evaluate the sounds that the car makes after turning the key. If a whole series of clicks is heard, then the battery is indicating a low charge.
- Check the battery terminals and contacts. There may be a current leak, causing the starter to lack power. If the ground contact constantly appears and disappears, then it should be disconnected from the body and cleaned well. It is also worth removing the negative terminal and using a multimeter to check the voltage of the battery outputs. If the device shows less than 9V, then the battery needs to be charged.
Healthy! At the moment of starting the power unit, the starter requires about 200 amperes. If the contact is insufficient, the device will receive too little charge and will not start working.
In this case, everything is quite simple, perhaps the driver forgot to turn off the headlights and the battery was discharged. We charge it or light it and hit the road. But, if there were no prerequisites for a strong discharge, then the problem may arise again. Therefore, it is better to additionally check the generator and make sure that the battery itself is in order.
But the dashboard lights may go out for other reasons.
Troubleshooting methods
If the check reveals a short circuit, it is easier to immediately replace the part with a new one. To restore normal conductivity on the “nickels” and correct a break in the holding winding at the fastening point, disassemble the spare part, desolder the terminals, clean the copper from oxide, reassemble, and tighten the fasteners.
Depending on the manufacturer and year of manufacture, the solenoid relay comes with a detachable housing (the cover of the power contacts is secured with screws) and with a one-piece housing (rolled into the metal of the housing). Diagnostics of both types of parts can be carried out without opening them, but there is a problem with repairs: with “one-piece” parts, the body is very difficult to assemble neatly and can easily be damaged during assembly. A cracked cover is unsuitable for further use. If you have little experience in fine work with electromechanical devices, it is easier to purchase a new, known working relay.
Battery
ATTENTION! A completely simple way to reduce fuel consumption has been found! Don't believe me? An auto mechanic with 15 years of experience also didn’t believe it until he tried it. And now he saves 35,000 rubles a year on gasoline! Read more"
The battery charge may be so low that the battery is unable to crank the starter directly. Naturally, this is not related to mechanical failure of the starter; the whole difficulty lies in the battery itself.
In order not to find yourself in a false situation, before checking the starter or disassembling it, you should properly test the battery. If it has been used for a long time, then this is another reason for a thorough check, because over time, the acid inside evaporates and the electrolytes no longer cope with their functions.
Thus, if the battery is discharged, it should be recharged, and if it does not hold a charge, then replace it with a new one.
It is extremely important to monitor the density of acid batteries. Testing this parameter is one of the mandatory stages of the maintenance process, which also involves diagnosing the acid level and measuring current.
You should know that in classic batteries the density is shown in g/cm3.
The technical condition of the battery is easy to determine, taking into account the criteria for electrolyte density. So, if the battery does not hold a charge, then you need to test the quality and level of acid in each section.
The test is carried out with a special device at plus 25 degrees Celsius. If the values differ from the standard ones, corrections are made to the readings, as indicated in the table below.
| Temperature of the electrolyte when measuring its density, ◦C | Correction to the hydrometer reading, g/cm3 |
| from -55 to -41 | -0.05 |
| from -40 to -26 | -0.04 |
| from -25 to -11 | -0.03 |
| from -10 to 4 | -0.02 |
| from 5 to 19 | -0.01 |
| from 20 to 30 | |
| from 31 to 45 | 0.01 |
| from 46 to 60 | 0.02 |
In the battery, the density should be maintained close to optimal values. It is important to know that the required parameters are accordingly determined by the geographical area in which the battery is operated. Taking into account the totality of all rules for care and operating conditions, the density of the battery must be established.
More details about this in the table below.
| Climatic zone (with average temperature in January, ◦С) | Electrolyte density | |
| Poured | In a fully charged battery | |
| Far North (from -50 to -30) | 1.27 | 1.29 |
| Northern zone (-30 to -15) | 1.26 | 1.28 |
| Central zone (-15 to -4) | 1.24 | 1.26 |
| South zone (-15 to 4) | 1.22 | 1.24 |
| Tropical zone (from 4 to 6) | 1.2 | 1.22 |