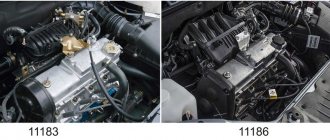
Almost all external surfaces of the engine and its components can be painted. Typically the valve cover and plastic casing are painted, but the cylinder block, intake manifold and exhaust manifold guard can also be painted. A well-painted engine will improve the appearance of the engine compartment. In addition, there are several practical advantages. For example, a cylinder block made of cast iron will be protected from rust by paint. On an engine painted in a light color, any leaks will be clearly visible.
In this article we will figure out how to paint the engine, how to properly prepare the engine and its components for painting.
To what temperature does the engine heat up?
For most vehicles, the normal operating temperature of a gasoline engine is between 90 and 105 degrees Celsius. When the temperature exceeds 110 degrees, the engine overheats. Above 120 degrees damage may occur. The engine oil can heat up from 150 to 200 degrees.
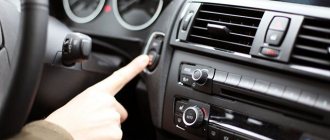
The engine temperature on the dashboard refers to the coolant, but the outside surface of the engine and its components are at a completely different temperature. Heating may vary. Areas distant from the exhaust manifold will have a temperature close to the coolant temperature, which is about 100 degrees. The valve cover can heat up to 65-120 degrees Celsius, depending on engine speed. The areas near the exhaust manifold are significantly hotter, around 200 degrees (the manifold itself heats up to around 500 degrees Celsius or more). Much also depends on the type of engine and weather conditions. A powerful V-twin engine in a car driving on the highway in the heat can get much hotter outside than a low-power engine in a car moving slowly on city streets in winter. Heat from the engine is dissipated by the cooling system and air flowing through the engine compartment.
Thus, we can conclude that automobile gasoline engines do not heat up too much, except in the area around the exhaust manifold. So, what should you paint your engine with?
Depot Analgin
Motorcycle repair and maintenance, customization
- home
- Team
- Customizing Proletarian Chronicles Increasing the compression ratio of the M72 internal combustion engine
- Installing a 12V generator on…
- Argon arc welding
- Goodridge Reinforced Brake Hoses
- Brake nomenclature
- Audi TT, tuning and repair
- Go to the forum
How to paint the engine?
You can find a wide range of high-temperature paints on sale. This paint is sold in both cans and cans for brush application. Reputable brands of foreign manufacturers: Duplicolor, Plastikote, Krylon, Rust-Oleum, POR-15, VHT (Very High Temperature), Valspar. There are also many other both foreign and domestic manufacturers. Both heat-resistant paints of different colors and special high-temperature primers and varnishes are sold. Heat-resistant paints are marked by the range of temperatures they can withstand without losing their protective and decorative properties. Engine Enamel paints, varnishes and engine primers are typically labeled 350-550F (350-500 degrees F equals 176-288 degrees C). Considering the above data on engine heating, this paint is suitable for most external surfaces. In addition to elevated temperatures, engine paint must withstand exposure to fuels and lubricants and salts. High-quality engine paints have good protective properties. When the temperature rises and falls, they do not change their protective and decorative properties.
Heat-resistant paints can be based on silicone or epoxy resin, or can be multi-polymer and include both components. Some paints contain ceramic particles, which give the paint heat resistance and wear resistance (withstands 1000 degrees). This paint can be used to paint the exhaust manifold or manifold guard, or even the exhaust pipe. Powder paints can be considered the most heat-resistant, but their application requires a special spray gun and subsequent high-temperature drying.
Many high temperature paints require heat activation (“baking”). It is necessary to clarify the need for this process in the instructions for the specific paint. This improves the appearance and activates all the unique protective properties of the paint. The curing (activation/baking) process must occur slowly.
This can be done by infrared drying, in the oven (if the size of the part allows), a hair dryer, a propane torch, or by natural heating of the engine.
Heating should be done after the paint has dried (usually within a day, it is better to check the instructions). If you heat it with the flame of a propane torch, then you do not need to heat the paint very much, you just need to quickly, superficially apply the flame. Same thing with a hairdryer. There is no need to heat the paint in one place for a long time; you need to evenly move it with an industrial hair dryer, having previously adjusted it to the desired temperature. You need to heat and cool the painted surface several times.
The manufacturer recommends the following process for heating high-temperature paint for its complete polymerization:
- Activation of a painted part removed from the machine . Heat to 350 degrees F for 30 minutes. Let cool for 30 minutes. Heat to 204 degrees for 30 minutes. Let cool for 30 minutes. Heat to 343 degrees for 30 minutes.
- Activation by engine heating . Start the engine, let it idle for 10 minutes, cool for 20 minutes. Start and let run for 20 minutes, cool for 20 minutes. Run for 30 minutes and you can drive the car to warm up the engine more.
Is it possible to paint the engine with plain car paint?
Oddly enough, a simple two-component automotive paint (with a hardener) sprayed with a spray gun gives good results when painting an engine. Two-part paint cures through a chemical process rather than simply drying like canned spray paint. Thus, the paint coating is stable. Cured paint shows good resistance to fuels and lubricants.
As was written above in this article, most of the engine surfaces heat up to a temperature of about 100 degrees. In the area close to the exhaust manifold it heats up more, but not above 200 degrees. For comparison, the body temperature of a black car in hot weather can reach 70–80 degrees. And if you add heating of the hood from the engine, the temperature may be higher. At the same time, the car paint on the body is not destroyed. While car paint is not specifically designed for the engine, quality two-part paint can withstand temperatures in excess of 100 degrees. The main advantage is the curing properties of two-component paint. Moreover, we already had practical experience in painting engines with two-component automotive paint with positive results. It is best to paint the exhaust manifold or exhaust manifold guard with a special high-temperature paint designed for the temperature range to which these surfaces reach.
Selection of coloring composition
ATTENTION! A completely simple way to reduce fuel consumption has been found! Don't believe me? An auto mechanic with 15 years of experience also didn’t believe it until he tried it. And now he saves 35,000 rubles a year on gasoline!
The first issue that must be resolved immediately is the choice of paint. The ideal option for painting the engine would be to use powder paint followed by polymerization in a hot oven. In this case, you need a tribostatic gun and equipment costing about 15 thousand dollars. Therefore, this option, which involves painting the valve cover and engine with your own hands, is no longer necessary.
In connection with the above, we will try to find an option acceptable for everyone who decides to paint the engine by hand. The most important criteria for choosing a paint coating are its high heat resistance and good paint properties on parts, bends and assemblies.
It is not necessary to buy only expensive paint with heat-resistant qualities. On some parts that are not exposed to high temperatures, a different, less expensive paint may be used. The result will not be any worse.
How to paint an engine?
It is convenient to paint the engine when it is removed from the car, and possibly disassembled. For example, the engine was removed for repairs. However, this is not always possible, so you need to look locally to see what access is available, what can be removed to improve access, or whether it will be possible to paint only individual engine elements.
Preparing the engine for painting
The key to any quality paint job is thorough surface preparation. In order for paint to adhere well to a cast iron engine block, the metal must be clean and dry. The cast iron surface has many small irregularities and pores that need to be thoroughly washed.
Use dish soap and a brush to remove oily stains. After this, use Scotch Brite to matt all painted surfaces.
Clean the surface with white spirit or another similar solvent.
It is necessary to remove not only dirt from the surface of the engine, but also traces of rust, if any. In some places you will need to use a wire brush and a drill attachment.
After the engine surface is cleaned, it needs to be dried. If possible, you need to blow out all areas of the engine with compressed air, or use a vacuum cleaner set to blow air. Before painting, you need to thoroughly degrease the engine surface.
Masking the engine compartment
After cleaning the engine compartment and drying it thoroughly, you can seal all the elements that cannot be painted. To do this you need to use masking tape. For larger areas, you can use newspaper or polyethylene. It is also necessary to cover all places where paint can get inside the engine.
It is not necessary to remove all components of the attachment, but it is better to remove the drive belts and spark plug wires. It may also be necessary to remove pipes that interfere with painting.
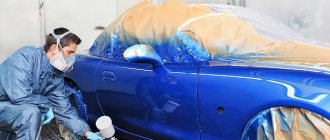
Engine painting
So, we figured out how to prepare the engine for painting and what to paint the engine with. Now you can move on to painting.
The paint layer should be thin so that the heat from the engine dissipates quickly. Automotive paints require prior application of primer to obtain good adhesion. It is better to use epoxy or special heat-resistant primer. 1-2 thin layers will be enough. No need to use filler primer.
Ensure good ventilation when painting. The surface to be painted should not be hot. You need to paint at a temperature of 19–35 degrees.
Before spraying the paint with a spray can, you need to shake it well so that all the paint components are mixed. Hold the can approximately 25–30 cm from the surface. If you hold it closer, smudges may form; if you hold it too far, the paint will fly dry and not spread.
The first layer is applied very thin, with a light spray. This layer will create the base for subsequent layers. After the paint has dried, you need to spray 2 full layers over the entire surface of the engine, with an intermediate drying period of 20 minutes between layers.
If a special high-temperature paint was used, it may require exposure to temperature to acquire all its unique properties. Methods for activating high temperature paint were described in this article above.
Putty and primer
If there are defects on the surface of the motor, you will have to putty. Only special compounds sold in construction or automotive stores are suitable for this purpose. Before work, the base of the putty mixture is combined with the hardener strictly according to the instructions, and applied with a spatula to the problem area. If the crack is significant, work in several layers with complete intermediate drying of each layer.
After final polymerization of the putty, the surface of the area is sanded with fine sandpaper or a special grinder wheel. As a result, the problem area should become perfectly smooth. It is degreased again and a primer is applied.
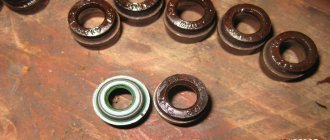
How to paint a valve cover?
It is better to remove the valve cover and then paint it, but you can do without removing it.
To remove the cover, you need to remove the spark plug wires and unscrew the cover fastenings. You will need to pry up the valve cover with a flat-head screwdriver, first from one edge, then from the other. It may be necessary to apply force to break the gasket seal. If the gasket is rubber, the cover will come off easily. The sealant will then need to be restored. After removing the valve cover, it is better to cover the top of the engine with polyethylene or a clean rag so that nothing gets in there. Once removed, place the valve cover on a clean surface.
The valve cover is made of aluminum and covered with a protective coating that may be partially destroyed. It is better to remove it with paint remover (see the article on paint removal, which describes in detail the use of remover). Spray or spread the remover until the old coating is saturated. Give the remover at least 10 minutes to work. Next, use a wire brush to remove any remaining coating. After removing the paint, rinse the surface of the valve cover generously with water and wipe dry with a towel. Preparation for painting is very important. Any missed, poorly prepared area will cause the paint to peel off. In addition to cleaning, you need to treat the surface with red Scotch-Brite.
Paint removal helps to easily remove the old coating.
To ensure that all oil contaminants are removed, saturate the surface of the valve cover with solvent. Spray the solvent and let it sit for 10 minutes. Then you need to wipe off the solvent and thoroughly wipe the surface with a degreaser. It is necessary to close all holes where paint and primer should not get in. Use masking tape for this.
Now you can move on to priming and painting. It is better not to paint under the scorching rays of the sun, but to do it in the shade or indoors. To paint, the valve cover must be placed on a hard, clean place; it is better that it rises slightly. You want all sides of the lid to be easy to paint.
It is better to apply a special high-temperature epoxy primer (Engine Enamel Gray Primer) to the aluminum valve cover. This will greatly increase the adhesion of the subsequent coat of paint by spraying 2 thin coats 10-15 minutes apart.
After the primer has dried for 30 minutes, begin painting. Apply the paint in thin layers, with intermediate drying between layers for 5–10 minutes. It may be necessary to apply up to 4-5 coats, depending on the hiding power of the paint. For better shine, the paint can be varnished.
The first layer is a special primer, then layers of paint.
After painting and drying, the valve cover must be replaced and screwed. If sealant was installed, new sealant must be used to ensure a tight and airtight connection. If you install an old rubber gasket, you need to clean it and coat it with a thin layer of oil.
You need to be careful not to overtighten the bolts and tighten the valve cover so that the gasket fits snugly. If the valve cover bolts are loose or too tight, oil may leak through the gasket.