Installation
- buy PTF (articles: 21900-3743011-00 and 21900-3743010-00), for example here. For Lada Granta FL, PTF catalog number: 261500097R.
- PTF activation button (article 759.3710-07.01A or 995.3710-07.06).
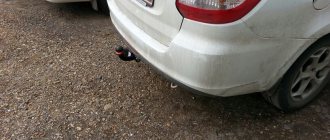
To install the PTF in the bumper, it must be removed. Then cut holes of the required diameter. Sand the sawn edges with sandpaper. And secure it to the fog lights in the bumper using screws. There shouldn't be any difficulties at this stage.
The whole process is also shown in the video:
Connection
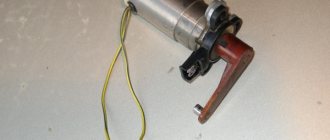
Below is a universal diagram for connecting a PTF using an additional button. The PTF kit contains everything necessary for installation and connection. In some cases, it may be necessary to lengthen the wires (cross-section of at least 0.75 sq. mm), be prepared for this.
It is recommended to hide the wiring under the hood in corrugation (cambric). We route the wires from the engine compartment to the passenger compartment through standard holes in the engine panel (the hole above the pedals). It is most convenient to place the relay inside the panel, behind the light control module (LCM). Plus, for switching the PTF, we take it from the battery or in the mounting block (most often this is a thick pink wire). Other useful contacts can be found in the table from the article on installing an alarm system. We install the button in any place convenient for you.
From the factory, the PTF is controlled via the light control module, diagram:
In our case, a separate, new button will be used to turn on the fog lights. The advantage of such a universal PTF connection is that the installation process is very simple and does not require much time and money. The disadvantage is that there is no indication of the fog lights on the dashboard, but this can all be solved by modifying the panel. By the way, the whole process is in many ways similar to installing a PTF on an old Kalina.
A car equipped with fog lights will come in handy for traveling in conditions of limited visibility, fog and other adverse weather conditions. Another important step will be the proper installation and adjustment of these external lighting elements. Despite the fact that fog lights were not installed from the factory in all trim levels of the Lada Grant, installing them yourself will not be difficult.
Read about how to correctly and safely implement fog lights on a Lada Granta into your lighting system with your own hands and get tangible results from all this, read below in our material.
Installation of fog lights in the bumper
Installing fog lights will not take much time. For accuracy, you need to take measurements and mark the locations of the headlight mounts.
For installation you need to follow the steps:
- Wash the bumper from dirt.
- Attach the fog lamp to the installation site and make marks for the frames.
- Remove the mounting frame from the headlight.
- Drill holes at the mounting location.
- Install the frame using self-tapping screws or bolts that are included in the kit.
- Screw the headlight to the frame.
- Install a switch in the cabin.
- Carry out wiring using one of the suggested methods.
- Carefully hide the cables in the corrugation and secure them to the main harness using plastic ties.
To install standard parts in factory locations, you need to remove the plugs and screw the bolts into special ebbs. In some cases, cars have all the necessary wiring for quick connection.
Preparatory stage (selection of PTF for Lada Granta)
In order to install the PTF in the Lada Granta, special installation locations will be required. Fortunately, the standard bumper already has such standard places from the factory. Their dimensions are completely similar and identical to the PTF from Kalina and have two different types.
Bosch brand and has a flat glass headlight block, and headlights with convex glass are produced under production in Kirzhach. These two types of headlights have the same mounts, so choose for yourself which headlights to buy for yourself.
Although, according to Grantovodov, glass from Bosch is much stronger.
On the left side there is a PTF from “Bosch” (LUCH), on the right side there is “Kirzhach”.
If you don’t want to “bother” with installing “Stock” elements, you can install standard PTFs; fortunately, you can also find a place for them in the front bumper.
First stage of installation
First of all, before installation, prepare the workplace for work, check the set of fog lights for integrity and also the set for connecting the PTF for the presence of all wires, relays and fuses. If you have never installed such lighting elements yourself before, then carefully study the car’s electrical wiring diagram and the PTF connection diagram.
How to choose
Even before connecting the fog lights, you should decide which type of lamps will be more preferable - halogen or gas-discharge, i.e. xenon. This is an important point, since different types of headlights are produced for these two types of lamps. If you install xenon in a headlight that is not intended for this purpose, consequences in the form of a fine or deprivation of rights are inevitable. PTF for xenon is marked with the letter “D”, for a halogen lamp “H”.
Other points to pay attention to when choosing are as follows:
After purchasing suitable PTFs, even before installing them in their permanent place, you should carry out a little preparatory work, namely, cover the glass with a protective film. This will protect the surface from clouding due to exposure to dust and dirt. In addition, the film will protect the glass from cracks when small stones hit it from cars ahead. You can also use liquid glass to treat glass, but this will not protect against chips and cracks. Before installation, it makes sense to purchase a universal kit for connecting fog lights.
Step-by-step preparation process
- First of all, remove the minus terminal from the battery.
- To make the PTF installation much easier, you need to remove the bumper.
- To do this, we unscrew 4 screws on the wheel arches, 2 self-tapping screws on the mount at the bottom of the bumper, as well as all the nuts that secure the engine crankcase protection or boot, which come from the manufacturer's factory. After this, unscrew the radiator grille.
Installation of PTF (photo instructions)
As you may have already noticed, the Lada Granta bumper is a single molded plastic form, in the body of which there are places for fog lights, hidden by plugs. The next step is to cut out these plugs.
- It's best to mark the location for the cutout first.
- This work should be carried out with extreme care and precision. In order to cut holes, you can use either a regular stationery knife or more professional equipment - a drill.
We cut out the hole as carefully as possible.
We clean all edges from irregularities.
We fasten the fog lights with bolts.
Installation of PTF via a separate button
In order to connect fog lights on a Lada Granta, you do not need to buy the entire set of wiring, relays and additional parts from scratch.
You just need to take a special kit for connecting the PTF for Lada cars of the Kalina/Priora/Grant family. This kit includes all the necessary materials, as well as detailed installation instructions. Still, as a rule, the main drawback of this wiring is the short wires for the PTF power button, but they can be extended without problems by cutting in the required length of wires.
Everything you need is already included in this set.
The installation should be carried out strictly according to the instructions, leading the wires from the PTF directly to the mounting block, along the bumper and side member, laying the wiring to the button itself. It is important to secure all wires with plastic clamps and place the wires in a corrugated tube where they are subject to maximum wear.
PTF connection diagram
We make the connection strictly according to this scheme:
When connecting the PTF according to this scheme, everything is guaranteed to work.
The only disadvantage of this option for connecting the PTF will be the absence of a warning light on the instrument panel.
Mounting options
Before installing the PTF, an electrical wiring diagram is developed - it will eliminate unnecessary wiring and guarantee the functioning of the electrical circuit.
Bumper mounting
There are 3 installation options: in the openings provided by the manufacturer, on a bracket or in a blind bumper where there is no niche for PTF.
To configure, use a homemade template. It is installed at a distance of 5 cm from the PTF. During adjustment, the coincidence line is set at a distance of 10 cm below the center of the lamps. By adjusting the headlights, they provide increased visibility and minimize the likelihood of being dazzled by oncoming cars.
Installation in a blind bumper
This option is labor-intensive; you have to cut out holes for the PTF.
Procedure:
- Remove the bumper and mark where the headlights will be.
- Drill holes around the perimeter, and then cut out a piece of the bumper with a sharp knife.
- Attach the headlights with appropriately sized bolts. Mount the protective cover - attach it to the bumper.
The headlights are adjusted using a special key - it is included in the package.
Other installation methods
PTF can be placed on a bracket made of durable steel. The bracket is fastened in accordance with the PTF installation standards. The part is secured with self-tapping screws. PTFs are installed at the mounting points and the wiring is connected.
Installation in the opening provided by the manufacturer:
- Raise the car by placing a 20 cm thick wooden beam under the front wheels.
- Remove the protective shields that cover the bottom of the bumper.
- Unscrew the fasteners from the plugs provided by the manufacturer.
- After inserting the PTF into the guides, attach them with self-tapping screws.
If non-original headlights are installed, the dimensions and mounting points may not match. Then the elements have to be adjusted.
conclusions
As you can see for yourself, in order to carry out a competent and correct installation of the PTF on the Grant frets, great skills and knowledge are not required. You just need to strictly follow our instructions and maintain skill and patience.
The last step will be to adjust the PTF so that driving the car is safe not only for you, but also for all other drivers traveling in the opposite direction.
In the standard configuration Norma, Standard, Lux, Liftback, fog lights (hereinafter referred to as PTF) are not installed in the front bumper. Instead of accessories, plastic plugs are built in. Let's look at how to install fog lights on a Granta liftback step by step below.
Preparatory stage (selection of PTF for Lada Granta)
The range of PTFs is not large; it is represented by several domestically produced models. Some owners claim that PTFs from Opel and Ford are compatible, but the information has not been verified.
| Name / manufacturer / article | Price, rub.) |
| LADA Granta (VAZ 2190) / Kalina 2 / LADA Largus |
OSRAM kit 21900-3743010
*prices are as of September 22, 2018.
Procedure for self-installation of fog lights on a Lada Granta liftback
We place the car on a flat platform with access around the perimeter.
- We dismantle the front bumper along with the radiator grille.
- Using a milling cutter, we cut holes in the openings for the PTF.
- We install the fog lights and secure them to the fasteners.
- We connect the blocks with wires.
- Reinstall the bumper. We check the functionality of the system.
Assembly order
- The first step is to make and connect the connectors to the fog lights, screw the ground wire (brown in the diagram) through the terminal to the body. Lead the positive one (blue in the diagram) to the battery area (it will be connected to the relay, terminal 30).
- We fix the relay in a suitable place and connect the wires. Red (87) to the battery via a fuse (you can use a relay with a built-in fuse). with a nominal value of 30 A. Black (86) to the body through the terminal (possibly to the battery negative). We run the control wire (green) from terminal 85 into the passenger compartment (drilling the engine shield is allowed). Pairs of terminals 85-86 and 87-30 are interchangeable.
- We install the button in any convenient place and follow some rules when connecting.
We choose the option of turning on the foglights with our own hands:
- autonomous (it turns on regardless of anything, but there is a chance to completely discharge the battery by accidentally forgetting to turn off the fogs) we connect to the dimensions or constant +ACC.
- use only when the ignition is on (it is not possible to use the backlight, for example from an alarm), take the plus from the ignition switch or look for IGN1, or better yet, IGN2 according to the circuit, device or control light. That's it, let's check the functionality.
Some tips
- The power button can be used from the rear fog lights.
- In connections it is better to use connection terminals with protective heat shrink rather than twisting and soldering.
- It is advisable to pack all non-standard wiring in corrugated material, which is both more aesthetically pleasing and safer.
Step-by-step process for preparing and installing fog lights
In the auto store we purchase: PTF, corrugation (at least 3.0 m), adapters - adapters for PTF with standard wiring.
- To remove the front bumper, unscrew three self-tapping screws on each side, four plastic clips, three “10” bolts in the lower perimeter;
- We remove the structure along with the radiator grille;
It is important to know. In the Norma and Standard models, there is no hole for adjusting the fog lights. The owners independently cut out a diameter of “8”. In the Liftback body modification, the opening is factory-made.
- We cut out the opening for the fog lights along the contour, it is factory-made;
- To make it smooth, treat the surface with a household hairdryer;
- We fix the headlights on three standard mounts;
- We connect adapters to each of the lamps, since the standard block with wires is short, its length is not enough;
- We put on the front bumper, screw it in with bolts and plastic clips.
Operating rules for PTF
There are no special requirements for the operation of fog lights, other than their placement on the car body and the rules of use in accordance with the provisions of the traffic rules. The switching circuit, when a separate button is installed in the cabin, is precisely designed to ensure the possibility of such operation.
In cases where it is not planned to use PTFs, it is better to cover them with protective covers. Otherwise, there is a high probability of damage to them by foreign objects during movement. If this happens, no button will help. In addition, the covers will avoid additional contamination of the surface of the PTF.
As for any lighting devices, as well as for PTFs, their correct and safe operation is possible if the fog lights are adjusted. It is best to perform it on special stands. Otherwise, you risk causing oncoming drivers to be blinded. And you should not exceed the recommended power of the light bulb used in the PTF. This will only cause the headlight housing to melt and worsen visibility due to the appearance of additional shadows on the road.
Installing fog lights on a car is quite possible on your own. Regarding the opinion about whether PTFs are needed or not, it is quite contradictory. In this situation, as in many others, the decision is made on the basis of everyone’s personal assessments. We can only say one thing - it won’t be any worse with fog lights.
Only a properly equipped car is as safe as possible. In many ways, this refers to the installed lighting equipment, without which movement in the dark is impossible. One of the important, although not mandatory, lighting devices on a modern car are fog lights, which are not always installed standard at the factory.
Those drivers who often have to make long trips or travel a lot see the point in installing PTFs themselves - driving without them in bad weather conditions is significantly difficult, and often completely impossible. Connecting the fog lights is not the most difficult job, so you can do it yourself.
Wiring diagram for fog lights Lada Granta liftback
Engine compartment
- We lay an additional wire from the right PTF headlight to the left one. We solder it and bring it into the engine compartment to connect to the relay.
- We fix the mass to the body at the place where the bumper is attached, maybe under the license plate, in the center.
- Do not forget to lay all electrical wiring in a corrugated material made of fireproof material.
Interior of the Lada Granta liftback car
- We lay the corrugated hose through the hole in the hydraulic corrector seal.
- The connection is best made at the ignition switch. That is, when turned off, the headlights will go out automatically.
- Open the glove box lid, press the side stops, and remove the lid.
- We stretch our hand into the cavity and carefully squeeze out the block of two buttons for controlling the heated glass and PTF.
- We power the minus from the heater button. Plus we won’t take it, since they will be activated at the same time.
- We connect the positive cable and install the unit again.
- We connect to the positive from the ignition switch unit (blue wire), it is located under the steering wheel.
- Finally, we power the relay - regulator: ground - wire from the button - end to the PTF - plus to the ignition.
In each specific configuration, the color scheme of the wire may differ. Read the diagram in the instruction manual for details. Classic colors: red, yellow, blue, brown. If you do not want to supply power through the ignition switch, the connection diagram is simplified with one less procedure.
How to connect
As a rule, the connection diagram for fog lights is identical for any car, and for installation you will need to prepare the following:
- PTF themselves;
- fuse 15 A;
- relay with block;
- electrical tape and wires;
- power button.
In order not to purchase all this separately, it is more convenient to use an installation kit for connecting fog lights, which includes everything necessary for proper connection.
Attention! It is not allowed to connect the PTF directly to the dimensions of the vehicle - their wiring and switch will not withstand the increased voltage, which will lead to equipment failure.
The algorithm for connecting fog lights consists of several stages:
After installing the electrical part, you need to install the PTFs themselves. Each of them has two wires - minutes for ground, positive ones go to the battery, through connector 30 to the relay. After checking the functionality, all wires should be carefully placed so that they are not exposed to strong heat and do not come into contact with moving parts of the engine. In order not to make a mistake with the cross-section, it is better to purchase a ready-made set of wires for connecting fog lights. Practical tips for connecting to video:
Features of self-connection
When performing the PTF installation work personally, the car enthusiast himself decides where to place the main units of the system - a fuse, a relay or an ignition unit if xenon lamps are installed. Despite the fact that each kit for connecting fog lights includes a recommended circuit, the final decision is still up to the driver. It is worth paying attention that, for example, it is better to place a relay in a place relatively protected from exposure to water.
All wire connection points will require the closest attention. Connecting fog lights is accompanied by the “formation” of a large number of twists, and each such connection must be reliably protected. For optimal protection against moisture and oxidation, it is optimal to use a special “heat shrink” that completely eliminates contact of the wires with the surrounding air. The places where the wires are attached to the ground can be treated with a special lubricant.
Let's say you installed fog lights and you need to figure out the connection. I hope we can help with this, there is nothing complicated in this situation.
First of all you need:
- minimal knowledge in electrical engineering (find +12v and ground);
- tools - knife, wire cutters, pliers, terminal block;
- consumables: blue electrical tape, heat shrink of suitable diameter, plastic clamps, automotive corrugation, mass and connecting terminals.
Select appropriate basic materials:
- 2-wire wire with a cross-section of 1.5 mm2 – approx. 6m;
- power relay with connector (regular light relay from VAZ 2108) - 1 piece;
- remote fuse 30A - 1 piece;
- power button (design to choose from, preferably backlit);
- connectors for fog lights (if not) - 2 pcs.
Now that everything is ready, let’s assemble such a circuit, Fig. 1.
Step-by-step instructions for installing a rear fog light
Many Lada Granta Liftback car owners are surprised to hear about this, but it is a fact. Of course, we are not talking about PTF in its classic form, but about a laser brake light. It is installed in the rear of the car and informs the driver behind about the vehicle. Since there is no strictly defined installation location, it is customary to fix it in the area of the license plate, under the lower contour of the bumper, in the spoiler. There are known cases of embedding an accessory inside.
A bright red light beam informs drivers behind, preventing accidents. The brake light is also used when it is necessary to notify the driver of the need to switch the high beam headlights. An alternative way to use lighting when backing up or parking in conditions of limited visibility. The maximum effective beam length is 25.0 meters. Exceeding the length does not guarantee the quality of lighting.
The voltage is supplied from the left/right brake light. Activation is possible either by pressing the brake pedal or by a separate button. The owner makes the decision based on personal beliefs. In practice, activation occurs with an autonomous button, since when driving backwards it is not always advisable to use the standard brake pedal. It is strictly forbidden to point the laser beam at the windshield area behind the driving driver.
What are the advantages of PTF
Drivers driving a car at night in rain, snow or fog constantly have to deal with a situation where, while driving along the highway, when the lights are turned on, especially the high beams, a white, almost impenetrable wall appears in front of them, through which nothing can be seen . The only thing that can be done in such a situation is to reduce the speed, turn off the high beams and drive using the low beam.
In such a case, visibility on the road is significantly reduced, it becomes difficult for oncoming drivers to notice your car, which increases the likelihood of an accident. In such a situation, the use of fog lights can provide very significant assistance when driving a car. PTFs do not illuminate the road for a significant distance in front of the car, but they make it more visible and also improve visibility in front of the car and on the side of the road.
This is due to the fact that the light produced by standard headlights and PTFs is of a different nature. Standard lighting devices create a directional flow of light, which, in good weather conditions, provides illumination of the road over a considerable distance. However, all this is true precisely for conditions of good visibility. In rain or fog, the beam of light is reflected and scattered on drops of water, and the driver faces an impenetrable white wall.
The peculiarity of fog lights is that they do not produce a directional light, but a wide one, spreading mainly in the horizontal plane. Due to this non-directional lighting, there is no scattering of the light flux, and it becomes possible to illuminate the road in front of the car and the side of the road.
It should be taken into account that during installation the PTFs are located closer to the ground; there are certain standards for this. As you know, fog almost always hangs over the ground, and these two factors provide greater lighting efficiency with such headlights.
Reviews
| from 2800 | |
| Kit 21900-3743011 | —/— |
| —/— 2190-3743011 | —/— |
| —/— 2190-3743010 | —/— |
| PTF wiring kit for LADA Granta (2190 2874498) | from 600 |
| PTF "LUCH" set 1118-3743010/11 | from 1800 |
| PTF glass (02B08507) Granta / Kalina 2 / Largus, Datsun | from 750 |
| AUTOMOTIVE LIGHTING / BOSCH (982469641) | from 2000 |
| № | Positive |
| 1. | Kirill , 36 years old: after purchasing a Lada Grant from the showroom, I immediately purchased a PTF from OSRAM 21900-3743010. I didn’t install it at the service station because I can do it myself. In general, I am satisfied with the quality of lighting, no complaints. |
| 2. | Vitaly , 29 years old: it is obvious that there are not enough foglights out of the box. I often drive at night and need a good view of the road. Since I don’t understand manufacturers, I entrusted it to a specialist at a service station. PTF Lada Granta liftback - my advice. |
| 3. | Georgiy , 37 years old: I’ve been working as a taxi driver for the second year, my shift often ends after one in the morning. The disadvantage of the standard lighting system is obvious. I bought a “LUCH” set 1118-3743010/11 at the market. The cost is 1850 rubles, the quality is good, installation couldn’t be simpler. |
| 4. | Victor , 25 years old: I work as an entrepreneur, purchasing goods from hundreds of kilometers away. By morning the products should be on the counter. To help the standard headlights, I installed PTF. Second week, no complaints. |
| 5. | Maxim , 28 years old: I leave my positive review of BOSCH fog lights (982469641). Special thanks to the store manager for his practical advice. |
| 6. | Konstantin , 37 years old: during scheduled maintenance, he ordered the service of installing a PTF from a technician. I chose OSRAM 21900-3743010 because the price and quality are at a decent level. Numerous positive reviews. |
| 7. | Vladimir , 48 years old: I was a little upset by the lack of fog lights from the box on the Lada Granta liftback. I had to install it myself last weekend. The lighting is good, no complaints. |
| Negative | |
| 1. | Alexander , 36 years old: not only are fog lights not included in the kit, but they also provide poor lighting. We are talking about a domestic manufacturer. Installed by BOSCH (982469641). I use it myself and recommend it to others. |
| 2. | Vitaly , 39 years old: installed domestic PTF OSRAM 21900-3743010. I regretted buying it, wasted money. The quality is below average, the angle of inclination is several degrees. I don't recommend it. |
| 3. | Vyacheslav , 37 years old: not happy with the installed fog lights, they don’t cover the side of the road, visibility is mediocre, the light is dim. |
Conclusion Every product has its own buyer. If you don’t find fault with a budget car, which is the Lada Granta Liftback, the quality of PTF lighting is good, it is enough for visibility. Of course, when compared with headlights from foreign brands in the premium segment, the advantage of the latter is obvious. In order to increase the service life of accessories, purchase products exclusively from certified points of sale. Require the provision of documents, check the functionality on site.