Good day to all! Today we will talk about such a device as an electric trunk lid or simply a rear door. Here you can call it whatever you like. The essence remains the same.
Many modern cars have a function that allows you to remotely and automatically open the luggage compartment. Everyone imagines what it is like when you don’t have to lift the lid manually. Therefore, many decide to install a similar element on a sedan, hatchback or other car body with a similar device.
The presence of an electric drive will significantly simplify closing and opening the trunk. Now there is a real opportunity to buy a universal set, connect it to your car and use it with pleasure and excellent comfort. I propose to study this issue in more detail and decide whether an electric drive is right for you.
Preparation for installation
We purchase a lock kit. There are a lot of manufacturers of auto parts on the market now, but there are no special differences between the sets. It is important that the device has a warranty card and instructions for use and connection. Also in the box you will find:
- Activator;
- terminal;
- Wires;
- Relay.
Additionally, you need to stock up on a set of standard tools: pliers, screwdriver, screwdrivers, multimeter, drill with carbide drill bit. In addition to the standard accessories, immediately buy additional wires; it is quite possible that the length of those you find in the box will not be enough for you. Black heat-resistant insulating tape, corrugated tubes, and clips for fastening the trim will also be useful, since very often the trim of car elements is attached to disposable ones.
Important! Be sure to check that the warranty card for the purchased device is available and filled out correctly. Regardless of who performed the installation, you or the service, you have the right to free repairs within a year.
Device set
Let's figure out why the throttle gets clogged
Like any vehicle component, the throttle valve must be serviced periodically. A common problem with this unit is blockage.
The throttle can become clogged for several reasons:
- Dust on the roads. Despite the location of the damper after the air filter, dust particles still enter the throttle air duct. If the filter itself is already dirty, then larger dust fractions enter the choke.
- Crankcase ventilation. On many modern cars, crankcase gases are cleared of oil in the oil separator and enter through the throttle into the intake system along with ordinary air. This principle is being implemented to comply with environmental standards.
- Exhaust gas recirculation. This system began to be used relatively recently, but has already become popular among automakers. The exhaust gases from the exhaust manifold again flow through the throttle into the intake for afterburning.
Now imagine that oil particles from the crankcase gases combine with dust and/or carbon particles from the exhaust gases. A dirty, oily film is formed, which constantly settles on the damper. After tens of thousands of kilometers, a layer of this dirt will disrupt the operation or completely disable the throttle assembly. Therefore, periodic cleaning of the throttle body is important for proper engine operation.
Equipping a domestic car with an electric trunk drive
If you install an electric drive for opening and closing the trunk on a domestic car (for example, a VAZ), the basic elements of the mechanism alone, which are already far from cheap, will not be enough. You will also need to install a trunk closer. Therefore, this method of improvement is irrational.
For domestic cars, a cheaper and simpler solution is suitable, such as using an electric window drive.
To bring this idea to life, you need to buy two ESP mechanisms (for example, consider products costing about three thousand rubles), a trunk lid control button (type 21100-3710620, cost 50 rubles) and a car window closing module (brand DenUp-RWC702m, price – 500 rubles).
Electric power windows "Forward"
We recommend: Checking and changing the camshaft position sensor yourself
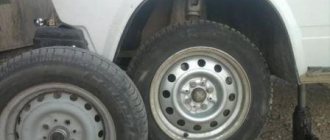
In our example, power windows are installed in the luggage compartment of the Lada Priora using a simple connection. The rear edge of the ESP rail is connected by a threaded connection to the crossbar at the back of the seat, on which the shelf rests. The front end of the window regulator bracket with a welded nut is screwed to the rear window mounting beam. To do this, a groove is cut in the beam into which an M6 nut would fit.
As a result, the assembled structure works without problems when you press a button specially located in the interior or on the remote control.
Connection diagram
Using one power window is ineffective, since it can hardly cope with its task, and the trunk lid closes askew.
The mechanism of two ESPs is free of these troubles. In some cases, the lock position will need to be adjusted.
What external “symptoms” indicate that the damper is dirty?
Problems in the operation of the throttle assembly do not always arise only due to the formation of deposits on the valve. These can be caused by failure of the position sensor, malfunctions of the drive and other malfunctions.
Even if you are not sure that the cause of the malfunction lies in the throttle valve, it is worth checking this unit and cleaning it in order to delay as much as possible the moment of formation of deposits, which sooner or later destabilize the operation of the engine.
If a problem arises with the electronic throttle, it is better to contact a service center - specialists will help you figure out its causes without the risk of damaging the mechanism.
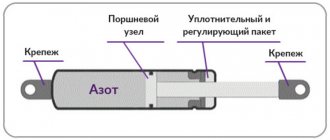
The principle of operation of the trunk opening and closing mechanism
How does the power rear door lift work? The electric trunk lock drive must open when the corresponding button is pressed by unwinding, thereby increasing the traction force and transmitting it to the rod. When voltage is applied to the unit, the system relay automatically repels the rod, which helps open the door. It must be taken into account that the electric tailgate drive cannot operate under load for a long time, as it may break due to overheating.
Designation of structural elements
Kit selection
Installation will not be possible if you do not have at your disposal a set of equipment necessary for installation. Buying it is not difficult, but you need to think about which specific option is best for you.
In total, 2 solutions to the current situation are being considered. Namely.
- Factory set. Purchased from trusted and reputable manufacturers. The kit contains almost everything you need, so you don’t have to assemble different elements. But the price is naturally higher;
- Amateur kit. Here we are talking about independently preparing all the necessary components. The motorist is faced with the question of where exactly to get them and how to choose a set so that everything fits. It is difficult to do this without relevant experience and certain knowledge. But you can save a lot of money financially.
We recommend: Do-it-yourself replacement of starter bushings on VAZ cars
I don’t know what exactly you will choose, but I want to give one piece of advice. Buy an electric drive equipped with an inertia mechanism. This will allow you to turn off the drive when an obstacle appears in the path of the luggage compartment lid. Roughly speaking, the drive will not pinch your hand or head when you poke around in the trunk.
So the inertial mechanism is a very useful thing.
If we talk about assembling a homemade kit, then it is important to collect several basic elements. These include:
- power window module 2 pieces;
- 2 mechanisms for lifting glass;
- wires;
- diodes;
- electromagnetic relay;
- five-pin relays;
- four-pin relays;
- Relay connection block;
- springs for the lid lock;
- power tools;
- wiring;
- nuts, bolts;
- Bulgarian, etc.
As you can see, the set is quite impressive. Therefore, consider whether it is worth trying to assemble the kit yourself. Sometimes it is much easier and even more economical to purchase a ready-made factory kit with a guarantee and all the associated benefits. Price does not always play a key role.
Let's sum it up
As you can see, installing an electric drive for the trunk lid is not a complicated procedure and can be done in a regular garage. The main thing is to take into account the nuances discussed above and follow the recommendations.
Let us also add that when selecting an electric trunk lid lock, it is important not to purchase a cheap product from an unknown manufacturer. The fact is that even if such a device works, the electric drive may not operate correctly and quickly fail.
We also recommend reading the article about which is better, LED lamps (light emitting diodes) in headlights or halogen/xenon. From this article you will learn about the advantages of LED bulbs and the disadvantages of LED bulbs compared to other solutions for installation in car headlights.
Of course, it is better to immediately purchase a good quality product and complete set (button, lock, electric drive mechanism and additional components) than to assemble all the elements separately. Only in this case can you count on precision operation and a long service life of the lock (provided that it is installed and connected correctly).
Installation of a standard electric drive on a Lada
Frets of the “tenth” family of recent years of production are equipped with an electric drive for opening/closing the trunk directly at the factory. Earlier series of cars do not have such equipment, so owners will have to install the electric trunk drive themselves.
Our example involves the operation of the electric trunk drive through a separate button in the cabin. Some alarm systems have an additional ability - to open the luggage compartment, so it is to this system that we will connect the electric drive. For installation you will need the mechanism itself and a mounting plate.
If you have an electric drive in a universal configuration, you will need to make the mounting brackets yourself.
In addition, you will need four meters of electrical wire and a switch button.
Before installing the electric drive, be sure to disconnect the negative terminal of the battery. Then we attach the lock drive and remove the protective casing, first removing the fastening clips. Using pliers, we straighten the rear end of the electric drive, unscrew the screw securing the rod, but not completely. The lock drive rod has been disassembled. Now the compartment cannot be opened from the outside, since the lock unlocking mechanism is disconnected from the lock cylinder.
Next, on the trunk lid amplifier, you should mark the locations for drilling the mounting holes for the electric drive attached to the lock. Using an electric drill, we drill holes with a diameter of 3 mm according to the marks. Then it is necessary to bend the rod and make a U-shaped bracket from 4 mm steel wire of such a width that its edges fit effortlessly into the exit points of the drive shell bosses.
An M4 thread should be pre-cut at each end of the bracket. Finally, we fix the electric drive using the prepared bracket and connect the traction lock to it.
We recommend: Advantages of ordering a car battery from a local company rather than from network companies
Through the green wire on the electric drive, current flows to the button due to the retraction of the rod. This wire is laid next to the original cable harness. We connect ground to the blue wire, which is negative. You can get power from any exposed area of the car body. The interior button is installed on the dashboard in the left corner of the mounting block.
The operating voltage will be connected to it from block Ш1 (pin 2). After assembly, you can check the functionality of the system by pressing the interior button. Everything should work smoothly.
Electric trunk drive: do-it-yourself installation
Installation of this device can be considered a luxury - many car owners can do without it for years. But it is obvious that such tuning ensures ease of opening, making life easier. Automatic opening by pressing a button in winter - there are no problems with the lock icing. The second advantage is that in this case it is much more difficult to break into the trunk door.
Today, more and more foreign cars have this convenient functionality; our manufacturers relatively recently began to equip luggage lids of cars in this way. If there is no electric drive in your car, this can be fixed.
Don't waste your time - use the Uremont search and get offers from nearby services with specific prices!
The operating principle of the electric trunk
There are devices with an electric motor and on magnetic plates that interact with a relay. The first option is durable and practical; in the second case, significant modernization of the car may be necessary due to a more complex design.
If the drive will be controlled from the interior, self-installation is more realistic (compared to linking to an alarm remote control - this requires an experienced auto electrician).
Models of these devices come with side mounts and standard ones. Reinforced specimens are more reliable and of better quality, but this is reflected in the price.
Experienced car enthusiasts recommend giving preference to inertial options in order to unload the engine (the rod rests - the internal combustion engine turns off, durable due to the lack of overheating).
How to install an electric trunk?
First you need to prepare the following list: screwdrivers, drill, pliers, screwdriver, spare wires, multimeter, corrugated tubes, insulating tape and clips. Read the car's repair manual (in particular, what is responsible for the power supply).
Electric trunk installation:
dismantle the plastic cover;
secure the device to the lid;
configure the mechanical connection of the unit with the lock;
attach a metal stick;
route the wiring using standard “paths” (if you need to “go around” bypass, use corrugated tubes);
the wires are routed to the cigarette lighter (often this is advisable);
dismantle the front part of this element and install the fuse;
the button is placed in a place convenient for the user;
pull the wires to the driver's door (bottom/top - at your discretion);
the connections are soldered and wrapped with electrical tape;
one “minus” is connected to the electric drive, the second to the control relay, the third to the alarm system;
connect the battery and test the result.
Selecting a power tailgate kit
For installation you need to buy a special kit. This may be a factory option, which immediately includes everything you need. A more economical solution would be to assemble an “amateur” set, but acquiring it requires knowledge and experience. Experienced car owners advise not to save money by buying a low-quality device. By spending a little more, you will save time and effort on fixing frequent breakdowns. Another bonus is that a high-quality drive increases the market value of the car (in the long term you will even win if you decide to sell the car).
Experienced car enthusiasts recommend choosing an inertial mechanism that “unwinds” before work. The traction force increases and goes to the pushing rod (the device does not overheat). Another advantage is that the mechanism can be turned off if there is an obstacle to the trajectory of the opening element. Your hands and head are protected from unexpectedly closing parts.
The standard package looks like this:
two lifting mechanisms;
a pair of electric lift modules;
Is it convenient to turn on the electric trunk lid remotely?
The remote control or alarm control is convenient, but requires batteries. Enabling is convenient because it saves time (for example, if you have shopping bags in your hands, having a remote option makes life much easier). A system with such functionality and an actuator is more difficult to install - it requires special skills and knowledge in the field of automotive electronics. A stationary button is more reliable and easier to use (another advantage is that you can do everything yourself). If you still choose the first option, contact a car service.
Installing an electric trunk
First, they debug the operation of the lock (disassemble and bend one of its teeth - this will make opening/closing easier). When purchasing a device, it is better to choose the option with a stem.
The next step is to disconnect the battery terminals and lay the wiring (it will take about 3.5 meters), powering it to the cigarette lighter. Remove the casing and place the wires up to the front of the car interior.
Disassemble the central shaft of the machine and place the fuse away from the mechanism and the cigarette lighter (safety measure). In the process, try not to make unnecessary holes, but if necessary, drill in a convenient place.
At the final stage, the unit is directly installed. When working independently, we recommend that you read the manufacturers’ recommendations and find detailed video instructions to avoid mistakes.
Advantages of the system in winter
The operation of opening a frozen lock can take a lot of effort from the car owner. You can use boiling water, a lighter, or just wait in a warm garage. Such “dances with tambourines” take up time, and access to the trunk is sometimes needed urgently. If you are not mentally prepared for such tests, take care of yourself and install an electric trunk drive.
Criteria for choosing an electric lock
When buying an electric trunk lid, you need to take the choice seriously. Our market offers customers many different devices in different price categories, but it is better to immediately exclude cheap options. Such a unit will not be able to work for a long time, because the low price, as a rule, is due to the same quality of production of the device. Therefore, immediately exclude Chinese options - in this case it is better to give preference to Russian or imported devices.
When purchasing a device, immediately consider how it will be controlled. For example, if it opens with a button, then you can purchase a regular device, which you can install with your own hands without any problems. But if you want the device to work from an alarm key fob, then it is recommended to take a more complex electrical device, and the connection procedure must be carried out by a qualified electrician.
Today you can find several models of devices on sale, by type they are:
- Standard. Such systems are equipped with side clamps and are cheaper.
- Reinforced. Their cost is higher, but their quality is higher. In addition, such devices will be more reliable in terms of operation.
Experts recommend giving preference to devices with an inertial mechanism. Thanks to this, a lower load will be placed on the electric motor, since when the rod hits an obstacle, it will simply turn off (video author - Sergei).
System TIDA-01424
The block diagram of the TIDA-01424 reference project is shown in Figure 3. The main elements of the board are two PGA460-Q1 ultrasonic rangefinder microcircuits, which perform all the main work associated with analog signals.
Rice. 3. Block diagram of TIDA-01424
The measurement results, which are essentially the distance to each object detected by the sensor, are compared to user-defined optimized threshold levels and used to make subsequent decisions. The flexibility of the system is due to the ability to receive digital data directly from the PGA460-Q1 rangefinders via the USART serial interface and use them as input data for the gesture recognition algorithm.
The main components of the analog part of the system, including two rangefinder chips PGA460-Q1 with matching ultrasonic transformers and other necessary wiring, a 3.3-volt LDO stabilizer TPS7B6933-Q1 and a TPS3700-Q1 monitor with a power intelligent power switch TPS1HA100-Q1 are mounted on a compact double-sided BoosterPack format board. A special feature of this form factor is the presence of a 20-pin connector, which carries USART signals and several standard input/output ports (GPIO). This connector is fully compatible with LaunchPad microcontroller boards manufactured by Texas Instruments. It is on such a board, running the MSP430F5529 microcontroller, that the rangefinder signal processing algorithms are implemented, the source code of which is available for free download on the Texas Instruments website.
The system is powered by a standard 12-volt battery. At the same time, the system has protection against polarity reversal, undervoltage and overvoltage, and can easily withstand overvoltages of up to 40 V, which arise, for example, during problems in the vehicle’s on-board network.
In passive mode, with the ultrasonic emitters turned off, the current consumption of the system is less than 100 μA, which allows it to be connected directly to the battery without the risk of significant discharge of the latter.
All system components are designed for use in automotive applications and have a corresponding temperature range of -40...105°C.
The overall system consists of two boards (analog signals and a microcontroller), indicated in blue in Figure 3, and requires the connection of only three external components: two ultrasonic sensors and a power supply. The main technical characteristics of the system are given in Table 1.
Table 1. Main technical characteristics of TIDA-01424
| Parameter | Meaning |
| Number of ultrasonic transceivers | 2 |
| Type of ultrasonic emitters | Sealed with transformer control |
| Operating supply voltage range, V | 6…18 |
| Permissible supply voltage range, V | -20 (reversal of polarity)…40 (sharp loss of battery load) |
| Current consumption in operating mode, mA | no more than 40 |
| Current consumption in off mode, µA | no more than 50 |
| Object detection range, mm | 200…500 |
| Gesture duration, s | 1…4 |
| Sampling rate, samples/s | 5…40 |
| Printed circuit board | Double-sided, BoosterPack form factor |