If you begin to notice that the outside air temperature readings on your car’s on-board computer differ from the actual values, then the outside air temperature sensor is to blame. Of course, if you are stuck in a traffic jam in the summer heat, and at this time you notice that the readings have increased sharply, there is nothing strange here, since at low speed or while parked with the engine running, the heat affects the sensor, it is not ventilated and starts slightly overstate the data.
The air temperature sensor is located at the bottom of the front bumper, but you won’t be able to remove it right away; you’ll have to do some more work. More on everything below in order.
First you will need to unscrew the lower grille of the front bumper, which is attached to 2 screws:
Shown below with magnification for a better understanding:
After both bolts are unscrewed, you can begin to remove the grille, first using a flat-head screwdriver to pry the grille from above and remove it from the latches:
After that, on the right side inside we find this part, which will be the sensor. You need to pull it a little to the right and remove it from its seat:
And then pull it out along with the wire, as shown in the photo below:
To replace the air temperature sensor, you need to disconnect it from the plug with the power wires, for which you need to press the latch and pull the plug to the side:
Now everything is ready, you can safely make a replacement by first purchasing a new part:
We perform the installation in reverse order, after which we check the functionality of the new part.
Hi all! My Standard configuration does not include an outdoor temperature sensor; in theory, and unlike the Standard, there should be no wires. But today, by chance, I saw this picture for the first time? What is this, a tidy glitch? Or are the wires still laid there and they are shorted? Who can tell me what? PS This is not the coolant temperature, it is shown separately there further in a circle.
How to replace the ambient temperature sensor on Kalina?
The vehicle system is equipped with a variety of instruments that measure this or that indicator, which are aimed at ensuring the most comfortable operating conditions and functioning of the car.
Some types of analyzers are vital, for example, DTOZH - coolant temperature detector. It monitors the level of heating of the cooler, thanks to which the system can regulate the operation of the engine ventilation complex, the level of fuel enrichment and speed.
External air temperature sensor
Other devices are not so indispensable in a car, but their use helps make the use of the car more comfortable and the trip more enjoyable.
Such devices include an external air temperature sensor.
This device should not be confused with an intake air temperature detector, which helps the engine operate properly. Both of them can carry the abbreviation DTVV, so you should be doubly careful when it comes to these devices.
External temperature sensor on Kalina
This device is used, as a rule, to optimize the operation of climate control and, together with a temperature sensor in the cabin, help maintain an optimal microclimate inside the car, thanks to which the trip becomes comfortable.
The outside temperature sensor is located behind the bumper radiator grille, which will need to be removed if there is a need to replace the device.
What are the signs of a bad sensor?
First of all, this is a discrepancy between the temperature on the control panel and the actual data. That is, if it’s frosty outside the window, and the device claims that it’s +15 there, this is a good reason to pay attention to it.
It is not uncommon for an error to occur that causes the detector to show -40 degrees Celsius, regardless of the weather.
In any case, if the discrepancy with the actual temperature is more than seven degrees, it is necessary to check the serviceability of the analyzer.
You should not lose sight of the entire system in which the device operates - these signs may also indicate that the wiring connecting the detector to the computer is damaged, or the contacts have oxidized.
For what reason can the Kalina ambient temperature sensor break down?
Due to its rather open location, this device can be damaged by a variety of factors:
- mechanical reasons - a stone hitting the detector body can easily damage it;
- low ambient temperatures;
- the third reason, already mentioned above, can lead to the device breaking down - malfunctioning wiring or oxidation of contacts.
Replacing the sensor
- The process of installing a new device should begin with a complete blackout of the car (disconnecting the battery);
- after this, the radiator grille is removed (nothing complicated, just unscrew two bolts);
- the sensor is de-energized and disconnected from its socket;
- the serviceability of the device is checked and, if it breaks, a new one is installed in its place;
- the wires are connected, the grille is put in place, the battery is turned back on;
- All that remains is to start the engine and check the operation of the climate control.
A special device will help you verify the malfunction of this device - a multimeter in ohmmeter mode, which is used to diagnose thermistors.
YouTube responded with an error: The provided API key has an IP address restriction. The originating IP address of the call (87.236.20.136) violates this restriction.
Source
Replacing the device
Sooner or later, everything falls into disrepair, and the coolant sensor in the Lada Kalina also faces the same fate.
If any problem does occur, the device cannot be repaired; it is simply replaced. But don’t worry about this, this procedure is not complicated, it can be done independently, or you can turn to professionals for help.
If you are sure that the problem is still in the coolant sensor, proceed with replacement
. First you need to drain the coolant, then remove the air filter. Next, the plastic clip opens and the sensor harness connector is separated. After this, the element can be easily removed from the thermostat housing. Installing a new device occurs the other way around: the element is first screwed into place where it should be, and only then fixed with all the clamps. The latest thing is to replace the antifreeze.
Naturally, when performing actions, you must follow all safety rules and be careful not to harm your property or yourself. As you can see, the procedure is actually not complicated.
, but if after this, malfunctions are observed in the operation of the car, and the engine in particular, it is worth contacting a service station and completely checking other systems.
Source
How to check the outside air temperature sensor on LADA
On all modern LADA cars, depending on the configuration, an external air temperature sensor can be installed, which transmits readings to the instrument panel. If the instrument cluster shows incorrect outside temperature values, then this sensor may be faulty. Before replacing, check it with a multimeter.
Where is the air temperature sensor located?:
- on Lada Granta/Kalina/Priora in the lower cross member of the body (photo);
- on Lada Vesta/XRAY in the lower left corner of the engine cooling radiator deflector (photo).
General information
As noted above, various sensors are installed on cars for a reason. They are necessary for the efficient operation of the system as a whole. As for the outside air temperature controller, it is mostly informational in nature and shows the temperature outside. But this does not apply to all systems. Sometimes the coolant temperature sensor is connected to the engine electronic systems. This is necessary to start the engine in the cold season and is a very convenient addition to the “autostart” function.
Unfortunately, not all cars have a temperature sensor built in at the factory. Many VAZ models do not provide this. But it doesn’t matter, let’s look at how to install it and what is remarkable about this process.
Changing the outside air temperature sensor
If you begin to notice that the outside air temperature readings on your car’s on-board computer differ from the actual values, then the outside air temperature sensor is to blame. Of course, if you are stuck in a traffic jam in the summer heat, and at this time you notice that the readings have increased sharply, there is nothing strange here, since at low speed or while parked with the engine running, the heat affects the sensor, it is not ventilated and starts slightly overstate the data.
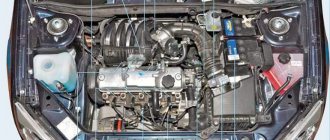
The air temperature sensor is located at the bottom of the front bumper, but you won’t be able to remove it right away; you’ll have to do some more work. More on everything below in order.
First you will need to unscrew the lower grille of the front bumper, which is attached to 2 screws:
Shown below with magnification for a better understanding:
After both bolts are unscrewed, you can begin to remove the grille, first using a flat-head screwdriver to pry the grille from above and remove it from the latches:
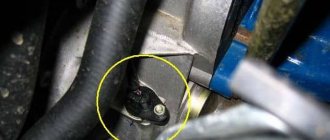
After that, on the right side inside we find this part, which will be the sensor. You need to pull it a little to the right and remove it from its seat:
And then pull it out along with the wire, as shown in the photo below:
To replace the air temperature sensor, you need to disconnect it from the plug with the power wires, for which you need to press the latch and pull the plug to the side:
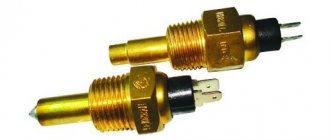
Now everything is ready, you can safely make a replacement by first purchasing a new part:
We perform the installation in reverse order, after which we check the functionality of the new part.
Source
CONTROL UNIT FOR VENTILATION AND HEATING SYSTEM LADA KALINA
Ventilation and heating system control unit: i — air temperature regulator; 2 — fan operating mode switch; 3 — air flow distribution regulator; 4— air recirculation control lever; 5 - rear window heating switch
The intensity of the air supply into the cabin is regulated by turning the handle of the fan operating mode switch. This turns on one of four fan speeds.
By turning the switch handle clockwise, we increase the fan rotation speed.
The position of the flow distribution control handle sets the following directions of air flow in the cabin:
By turning the handle of the air temperature regulator, we change the temperature of the air entering the cabin. To increase the air temperature, turn the regulator handle to the left, to the red sector of the scale, and to decrease the air temperature, turn to the right, to the blue sector.
The air recirculation mode (stopping the flow of outside air into the cabin) is recommended to be used when you need to quickly lower or increase the air temperature in the cabin, as well as when driving in a dusty area or in dense traffic to prevent exhaust gases from entering the cabin. The recirculation mode can only be turned on for a short time, since this does not allow fresh air to enter the cabin and the windows may fog up. To turn on the air recirculation mode, move the air recirculation control lever to the extreme right position. To allow outside air to enter the cabin, move the lever to the extreme left position.
The directions and intensity of air flows through the side and central deflectors of the ventilation and heating system are regulated by corresponding rotation of the guide vanes and changing the position of the deflector flaps until they are completely closed.
Central deflectors of the ventilation and heating system:
1 — handwheel for adjusting the direction of air flow left and right; 2 handwheel for adjusting the flow intensity through the deflectors (when rotating up, the damper opens, down, it closes)
The direction of air flow through the deflector up and down is adjusted by pressing on the top or bottom of the deflector.
The directions and intensity of the air flow through the side deflectors of the ventilation and heating system are regulated in almost the same way (the flow intensity adjustment handwheel turns left and right).
Video on the topic “Lada Kalina. VENTILATION AND HEATING SYSTEM CONTROL UNIT"
Quick repair of the heater regulator on the Lada Kalina
Lada Kalina - Replacing the heater control unit.
Repair of the Lada Kalina 1 stove (replacement of the cable, heater lever block)
Installation
You will need : buy a temperature sensor (catalog number: 21150-3828210-00, 21150-3828210-02 or 21150-3828210-03, approximate price - 200 rubles), protective corrugation 3 meters and 3 meters of wires. Find out the model and firmware version of the instrument cluster, it should be 2190-3801010-20 (firmware 90 or 91) or 2192-3801010-20 (firmware 06 or 07). On other versions, the operation of the sensor is not guaranteed (it needs to be flashed).
Procedure:
- We attach the outside air temperature sensor to its standard place behind the bumper, slightly above the towing eye (it is not necessary to remove the bumper).
- We stretch the wires from it along the hydraulic corrector hoses, fastening the corrugation with the wires with plastic clamps.
- From the engine compartment to the passenger compartment we pull the wiring through the hole in the engine panel. Inside, the wires will appear above the clutch pedal.
Connection
Procedure:
- We insert one wire into the black block of the dashboard between the pink and black and white wires.
- We connect the other wire to ground using a screw under the panel.
We check the presence of outside temperature readings on the display when switching modes. We perform assembly in reverse order. In the comments, leave the versions of your panels on which you managed to install a temperature sensor.
The installation of DTNV is also shown in the video:
Do you know how easy it is to change the interior of your car using vinyl film?
Share on social networks:
Found an error? Select it and press Ctrl+Enter..
Source
Outside temperature sensor viburnum
If you begin to notice that the outside air temperature readings on your car’s on-board computer differ from the actual values, then the outside air temperature sensor is to blame. Of course, if you are stuck in a traffic jam in the summer heat, and at this time you notice that the readings have increased sharply, there is nothing strange here, since at low speed or while parked with the engine running, the heat affects the sensor, it is not ventilated and starts slightly overstate the data.
The air temperature sensor is located at the bottom of the front bumper, but you won’t be able to remove it right away; you’ll have to do some more work. More on everything below in order.
First you will need to unscrew the lower grille of the front bumper, which is attached to 2 screws:
Shown below with magnification for a better understanding:
After both bolts are unscrewed, you can begin to remove the grille, first using a flat-head screwdriver to pry the grille from above and remove it from the latches:
After that, on the right side inside we find this part, which will be the sensor. You need to pull it a little to the right and remove it from its seat:
And then pull it out along with the wire, as shown in the photo below:
To replace the air temperature sensor, you need to disconnect it from the plug with the power wires, for which you need to press the latch and pull the plug to the side:
Now everything is ready, you can safely make a replacement by first purchasing a new part:
We perform the installation in reverse order, after which we check the functionality of the new part.
Hi all! My Standard configuration does not include an outdoor temperature sensor; in theory, and unlike the Standard, there should be no wires. But today, by chance, I saw this picture for the first time? What is this, a tidy glitch? Or are the wires still laid there and they are shorted? Who can tell me what? PS This is not the coolant temperature, it is shown separately there further in a circle.
FakeHeader
Comments 16
GUYS, STUPID QUESTION: WHERE DOES THE SENSOR ATTACH? PLUGGED EVERYTHING IN WORKS JUST HANGING IT IS NOT GOOD DOES IT HAVE ANY LEGAL PLACE?
There is a regular place where such a loop sticks out. If you want, attach it to a plastic clamp anywhere, just not to the radiator and other hot parts))))
This happened too, I didn’t understand it either. Also Standard.
Hello! was there a wire?
It doesn't come out of the harness anywhere. In my case, I need to re-stretch it.
I had such a trick yesterday, the car is May 14th, mileage 2800, standard, the on-board engine is always set to fuel consumption. And so, yesterday I started it and I don’t understand, it shows the street temperature, the readings only appeared yesterday. Then it happened like this, for the first minute, while I was surprised, it showed 10′ But then for 2.5 hours it showed something similar to the truth -1′ -2′ I called the engineer if they would fix this position. Today I went out just for fun to look at 0″ on the street, but it shows 13 -15 In general, they also stuck a sensor in me
It was so. Norma 027. I took it home from the salon after purchase. It was raining, the computer showed either -32 or -23. A couple of days later it also showed three hyphens, then the item disappeared completely. I thought about showing it to the dealer at MOT, but I looked at the brochure with the equipment. There shouldn't be a sensor there at all. Actually, he wasn’t there. But there was a connector. I bought a sensor for 110 rubles, inserted it, the item with the temperature appeared on its own, it shows everything normal.
There was similar garbage, the next day I found a wire with a connector sticking out under the bumper. I went to the OD, they said “your sensor was probably stolen or was knocked off by a jet at the car wash,” they installed the sensor for 150 rubles, it seems. As a result, on the “norm” configuration I now have an outside temperature indicator. But I still don’t see the engine temperature in the original dashboard, even after reflashing it according to the AvtoVAZ recall (expressed in “tirik-tik-tik” turn signals). We have to use the “staff”. By the way, the engine does not warm up above 78 in winter - as I understand it, this is a global problem?
How to check the ambient temperature sensor?
The easiest way is to replace the sensor with a known good one. If you have an ohmmeter, you can measure the resistance at its terminals and compare it with the data from the table:
On a Lada Vesta car, to check the sensor, it is proposed to assemble an electrical circuit:
Then apply voltage U=3.2 V ±1% to the sensor through a constant resistance R=4420 Ohm ±1%, which simulates the instrument cluster. Using the voltage Ux, determine the resistance of the sensor. Data to check in the table:
Manufacturer's recommendations: Check the sensor by immersing the sensor in a reservoir with silicone liquid at a certain temperature, after 3 minutes of exposure, measure the voltage Ux.
Note: In summer, in traffic jams, the readings of the outside air temperature may be too high, because... the sensor is not blown with air, and is heated by the hot asphalt and engine.
Source