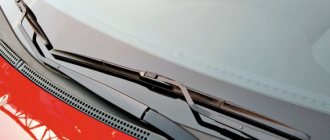
Operating a car without working instrument lights becomes uncomfortable, so in this article you will find 5 reasons why the lights may go out. In a situation where the backlight of the VAZ 2114 instrument panel does not light up, it is difficult to track the readings of engine temperature, fuel level, tachometer and speedometer, so the problem should be resolved promptly.
Useful video:
Solutions
First of all, you need to check the backlight bulb; if it does not work, it needs to be replaced. Also, the reason that the instrument panel does not light up in the VAZ 2114 may be a violation of the integrity of the wiring. She should be called. A damaged fuse and electrical circuit, as a rule, cannot be repaired - they simply need to be replaced. Let's look at quick ways to solve these problems.
One or more light bulbs do not light up
One of the most common reasons why the instrument panel lighting on a VAZ 2114 stopped working is burnt out light bulbs. The electrical circuit in this model is designed in such a way that if one light source fails, all of them stop working. To determine exactly what is broken, you will need to ring the entire system using a tester. Another reason for the lack of lighting may be the independent installation of LEDs instead of standard incandescent lamps. In this case, an error is often made in the distribution of power or the electrical parameters of the led elements are calculated incorrectly.
Wiring
Damage and rupture of wires in the power supply system of the on-board network is not uncommon on a VAZ 2114 car. To locate the disconnection point, it is necessary to test all possible wires that can be found surrounded by the instrument panel illumination. In addition, the light bulbs may not light due to the formation of oxide deposits on the pads. To fix the problem, you will have to dismantle it and clean the entire contact group.
Fuse
Before you start calling the electrician of the VAZ 2114, the fuse box must be dismantled. Otherwise, the diagnostics will not be complete and will not reveal a complete picture of faults in the instrument panel lighting system. The cause of breakdowns should be sought both inside the electrical wiring distribution system and outside - in the seat. If during testing it is determined that the module is faulty, it should be replaced with a new one, since such equipment simply cannot be repaired.
The board is damaged
A violation in the electrical circuit of the dashboard system board on the VAZ 2114 is the most serious problem of the above. Despite the fact that many radio enthusiasts still repair and eliminate this defect, in practice it is better to immediately replace it with a new one. The main reason that the backlight does not light in this case is a previous short circuit in the circuit. External signs of this will be as follows:
- If the light source is an incandescent light bulb, the wiring connection to the board will be black.
- If LED elements are installed, a darkened junction between them and the base will indicate the destruction of the microcircuit.
Manufacturer's choice
The second important factor when choosing low beam lamps for Ford Focus edition 3 is the manufacturer. Initially, branded light sources from the Osram line are used in the basic configuration. However, often as an alternative, car users use analogues of brands such as:
- Philips.
- Koito.
- Behr hella.
Osram H7 Original
Original halogen lamp in low beam optics for the 3rd generation Ford Focus hatchback. Its power consumption is 55 W at an operating voltage of 12 V. The luminous flux reaches 1.5 thousand lumens at a temperature of 3200 K. The guaranteed service life is 6 months. To correctly replace it with a similar new one, you must follow the installation rules - do not touch the flask with your bare fingers. Otherwise, the fatty marks left behind will significantly reduce its durability.
The lamp is used as an analogue of the standard one installed in the low beam optical system on the Ford Focus 3, and therefore has similar parameters. The only difference is a 60% stronger luminosity at the same color temperature - 3.2 thousand K. The use of such a lamp allows you to extend the visibility horizon and improve the comfort and safety of driving a car.
Koito Whitebeam h7
The lamp belongs to the category of high-temperature lamps with a rating of 4.2 thousand K. With a power consumption of only 55 W, it produces a luminosity of 100 W. At the same time, the low beam combines softness and richness - qualities that do not overstrain the driver’s vision. Installing them on standard Ford Focus-3 optics does not lead to problems with deformation of the headlight housing and burnout of the wiring. Durability with average use reaches 2-3 years.
Another standard halogen lamp for installation in the low beam optical system on a Ford Focus 3. A characteristic feature is a white-blue tint. Other advantages include low cost and long service life.
MAIN PANEL ELEMENTS
The main place on the dashboard is reserved for the tachometer and speedometer, the fuel quantity sensor and the current fluid temperature in the cooling system. Let's look at the main symbols on the VAZ 2114 panel in more detail.
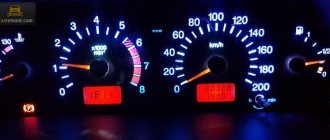
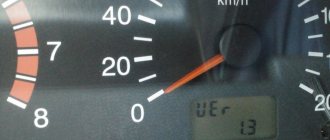
Tachometer
The VAZ 2114 tachometer is a pointer device, the signal to which is sent by the on-board computer of the fourteenth. The tachometer displays data on the number of revolutions of the crankshaft at the current time. The tachometer is divided by scales into 5 units, every second of which is digitized. The maximum numerical value of revolutions is 80.
To find out the actual engine speed when the car is moving, the tachometer indicator must be multiplied by 100. For example, if the arrow is located at 40, then the crankshaft is performing 4000 revolutions per minute.
The manufacturer has indicated a critical speed value, upon reaching which the engine of the fourteenth may fail due to excessive load. It is highlighted on the device with red shading; this value ranges from 6000 to 8000 rpm.
Under the tachometer there is an electronic window, which displays data about the current time and ambient air temperature.
Speedometer
The fourteenth has an induction dial speedometer, which is located on the right side of the dashboard. The speedometer is also divided into sectors, the division size is 10 kilometers. The maximum mark is 200 km.
The speedometer operates from a speed measurement sensor located inside the gearbox. It is worth considering that all induction speedometers, including the one installed on the fourteenth, have an acceptable error level of 5 km/h.
At the bottom of the speedometer needle there is an electronic screen on which you can see data on the total mileage of the car and the mileage from the last starting point. The driver himself can set the starting point; for this, under the number 200 on the speedometer there is a manual switch that resets the current mileage count to zero.
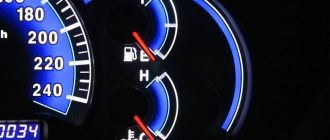
Gasoline quantity sensor
On the right side of the instrument panel of the VAZ 2114 (the instrument panel of the VAZ 2114 and the designation of the indicators on the instrument panel of the VAZ 2113 are completely similar to the fourteenth model) there is a dial gauge for the current amount of fuel in the gas tank.
The sensor scale is divided into three marks: 1 – full tank, ½ – tank half full, 0 – empty tank.
Next to the sensor there is a color indicator - a light bulb that lights up orange when the fuel level is close to a critical minimum. When the light comes on, you need to refuel the car within 20-30 kilometers.
Cooling system fluid temperature sensor
The coolant temperature sensor is divided into gradations of 20 units. The minimum temperature is 50, the maximum is 130 degrees. The critical temperature zone starts at 105 degrees and is marked with red shading.
If the coolant of the fourteenth boils, then you must immediately stop the car and turn off the engine, since driving in this mode is fraught with serious troubles, even complete engine failure.
If the temperature sensor on the VAZ 2114 dashboard does not work, you need to check the wiring through which the sensor is connected to the coolant container. It is also possible that the sensor contacts may oxidize; they must either be wiped with a solvent or the sensor replaced with a new one.
VAZ 2114 devices do not work
If on a VAZ-2114 car on the instrument panel none of the indicators installed on it work (speedometer, odometer, tachometer, fuel level and coolant temperature indicators), then the first thing the driver will have to do is check the integrity of fuse F3, which is located in the mounting block. If it has burned out, then before replacing it, you need to find the reason why it burned out, otherwise the newly installed new fuse will have the same fate as the previous one. Most often, fuses burn as a result of a short circuit.
Even if the fuse is intact, then do not be lazy to take it out and check the condition of the contacts. There are cases when the contacts oxidize, and the electrical circuit in this place is interrupted. After making sure that the fuse is intact, the next step is to check the ignition relay, which is located inside the car to the left of the steering column. It is attached to a pin upside down. In the block where this relay is inserted, you can try to short-circuit the power wires using a jumper. If the instrument panel comes to life, the ignition relay will have to be replaced.
If the ignition relay is working properly, there are only two possible reasons for the instrument panel not working: the ignition switch and the mounting block. Before installing the ignition relay on the VAZ-2109 car, the lock contacts burned quite often, and they had to be cleaned by disconnecting the contact group from the lock itself. After changes were made to the principle of supplying voltage to the ignition switch, its contacts began to burn very rarely, but the likelihood of this phenomenon still remained. On the mounting block, in its board, tracks may burn out; in order to see this, the mounting block will have to be removed from the car.
In addition to the reasons listed above, which can lead to failure of the instrument panel, it is also necessary to check the reliability of fastening the ground wire.
4 comments
Hello! Today, on the 14th, I changed the main lighting bulbs in the cabin and after that the instrument readings stopped showing readings of revolutions, speed, fuel level and fluid temperature... I replaced the F3 fuse as written on your website and everything began to show. But the lights still don’t light up in the cabin. Thank you!
the person clearly explained the problem +1 to him. I also accidentally shorted the interior lighting contacts.....
The car starts, but the instruments do not respond! + Turn signals and wipers do not work. The relay and front are normal. Give me some advice ;)
Hug the bronze dog
A Basset dog named Bobka is a legend of the Kolomna fire department, which is still located not far from Susaninskaya Square. In the 19th century, the dog lived in the Fire Tower, was a member of the fire brigade and helped save Kostroma residents from fire. The whole city spoke about her exploits: Bobka became such a noticeable phenomenon that she became the hero of a story by local writer Leonid Kolgushkin.
In memory of the brave rescuer, a bronze monument was erected in 2006. In winter, this absolutely charming bronze figure is decorated with a scarf so that Bobka does not freeze
The dog continues to help the townspeople today: he guards a piggy bank in the shape of a ball, where you can throw coins and bills. All money raised goes to help a shelter for homeless animals. And if you sit on a dog’s back and pet it, they say your most cherished wish will come true.
Decoding the plugs of the mounting block of fuses VAZ 2114, 2113, 2115 model 2114-3722.010
| Table for decoding the terminals of the VAZ 2114, 2113, 2115 fuse mounting block | |||
| Plug connector designation | Terminal number | Wire color | Device name |
| Ш1 | 1 | B | window lifters |
| 2 | G | ignition switch (cl. 15/2) | |
| 3 | GP | ignition switch (terminal 15) | |
| 4 | ZhG | heater motor switch | |
| 5 | R | ignition switch (cl. 30/1) | |
| 6 | KR | ignition switch (terminal 30) | |
| 7 | door lock | ||
| 8 | P | ignition switch (terminal 50) | |
| Ш2 | 1 | BG | rear window wiper switch |
| 2 | G | Turn signal switch (right) | |
| 3 | RP | brake light switch | |
| 4 | B | lamp continuity indicator | |
| 5 | IF | hazard warning switch | |
| 6 | GB | left front door | |
| 7 | ABOUT | rear fog light switch | |
| 8 | 34 | high beam warning lamp | |
| 9 | -/td> | ||
| 10 | 04 | rear fog light switch | |
| 11 | midrange | fuel reserve warning lamp | |
| 12 | pch | fuel level warning lamp | |
| 13 | Warhead | interior lamp | |
| 14 | kg | hand brake warning lamp | |
| 15 | hh | Turn signal switch (left) | |
| 16 | electric motor for headlight cleaner | ||
| 17 | — | ||
| Ш3 | 1 | and | speed sensor |
| 2 | emergency | hazard warning switch | |
| 3 | gp | direction indicator switch | |
| 4 | Sat | oil level warning lamp | |
| 5 | h | weight | |
| 6 | RB | washer fluid level warning lamp | |
| 7 | ro | brake lining wear warning lamp | |
| 8 | 3v | headlight switch | |
| 9 | zhz | windshield wiper switch | |
| 10 | pg | portable lamp connection socket | |
| 11 | O | ignition switch (terminal 15) | |
| 12 | RF | rear window washer switch | |
| 13 | |||
| 14 | and | fog light warning lamp | |
| 15 | |||
| 16 | sg | oil pressure indicator | |
| 17 | |||
| 18 | R | wiper switch | |
| 19 | with | wiper switch | |
| 20 | With | wiper switch | |
| 21 | about | rear fog light switch | |
| Ш4 | 1 | salary | On and indicator lamp for heated rear window |
| 2 | GB | headlight switch (high beam) | |
| 3 | O | wiper | |
| 4 | warhead | outdoor lighting switch | |
| 5 | To | Instrument lighting rheostat | |
| 6 | R | battery | |
| 7 | bw | windshield wiper and washer switch | |
| 8 | O | block Ш4 of the mounting block terminal 3 | |
| 9 | sch | horn switch | |
| 10 | bp | brake light switch | |
| 11 | R | battery | |
| 12 | joint venture | headlight switch (low beam) | |
| 13 | warning light | ||
| 14 | — | ||
| 15 | — | ||
| 16 | rg | brake fluid level warning lamp | |
| 17 | zb | coolant temperature gauge | |
| 18 | kb | battery charge indicator lamp | |
| 19 | zhch | fog light switch | |
| 20 | rz | coolant level warning lamp | |
| 21 | and | tachometer | |
| Ш5 | 1 | 3 | high beam (right) |
| 2 | zch | high beam (left) | |
| 3 | sch | low beam (left) | |
| 4 | P | starter (cl. 50) | |
| 5 | pb | electric radiator cooling fan | |
| 6 | With | low beam (right) | |
| Ш6 | 1 | — | |
| 2 | 3 | reverse light switch | |
| 3 | hh | Turn signal (left front) | |
| 4 | |||
| 5 | — | ||
| 6 | — | ||
| 7 | — | ||
| 8 | zhch | side light (right front) | |
| 9 | warhead | electric fan thermostat | |
| 10 | zhch | side light (left front) | |
| 11 | G | Turn signal (right front) | |
| 12 | O | reverse light switch | |
| 13 | rg | brake fluid level sensor | |
| Ш7 | 1 | — | |
| 2 | zhg | electric motor for headlight cleaner | |
| 3 | b | electric motor for headlight cleaner | |
| 4 | — | ||
| 5 | Sat | oil level sensor | |
| 6 | sch | sound signals | |
| 7 | With | speed sensor | |
| 8 | zb | coolant temperature sensor | |
| 9 | kb | generator (cl. 61) | |
| 10 | R | windshield washer pump | |
| 11 | warhead | engine compartment lamp switch | |
| 12 | RB | washer fluid level sensor | |
| 13 | RF | brake linings | |
| 14 | |||
| 15 | kp | tachometer | |
| 16 | rz | coolant level sensor | |
| 17 | reinforced concrete | fog light relay | |
| Ш8 | 1 | zhl | fog light relay |
| 2 | zhch | fog lamp (left) | |
| 3 | and | fog lamp (right) | |
| 4 | gp | ignition coil | |
| 5 | R | generator (cl. 30) | |
| 6 | R | generator (cl. 30) | |
| 7 | |||
| 8 | RF | fog light relay | |
| Ш9 | 1 | RF | electric motor rear window wiper |
| 2 | G | Turn signal (right rear) | |
| 3 | bg | electric motor rear window wiper | |
| 4 | very good | rear fog lights | |
| 5 | sch | back door | |
| 6 | pch | front right door | |
| 7 | warhead | interior lamp | |
| 8 | kg | handbrake sensor | |
| 9 | warhead | open door alarm buttons | |
| 10 | rear window heating elements | ||
| 11 | With | license plate light | |
| 12 | GB | front left door | |
| 13 | b | interior lamp | |
| 14 | P | brake lights | |
| 15 | and | side light (right rear) | |
| 16 | h | reversing light | |
| 17 | zhch | side light (left rear) | |
| 18 | zhch | rear window cleaner | |
| 19 | O | rear window heating elements | |
| Ш11 | 1 | and | pump |
| 2 | RF | rear window washer valve | |
| 3 | |||
| 4 | and- | pump | |
| 5 | warhead | engine compartment lamp | |
| 6 | |||
| 7 | |||
| 8 | CC | engine compartment lamp | |
| 9 | b | electric windshield wiper motor | |
| 10 | O | windshield wiper motor | |
| 11 | |||
| 12 | with | emergency oil pressure sensor | |
| 13 | |||
| 14 | R | windshield washer valve | |
| 15 | with | electric wiper motor | |
| 16 | With | electric windshield wiper motor | |
| 17 | reinforced concrete | electric windshield wiper motor | |
| 18 | |||
| 19 |
Wire colors:
- B - white;
- G - blue;
- F - yellow,
- 3 - green,
- K - brown;
- O - orange;
- P - red;
- P - pink;
- C - gray,
- H - black.
The light in the interior of the VAZ-2115 does not work: possible reasons
Lighting in the VAZ-2115 is one of the most important components of comfortable movement by car at night. If the interior light does not work, the driver faces a lot of inconvenience.
The light emitted by street lamps will not help you find the desired item in the glove compartment, therefore, it is best for the driver to take care in advance that all the light bulbs and other components of the car’s electrical equipment work stably and reliably. But what to do in a situation if the lighting fixtures in the interior of a VAZ-2115 for some reason refuse to fulfill their duties?
The main reasons for the lack of lighting in the cabin
Inside the VAZ-2115, the manufacturer often installs one lamp located directly on the ceiling and individual lamps. It is attached using fasteners and is activated when the doors are opened. Drivers have been familiar with this principle of operation of a lighting device since the “classic” times. The lamp can also be turned on and off manually using a switch located on its body.
The lampshade and other lighting fixtures are part of the electrical system, therefore, if any malfunctions occur with the light, you should start looking for the problem from the electrical circuit diagram. Most drivers prefer to have their car electrically repaired, but such a nuisance can be fixed on your own. To do this, you need to arm yourself with a minimum set of tools and the circuit itself.
The main reasons for the lack of lighting inside the car are:
- Burnt out light bulbs;
- Breakage inside the lampshade;
- Relay or fuse problem;
- Breakdowns in the wiring.
When the reason why the lighting fixtures have stopped functioning properly has been determined, you can safely move on to fixing the problem yourself. As a rule, such work does not cause any particular difficulties for novice drivers. All you need is basic knowledge of how automotive electrical equipment works.
How to disassemble the dashboard of a VAZ 2114
Before embarking on this complex process, the driver must carefully familiarize himself with the design and arrangement of the instrument panel on his car. When disassembled down to the cogs, it looks like this:
If you carefully study this diagram, it becomes clear how to remove the panel on a VAZ 2114. Having determined the order for yourself, you can begin the process.
Using a Phillips screwdriver, you need to unscrew the three screws holding the left console screen
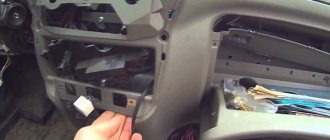
For convenience, when doing this work, it is better to use a screwdriver with a short handle and blade. When removing the screen, carefully remove the lower edge of the trim from the body bracket. The right console screen is secured with five self-tapping screws. Using a Phillips screwdriver, carefully unscrew all the screws while holding the trim with your hand. Remove the screen without allowing it to get caught in the wiring harnesses that are hidden behind it. Disconnect the ground from the battery by disconnecting the connectors. If your car has a radio, disconnect it from the main bundle of wires by pulling out the connecting block
If there is no radio installed on the car, then simply pull the wires out of the panel; they should be closed with a plug. Be sure to turn off the cigarette lighter and remove the socket with the ashtray light bulb. Remove the handles from the heater damper control levers. To make the process easier, pry them off with a flat-head screwdriver. Despite the apparent simplicity of this item, removing the handles from the levers can take a lot of time. To do this, a clear example is given of how this should be done on a removed unit. Remove the electric heater fan handle by simply pulling it towards you. Unscrew the self-tapping screws with a cross-shaped head that secure the instrument panel to the brackets on the right and left with a screwdriver. In the window on the instrument panel, where the instrument unit is located, there are two self-tapping screws at the top and two at the bottom - under the window. It is necessary to turn them out, loosening the cover (2) and the shield (8). Pull out the plug and unscrew the self-tapping screw located behind it. Remove the two self-tapping screws from below that hold the trim and remove it. Having marked the wires suitable for the switches, disconnect them. Unscrew the bolts from the steering wheel bracket. Use an “8” key to unscrew the screws of the lower bracket mounting. Unscrew the self-tapping screw and remove the light guide. Remove the fasteners from the heating control unit and remove the cartridges from the back of the unit. remove the decorative insert, removing all external parts. Unscrew the nuts with a key set to “21”. Remove the hydraulic corrector illumination. Unscrew the upper and lower fastenings of the panel, and remove the fastening to the cross member on the left side. Now you can remove the VAZ 2114 torpedo. Installation is done in the reverse order.
In order to clearly see the whole process in motion, you can watch a video on how to remove the dashboard on a VAZ 2114.
Replacement - order
Having figured out how many lamps the dashboard contains, it won’t hurt to find out how to replace them on the 2114th model. The procedure itself is not very complicated, but extremely troublesome.
- First of all, you will need to disassemble the shield. The radio tape recorder, heater and ventilation control levers are removed from it.
- Then unscrew the screws holding the decorative panel trim. Before doing this, the steering wheel should be moved to the lowest possible position - this way it will not interfere.
- Find the screws - there are five of them, and they are closed with plugs. Carefully pry the latter with a knife and pull it towards you. After removing the screws, pull the VAZ-2114 panel towards you.
- Now you need to unscrew the two screws holding the instrument panel itself. This is done with a Phillips screwdriver.
- Afterwards, the panel is lowered and the opened terminals of the wire loops are disconnected. Then the element is freely taken out.
- Next, the damaged light bulb is pulled out - turn it 90 degrees in any direction until the protrusions on the socket fit into the grooves. Then all that remains is to remove the product from the base and put a new one in its place.
As noted above, so that the 2114 panel does not have to be disassembled again after some time, it is advisable to immediately replace all the lamps. This will also ensure an even glow of all elements.
The backlight of the VAZ 2114 instrument panel does not light up: do-it-yourself repairs
The dashboard on the VAZ 2114 allows the driver to control engine data, monitor the remaining amount of fuel, his speed, and other data. The panel should be maintained in working condition so that the backlight not working does not cause discomfort, and the sensors show real values.
Bright backlight
But quite often, VAZ 2114 owners discover that the instrument panel lights do not light up. If such a situation occurs, appropriate action should be taken immediately to eliminate it.
Why the instrument panel does not work
Disassembled dashboard
The first thing you need to figure out is why the instrument panel on the VAZ 2114 does not work. If the backlight goes out, there may be several reasons for this:
- The incandescent lamps burned out, the LED lighting groups stopped working;
- The connectors have oxidized;
- The electrical wiring is faulty, there are defects in the circuit;
- The fuse box has stopped working;
- Damage appeared on the common contact board;
- The dimensions system is damaged;
- There is no minus on the body (weight).
Removing the dashboard
To replace the light bulbs in the dashboard of the VAZ 2114, it will first have to be dismantled. Without this action, you will not be able to access the problematic device.
Panel disassembly diagram
Therefore, now we’ll figure out how to disassemble the instrument panel on a VAZ 2114:
- Unscrew the three screws, remove the trim and the protrusion from below. It comes out of your car's body bracket;
- Now remove five more screws located on the right console trim;
- Remove the screen; Disconnect the negative terminal from the battery;
- Disconnect the wiring harness connector from the cigarette lighter;
- Remove the handle from the lever;
- The fasteners for the electric fan of the heating system, that is, the stove, also have to be removed;
- Unscrew the steering wheel block bracket fixing bolts;
- Remove LEDs, lamp sockets and decorative inserts on the panel;
- Unscrew the hydraulic corrector illumination lamp. For this you will need a key for 21;
- Now all that remains is to remove the screws at the top and bottom.
Thus, we figured out how to remove the dashboard on your VAZ 2114. Be sure to cover the electrical circuit with something after the measures have been taken to prevent moisture, dust and all kinds of contaminants from getting there.
Proceed to replace the lamps that turned out to be faulty. At the same time, many are interested in how many light bulbs are in the dashboard of the VAZ 2114. There are 13 of them, but only 8 can be replaced. Do not forget to clean the contacts if there are traces of oxidation on them. In some cases, it is not the lamp itself that has to be replaced, but the socket for it.
Selection of light bulbs
Wiring ringing
Today the market offers a wide range of lamps that can be used for the dashboard of the VAZ 2114. Among the most well-proven devices, we note a few. Their name and cost are presented in the table.
| Manufacturer | Price |
| LED lamps Sho-Me SM-T5 (blue, white and red (Korea) | 80 rubles - pair |
| High Brightness SMD LED Module | 20 rubles |
| LED Sho-me SM-T5-cap-super (white) | 50 rubles |
| Osram and Philips halogen lamps | About 40-80 rubles per unit |
Replacing the backlight
In analysis
To improve the quality of your dashboard lighting, it is advisable to install new LEDs in place of the old ones. They provide excellent illumination, consume minimal energy, and guarantee a high level of data reading.
- Buy a set of LED lamps, having previously calculated the number of devices needed for each sensor.
- After removing the block, install the resistors and lamps in specially designated places on the VAZ 2114 - in the sockets. To dismantle the cartridges, they are carefully unscrewed counterclockwise. New sockets are installed in their place and light bulbs are inserted. Respect the polarity and position the LED heads. They will have to be carefully ground off.
- Connect the power and check how the new backlight works.
- Reassemble step by step. Be sure to route the wiring to the board and carefully secure it to it. This way, the backlight components will not interfere with the reassembly process.
- Make sure the instrument panel arrows are positioned correctly. When trying to quickly complete a job, they often become deformed and bent.
- The backlight structure is fixed with screws.
- The power for the LEDs is connected to the power supply for the light bulbs, the arrows are put on and set to zero.
- Using the on-board computer, check the operation of each sensor and device. If the IDs are functioning correctly, return the instrument panel to its original condition. That is, assemble the entire assembly.
Burnt out light bulbs
Dashboard lights operate under less than ideal conditions. They are regularly exposed to shaking, power surges in the car's electrical network and temperature changes. All this significantly reduces their service life.
Especially if these are not LEDs, but ordinary incandescent lamps, which were equipped with the first VAZ 2114 models. There are a total of 19 lamps (but this number also varies depending on the year of manufacture of the car, and the number of lamps should be specified in the technical documentation for the car).
Another reason for light bulbs to burn out is their improper installation. This is most often observed on early VAZ 2114 models, where drivers decide to independently replace obsolete incandescent lamps with new LEDs, making some changes to the electrical circuit. Without proper qualifications, this operation is not so easy to perform. Here's what the sequence for replacing light bulbs looks like.
- The steering column is lowered to the bottom position until it stops. Above it is the dashboard cover with four mounting screws. They are unscrewed with a Phillips screwdriver. To move the dashboard cover, just unscrew 5 bolts
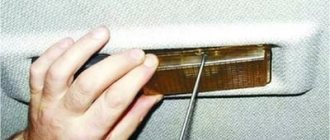
- To the right of the panel there is a row of buttons. Next to it there is another screw hidden by a plastic plug. It is pryed off with a knife (or a flat screwdriver). The screw is unscrewed.
- Now you need to remove the car radio from the niche by unscrewing its mounting bolts, and also remove the plastic handles from the heater controls.
- The instrument panel casing is freed from its fasteners. It should be pulled towards you, extending it 15–20 cm. This will be enough to gain access to the rear wall of the instrument unit.
- A number of recesses with light bulb sockets are visible on the wall. They are removed manually. To do this, the socket together with the lamp is turned counterclockwise until a characteristic click is heard. The arrow on the back wall shows the socket with the light bulb; it is unscrewed by hand
- Burnt out lamps are replaced with new ones, then the instrument panel is reassembled.
Checking the indication
There are 5 indication modes:
- off – when the key is not in the ignition switch;
- standby mode - the BSK VAZ 2114 goes into it when the key is inserted into the ignition, but remains in the “Off” position; if you open the door, an error about a forgotten key will be displayed. You must close the door or remove the key to stop the horn;
- test - turns on when the ignition key is turned to the “Ignition” position. A sound signal and the turning on of all the system lights indicate that the device is working properly. Afterwards, all systems are tested, while the sensors are turned off;
- preliminary test - after testing is completed, the VAZ 2114 display unit, if there are malfunctions, the diode responsible for a certain parameter begins to blink for 8 seconds, after which it lights up evenly until the key is returned to the “Off” position. The blinking of the indicator is accompanied by a rhythmic sound signal;
- test with the engine running - this mode for BSK 2114 is the final stage of control. Monitoring of sensor parameters goes into sleep mode. It only carries out periodic additional monitoring of the vehicle’s performance. All malfunctions that occur in this mode are remembered until the end of the trip and the lights glow steadily.
The dashboard of the VAZ 2109 does not light up
Common instrument panel faults
The instrument cluster on the VAZ 21099 or 2109 is a fairly reliable unit. However, even this can fail over time.
The main malfunctions characteristic of the VAZ instrument panel:
- The lights on the instrument panel of the VAZ 2109 stopped lighting. If only a few light bulbs refuse to work, then most likely the reason lies in their burnout. If the instrument panel lighting stops working completely, then most likely the problem is a poor power supply. As practice shows, power problems are usually caused by either damaged wiring or oxidation of contacts at connections and connectors. If this is the case and the backlight does not light up due to oxidation, then you can get rid of this problem by cleaning the contacts or replacing them. If the problem lies in the lighting sources, then replacing the lamps will solve it.
- Another problem, oxidation on the circuit board, is common in older vehicles or vehicles that have moisture. Due to oxidation of the board, the backlight and some instruments may not work, in particular, fuel level and coolant temperature controllers, tachometer, etc. If the needles do not rise on the tachometer, speedometer, fuel consumption sensor and generator voltage, or they work chaotically, then you need to carry out a full check of the dashboard.
- VAZ 2109 cars are characterized by the problem of a non-working speedometer. As a rule, it appears as a result of wear of the cable connected to the box, or due to repairs to the device and its incorrect connection. If the cable is worn out, then you just need to replace it, there is nothing complicated about it. The main thing is to connect the cable correctly so that its tip fits exactly into the groove on the tidy speedometer.
- Damage to the board itself. Such a malfunction occurs quite rarely, but, nevertheless, it should not be forgotten. If the structural board fails, the shield will have to be repaired, but if this does not help, then it will need to be replaced.
Instrument panel pinout
VAZ 2109, 21099 cars can use low and high center consoles, as well as Europanels. Depending on the type of torpedo, the combination of the instrument panel and its pinout, as well as the position of the indicators, will be different. Below are photos and symbols of components on instrument panels with different torpedoes.
Photo gallery “Designation of indicators on dashboards”
If you decide to tune your instrument panel, then most likely you will be interested in knowing what options exist for doing it. The tuning shield, as you know, pleases the driver’s eye, so this issue is relevant for many car owners.
Wiring damage
The last and most undesirable cause of a malfunction is a broken switch wiring. In the absence of visible damage to the wiring, it is difficult to find the location of the break without checking. If you can find a break, you should completely replace the wire, and not try to glue it with electrical tape, because shortening the wires leads to a change in resistance.
Another reason for incorrect operation is oxidation of the contacts inside the light housing. It is enough to clean and return all the plates to the factory position. To replace the wiring of the lighting assembly, you will need a wiring diagram for the interior light. Below we present the diagram in detail.
To fully analyze the circuit, let’s look at the notation:
- X1 – lighting lamp;
- SW1 - factory backlight mode switch;
- SW2-SW5 – limit switches in the doors;
- F – fuse.
Checking the malfunction should be done by examining the fuse and light bulbs. Only after this should you look for the cause of the problem in the limit switches and wiring.
How to disassemble the dashboard of a VAZ 2114
Before embarking on this complex process, the driver must carefully familiarize himself with the design and arrangement of the instrument panel on his car. When disassembled down to the cogs, it looks like this:
If you carefully study this diagram, it becomes clear how to remove the panel on a VAZ 2114. Having determined the order for yourself, you can begin the process.
Using a Phillips screwdriver, you need to unscrew the three screws holding the left console screen
For convenience, when doing this work, it is better to use a screwdriver with a short handle and blade. When removing the screen, carefully remove the lower edge of the trim from the body bracket.
The right console screen is secured with five self-tapping screws. Using a Phillips screwdriver, carefully unscrew all the screws while holding the trim with your hand. Remove the screen without allowing it to get caught in the wiring harnesses that are hidden behind it.
Disconnect the ground from the battery by disconnecting the connectors. If your car has a radio, disconnect it from the main bundle of wires by pulling out the connecting block
If there is no radio installed on the car, then simply pull the wires out of the panel; they should be closed with a plug. Be sure to turn off the cigarette lighter and remove the socket with the ashtray light bulb. Remove the handles from the heater damper control levers. To make the process easier, pry them off with a flat-head screwdriver.
Despite the apparent simplicity of this item, removing the handles from the levers can take a lot of time. To do this, a clear example is given of how this should be done on a removed unit.
Remove the electric heater fan handle by simply pulling it towards you. Unscrew the cross-head screws securing the instrument panel to the brackets on the right and left with a screwdriver
In the window on the instrument panel, where the instrument unit is located, there are two self-tapping screws at the top and two at the bottom - under the window. It is necessary to turn them out, loosening the cover (2) and the shield (8).
Pull out the plug and unscrew the screw located behind it
Remove the two screws from the bottom that hold the trim and remove it.
Having marked the wires suitable for the switches, disconnect them.
Unscrew the bolts from the steering wheel bracket. Use an “8” key to unscrew the screws of the lower bracket mounting.
Unscrew the self-tapping screw and remove the light guide. Remove the fasteners from the heating control unit and remove the cartridges from the back of the unit.
remove the decorative insert, removing all external parts. Unscrew the nuts with a key set to “21”.
Remove the hydraulic corrector illumination. Unscrew the upper and lower fastenings of the panel, and remove the fastening to the cross member on the left side.
Now you can remove the VAZ 2114 torpedo.
Installation is in the reverse order.
Troubleshooting steps
To diagnose and repair the backlight system for the instrument panel on a VAZ 2114, you will need a pair of wrenches, sizes 8 and 21, and a set of screwdrivers. The general procedure for dismantling and adjustment work boils down to the following steps:
- Remove the trim by first unscrewing the three fastening screws and removing the protrusion from the body part bracket.
- Remove the five mounting screws from the right side of the console and remove the screen.
- Disconnect the terminal with the battery suitable for the negative power source, as well as the block with the bundle of wires from the cigarette lighter system.
- The handle of the lever mechanism is removed.
- The stove ventilation system clamp is dismantled.
- The screws securing the steering column brackets are removed.
- The sockets are unscrewed, the light guide and the decorative panel insert are removed.
- The light bulb for illuminating the hydraulic corrector is removed using a 21 key.
- Finally, the screws that secure the top and bottom of the instrument panel itself are unscrewed so that it can be removed.
Once the instrument panel is removed, you can begin to find the reason why the backlight is not on. First of all, it is customary to check the lamps on the VAZ 2114. If they are working properly or after replacing the damaged unit the system still does not work, you should clean all contacts from the oxide film. To speed up the process, it is better to use special mixtures such as VD-40.
Upon completion of all these manipulations, it is necessary to perform a wiring test to detect a break. For this you will need a multivoltmeter or tester. If all the checked elements are in working order, but the backlight does not light, the safety module is to blame. It needs to be replaced with a unit with similar technical characteristics (and preferably from the same manufacturer).
Let's look at the problem: the backlight of the VAZ 2114 instrument panel does not light up
An element such as the dashboard is very important for the driver - because it is thanks to it that he can control the most important parameters of his car while driving. And that is why a serviceable instrument panel ensures not only comfortable driving, but also the safety of the motorist and his passengers.
For a clearer perception of instrument readings on the panel, especially at night, it has a built-in backlight. True, situations often occur when the backlight of the VAZ 2114 fails. We’ll talk about why this happens and how to restore its functionality with your own hands below.
What else is this fuse responsible for?
If the instrument backlight fuse on a VAZ 2114 blows, the left side lights, license plate lights, ashtrays and other above-mentioned elements should also not work. To diagnose a malfunction, you need to find this fuse in the mounting block and inspect it. Often the defect is clearly visible externally.
You can also check it with a multimeter. If there is voltage at one end of the part, but not at the other, it has failed. Replacing an element with a known good one also helps diagnose a breakdown. If everything works after this, the reason has been established correctly. The fusible element is cheap. Therefore, you should look for the cause of the breakdown by replacing it. This usually helps solve the problem. If this does not help, you need to consider other faults.