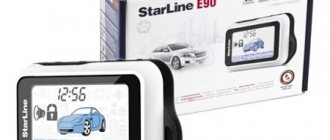
At the moment, the Starline E90 security system is one of the most advanced car alarms available to motorists. The system appeared back in 2013 and provides reliable protection of the car against theft. Moreover, the Starline E90 and E90S system has additional functions that can significantly make life easier for its owner.
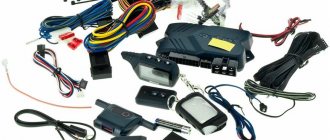
Installation kit includes:
- instructions for installing and using the system;
- main key fob with LCD display and immobilizer feedback. For greater security of the remote control, it is recommended to purchase a suitable case;
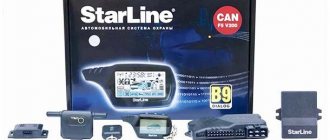
- central unit, which is installed on the car body and is responsible for processing and executing all commands;
- power module and radio transmitter unit;
- safety siren;
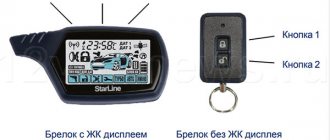
- a second key fob, which is a spare in case the main remote control is lost (it lacks an LCD display, and a red LED acts as an indicator);
- cables for connecting the CAN interface;
- main 18-pin connector;
- limit switches installed on the door, trunk and hood locks;
- engine temperature, shock and tilt sensors;
- Valet button;
- screws for fastening;
- LED indication;
- Optionally, the Starline E90 Slave system can be equipped with a GSM module to enable control of functions from the phone.
Below are detailed installation instructions with photo diagrams and configuration recommendations. How to register the Starline B9 keychain.
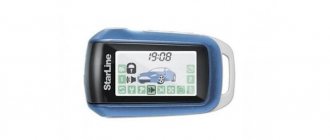
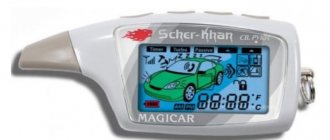
1. Starline E90 control key fobs
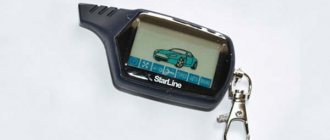
The main StarLine E90 key fob is a compact rectangular device with slightly rounded contours and 4 buttons. The remote control works in both directions (dual communication), i.e., with its help you can send alarm commands and receive notifications from it, which are expressed in the form of sound signals and graphic notifications on the LCD display.
Keychains Starline E90
In addition to the main one, the kit includes an additional StarLine E90 keychain. As with most Starline alarms, it is distinguished from the main one by the absence of a screen and feedback. This means that you can only send commands to the system from the additional key fob, but you cannot receive alerts.
There are buttons on the key fobs for control. Depending on the pressing method, different alarm commands can be issued. For both key fobs the following are provided:
- Short press – fast, for only 0.5 seconds, without pressing the key.
- Long – the button is pressed and held until the key fob beeps.
- Double – 2 short presses within 1 second.
- Sequential - a long press is followed by a short one, and this way you can press either one or different keys.
For each of the commands issued from the key fobs, a specific combination of keys and their presses is provided. You can control security modes, engine, equipment and service functions. Key combinations for the main and additional key fobs are shown in the table.
How to install the system and connection diagram
How to install the system:
- Before installation, you must make sure that the machine's electrical system is operating normally. If there are errors on the dashboard, you should diagnose the car.
- The first step is to install the central unit. The control module is the main element of the system; its purpose is to receive and process incoming pulses, as well as transmit signals to the key fob. The unit can be installed in the trunk, provided that the installation site is dry and protected. But usually the control module is installed inside the car. It can be placed behind the glove compartment; to do this, the glove compartment must be removed. One of the most difficult places for installation is the free space behind the control panel. To gain access to it, an attacker will have to remove part of the cladding, and this will take a lot of time. After choosing the installation location, the module is securely fixed so that it does not vibrate when the car is driving.
- The siren is placed under the hood of the car. Please note that its condition is affected by high temperatures, so placing the device in close proximity to the cylinder block will lead to its breakdown. Install the siren near the battery or find another free space for installation. The main thing is that it is located away from the power unit.
- Then the temperature controller is installed. It must be embedded into the cooling system pipe so that the sensor accurately records the temperature of the coolant and the engine. The controller must not be installed near the exhaust manifold. When the engine is running, this device becomes very hot, which can damage the sensor. During installation, the steel housing of the controller must not be pressed with bolts.
- It is recommended to place the sensitivity sensor on the partition between the car interior and the engine compartment. When installing, the controller must be firmly fixed, otherwise it will operate for no reason.
- A transceiver with a diode indicator is mounted on the windshield of the car. The antenna is installed away from the metal components of the body, otherwise the reception and transmission of impulses will be difficult. The transceiver must be placed at least 5 cm from the metal. The LED indicator is placed so that it can be seen at a distance from the machine. This will alert potential attackers that the machine is protected.
- Limit switches are mounted on all doors, trunk, and hood.
- If necessary, you can connect a GSM module to the installation or install a built-in adapter. External devices must be connected to the three-pin plug of the control module. A special wire is used for connection.
- The service button is mounted. It must be installed so that it is located in a hidden place, while the driver must have access to the key from his seat.
- Wires are being laid. Electrical circuits should be laid out so that they are away from sources of interference. We are talking about high-voltage cables, ignition coils and other components. When laying, make sure that the wires are not affected by moving components of the machine structure. For example, pedals, door mechanisms, steering rods, etc. All components of the anti-theft installation are connected to the control module; wiring from the engine compartment from the siren is laid through a technological hole.
In the video, user Sergey Zaitsev talked about the nuances of installing a signaling system yourself.
All signaling components are connected to the unit in accordance with the diagram; power is provided through two channels:
- The black contact is grounding. To connect to ground, you can use a standard bolt or nut. You can install a terminal on the cable itself, but it must match the size of the clamp. Connecting the ground cable to the car body using a self-tapping screw is not allowed. Before connecting, carefully treat the working surface with an anti-corrosion agent.
- The red terminal connection is made using the existing electrical wiring of the machine. The circuit is connected to a voltage that cannot be switched off, which means it is best to crash into the ignition switch. The wiring cross-section must be at least 2 mm2. It is possible to connect the contact to a battery.
Separately, we should talk about connecting electrical circuits to implement remote start of the internal combustion engine:
- Red contact - power, connects to the battery. For connection, it is advisable to use cables with a cross-section of at least 6 mm2. If you cannot connect directly to the battery, you can choose a standard cable with the cross-section indicated above. Remember that the nominal value of the standard safety device will be at least 30 amperes.
- The yellow contact is a power one, it is necessary for connection to the ignition system, we are talking about the IGN output on the lock.
- The green contact is programmable, designed to duplicate the ignition circuit. Connects to the IGN or ACC output.
- The blue contact is also programmable and power, designed to duplicate IGN or ACC electrical circuits. It can also be used to simulate pressing the brake or clutch pedal when starting the engine remotely. This output may not be used in all cars, it all depends on the model.
- The black-yellow contact is necessary for connection to the starter mechanism, in particular, to its electrical control circuit. If you need to duplicate the electrical circuit, you will have to add an additional relay to the circuit.
Typical connection diagram for StarLine E90, E91
If the car is equipped with a Start-Stop button instead of a lock, the connection diagram will be slightly different.
What to consider:
- The red contact is the power contact and is connected directly to the battery. The circuit can be protected by a fuse device rated at least 30 amps. It is allowed to connect to the power cable of the control module, the ignition switch.
- The yellow contact is not used.
- The green contact also does not need to be connected.
- The blue output connects to the brake pedal.
- The yellow-black output is connected to the Start-Stop key. The connection diagram may vary depending on how much current is required to provide power.
Main key fob functions menu
The first thing you should configure using the key fob is various time parameters, alarm volume and type of sound signal. Their configuration is carried out according to the same principle.
You need to enter the programming mode - to do this, press button 4 for a long time until 1 long signal and then 2 more short signals sound. Next, using keys 1 and 4, you can scroll through the menu of functions and stop at the one you want to configure. The main thing is to do it in 8 seconds, otherwise the system will automatically exit the programming mode.
To set the date and time on the Starline E90 key fob, you need to select the “F – 1” function. Next, press button 4 for a long time until 2 short signals are heard. To set the date, use buttons 4 and 1, and the current time - 2 and 3.
Setting the alarm is the “F – 2” function. It can be set to turn on only once or to turn on periodically. The setting is carried out according to the same principle as the current time.
The next function is the timer, designated “F – 3”. The maximum countdown value is 23:59. The setup follows the same principle.
The “F – 4” function corresponds to the type of sound signal. It can be loud or quiet. In addition, you can select silent mode. There are 2 options for the sound signal: “Siren” and “Trill”. To select one of them and adjust the volume, use the instructions in the picture.
Instructions
Before you start using the alarm, we recommend that you read the operating instructions.
This instruction in Russian is intended for the StarLine E90 Dialog car alarm ; it describes the principle of operation and the main points of operating the device.
The manufacturer strongly recommends that you carefully study these instructions before turning on the car alarm.
The Starline E90 alarm system is one of the most popular on the Russian market. At a relatively low cost, it combines the functions of advanced models, supports automatic engine starting, and also demonstrates excellent resistance to burglary. When choosing this system for your car, you need to fully understand its functions and technical characteristics.
3. Programming operating modes using the cursor method
The basis for setting the modes and functions of the StarLine E90 alarm using a key fob is the cursor method. If a mode is activated, an icon corresponding to it is displayed on the remote control display. Using it you can monitor the status of the car alarm and the car as a whole.
Enabling or disabling any of the functions follows the same principle. You need to position the cursor on the mode that you want to activate or, conversely, disable and confirm your action. The cursor is a blinking icon. It can be moved left and right using keys 2 and 3, 4. Having placed the cursor on the desired icon, all that remains is to press button 1 and confirm turning the selected function on or off.
Reviews about the operation of the Starline E90 and E91 alarm systems
| Positive | Negative |
| I have a Renault Logan. There are never any questions about it. True, I only use the basic functions - open-close and autostart. But everything works smoothly, the range is good, nothing glitches or breaks. The keychain is also normal, the design is nice. It fell out of my hands several times, but did not crack. | The quality is not very good, below average. The signal is quite convenient and easy to operate, but the range of action does not at all correspond to the declared one. The key fob constantly breaks down, the buttons are glitchy, the programs get lost. It appears to be a product of Chinese origin. |
| After my old alarm completely died, I went to the salon, where there was a choice of several options with auto start. I bought Starline E90 for 12 thousand, because I heard a lot of good things about this company. The installation cost me 3600. They installed it almost all day, and I was only able to pick up the car in the evening. The employee showed how to use the key fob and how to control it from the phone. The first few days I was lost in the functions, but I read the manual and soon got the hang of it. Very practical, fast and smart alarm system. | Installed on a Qashqai in the cabin. The keychain broke almost immediately. At the station they said it was not a warranty case. I had to buy a new one. The settings were lost several times. I've only been using it for 3 months, I don't know what else to expect from this alarm. I do not recommend this product. |
| The previous Starline A9 served me for many years, but cases of theft became more frequent in the city, so I decided to replace it with something more modern. The choice was made on the E90, since it has good protection and a large selection of various functions, and the reviews about it are good. Compared to the old signaling system, this is heaven and earth! It works so quickly, you just don’t have time to press the button before the machine has already done everything. You can set autorun and other parameters directly from your phone. A very cool toy, I recommend it to everyone, it’s definitely worth the money! | We use the Starline e90s car alarm with auto start on a Citroen car. This alarm cost me much more than the price tag. I had to purchase a CAN bus module separately, since it was not included in the kit. Then there are door locks and a GSM module. It turned out that you need to insert a SIM card into it, like on a mobile phone, and top it up every month in order to have a connection. As a result, the amount came out to be almost twice as much as agreed upon in advance. I am not satisfied. For this money you can get a complete complex with all the bells and whistles. |
| I arranged it based on price and features. You can build in GSM, and it will be the same as the cooler alarms. That's exactly what I did. Now, if there’s something wrong with the car, she calls her mobile phone, and if she doesn’t get through to me, she dials my wife. You can even register several numbers there. Very modern, comfortable and safety guaranteed. I'm glad I purchased this particular model. | Of course there are advantages, but there are also many disadvantages. The price is not that low, and the alarm itself is designed like a budget alarm, as can be seen even from the plastic of the key fob itself. My Grant started to malfunction periodically, especially in cold weather. Autostart doesn't work well. Once the transceiver module broke down, the contacts had to be resoldered. This is for 2 years of operation |
Related link:
Review of Pandora LX series car alarms.
Reviews taken from resources: https://otzovik.com/, ugonavto.net, https://m.ua/
4. Disabling security without using a key fob
In unexpected situations, the security mode can be turned off without using the key fob. But for this you must know a special personal code.
Emergency disarming of the Starline E90 auto alarm using the standard code (3)
Emergency disarming of the Starline E90 auto alarm using a personal code
After its introduction, the security mode is turned off.
The personal emergency shutdown code is set in advance. It can have 1, 2 or 3 digits. If you have not changed the PIN code, then according to the factory settings it is set to “3”. Personal code is programmable function No. 9.
5. Displaying alarms on the key fob display
When different alarm levels are triggered, notifications appear on the LCD screen of the control panel. From them you can understand what happened to the security system. This could be when a sensor is triggered, the parking brake is turned off, the ignition is turned on, or the hood or trunk is opened. All possible notifications for different alarms are shown in the picture.
7. Setting the sensitivity of the shock and tilt sensor
For the shock and tilt sensors to work correctly, you need to adjust their sensitivity level. Configuration is carried out at the software level. Although there are alarms where the sensitivity is changed only mechanically. For example, the Starline A91 shock sensor is adjusted by turning the controls on the body. There is no software method provided here.
Instructions for changing the sensitivity of the StarLine E90 shock sensor are shown in the picture.
The maximum and minimum sensitivity values are the same for the shock and tilt sensors, as is the setting principle. For more precise adjustments, it is worth checking how the devices work after each change. This will help you select the optimal sensitivity values.
Car alarm A93 – bestseller
The clear favorite among the Starline A90-96 security systems is the A93 model. It attracts the buyer with the presence of all the necessary functions, as well as the ability to select additional options, such as a GPS module, CAN+LIN systems and an additional blocking relay.
The model has several different modifications: the starline a93 gsm car alarm, with control function using a mobile phone, CAN+LIN or 2CAN+2LIN, which can be integrated into the vehicle’s electrical system, as well as the ECO option, which has a somewhat stripped-down package and is cheaper.
Let's look at the characteristics inherent in all versions of the A93 anti-theft system:
- Three-level car protection: individual PIN code, immobilizer, security system
- Automatic engine start. You can turn on the motor manually, by command from the remote control or phone, or at a specified time using a special program.
- Shock and movement sensor. If the robbers decide to jack up the car or transport it with a tow truck, the sensor will immediately go off, turn on the siren, and send an alert to the owner.
- Equipped with CAN+LIN modules, the starline a93 2can 2lin eco car alarm allows you to easily integrate it into the standard electrical wiring and maximally synchronize the actions of the car control unit and anti-theft security.
- Connecting additional features, such as controlling light signals, raising windows or folding mirrors, is possible thanks to additional channels
The range of the starline a93 car alarm reaches 2000 meters and even more (depending on the presence of interference on the air and terrain features).
8. Temporarily disabling the shock and tilt sensor
During one security cycle, the shock and tilt sensor can be turned off an unlimited number of times. The difference is that the first has 2 levels: warning and alarming. They can be disabled individually, as described in the instructions below.
The tilt sensor does not have levels, so it turns off immediately. For both devices, temporary deactivation may be necessary in case of incorrect operation, for example, with a large number of false alarms in the security mode.
12. Service mode
In service mode, the anti-theft and security alarm functions temporarily do not work. This provides protection against interference in the system, which is important when taking the car in for repairs or service at a service station. Service employees will not be able to change the personal code, record new key fobs or reprogram functions and modes.
The service mode is activated very simply - you need to activate the icon in the form of a wrench using the cursor method. Exit follows the same principle.
13. How to register the Starline E90 key fob
You can store up to 4 key fobs in the StarLine E90 alarm memory. This allows several family members to use the car. Complete instructions on how to register the Starline E90 key fob are presented in the picture.
To configure, you must know where the service button is installed in the cabin. It can be under the dashboard, in the glove compartment, near the mounting block, near the gear lever.
Please note that you need to record all remote controls at the same time, even if you already have 1 or more key fobs linked. If only 1 remote control was used before, and you decide to add a second one, then you need to rewrite both, otherwise the first one will be erased from memory. The same applies if you need to register the 3rd or 4th key fob. Only in this case will you be able to use the required number of remote controls without any problems.
general characteristics
ATTENTION! A completely simple way to reduce fuel consumption has been found! Don't believe me? An auto mechanic with 15 years of experience also didn’t believe it until he tried it. And now he saves 35,000 rubles a year on gasoline! Read more"
The car alarm is the latest development from Ultrastar. The list of innovations includes a unique “Quick Dialogue” control code, as well as an automatic engine start function. Thanks to individual encryption keys, the possibility of hacking using a code grabber is eliminated. Starline e90 is resistant to any type of electronic attacks. The system provides the ability not only to remotely start the engine, but also to fully control it. This is ensured by a special processor. Car owners will be pleasantly surprised by the range of the key fob. The advanced signal reception/transmission system ensures impressive signal stability and clarity.
Starline e90 is suitable for cars of any type of engine and gearbox. The presence of 50 programmable functions allows you to customize the alarm system to suit your individual needs.