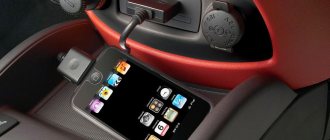
Car enthusiasts are well aware that standard radios, even in production cars such as the Ford Focus 2 and Chevrolet Lacetti, have always had poor functionality. With the use of all kinds of smartphones, tablets, and MP3 players in the modern world, we are accustomed to listening to music anywhere we are. But what to do in a situation when you want to listen to music in the car, but there is no way to connect the gadget via aux on the CD radio. More precisely, there is simply no factory version of it. And what to do in this situation? Are there instructions on how to make aux on any radio? We'll figure out.
What are aux inputs and outputs?
In Russia and some CIS countries they are called linear outputs. They are small connectors that can be supplied with voltage from 0.4 - 1.9 volts. In Western countries, this connector is labeled aux out or cd out.
If your device has connectors such as aux input or aux output, then in most cases such a player is equipped with an audio signal amplifier and is capable of working with other external devices. By connecting a smartphone or MP3 player through this connector, you can listen to audio files through the car speakers.
But the saddest thing is that not all old-style radios have such outputs. And if you want to listen to your favorite music from your own media, the owner will have to buy a radio with an aux input installed, or make aux on the standard radio, paying a lot of money in the first and second options.
After some thought, the thought often arises that there may be a possibility of making such a connector yourself. Let's consider the options.
Special emulator for the head unit
There are devices such as CD changer emulators for radios. This device connects to a special connector (on the rear panel of the radio) and allows you to read music from SD cards, USB drives, or receive it from your phone via AUX or Bluetooth. And the radio “thinks” that it works with a regular CD changer. Everything connects beautifully and works, without any hassle. Suitable for old stock car radios.
It is connected via the input for the CD changer. Or through a special adapter.
As a rule, it is displayed somewhere in the glove compartment, or in another convenient place. The head unit identifies it as a CD changer.
Nothing complicated, just be careful when choosing this device. There are a lot of them on AliExpress. Be sure to find out whether a particular model will suit your specific vehicle. It is necessary that certain protocols supported by the emulator and the head unit match. Read reviews, ask the seller, Google information on your car model.
Installing an aux input on the CD radio
In fact, most radio tape recorders are equipped with aux connectors, but for some reason the manufacturer did not consider it necessary to display them on the front panel. To solve the problem of outputting an aux output on a CD radio, a car enthusiast will need a certain number of consumables and tools:
- medium Phillips screwdriver;
- knife;
- insulating tape;
- special keys to get the radio;
- USB cable from the computer controller;
- jumper from a computer hard drive;
- a small piece of cable with a 3.5 mm plug.
Using a knife, carefully remove the decorative plate by prying it by the edge. Using a screwdriver, unscrew the two screws that secure the grille and lift it up. Using special keys, remove the radio.
Having pulled out the radio, we see a white rectangular connector on the back of the case. You need to connect a USB plug with a cable and a jumper to it. The computer controller cable consists of three cores: the left channel, the right channel and the screen. We connect the wires of the left and right channels to a two-core cable with a 3.5 plug and insulate it well using insulating material. We install the car radio in place. We bring the cable with the plug into the car interior.
What to do if the radio does not “see” the smartphone
There are often cases when those who like to combine driving a car with listening to fashionable music encounter a problem: they cannot connect the radio and smartphone via Bluetooth, USB port or AUX connector. Why is this happening?
Why can't I play audio files?
If all attempts to connect the phone to the radio are unsuccessful, then you need to perform a series of checks.
- Make sure the connecting cable is in good condition. It can be checked by connecting the phone using the same cable to the computer. If the connection is normal, then you need to look for the reason in something else.
What to do so that the device can transfer data
Possible methods for solving the problem are selected based on the causes of the breakdown:
- You can start by rebooting your phone - the possibility of a system failure cannot be ruled out.
Video: how to connect an iPhone to a radio
Connecting your phone to the radio via USB, AUX and Bluetooth is a simple operation, which, however, has its own characteristics. Compliance with all connection rules guarantees the quality of operation of the devices and the pleasure of playing music or listening to the radio while in the car.
How to make aux on a stock radio
Unfortunately, not all standard-installed radios have external aux connectors. So, with a greater degree of probability, the radio will have to be disassembled in order to get to the main board of the player. For this we will need the following materials and tools:
- insulated wires with a cross-section of 0.5 cm and a length of 40 - 50 cm;
- 3.5 mm plug;
- heat shrink tubes;
- soldering iron;
- medium Phillips screwdriver;
- knife.
Using a knife, carefully remove the decorative plate above the radio, prying it by the edge. We also use a knife to pry it up and then remove the decorative panel near the gear lever with our hands. Unscrew the fastening screws securing the radio. We remove the radio and disconnect all the wires on the back wall of the case. Remove the cover of the player by unscrewing the bolts holding it and remove it from the case.
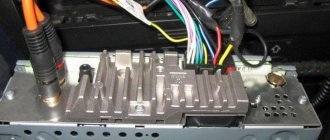
Disassembled car radio
Once you have access to the board, inspect it carefully. You need to find three points labeled LCH, RCH (left and right channels) and GND (“ground”). Using a soldering iron, we attach three wires to the three points found and put them into the heat-shrink channel. We assemble the player in the reverse order, and take the cable we made to a convenient place in the car. Solder a 3.5 mm plug to the end of the cable.
Preparation
Before equipping the radio with an AUX output, you must remove it from the front panel of the car. Standard radios installed by the manufacturer are usually attached to brackets using self-tapping screws or self-tapping screws. The radio can also be secured using latches or side clamps.
Dismantling the radio is carried out in the following sequence.
- First you need to remove the plastic decorative plate around the perimeter of the radio. It is attached using latches; to remove the plate, you can pry it off with a flat screwdriver or knife and carefully remove it.
- After removing the cover, you need to remove the radio from the bracket mounts. It is best to use a set of standard keys for squeezing the latches for this. The keys need to be inserted into the slots and used to bend the latches. After the latches are released, you need to hold the radio by the protruding parts and remove it from the niche.
- If the radio is fixed in the panel niche using screws or self-tapping screws, then you will need a screwdriver for dismantling. It is advisable to use a magnetic screwdriver so that unscrewed screws or screws do not get lost.
- After the radio is removed, you need to disconnect its motherboard from the player. To do this, you need to press out the plastic latches using a screwdriver and unscrew the bolts securing the front panel of the radio to the side walls. Then you need to remove the back and side covers of the device, disconnect the cables and put away the player.
Making aux for a cassette player
Many will say that there are no such car radios left in nature. But this is not true. Of course, such rarities are not comparable to the quality of players from brands such as Bose, however, there are still connoisseurs of such outdated devices. And believe me, they also want to listen to their favorite tunes from their smartphone or MP3 player through an old cassette player in their car. And to be happy they need:
- wires, shielded 40 cm, cross section 0.5 cm;
- heat shrink tubes;
- 3.5 mm plug;
- medium Phillips screwdriver.
We remove the radio from the niche by unscrewing the mounting bolts. Unscrew the bolts holding the device cover. By removing the cover of the radio, we get access to the tape drive mechanism, which is secured with metal latches. By bending the latches, we remove the mechanism, thereby gaining access to the volume control.
Car radio board
We take it out and solder three common wires to it, for the left stereo channel and for the right stereo channel. We put the wires into a heat-shrinkable channel and assemble the car radio. Having installed the player in its place, we bring the wire into the interior or into the glove compartment and attach a 3.5 mm plug to it using soldering.
As we can see, you can install an aux output on any radio. Much, of course, depends on the manufacturer of the product and, of course, on the design components. In modern models from companies such as Bose, there is no need to think about how to connect any mobile device via aux. But unfortunately, there are still a lot of devices on the radio electronics market that require serious improvements.
Although now on the car radio market there is an AUX input on almost all devices, I will tell you if you have hands, a soldering iron and a piece of wire with a 3.5 jack. make a linear input to the radio. Many may say - “It’s a waste of time, it’s better to change the radio and not worry!”, I certainly agree - it’s easier, but firstly it’s always interesting to try to do something yourself, and secondly, with such modifications to the radio, you can connect it in the garage to some old speakers, and enjoy music while working without any material costs.
Let's start with what I needed.
1. The radio itself and the circuit diagram for it. 2. Soldering iron and, accordingly: solder, soldering acid. Soldering Magnifier (Preferable, but not required) 3. Electrical tape. (Where would we be without it?) 4. speaker wire and stereo jack 3.5. 5. 1.5 - 2 hours of free time.
To connect in the garage
You need a battery charger, or any other 12 volt power source. There is an option to connect using a power supply from a computer, but with two speakers the 350-watt power supply was not sufficient. The radio turns on, but as soon as you turn on the song it immediately goes out. You can also connect it from a battery, but you will have to constantly charge it, and if you have a charger, there is no need for a battery.