Schematic electrical diagrams, connecting devices and pinouts of connectors
VAZ cars have a fault diagnostic system that allows you to read and decipher error codes. Most VAZ-2110 cars have an old type “January-4” controller installed. The activation of “CHECK ENGINE” is considered a malfunction detection signal. Troubleshooting in such a controller is simple - error codes are calculated starting from the number 12 and ending with 61. For more modern VAZ models, ELM-327 electronic adapters with the OBD-II program are suitable.
Where is the diagnostic connector located?
On different cars of the VAZ family, the socket is located in different parts of the car. Let's look at a few models as an example:
- on the VAZ-2112 , as on the 2110 , as well as the 2111 , the socket is located to the right of the driver’s seat, immediately under the column;
- on models 2108 , 2109 and 21099 , the socket you need is located under the glove compartment, on a special shelf;
- on cars with a europanel it can be found in the center of the console, near the cigarette lighter. A special decorative cover is used to disguise it;
- Lada Kalina cars the connector is near the gear shift lever, it is also hidden under a special cover;
- On a Lada Priora, look right behind the glove compartment, on the wall.
VAZ 2110
VAZ 2109 diagnostic block - ease of car maintenance
An on-board computer in a car is not an urgent need, but it is a useful device for the car owner, with which you can find out technical information about the status of some car systems in real time. BC on domestic VAZ 2109 - 2115 cars can be installed if the car has a fuel injection system.
How to diagnose a car
- Connect contact “B”, which has the diagnostic block and “ground”;
- Turn the ignition key to the third position, do not start the car;
- First, the “CHECK ENGINE” lamp displays code 12 with 3 flashes. It shows that the diagnostic programs are working. On the VAZ 2110 this happens in this order: the lamp blinks briefly 1 time (which should be considered the designation of number 1). After a pause lasting at least 2 seconds, it flashes 2 times in a row (two). So we got the number two. And this is repeated 3 times so that the driver understands these signs;
- After the diagnostic program has declared its serviceability, it will begin to display error codes, if there are any, of course. In the same way - flashes and pauses.
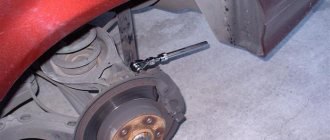
Replacing the fine fuel filter
The fine gasoline filter is located under the hood if the car has a carburetor. It is installed on the fuel hose that goes to the fuel pump. To replace the fine filter, you only need one screwdriver. It is recommended to replace it after approximately 15 thousand kilometers. On fuel-injected cars, such a filter is located at the rear under the body. You will learn about its replacement in another review.
Work order:
- Unscrew the screws of the clamps.
- Pull the filter out of the hoses.
When replacing the filter, pay attention to the direction of the arrow on the housing, which should be directed towards the fuel pump.
The quality of the fuel affects the condition of the filter. If you refuel your car at different gas stations that you are not sure about, then inspect the filter more often.
A clogged filter element leads to jerking when driving at high speeds. And if the filter is heavily soiled, then even at low speeds. If a dirty and cloudy filter element is visible through the transparent housing, replace it. This will only take a few minutes, not including shopping at the store. But you will maintain normal engine operation and extend its service life.
Deciphering error codes
The first character is a letter and indicates a fault block:
- B - body;
- C - suspension;
- P — engine (ECM, gearbox);
- U - data exchange bus.
The second character is a number, code type:
- 0 — SAE (standard);
- 1.2 - OEM (factory);
- 3 - reserved.
The third character is a number, system:
- 1, 2 - fuel system;
- 3 - ignition system;
- 4 — reduction of exhaust gas toxicity;
- 5 - idle;
- 6 - ECU or its circuits;
- 7, 8 — transmission (automatic transmission).
The fourth and fifth characters are numbers, the error code itself.
To diagnose a VAZ 2114, 2113 or update the ECU firmware, car owners, diagnosticians or mechanics need to know the location of the OBD2 diagnostic connector, as well as its pinout and type. To flash the electronic unit or replace it, you also need to know the location of the ECU and the purpose of the pins.
First conclusions
After analyzing the overall results, we can draw the following conclusions:
- compression of 0-4 atmospheres indicates a probable burnout of the piston, valve or cylinder head gasket;
- compression 4-6 atm. usually indicates broken piston rings or partitions between these rings;
- if the compression in each cylinder is approximately the same and amounts to 8-10 atmospheres, then this indicates wear of the cylinder-piston group, so it is necessary to prepare for the upcoming engine overhaul;
- A new and run-in engine can have a compression of 12-12.5 atmospheres.
If a car with decent mileage produces results equal to or higher than normal, this indicates that oil may have gotten into the cylinders. The probable reason for this is wear of the cylinder-piston gear or valve guides.
Now it is necessary to compare the obtained data with the results of a visual inspection.
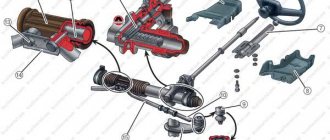
Where is the diagnostic connector for the VAZ-2114
VAZ 2108-2115 with a “European panel”, the diagnostic connector is located in front of the gearbox, directly under the cigarette lighter. The block is closed with a decorative cover. On injection models since 2002, a 12-pin rectangular connector has been used.
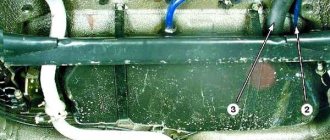
The location of the connector is indicated on the diagram in position No. 8 . The following are visual photos of the diagnostic block.
Photo of the block location:
About the ECU and its location is written in the article “Diagnostics of VAZ 2114”. The following shows the pinout of the OBD2 connector and the assignment of contacts of the electronic control units that were installed on the Fourteenth VAZ models.
Connector type No. 1—16-pin OBD-II connector in the shape of a trapezoid:
Brands and years: some models after 2002 with control systems BOSCH MP7.0 Euro-3, BOSCH M7.9.7, January-7.2, January-7.3.
Connector type No. 2 - 12-pin rectangular connector: Make and year: all injection models, except for some models after 2002 that have an OBD-II connector
VAZ 2109 diagnostic block - ease of car maintenance
Installation location of the diagnostic block for VAZ 2109
Communication with the electronic control unit (ECU) of the main components of the car is carried out by the diagnostic block. On a VAZ 2109 car, the diagnostic block is located on the right side under the dashboard next to the ECU. A special diagnostic tool or counting the number of flashes of the built-in “CHECK ENGINE” lamp can read the vehicle fault codes that are stored in the ECU memory. The article suggests getting acquainted with the procedure for reading fault codes in a VAZ 2109 car and how to perform all operations yourself.
OBD1 pinout - 12 PIN (GM12)
Description:
OBD1 (GM12) connector is rectangular in shape, consists of 12 contacts.
Brands and years:
All injection models, except for some models after 2002, which have an OBD-II connector.
Access and location:
Open access. Located next to the ignition switch, partially covered by the steering column cover.
Pinout:
| M | L | K | J | H | G |
| A | B | C | D | E | F |
| Key * | |||||
* Connector Keying - A design element of a removable connector that ensures the correct orientation of the plug and socket.
Example in the photo:
Conclusions and their purpose:
| Conclusion | Color | Purpose |
| A | Weight | |
| B | L-line diagnostics (not always routed) | |
| D | CO potentiometer (not always diluted) | |
| G | Fuel pump control | |
| H | Power supply +12V (not always wired) | |
| M | K-line diagnostics |
ODB connector pinout: convenient pin layout
In order to personally diagnose a VAZ-2110 car through the connector located under the steering column, you need to know where to connect this or that equipment. This task is greatly facilitated by pinout, which is a diagram of the placement of contacts. It identifies the following main outputs:
- A – ground from the car battery is connected to this output;
- B – output is intended for connecting L-Line type equipment. It is not used on all modifications of the VAZ-2110, so be sure to pay attention to this when choosing a computer scanner or adapter;
- M – K-Line type devices are connected to this output. They are rightfully considered the optimal choice for self-diagnosis of the VAZ-2110, as they provide excellent interaction with any computer equipment;
- H – output to which power is supplied during diagnostic operations;
- G is a very important pinout element, since it is it that ensures safety control of all procedures performed and eliminates any short circuits or other emergency situations.
This designation of contacts will allow you to avoid mistakes when connecting diagnostic equipment, as well as perform all the necessary work efficiently. Now that you know the location of the ODB connector, as well as its main components, you can begin to assess the technical condition of the car.
OBD2 pinout - 16 PIN
Description:
The OBD2 connector is trapezoidal and consists of 16 pins.
Brands and years:
Gasoline passenger cars and light commercial vehicles manufactured or imported into the United States since 1996 (US CARB and EPA legislation) and in Europe (EOBD) since 2000-2001 (European Union Directive 98/69EG) and Asia (mainly since 1998). ).
Access and location:
Pinout:
| 1 | 2 | 3 | 4 | 5 | 6 | 7 | 8 |
| 9 | 10 | 11 | 12 | 13 | 14 | 15 | 16 |
| Smaller side of trapezoid | |||||||
Example in the photo:
Conclusions and their purpose:
| № | Color | Purpose |
| 2 | J1850 Bus + | |
| 4 | Body grounding | |
| 5 | Signal Ground | |
| 6 | Line CAN-High, J-2284 | |
| 7 | K-line diagnostics (ISO 9141-2 and ISO/DIS 14230-4) | |
| 10 | J1850 Bus- | |
| 14 | Line CAN-Low, J-2284 | |
| 15 | L-line diagnostics (ISO 9141-2 and ISO/DIS 14230-4) | |
| 16 | Power supply +12V from battery |
Diagnostic connector pins for used protocols
Pins 4, 5, 7, 15, 16 - ISO 9141-2.
Pins 2, 4, 5, 10, 16 - J1850 PWM.
Pins 2, 4, 5, 16 (without 10) - J1850 VPW.
The ISO 9141-2 protocol is identified by the presence of pin 7 and the absence of pins 2 and/or 10 on the diagnostic connector.
If pin 7 is missing, the system uses the SAE J1850 VPW (Variable Pulse Width Modulation) or SAE J1850 PWM (Pulse Width Modulation) protocol.
All three data exchange protocols operate via a standard OBD-II J1962 connector cable.
The correct connection diagram for a 12 PIN block with a 16 PIN adapter
What factors may influence measurements?
- only a new or well-repaired car can have a compression of 12 atmospheres, for example, after an engine overhaul;
- a cold engine that has not reached operating temperature will have significantly lower compression;
- if the battery is weak or begins to “crumble”, then the engine will not turn so fast, so in this case the compression will be less;
- compression increases due to the combustion of oil in the cylinders - as a result of its combustion, the connection is sealed.
- Having recorded all the measurement data, it is necessary to analyze it. The spread of results for all cylinders should not exceed one atmosphere. For example, if in one cylinder the compression is 9 atmospheres, and in the other three – 11, then in this case you need to think about it. To more accurately determine the nature of the malfunction, it is necessary to carefully monitor the pressure gauge readings, or more precisely, how the pressure increases with each crankshaft revolution.
If at the first revolution there is low pressure (3-4 atm.), and with subsequent revolutions it increases, this indicates wear on the cylinders or problems with the rings. In this case, when about 10 cubes of engine oil are added to the cylinder, an increase in compression will be observed already with the first revolution.
When at the first revolution a compression of 5-8 atmospheres is observed, and with subsequent revolutions the picture practically does not change, this indicates possible valve deformation or a leaking cylinder head gasket
OBD 2 connector
The VAZ 21099, produced since 2002, began to install a diagnostic connector that complies with the OBD 2 standard. Externally, it differs from the VAZ one in its trapezoidal shape:
You can carry out diagnostics on the injection VAZ 21099 using a car scanner (for example, based on the elm 327 processor). This is done with the preliminary installation of an application sold with a licensed scanner, even using a smartphone. By logging into the installed application, you can easily set error codes and also delete them.
True, the market is flooded with Chinese products that “do not see” the ECU of domestic cars, so you have two options:
- reflash the Chinese scanner;
- purchase a diagnostic cable connected to a laptop, Vag-com brand.
If you have an “old” GM12 block on your car, then the following adapter will help you connect to the scanner or cable:
However, in cases where you need to output errors to the computer, but there is no adapter, you can connect by independently connecting to any of the connectors for diagnostics, using the following correspondence diagram:
VAZ cars have a fault diagnostic system that allows you to read and decipher error codes. Most VAZ-2110 cars have an old type “January-4” controller installed. The activation of “CHECK ENGINE” is considered a malfunction detection signal. Troubleshooting in such a controller is simple - error codes are calculated starting from the number 12 and ending with 61. For more modern VAZ models, ELM-327 electronic adapters with the OBD-II program are suitable.
see also
Comments 122
I had a diagnostic connector on my '98 car. And since I always had a repair book on hand, I quickly identified all the unclear connectors from it :) but there was no sensor in the gearbox. There is a sensor for the beige one, but the box is already 2110
The TDC sensor was installed before 1995, emnip.
How is driving the Ex-85, I wonder?! )))
A few years ago I bought a friend a Soviet instrument panel 2108 with a test mileage of 00002 at a very ridiculous price.
There is that same TDC sensor, now screwed into the gearbox bell (the one from the USSR). If you are interested, I will send it. The condition is really bad.
Thank you, there is such a thing, but without a tester it’s more likely just for beauty)
How can a tester carry out diagnostics? And what kind of tester?
There are still large quantities of mirror caps in the warehouse (where I worked) both left and right!
take out a few sets if you have more
There are still large quantities of mirror caps in the warehouse (where I worked) both left and right!
I'll buy it if there are any left.
And you want to say that this connector can be used?
Why not, if there is a device
I still have the sensor on the gearbox. I kept racking my brains as to why the hell he was needed there. Now I already know. Another "trick". Near the fuse block (on the right side) in early (as well as in other) models, there is a “specific” connector, somewhat reminiscent of a cigarette lighter connector. This is a connector for a carrying case, which has two magnets on the reverse side for fixing it to the body (it still serves me faithfully). avtohpp-ru.1gb.ru/index.p…rer_ >
I had such a connector. I found the carrier in the garage late, after the car was sold.
I also have a connector, I was wondering what it was for, thanks for the article. I'll have to look at the box and look at the sensor.
The old expansion one and I would install it with great pleasure! Cool little things... History!
What kind of diagnostic device was it?
there’s a sea of them, even a gazelle seems to fit, but I haven’t checked, otherwise www.ebay.co.uk/itm/Lada-S…ain_3&hash=item540583a8d8
for this money you can install an injection engine and still have enough for OBD)
ELM327 adapters
Once you receive the adapter, you should check its version, for example, with the Torque program. To do this, first pair the adapter with a communicator (tablet) via Bluetooth, usually using a 1234 dongle. Next, connect the power to the adapter. There is no need to connect the adapter to the vehicle diagnostic line at this stage. Having received power, the adapter turns on the red LED. Now you can launch Torque and wait until the adapter icon stops blinking and becomes permanent. At this point, the green LED on the adapter may begin to blink. Next, go from the main menu to the Adapter Status section and look at the Adapter Version item, it should say “ELM327 V1.5”. If so, thank the seller; if it is V2.1 or empty, perhaps they sold us the wrong thing.
It is also worth noting that after connecting to the ECU, the car icon stops blinking, stays on constantly, and the yellow LED starts blinking.
If your car (some VAZs) does not have an OBD-II connector, but a so-called GM connector or OBD-I connector, you can also connect to it according to the pinout of the connectors, using 3 wires - “+”, “-” and K- line. The only thing worth paying attention to is that the supply voltage (“+”) is not always present at this connector, because This pin is connected to the fuel pump, which turns off when the ignition is on but the engine is off. For reliability, it is better to power the adapter from the cigarette lighter, and connect only the K-line to the connector.
see also
Comments 122
I had a diagnostic connector on my '98 car. And since I always had a repair book on hand, I quickly identified all the unclear connectors from it :) but there was no sensor in the gearbox. There is a sensor for the beige one, but the box is already 2110
The TDC sensor was installed before 1995, emnip.
How is driving the Ex-85, I wonder?! )))
A few years ago I bought a friend a Soviet instrument panel 2108 with a test mileage of 00002 at a very ridiculous price.
There is that same TDC sensor, now screwed into the gearbox bell (the one from the USSR). If you are interested, I will send it. The condition is really bad.
Thank you, there is such a thing, but without a tester it’s more likely just for beauty)
How can a tester carry out diagnostics? And what kind of tester?
There are still large quantities of mirror caps in the warehouse (where I worked) both left and right!
take out a few sets if you have more
There are still large quantities of mirror caps in the warehouse (where I worked) both left and right!
I'll buy it if there are any left.
And you want to say that this connector can be used?
Why not, if there is a device
I still have the sensor on the gearbox. I kept racking my brains as to why the hell he was needed there. Now I already know. Another "trick". Near the fuse block (on the right side) in early (as well as in other) models, there is a “specific” connector, somewhat reminiscent of a cigarette lighter connector. This is a connector for a carrying case, which has two magnets on the reverse side for fixing it to the body (it still serves me faithfully). avtohpp-ru.1gb.ru/index.p…rer_ >
I had such a connector. I found the carrier in the garage late, after the car was sold.
I also have a connector, I was wondering what it was for, thanks for the article. I'll have to look at the box and look at the sensor.
The old expansion one and I would install it with great pleasure! Cool little things... History!
What kind of diagnostic device was it?
there’s a sea of them, even a gazelle seems to fit, but I haven’t checked, otherwise www.ebay.co.uk/itm/Lada-S…ain_3&hash=item540583a8d8
for this money you can install an injection engine and still have enough for OBD)
Leak test
You can check the tightness of the cylinder as follows:
- Use an oiled rag or the previously described device with a whistle to close the hole in the problem cylinder.
- It is also necessary to lift the car (it is enough to lift one drive wheel). Everything will be much simpler if there is a “crooked starter”.
- When the top gear is engaged, you need to turn the drive wheel or turn the engine using a crooked starter in neutral gear. It is necessary to rotate the crankshaft until the oily rag flies out or the whistle begins to whistle. Using this simple method, you can determine the compression stroke in the required cylinder.
- Next, the car is lowered, the handbrake and gear are engaged, after which the suspicious cylinder is inflated by a compressor (in extreme cases, air from the wheel can be used).
By the hiss of air you can get a more accurate picture:
- air escaping from the adjacent spark plug hole indicates a burnt-out cylinder head gasket;
- air escaping from the carburetor indicates a problem with the intake valve;
- A hissing sound in the muffler indicates a burnt out exhaust valve. A side effect of this malfunction is the engine “triggering” and smoking. This problem is the most common;
- Air coming out of the crankcase gas outlet indicates piston burnout or ring wear.
So, using the simple procedures described above, you can accurately determine whether this car is worth buying (if this was the purpose of the diagnosis), or find out whether your favorite car needs repairs.
VAZ cars are very popular due to their affordable price, reliability and availability of spare parts on the car market. Many drivers are familiar with the design of the car, so they can carry out repairs themselves. The article talks about self-diagnosis, examines diagnostic equipment, including an adapter for diagnostics on a VAZ car.
Elm 327 does not connect to the ECU (electronic control unit): what to do?
If the elm327 adapter does not connect to the VAZ 2114 ECU, then it is possible that you purchased version 2.1 or version 1.5, which was converted from 2.1. The fact is that such devices use a different version of the Bluetooth module, which supports only 2 protocols out of the available 6. In this case, the adapter connects to a smartphone/tablet, but when you try to connect to the car’s ECU, a message appears that the ECU is not responding.
If your adapter elm327 VAZ 2114 really belongs to version 1.5 and has all six protocols, then you can correct the work and adapt to the ECU commands by manually entering initialization lines.
Such attentive and responsible attitude towards the technical condition of your own car will be a guarantee of safety for you and your loved ones. Trips of any distance will no longer be a test of your own luck and will turn into comfortable trips that bring maximum pleasure.
It should be noted that such situations arise quite rarely. As a rule, a high-quality car scanner purchased from a reputable seller does not present the owner with any unpleasant surprises. The main thing is that during the process of purchasing/ordering a device, the make of the car, the year of its manufacture, etc. are taken into account. It is advisable to check with the seller how well the elm327 adapts and works on the VAZ 2114.