Signs of malfunction of the VAZ 2107 steering linkage
You can determine that the steering ends of a VAZ 2107 are worn out by the following signs:
- increased steering play;
- knocking in the steering;
- accelerated or uneven tire wear.
The latter can also be caused by bent steering rods. In addition, their deformation leads to the car moving away from the straight path.
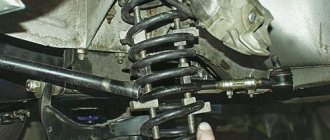
Similar phenomena are observed when other elements of the front suspension are worn out and the wheel camber and toe angles are incorrectly adjusted. Therefore, before changing rods and tips, you need to make sure that the reason lies in them. To check the ends and tie rods of the VAZ 2107, it is necessary to provide access to the car from below - lift it on a lift or install it above the inspection hole.
It is better to start your inspection with the steering tips. Check the condition of the anthers, which should not have ruptures or cracks. The permissible play of the tip hinges is 1.5 mm. If you hear a knocking sound when the tip is pulled up and down, it should be replaced.
Unlike the tips, tie rods practically do not wear out. They can only bend as a result of an accident or due to strong impacts on the suspension (for example, when a car hits a pothole at high speed).
Auto repair school - Do-it-yourself car repair
May 25, 2016 VAZ 2101, VAZ 2102, VAZ 2105, VAZ 2106, VAZ 2107, Zhiguli, Classic by admin
Failure of the steering tip, tie rod and even the entire steering linkage on VAZ-2101, VAZ-2105, VAZ-2106, VAZ-2107, Classic cars is accompanied by a characteristic knocking sound in the suspension (even on small bumps), loss of directional stability when driving ( the car refuses to go straight, pulls to the side and you have to constantly steer) and uneven tire wear. I think this is familiar to many car enthusiasts and, given the quality of our roads, the question of replacing the rod, tip, or all at once has arisen more than once. And naturally, the same questions come to everyone’s mind: How to determine whether the steering tip or rod ? Is it possible to replace the linkage or steering linkage yourself? What tool will you need for this job? Which steering linkage is best to buy? Are there any pitfalls in this matter? And is it necessary to do a wheel alignment after repair ? Where can I find comprehensive information on replacing tie rods ? Right!? Well, it’s not for nothing that you are reading these lines))). And answering the last question, I will say – Here!. At the very least, I will try to keep it that way. I hope that after reading this material, you will know all the answers to your questions... I screwed it up))) Okay, then let’s just get to the point.
Determining whether it’s time to change traction or not is not difficult. It is enough to drive the car into the pit and shake it with your hands and pull the rods. Checking the axial play in the ball pins. If the axial play exceeds 1 mm or the tip makes a knocking sound when you pull the rod up and down, then it’s time to read on and get ready for work. Since it is difficult to describe the diagnostic process, I decided to post a video in which you will see how to check and how the ball pins of steering rods and ends . Watch the video below.
And then, let's immediately decide on the place to carry out the work and the tool that we will need to successfully replace the steering linkage on VAZ-2101, VAZ-2105, VAZ-2106, VAZ-2107, Classic cars . You won’t have to write or read much here, since the work must be carried out on a pit, overpass or lift. Otherwise, you are guaranteed a fun time and injuries too. Regarding the tool, everything is also simple, see photo 1 below.
I think you will have a wrench for 22, 13, 12 (might come in handy), a screwdriver, a hammer and pliers. You are still a serious car enthusiast)). But you will have to buy a puller for steering rods . Look at photo 2. Two options, on the left is a universal puller, on the right is a veteran puller, in common parlance a “corner”, which was probably invented the next year after the release of the first Classic. Both will help you cope with the task. But, I would advise you to choose a universal puller and it will be more convenient to work, and it will unpress your fingers in one go, and it will still work on other brands of cars. Yes, and don’t forget to prepare a tape measure.
Spare parts... I think that the best option for purchase is steering ends, rods and trapezoids produced by Belebeyevsky. Photo 3. The kit includes: two tie rods, two tie rods, a transverse (middle) rod, six nuts and the same number of cotter pins. Everything seems to be good, but not everything. No, tie rods (adjusting couplings)! Why the manufacturer does not complete their kits with them remains unclear. If I'm not mistaken, only Trek considers it necessary to have steering brackets included in the kit. So, we check everything without leaving the cash register! If there are no squeegees, we will definitely buy them. What they look like and how many of them there are can be seen in photo 4.
And about the main thing. Description with photographs of replacing the steering linkage on VAZ-2101, VAZ-2105, VAZ-2106, VAZ-2107, Classic cars:
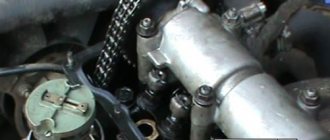
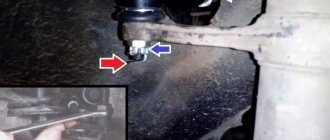
1. First of all, getting under the car, we clean the ball stud nuts from dirt. Using pliers, we pull out the cotter pins, wire, nails, in general, everything that was used to secure the nuts from the fingers. Photo 5
2. Next, use a 22 wrench to unscrew all the nuts one by one. Photo 6.
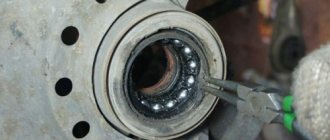
3. The nuts are twisted, we put the puller into action. Photos 7 and 8.
4. Since the right and left tie rods are different, we try not to confuse them. They removed the right tie rod with the tip and placed it on the right side. But it doesn’t matter if you forget where it is. You can easily find out by turning the rod up with your finger and looking in which direction the tilt goes; on that side it was removed (photo 9), do the same before installation. It’s better to check again than to press the finger out again and risk damaging the boot.
5. After the rods are removed, you can take measurements from them. Using a tape measure, measure the distance between the centering holes of the steering rods. And set the same size on new rods (photo 10). The rods have been twisted, but do not tighten the clamps on the bends yet.
6. If the rods are twisted to the required size, they can be installed on the car. Let me remind you once again, do not confuse the left and right sides. And we install the transverse (middle) link with a bend towards the engine crankcase , that is, the cross member goes around the gearbox casing. Photo 11.
7. When all the pins are tightened and cottered, you can also tighten the clamps. Photo 12. And we are preparing for the trip to the wheel alignment.
Somehow, yes! And yet, if you change one tip or a pair (rod and tip) and set the size correctly, you can avoid a trip to the wheel alignment . But, if you change the steering linkage completely, then you will not be able to avoid this procedure. Since the new transverse link will not allow you to maintain the required size. This has been verified.
When using an article or photographs, an active direct hyperlink to the website www.avtorem.info is required!
Did you like the article? Share it on your page!
Required Tools
To change the steering rods or linkage assembly, you will need the following tools:
- a set of spanners or open-end wrenches;
- pliers;
- puller for steering rods.
The last point is extremely important. Without a puller, dismantling the steering rods is, if not impossible, then extremely difficult. There are several types of pullers that allow you to remove tie rod ends. It is better to purchase a universal puller that allows you to remove steering and ball joints on cars of various brands.
Replacing steering rods VAZ 2107
Depending on the number of tips and rods to be replaced, you should decide whether to buy and replace parts separately or replace the steering linkage assembly. The assembled VAZ 2107 trapezium is easier to install and costs less than purchasing parts separately.
The work must be carried out by lifting the machine on a lift or placing it on an inspection hole. The thrusts on the left and right sides change approximately equally. The replacement procedure is as follows:
- Raise the car with a jack (if the work is being done on a lift) and remove the front wheel located on the side from which the traction will be replaced.
- Straighten and remove the cotter pin that prevents the steering end nut from unscrewing.
- Using a 22mm wrench, unscrew the nut securing the steering pin.
- Install the steering wheel end remover.
- By turning the nut or bolt of the puller (depending on the design), press the steering tip pin out of the steering knuckle.
- Unscrew and unscrew the nut of the second finger of the tip.
- Using a puller or hammer, press the second pin out of the intermediate joint.
- Remove the steering rod.
- Install a new rod.
- Tighten and cotter the nuts on the rod pins.
Arrangement of rods and tips
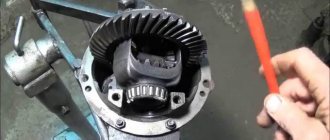
The middle solid element of the trapezoid has the simplest design - an iron rod with two hinges at the ends. The rod fingers are inserted into the second holes of the bipod (counting from the end of the lever), screwed with 22 mm castle nuts and secured with cotter pins.
Please note: the mid-link rod is bent forward slightly to bypass the gearbox. If you insert the part the other way around, problems are inevitable - the bend will begin to rub against the gearbox housing, making it very difficult to control the car.
Not all service station mechanics know about the correct installation of the middle trapezoid rod. My friend, who came to the service to change a set of steering rods on a VAZ 2107, was convinced of this. The inexperienced master placed the middle section in a backward bend, so it was not possible to go far - exactly until the first turn.
Side rods consist of the following parts:
- short (outer) tip with ball pin;
- long (inner) tip with hinge;
- connecting clamp with 2 bolts and nuts M8 for a 13 mm spanner.
The element is made detachable to adjust the toe angle of the front wheels. The length of the lever can be changed by rotating the threaded clamp and thus adjusting the position of the wheel for straight-line movement. The threads of the tips and inside the clamp are different - right and left, so when rotated, the rod lengthens or shortens.
The design of all hinge ends is the same and includes the following parts (the numbering coincides with the diagram):
- Ball pin with M14 x 1.5 thread for a 22 mm castle nut. The radius of the sphere is 11 mm; a hole is made in the threaded part for a cotter pin.
- A rubber (or silicone) dirt-proof cover, also known as a boot;
- Metal body welded to a rod with M16 x 1 thread.
- The support liner is made of a composite material, otherwise - a cracker.
- Spring.
- A cover pressed into the body.
Some lever manufacturers cut into the cover a small fitting for periodic lubrication - a grease fitting.
The short outer ends of the side rods are the same, but the long ones are different. You can tell which part belongs to it by its bend—a lever curved to the right is installed on the right side. The ball pins of the side rods are attached to the first holes of the bipod of the pendulum and gearbox.
A car mechanic I know suggests distinguishing between long tips like this: take the part in your right hand by the hinge, pointing the ball pin downward, as if you were holding a gun. If the “barrel” is curved to the left, you have a left-hand rod tip in front of you.
Video: design of the rod end for VAZ 2101—2107
Purpose of the mechanism.
During a maneuver, the radius of the vehicle's trajectory is determined by the angle of rotation of the steered wheels. However, the simplicity of this action is only apparent. When making turns, a problem arises - the wheels describe curves with different radii: for the outer one it is larger, for the inner one it is smaller. Accordingly, in order to eliminate slippage of the internal wheel and deterioration of adhesion to the road surface and loss of control during a maneuver, it is necessary to provide different angles of deflection of the steered wheels: smaller for the external one, and larger for the internal one.
This problem is solved by the design of the steering linkage.
Replacing the ball joint
You can do all the work either in your own garage yourself or in a service center, entrusting all the tools to the hands of an experienced mechanic. The cost of replacing a ball joint depends on the design of a specific car brand. Some car owners do not know how to remove the ball joint, because it can be pressed into the lever or secured with rivets. To remove it, you will need to spend a lot of effort, because you will have to drill out the rivets and select bolts of the appropriate diameter. Therefore, all the work can cost either one or several thousand rubles.
Replacing the ball using a puller
Before lifting the car, you need to loosen the wheel fasteners without completely unscrewing them. To prevent the car from rolling back, bricks are placed under the other three wheels. Then, armed with a jack, the side of the machine on which the ball needs to be replaced is raised. For safety, it is best to get a “goat”.
Independent replacement of a ball joint with a puller is carried out as follows:
- Unscrew the mounting bolts and remove the wheel
- Loosen the nuts that secure the ball joint
- We take a special puller and insert it between the support body and the lever
- We apply a little effort and make movements in a circle to release the support
- Then we remove the rubber boot from the new copy, apply lubricant to it, and treat the support itself
- Install the new part and assemble the unit in the reverse order
As you can see, doing the job is much easier with a puller. But you should always keep a hammer at hand. If the support is too pressed with the lever, the puller must be installed at a slight angle and lightly hit with a hammer. But what to do if you can’t get a puller?
Replacing a ball without a puller
Without a puller, but with only one hammer, the work is carried out as follows:
- Unscrew the nut from the support pin until it is compared with the axis of the pin
- Take the pry bar in one hand and the hammer in the other
- With one hand we pull the lever down, and with the other we strike until it moves down from the finger
- When the lever is lowered, release all the nuts and remove the ball joint
Also nothing complicated, but you will have to spend more time and effort. During the work, it is advisable to remove any remaining grease from all parts, especially from the boot.
Device and principle of operation.
The mechanism includes:
- Steering bipod;
- Pendulum arm;
- The rods are a long (transverse) central one and two lateral ones, consisting of a long and short tip, for connecting which split couplings with tie clamps are used.
When performing a maneuver, the transverse rod of the steering linkage moves under the influence of the bipod. At the same time, due to its fastening on the pendulum arm, it skews relative to the geometric axis of the bridge and at the same time pulls or pushes the side rods. Due to the skew, the impact on the tips is different, which ensures a difference in the angles of rotation of the wheels.
The adjusting couplings used to connect the ends of the side rods are designed to quickly change their length without disassembling the mechanism. This allows you to set the wheel angles (“wheel alignment”).
Ball joints are used to connect the parts (all of them are of the same type, which simplifies the design and maintenance). This solution makes it possible to ensure normal operation of the drive under any surface condition, even when driving over rough terrain and uneven roads.
The serviceability of the steering gear is the key to vehicle controllability and, accordingly, the safety of the driver and passengers.
Removing and installing the windshield wiper gear motor - VAZ 2107
Removing the windshield wiper gear motor from a VAZ 2107 car
1. We prepare the VAZ 2107 car for operations (see “Preparation of the VAZ 2107 car for maintenance and repair”).
2. On a VAZ 2107 car, disconnect the wire from the negative terminal of the battery (see “Battery for a VAZ 2107 car - removal and installation”).
3. Using a 10 mm socket wrench, unscrew the union nuts securing the windshield wiper blade arms.
4. Using an open-end wrench or other suitable tool, remove the levers of the windshield wiper blades from the conical splines of the drives. If it is difficult to remove the windshield wiper blades, apply a penetrating lubricant to the splined surface of the drives.
5. Using a 21 mm socket wrench (or a spark plug wrench), unscrew the nuts securing the windshield wiper arm drives.
6. Remove the plastic bushings and rubber gaskets from the wiper arm drives.
7. Disconnect the windshield wiper wiring harness block.
8. Lifting the edge of the seal, remove the windshield wiper wiring harness from the slot in the engine compartment partition.
9. Using a 10 mm socket wrench, unscrew the two nuts securing the windshield wiper gear motor to the body of the VAZ 2107 car.
10. By removing the windshield wiper arm drives from the holes in the body, remove the windshield wiper from the VAZ 2107 car.
11. Using a slotted screwdriver, remove the spring retainer and washer from the wiper rod axis. Disconnect the windshield wiper rod.
12. Using a 10 mm socket wrench, unscrew the nut and remove the crank from the drive splines of the windshield wiper gear motor.
13. Using a 10 mm socket wrench, unscrew the three bolts securing the windshield wiper gear motor to the bracket.
14. Remove the bracket along with the rods.
15. Having unfastened the tensioning belt, remove the dirt cover for the windshield wiper gear motor.
Installing a windshield wiper gear motor on a VAZ 2107 car
1. Before installing the windshield wiper gear motor on a VAZ 2107 car, we wash the rods with levers from dirt. Lubricate the hinges of the windshield wiper arms with grease.
2. Connect the connector block of the new windshield wiper gear motor to the wiring harness block. We connect the wire to the negative terminal of the battery. Turning on the ignition, turn on the intermittent operation of the windshield wipers for a short time. In this case, the windshield wiper gear motor drive will be installed in a position corresponding to the extreme left position of the windshield wiper blades. Turn off the ignition and disconnect the wire from the negative terminal of the battery.
Signs of malfunctions and diagnosis of trapezoid.
The most common malfunctions of the steering drive are wear and breakage of the rod joints, and destruction of the anthers. The service life of parts and components depends mainly on the driving style and road conditions in which the car is operated.
In case of strong impacts while driving, as well as in the event of an accident, the geometry of the rods may be disrupted, which also threatens the performance of the unit.
The occurrence of malfunctions can be determined by the following signs:
- The appearance of play in the steering wheel or its tight rotation;
- Characteristic knocking noises in the front suspension area on uneven roads;
- Arbitrary movement of a vehicle from a straight path on flat sections of the road;
- The presence of play when the wheel rocks in a horizontal plane;
- Transfer of shocks and vibration to the steering wheel;
- Uneven tire wear (indicates a wheel alignment disorder, which can also be a consequence of a faulty trapezoid, especially if adjusting it becomes difficult).
It is possible to carry out a complete diagnosis if service centers have the appropriate equipment. However, you can draw a conclusion about the need to repair or replace the mechanism yourself. For this:
- The car is driven into a pit or overpass to gain free access to the mechanism parts;
- Conduct a visual inspection, paying special attention to the integrity of the anthers;
- Check the play of the hinges, which in good condition should not exceed 1.5mm;
- The tips are rocked manually (the appearance of a knock indicates wear or damage and the need for replacement).
Since the system parts cannot be repaired, if problems are found, they should be replaced. Car manufacturers and service center specialists advise changing the trapezoid assembly. This will ensure reliability and durability of further operation.
Troubleshooting
As the car moves, the ball pins rotate in different planes and gradually wear out the crackers, which causes backlash. The following signs indicate critical wear of a tip (or several):
- a distinct dull tapping sound when driving over any uneven surfaces;
- vibration from the play of the ball pins is transmitted to the steering wheel;
- on a flat section of the road the car spontaneously leaves the straight path;
- The rotation of the steering wheel is difficult, and a creaking sound is heard from below.
When a lot of force is required to turn the steering wheel, the worn tip must be replaced immediately. The symptom indicates that the ball pin is jammed inside the housing. If measures are not taken in time, the hinge may jump out of its socket and the car will become uncontrollable.
A similar story happened to my relative. When there was literally half a kilometer left to drive to the garage, the right steering tip on the “seven” broke off. The driver showed ingenuity: he tied the end of the dropped rod to the suspension arm, leveled the wheel with his hands and slowly continued driving. When it was necessary to turn, he stopped, got out of the car and manually adjusted the wheel in the right direction. The 500 m long path was covered in 40 minutes (including the entrance to the garage).
Price issue.
Manufacturers offer several options for steering linkages for the VAZ 2107. The price of a complete set (with mounting parts) ranges from 1,100 to 2,000 rubles, depending on the manufacturer and seller.
Among the most popular and popular offers, the following products stand out:
- Vazinterservice. An original kit from a well-known manufacturer is offered at a price of 1400-1800 rubles. Supplied in packaging with holographic protection. According to motorists and experts, it provides the optimal quality/price ratio.
- Track. Trademark PA "Trek" from the city of Miass, Chelyabinsk region. Several modifications are produced - “Classic”, “Champion”, “TS”, differing in materials, technologies and, accordingly, reliability. For the most common “Classic” series, prices start from 1,700 rubles. At the same time, it outperforms almost all analogues of competing companies in terms of reliability and provides a service life of more than 100 thousand kilometers.
- Belman. Products of acceptable quality at a relatively low price (from 1400 rubles).
- Cedar. CJSC Kedr is one of the largest manufacturers of auto parts (also located in Miass). Despite the presence of certificates, the kits often cause complaints from car owners. The main advantage is the low price (from 1200 rubles).
Video.
The VAZ-2107 steering linkage consists of tips and rods combined into one design. It is necessary in order to turn the front wheels - force is transmitted from the steering wheel to the gearbox, and from the latter to the rods. If the tip or rod fails, this leads not only to inconvenience while driving, but also to an accident - driving the car becomes unsafe.
You can replace the elements of the steering linkage yourself relatively quickly, but it is better to adjust the camber and toe using specialized equipment. And the accuracy of adjustment using “old-fashioned” methods leaves much to be desired.
Steering rods, what are they? Is it worth delaying renovations?
Hello dear car enthusiasts and readers of the Arafanat.ru blog. Many drivers ignore steering problems. As long as the car is driving, it’s fine, but if it breaks down, then they go to a service center to repair it. But due to control problems, the chance of getting into an accident in a difficult road situation increases, and due to a violation of the toe angle, the tires will very soon “die for a long time.”
Tie Rod Functions
The tie rods transmit forces to the steering arms of the hubs from the steering mechanism, which turns the wheels. They are also part of the steering linkage, simultaneously ensuring that the wheels turn at different angles - after all, during a turn, the wheels roll along different radii.
Hinges are mounted at the ends of the steering rods. Thanks to them, during the mutual movements of rods, body, wheels and suspension operation, the possibility of transmitting forces from the steering mechanism remains unchanged, and the selected angle of rotation of the wheels remains unchanged. The rods (one or two) have threads for changing the length of the rod, which is necessary to adjust the angle of the wheels (the so-called toe angle). In cars with a common rack-and-pinion mechanism, there are two rods and four lugs.
Excessive wear of the hinges is a malfunction inherent not only to the steering rods, but also to the steering system as a whole. This is usually an excessively worn liner (or in some designs, a rubber bushing). In hinges with liners, after a significant mileage, wear may appear on the spherical surface of the “pin”. Its cone, surface or thread may be damaged due to corrosion or unqualified installation or dismantling. Actually, the rods themselves bend infrequently - as a result of a wheel hitting the edge of a pit or a direct impact with a stone.
The cotter pin (something like wire) that secures the castle nut should not be reused. If you save money in this way, install it incorrectly or poorly, it may fall out. Because of this, the nut can loosen, unscrew, and the “finger” loses tight contact with its part, which leads to a violation of the geometry of the steering linkage and loss of control of the car. If the repair of hinges with a collapsible design is carried out unskillfully, they may unexpectedly fail or simply fall apart due to a retaining ring that is installed incorrectly.
An imperceptible but significant malfunction is the displacement of the cover from the mounting socket or the rupture of the boot. As a result, dust, moisture and dirt will get into the hinge, which will greatly accelerate its wear. The mechanism for adjusting the toe angles - locknuts, bushings, threaded part of the rods - can sometimes fail due to corrosion and damage received during a collision with obstacles on the road.
Signs of faulty steering rods
A sign of a malfunction of the steering rod joints is a large free play of the steering wheel and knocking, extraneous sounds that appear when turning the steering wheel to the right - to the left. Significant wear of the tips or a hinge that has “disassembled itself” manifests itself in the car’s unauthorized deviation of the selected line of movement or turning radius, and inaccurate control. As a rule, this does not lead to a complete loss of control, since the ball part of the “finger” does not fall out of the body. But if the fastening nut of the “finger” is unscrewed, the wheels can turn in different directions, and your car will no longer obey the steering wheel. In order to avoid a sudden loss of control over the car, you should not ignore independently checking the fasteners of the steering linkage and the condition of the steering rods, and from time to time call for a service.
Where is the trapezoid located?
The steering tips and rods are located in the lower part of the engine compartment, in close proximity to the interior partition. You can see them on a lift or overpass, or when turning the steering wheel to its extreme position. The design of the trapezoid consists of the following elements:
- Two lateral rods (left and right short).
- One medium pull.
- Tips – total quantity 6 pieces.
The design also contains a pendulum lever - it is installed on the right side in the engine compartment.
Design
Externally, the tip is a steel rod, at one end of which there is a hinge, at the other there is a thread that serves for connection to a rack or gearbox. The tip pin is inserted into a special hole in the fist and secured with a nut and cotter pin. In more detail, the rod end consists of:
- a metal cylinder closed at the bottom with a plug;
- a compression spring placed between it and the heel;
- ball pin;
- a cover (boot) made of silicone or rubber;
- plastic liner.
The last element is necessary so that the pin rotates freely in any direction, and thanks to the spring, the backlash that occurs during operation of the car is eliminated for some time. If the tip fails, the part is replaced entirely, since it has a non-separable design. There are also composite parts that were once popular in the Soviet Union (due to a shortage of spare parts), but they are practically not used today due to low reliability.
How to determine if a trapezoid is broken?
The main symptoms by which you can understand that the rod ends are out of order:
- Increased free play (play) of the steering wheel.
- There are knocks in the steering system.
- Tire wear is too fast (or uneven).
Rubber wears out quickly if the toe angles of the front wheels are violated. Also, similar symptoms appear when the steering rod itself is deformed. At the same time, the car leaves the trajectory, the camber and toe angles are quite difficult to adjust.
Maintenance and repair
The VAZ 2107 car has fairly reliable steering, the system has been tested over years of operation. The diameter of the steering wheel is chosen well; its size allows minimizing the load on the driver when driving. The equipment requires periodic inspection and maintenance:
- During maintenance, the mechanism is carefully inspected for increased play and increased wear of ball joints. The steering wheel, the optimal size, turns from side to side. Lack of reaction from the wheels when the wheel deviates from the initial position by more than 5 degrees indicates significant wear.
- The oil in the worm gear housing is changed every 60 thousand kilometers. The device is checked for no leaks of operating fluid through the seals.
- The pendulum steering lever of a VAZ 2107 car is inspected when the steering wheel is slowly turned from side to side. Movements of parts in the vertical plane are not allowed.
Any steering malfunctions must be immediately corrected: the mechanism and drive are partially dismantled. Defects of parts are carried out, the entire steering system is checked with special care. Units with signs of significant wear must be replaced.
Rods, bipod, hinges - where is it all?
The main parts and steering components of the VAZ-2107 and other rear-wheel drive models are shown in the figure below. To understand what is faulty, let’s remember “who is who”. You also need to remember that breakdowns of steering parts and assemblies are very dangerous and, in most cases, lead to serious accidents! For example, if the steering rod breaks, the front wheels lose contact with the steering wheel and the car flies into a ditch or into oncoming traffic. To prevent this from happening, let's check the condition of the steering of our “classic”.
Steering VAZ-2107
1 – lateral thrust. 2 – bipod. 3 – medium traction. 4 – Pendulum lever. 5 – adjusting clutch. 6- lower ball joint of the front suspension. 7 - right steering knuckle. 8- upper ball joint of the front suspension. 9 - right steering knuckle lever. 10- bracket for the pendulum arm. 11- bearing of the upper steering shaft. 12, 19 - steering shaft mounting bracket. 13- pipe of the steering shaft mounting bracket. 14- Upper steering shaft. 15 - steering gear housing. 16- intermediate shaft. 17- facing casing. 18- steering wheel. 20- fixing plate of the front bracket. Pinch bolt for fastening the universal joint. 22- body spar.
Inspection and testing of the VAZ-2107 steering
You need to check your steering if your car has the following signs: -increased play (free play) of the steering wheel; -knocks in the area of the front wheels; - difficult (tight) rotation of the steering wheel. It is better and more convenient to perform all work in an inspection ditch or on a lift. Be sure to invite an assistant; you can’t handle the check alone. Before work, the car must be thoroughly washed from below. Set the steering wheel to the position for driving in a straight line. Turning the steering wheel left and right, we check one by one: - the play of the steering wheel along the rim is 18 – 20 mm; - there should be no knocking in the hinges and joints; - the fastenings of the steering gear housing and the pendulum lever are not loose; - there is no play in the ball joints of the rods and in the bracket of the pendulum arm, and the bipod does not move in the axial direction; - steering force does not exceed 20 kgf; - the adjusting couplings of the side rods are securely secured with clamps; -all protective caps and rubber covers have no cracks or tears.
Ball joints of steering rods are considered to be in good condition if the axial movement (along the axis of the fingers) is no more than 1.5 mm. When you press the mount on the hinge, you should feel the resistance of the spring.
Trouble-shooting
Loose threaded connections must be tightened, damaged and worn components and parts must be replaced. The most common parts to be replaced are tie rods with joints and a pendulum arm. A stiff steering wheel or knocking noise in the steering mechanism can be eliminated by adjusting the worm gearing . After replacing the rods, you need to adjust the camber and toe angles of the wheels.
Watch the video on steering linkage diagnostics
VAZ cars, which are classic models, are distinguished by pleasant reliability. This also applies to the steering mechanism.
It is quite complex, but its design allows you to maneuver and ensure reliable vehicle control even in the most difficult road conditions.
The modernization process led to the installation of a composite shaft and a safety column. Due to the size of the steering wheel, the driver makes the necessary maneuvers without any problems. From lock to lock, it takes 3.5 turns to turn the steering wheel completely. The force from the steering column is transmitted to the drive via a composite shaft.
The current steering mechanism on the VAZ 2107, a product of the Volga Automobile Company, is quite informative and does not allow the driver to get tired during long trips. There are certain difficulties when turning in a parking lot, but as soon as the car begins to move, the resistance weakens and turning the steering wheel becomes easier.
There is one more nuance - when the steering mechanism is working properly, there is a slight play. But its limit value complies with the traffic rules. This is due to the fact that there are steering rods on the VAZ 2107 and an impressive number of elements in the gearbox.
In general, the steering of the 7 can be considered reliable.
Diagnostics of trapezoid elements
But before you replace the VAZ-2107 steering linkage, you need to make sure that it is faulty. To do this you need to do the following:
- Place the car on a viewing hole or overpass to make access to the steering control elements easier.
- Inspect the tie rod ends. Pay attention to the anthers - there should be no cracks or cuts on them. The play of the hinges should not exceed 1.5 mm.
- Twitch the tips and listen for sounds. If knocking noises are heard, then the tip must be replaced - it is useless to repair it, although such a service is available.
- Steering rods have virtually no wear - they only bend as a result of an accident or driving into large holes.
You should not try to straighten the rod - it is made of very durable metal; to do this, you need to make a huge effort. In addition, the strength of the metal is compromised after such “repairs”.
Selecting new trapezoid parts
Since the VAZ 2107 car has been discontinued, finding original spare parts is becoming increasingly difficult. On the roads of the CIS countries, steering rods fall into disrepair quite often, so the supply of “original” parts has long been exhausted. In recent years, trapezoid kits have been supplied to the market by several well-known manufacturers:
A special feature of repairing a steering linkage is that worn tips can be replaced one by one. Few Zhiguli owners install complete sets because of one broken ball pin. As a result, the “seven” trapezoid is often assembled from spare parts from different manufacturers.
The quality of steering rods from these manufacturers is approximately the same, as evidenced by reviews from car enthusiasts on the forums. Therefore, choosing a new spare part comes down to following 3 rules:
- Beware of fakes and do not buy parts from dubious outlets.
- Avoid tie rods from unknown brands sold at bargain prices.
- Do not confuse the left long tip with the right one if you are changing part of the trapezoid.
Tools for repair
In order to replace the elements of the VAZ-2107 steering linkage, you need to prepare the following tools:
- Socket and open-end wrenches.
- Pliers.
- Tip remover.
It is best to dismantle the VAZ-2107 steering linkage rod using a special device. Be sure to buy a puller - it is not very expensive, but the work will go well with it.
It is very difficult to remove the pins of the tips from the holes - they are conical in shape, and the metal often sticks. You can benefit if you buy a universal puller - you will also need it when repairing the suspension (for removing ball joints).
How to unscrew the steering wheel nut
If there is a broken thread that cannot be unscrewed, there are three ways:
- You shouldn’t immediately take a radical approach to this matter; perhaps not everything is as bad as you think and just simple manipulations are enough. First, let's clean the entire surface on which we will work with a wire brush and drop a little penetrating lubricant. If you do everything described above, then there is a chance that a regular spanner will help you to unscrew a bolt or nut with torn edges. If not, there are other ways. You can try to simply tap the ill-fated object (but not too hard!).
Lubricating a soured nut with WD-40
- How to unscrew a bolt or nut with broken edges? Of course, a gas wrench will help you a lot in this case. This is truly a magical tool. This tool, of course, requires a lot of space since it is very large, but at the same time it is able to hold even the most even objects, which helps a lot in this problem.
Gas key
- In those equally frequent cases when a gas wrench will not help, but the nut (or bolt) is large enough, an angle grinder will come to the rescue. You can simply take and carefully cut the edges, which will be smaller than those that have been erased. Four of these newly cut edges will be enough; there is no need to try to cut out all six. After this, the nut (or bolt) can be easily unscrewed with a socket or socket wrench, or using a gas wrench for greater confidence in a positive outcome (it is not recommended to touch the open-end wrench). You can also restore the edges using a file, although this, of course, takes more time.
Cutting the nut thread with a grinder
Carrying out replacement: step-by-step guide
You immediately need to decide how many rods and tips need to be replaced. Based on this, you can understand whether it is worth changing the VAZ-2107 steering linkage assembly, or its individual elements. Sometimes it turns out that completely replacing a trapezoid is much more effective - its service life is much longer than that of a restored one.
To replace you will need to perform the following manipulations:
- Place the car on a viewing hole or overpass. It is imperative to remove the wheel from which the repair will be carried out.
- Straighten and remove the cotter pin, after which you can unscrew the nut from the tip pin. You do this using the key at “22”.
- Install a puller on the tip and turn its bolt, squeezing the pin out of the hole.
It is advisable to treat all threaded connections with WD-40 penetrating lubricant before starting work. The price of the assembled VAZ-2107 steering linkage will be about 2000 rubles. And it is much easier to dismantle it than each rod separately.
After pulling out the first finger, proceed to the second - repeat the manipulations described in points 2 and 3. After this, the traction can be completely removed. To disrupt wheel alignment as little as possible, you will need to measure the length of the old rod and ensure that the new one has the same size. But this does not mean that after repair there is no need to adjust the camber and toe - this procedure is mandatory.
Complete disassembly of the trapezoid
Removing all rods is practiced in two cases - when replacing assembled levers or a complete set of anthers on hinges. The technology for carrying out the work is similar to dismantling the outer tip, but is done in a different order:
- Complete the preparatory stage - place the car in the pit, clean the hinges, apply lubricant and remove the cotter pins. There is no need to turn or remove the wheels.
- Using a 22 mm spanner, unscrew the nuts securing the two side link ball pins; do not touch the clamp bolts.
Don't forget to position the middle section correctly - bending forward. After replacement, it is worth driving out onto a flat section of the road and observing the behavior of the car. If the car pulls to the side, go to a service station to straighten the camber angles of the front wheels.
Manufacturers of steering linkages
And now a question that interests many motorists - which is the best steering linkage for the VAZ-2107? There are many manufacturers on the market, it is quite difficult to choose a decent one. Here are just a few of the most popular manufacturers:
- "VIS" - have high reliability, their cost is relatively low. According to reviews from motorists, this is one of the high-quality manufacturers of elements.
- "TRACK" - the highest quality elements from this manufacturer. Rubber boots last quite a long time - there are practically no equal ones in terms of service life.
- "BELMAG" - good quality products at a relatively low cost.
- "CEDAR" - low cost and very poor quality.
This is a list of the most popular manufacturers that can be found on the market.
Motorists praise TRACK very much - these are very high-quality VAZ-2107 steering linkages. Its price is approximately 1700-2000 rubles. Its resource is very high, it cannot be compared with KEDR products. Most of them are of very poor quality - it gets to the point that they last 2000-5000 kilometers, after which terrible knocking noises appear. Therefore, it is better to purchase quality products.
Gearbox oil
To reduce friction of the internal elements of the steering column, GL-4, GL-5 transmission oil with a viscosity grade of SAE75W90, SAE80W90 or SAE85W90 is poured into the mechanism. In the old fashioned way, many car owners use TAD-17 oil for the unit in question. The filling volume of the gearbox on the VAZ 2107 is 0.215 liters.
Checking the oil level
To avoid premature failure of mechanism parts, it is necessary to periodically check the oil level and replace it.
It is worth taking into account that the fluid from the gearbox, although slowly, leaks, and the leak occurs regardless of whether the column is new or old. The level check is performed as follows:
- Use a 8 wrench to unscrew the filler plug.
- Using a screwdriver or other tool, assess the oil level in the crankcase. The normal level should be at the bottom edge of the filler hole.
- If necessary, add lubricant using a syringe until it begins to flow out of the filler hole.
- Tighten the plug and wipe the steering gear from smudges.
How to change the oil in a gearbox
As for changing the oil in the steering device, this procedure should be carried out every year and a half. If the decision has been made to change the lubricant, you need to know how to perform the procedure. In addition to the new lubricant, you will need two syringes of the largest possible volume (purchased at the pharmacy) and a small piece of washer hose. The procedure is carried out in the following order:
- Use a key to unscrew the filler plug, place a piece of tubing on the syringe, draw in the old oil and pour it into the prepared container.
- Using a second syringe, new lubricant is poured into the gearbox to the required level, while it is recommended to rotate the steering wheel.
- Tighten the plug and wipe off traces of oil.
Video: changing the oil in a classic steering gear
Despite the complex design of the steering mechanism of the “seven”, every owner of this car can perform preventive maintenance, repair or replacement of the unit. The reason for repair is characteristic signs of malfunctions in the mechanism. If parts with visible damage are found, they must be replaced. Since the steering column is one of the critical components of the car, all actions must be performed in strict sequence.