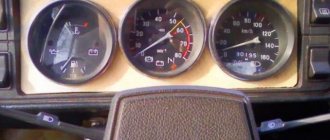
When constantly using cars of the “tenth” family from AvtoVAZ, the question often arises as to why the speedometer does not work on the VAZ-2115. This sensor is vital, because not every driver has a developed sense of speed to move with a non-working device.
However, this feeling is quite well developed in security cameras that record speed limit violations on city and suburban roads. A car enthusiast can detect and fix this malfunction on his own, but this will take a little time.
What does the operation of the pointer depend on?
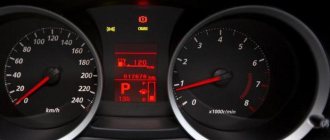
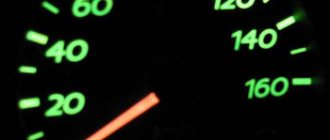
An ignorant motorist may think that the speedometer of the VAZ 15th model itself has broken down and that half the car will have to be disassembled in order to change it. In reality, this happens extremely rarely; the reasons usually lie in the devices that transmit the signal for the speed indicator. It is quite easy to make sure that the instrument panel, including the speedometer needle, is in good working order: when you turn on the ignition, all indicators should jump to the maximum.
The operation of the indicator on the instrument panel depends primarily on the speed meter installed in the gearbox. The following types of sensors exist:
- mechanical;
- electronic.
The first ones were installed on carburetor VAZ 2115 models. The meter is a steel cable in a casing, rotated by the speedometer shaft drive built into the gearbox. That is, the drive shaft is mechanically connected to the pointer and odometer directly, so that this device is quite reliable in operation and rarely fails.
The electronic speed sensor, installed on more modern versions of cars with an injector, is a coil of thin wire with a core. It operates according to the Hall principle: the frequency of electrical pulses passing through the coil changes when a significant metal mass appears next to it. The controller that controls the speed indicator and odometer supplies the sensor with a constant voltage of 12 V, and in response receives a pulse signal, the frequency of which depends on the revolutions of the secondary shaft of the gearbox, and therefore on the speed of the vehicle.
It is the malfunction of the electronic meter that most often becomes the reason why the speedometer 15 of the VAZ model does not work. The sensor is considered a device of average reliability and can fail at any time. There have been cases when the sensor had to be changed after 300 km of a new car. The cable drive of the carburetor modification fails much less frequently, once every 100-150 thousand km.
Wear or breakage of the VAZ 2114 speedometer cable
Speedometer cable VAZ 2114 - is responsible for transmitting speed from the box to the instrument panel of the car’s speedometer. One end of this cable is connected to the drive gearbox, which is located on the gearbox, and the other end is connected to the speedometer mechanism itself, which in turn is located on the instrument panel.
The speedometer cable of the VAZ 2114 is located near the bottom of the gearbox housing and is attached to the gearbox, for clarity, so that you have at least the slightest idea of where the cable is located, look at the photo below in which the arrow indicates the cable:
The speedometer cable is replaced in 2 cases:
Failure, and therefore the speedometer will not show any values on the instrument panel. And also when it is deformed and when the nut that secures it to the gearbox or to the speedometer mechanism breaks. It is important to know: If you have a nut securing the cable to the gearbox, or to the speedometer, it is broken, then when driving you will experience sharp jumps in the speedometer needle!
Additional symptoms of trouble
If the speedometer does not work in the carburetor version of the VAZ 2114-2115, then this does not in any way affect the dynamic and speed qualities of the car. At idle, the engine also operates stably, since the drive shaft, cable and pointer are not connected to the engine power system.
Another thing is a direct injection system with an injector, where all processes are controlled by the electronic brain of the car - the controller. Receiving signals from various sensors, including a speed meter, the controller sends commands to the injectors about the injection duration and the degree of enrichment of the air-fuel mixture. Therefore, if the speed sensor fails, the car may stall at idle or while coasting with the gear engaged.
During long-term operation with a faulty meter, increased fuel consumption will become noticeable.
A breakdown of the cable drive is detected visually; you only need to remove it from the gearbox. Most often, the flexible shaft breaks at the entrance to the gearbox. It will be difficult for an ordinary motorist to check an electronic device without special equipment. There is only one way: buy and install a new sensor. But before purchasing, you need to make sure that the reason does not lie in the meter connection wires and contact group, which often oxidize.
Tips for motorists
Nowadays, driving a VAZ-2115 passenger car with a faulty speedometer can become a very expensive task. Since the driver is unlikely to be able to accurately determine the speed of the car by eye. But on the roads, in addition to traffic police inspectors with radars, there are also camouflaged radar detectors with video recording systems, which cannot always be noticed in time. Therefore, the amount of fines can easily exceed the amount you will pay for speedometer repair.
Troubleshooting
A breakdown of the mechanical speedometer drive is rare, but it is also more difficult to fix. Having purchased a new cable, you need to disassemble and replace it in the following sequence:
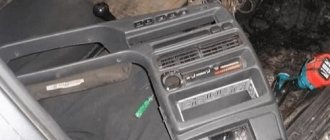
- Unscrew and remove the instrument panel. Here you will have to work hard to remove the plastic decorative trims, unscrew all the screws and remove the clamps.
- Disconnect the connectors of the low beam switches, hazard lights and side lights.
- Remove the radio, disconnect the wires from the cigarette lighter and unscrew the panel mounting screws.
- Pull the end of the flexible shaft out of the speedometer block. Unscrew the second end from the gearbox; it is mounted into the differential housing on the top side.
Replacing an electronic speed sensor is much easier and less time consuming. Before carrying out work, you must make sure that the cause is in the sensor and not in the wiring or contacts. To do this, the contacts should be cleaned and the insulation of the wires should be checked visually.
Having prepared a set of keys, pliers and screwdrivers, you can begin replacing the device, following the following algorithm:
- Disconnect the negative battery terminal (ground). Remove the air filter and air duct pipe.
- Disconnect the connector from the sensor and clean the place where it is installed from dirt so that it does not get inside the gearbox when removing it.
- Using a 22 mm open-end wrench, loosen and unscrew the sensor nut. Remove it and cover the hole with a rag.
- Install a new meter; there is no need to tighten the nut too much. Connect the connector, install the air filter and replace the battery terminal.
VAZ 2115 Samara cars use 2 types of speed sensors - from the Bosch and General Motors brands. The former are distinguished by a square connector shape, the latter by a round one. These features do not affect the principle of operation and the procedure for replacing parts. There are also Russian-made elements of the January-4 type, which have a round connector.
Types of installed meters
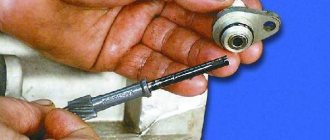
Replacing a speed sensor with your own hands for a VAZ 2115 is not much different from replacing it on any car of the “tenth series” (for example VAZ 2110-2112), as well as the Samara series (VAZ 2113-2115), and new products such as Lada Kalina , Grant or Priora. The sensor itself is located on the rear side on top of the gearbox (when viewed from the radiator) directly above the differential, where the wires come out (in the photo below it is shown by an arrow, look under the pipes).
The meter we are looking for is located under the pipe indicated by the arrow.
At different times, three types of sensors (meters) were installed on VAZ models. The first of them is no longer used on new cars.
Type No. 1
Installed on the first Samaras with an injector with a cable-driven speedometer:
- It was installed as an “intermediate insert” between the speedometer cable and the gear output to the gearbox.
- Wires with a connector extend from it to the side.
Speed meter of the first (oldest) type
- Its malfunction can only be determined with a special diagnostic tool at the same speed at idle. And also when the car is coasting and when stopping.
Sometimes, when such a breakdown occurs, the car begins to stall immediately after engaging the “neutral” (neutral gear) while driving. This happens due to the fact that the car, when driving, maintains a slightly higher idle speed initially (1000 instead of 850 if the car is stopped). This is designed for smooth shifting when coasting from neutral to gear.
Attention: Before replacing, it is recommended to check the drive mechanism (on which the meter sensor is screwed)
You can do this by trying to turn the drive using any available means. Carefully! So as not to break the square window.
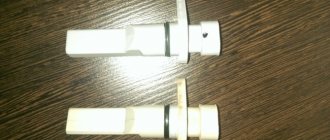
Type No. 2
A newer model of the meter is installed on subsequent models of injection vases. Its main difference is an electronic speedometer and the complete absence of a cable. It is screwed directly onto the output of the drive gear.
Type 2 speed meter, newer model without cable
If it breaks down, the speed of the car stops being displayed on the instrument panel. The rest of the symptoms are the same as those of the first model.
Type No. 3
The newest version in which the unreliable drive mechanism (in the event of a breakdown, the box had to be removed and disassembled) has been replaced with a modern electronic one (which is based on the Hall effect).
Speed meter based on the Hall effect
The consequences of failure of such a meter are exactly the same as those considered in the previous analogue. However, on cars with this type of sensor, electric power steering (abbreviated as EPS) is installed. If the meter fails, the force when turning the steering wheel changes, and in some cases the EUR winding burns out. This is especially unpleasant if there is a “floating” defect in the speed meter. When turning, the force on the steering wheel begins to change. This scares some drivers. Now the EUR has been abandoned.
Attention: Such meters have completely different markings for Priora and Kalina and are not interchangeable!
Before buying a new one, you need to check which meter is installed on your machine. The marking of the meter is written on its side belt.
Speedometer doesn't work
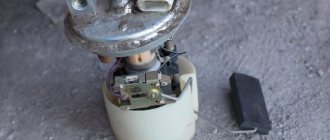
I’ll say right away that the problem has already been solved. It all started simply on one day in February: morning, frost 32 degrees, which is rare in our area, warming up, trip to Belgorod (business and work, at the same time sharpening new Bauer-200r skates at the Orange Ice arena). On the way back, at first the speedometer jerked and then stopped working. It doesn't matter - there is a navigator. I arrived home, opened the hood - there was oil on the box, it was thrown out through the breather, although the oil level in the gearbox was normal, the wires were in place. Okay, let's leave it like that for now. I searched the Internet, maybe DS (speed sensor). 1. Replacing the DS
— February 16.
I took it off and looked. It's covered in oil, the axle is loose, it's probably him. On February 16, the opportunity arose to buy, I bought a DS with a metal axle from the “Yellow Road” (they say it’s better than plastic, photos later). I put a new one (220r) near the store, removing the air filter. I drove off, the speedometer does not work, there is no indication on the trip computer and error 500 - no connection with the DS. 2. Checking the wires.
We read on the Internet, take a tester, check the voltage at the connector.
1-+, 2- readings (A), 3-minus. C + and - are simple, but we check the reading wire with an assistant: I short it to ground, the assistant watches the needle fly up to 200 km/h. This means the connector is alive. 3. I was sick.
A break in the struggle, I read the options on the Internet, the only thing left is the speedometer drive in the gearbox, they come in 3 types, which means you just have to remove and buy.
4. Replacing the speedometer drive in the gearbox
. On March 15, the speedometer drive was removed, the teeth on the plastic gear were chipped, we counted the teeth and looked at the color of the gear. They come in 11 teeth (gray) - pair 3.7 12 teeth - pair 3.9 16 teeth (yellow) - 4.3. My brother removed the drive from the four-speed for a pair of 4.3, the teeth are small, it won’t work. I bought it again on the Yellow Road (oh, almost an advertisement, just less defective, although I got it too) - 100 rubles. I changed it near the house, although I couldn’t do it without a hammer, the ds sensor didn’t fit, you can see burrs inside the shaft. I carefully hammered the DS onto the shaft with the wooden handle of a hammer, lightly screwed the DS, and then put it in the box. The speedometer works, hurray. I will be glad if it helps anyone. I attached a photo. + there is a spare speed sensor left.
How to repair a speedometer with your own hands CAR WORKSHOP
It's no secret that accurate speedometer readings are extremely important for the driver.
It is through this device that the driver knows at what speed the passenger vehicle is moving and how many kilometers the vehicle has traveled. A breakdown of the speedometer is fraught with dangerous consequences - from a fine for speeding to incorrect gear shifting, or missing a turn due to excessive speed.
How to understand that the speedometer is starting to fail?
The following symptoms may indicate a speedometer malfunction to the driver:
- Complete stop of numbers counting total mileage
- The device indicates an inaccurate speed (you can check it using the navigator turned on on an independent device).
- Dashboard sensors fail.
The order of preparatory actions to begin repairing the speedometer:
- First you need to remove the front panel and turn off the power to the car's light signal switches (dimensions, turn signals, low beam).
- Then remove the radio and turn off the cigarette lighter, unscrew the screws that secure the panel and the speedometer cable.
- After this, remove the 3 pads and the panel itself. Now the speedometer mounting bolts are accessible and need to be unscrewed.
If the device shows a speed higher than the actual one, it is recommended to perform the following actions:
- throw the arrow over the limiter;
- We secure a small piece of construction tape under the device data;
- Using a pencil, we place marks on the tape. The distance between the two risks should be 7 millimeters, which is equal to a speed of 10 km per hour;
- we take out the arrow and place it so that its bottom overlaps the second line.
If everything was done correctly, the arrow should be returned to its original position.
If the total mileage of the car is inaccurate, the numbers can be easily corrected manually. Speed sensors that have become unusable for one reason or another are simply replaced with new ones.
We repair the speedometer with our own hands
If the speedometer does not show signs of life, or shows false readings, it is quite possible that you can limit yourself to replacing the drive. The drive itself in VAZ cars is made in the form of a flexible shaft, with a total length of no more than 355 cm, or an electric drive. During the repair of the Ninety-Nine, the drive gears, o-rings and speedometer drive must be removed. Luckily, they can be removed without touching the gearbox.
The Car Repair Manual recommends that motorists do the following:
- The car is driven to the inspection pit.
- Using a socket wrench, you need to unscrew the bolt from the body that secures the speedometer drive housing to the gearbox.
- Using a screwdriver, carefully pry and remove the housing.
- It is also necessary to remove the driven gear.
Be careful when visually inspecting the socket where the flexible rod end of the device is installed. The gear should not be licked or have any defects. If they are present, it must be changed.
The box body where the drive will be installed is carefully inspected. If there is a trace of machine oil there, then the O-ring needs to be replaced. To do this, pull out the driven gear and push out the O-ring. The parts are washed carefully and clean in kerosene. After they dry, you need to install them in the same order as you took them out.
When deciding to do all the work himself, the car owner saves an impressive amount of money that he would have to pay to the craftsmen at a car service center.
How to correct the mileage of a VAZ car
Many car enthusiasts resort to the method of calculating the mileage on their cars. This is due to the desire to sell your iron horse as dearly as possible or to simplify the procedure for passing a technical inspection.
Amateurs have long come up with a way to twist the speedometer readings. The main headache is the correct installation of the device in its place.
Accurate operation of the speedometer is the key to road safety!
Speed sensor, device and principle of operation
The purpose of the speed controller in carburetor and injection engines is to transmit information about the vehicle's driving speed to the instrument panel. The principle of operation of the DS is quite simple and is based on the Hall effect:
- The controller transmits voltage signals to the ECU with a frequency directly proportional to the speed of rotation of the vehicle wheels.
- The ECU, in accordance with the signals received from the engine, adjusts the engine at idle speed and, using the XX sensor, controls the air supply bypassing the throttle.
- It is very important that the controller pulse frequency is directly proportional to the actual speed of movement.
Basic functions of the speedometer
Let us immediately note that the task of the VAZ-2115 speedometer includes several functions. This sensor is designed to:
- To output an electronic signal to the speedometer, which is located on the dashboard. As a result, it is possible to control the speed and distance.
- Based on the speedometer readings, the ECU adjusts and determines the optimal engine speed in different driving modes.
Signs of a malfunction in the VAZ 2115 speed sensor
- One of the most likely symptoms of a breakdown is incorrect values on the speedometer, in particular, the dial needle moves chaotically in different directions.
- Another sign is that the engine runs intermittently at idle.
- The revs fluctuate at XX.
- Increased fuel consumption.
- Dips during acceleration, i.e. when the driver presses the gas, the engine does not react to this in any way, power does not gain.
Causes of damage
To determine why the VAZ-2115 speedometer with an injector does not work, you can use a simple test to check its serviceability. Initially, press the button for resetting the daily mileage readings, hold it and at the same time turn on the ignition. If all the sensors on the dashboard are working properly, the arrows move from the initial readings of the scale to its end, and then return back. This should be repeated three times. If the VAZ-2115 speedometer does not work, the arrows will not move. This means that the problem lies only in the speed sensor. The speedometer itself works fine.
If the VAZ-2115 speedometer does not work in a car with a carburetor-type engine, then the reason is most likely that the gear drive has stopped functioning normally, which transmits the necessary readings from the speed sensor. The reason for this may be mechanical damage: the edges at the tip of the drive shaft are cut off or the teeth on the gears are damaged. As a result, the transmission of torque from the gearbox shaft to the sensor shaft is interrupted.
Diagnostics of the speed sensor operation
Diagnostics of the sensor's performance is performed using two methods.
To implement the first method you will need a multimeter:
- First of all, dismantle the controller itself. Read removal instructions below.
- Next, set the tester to AC voltage measurement mode.
- Then the multimeter probes must be shorted to the contacts of the controller plug. Connect the first probe to the contact going to the dashboard, it is located in the center, and the other to the car body, i.e. to ground.
- There is a special rod in front of the controller. When it rotates, the device starts. To diagnose the operation of the regulator, it is necessary to rotate the rod, for which a metal tube of the same size is installed on it.
- The rod will begin to rotate, and the multimeter display will display information about the alternating voltage, or rather, its surges. Moreover, the higher the rod rotation speed, the larger the jumps in values. This will indicate a controller malfunction.
The second method of checking the device is carried out without dismantling, however, to do this you need to drive the car into a pit or overpass:
- When the car is in the pit, jack up the left front wheel.
- Next, find the controller and disconnect the connected wiring from it.
- Now take your multimeter. Its probes must be connected to the ground contact and the impulse transmission contact on the ECU; on the block this is the central and outermost contact.
- Then spin the jacked wheel and check the multimeter readings to see if any voltage surges are occurring. If you don’t have a tester, you can use a regular test lamp with wires connected to it. Connect the first wire to the power supply, that is, to the left contact, and the other to the central one. If the light source blinks when the wheel rotates, then the DS is working.
It is quite possible that the cause of the DC failure lies in poor contact with the vehicle’s electrical network; in this case, you simply need to replace or clean the contacts. Before diagnosing, inspect the device. If it shows signs of damage, there may be no point in even checking it.
REMOVAL AND REPLACEMENT
If the check shows that the DS is faulty, it needs to be replaced. Repairing sensors and similar small electronic devices is a thankless task. It is unlikely that this will be possible to do in a garage; the only thing that can be done is to clean the contacts from oxidation.
VD-40 or any solvent (the same alcohol) is perfect for this; wipe the contacts on the block with a cotton swab; if the problem was oxidation, the DS will start working.
If this does not help, the most rational thing to do is to purchase and install a new device - it is not expensive (the cost of a new DS is about 300-400 rubles) and replacement takes no more than 10 minutes.
To remove and connect the DS you will need a 21 key and a technical rag to wipe the mounting socket from oil and dust deposits that have accumulated on it.
First, let's figure out where the speed sensor is located on the VAZ 2114. You can see it on the gearbox housing, near the dipstick for checking the amount of oil in the crankcase. If you drive the car into a pit, it will be much easier to remove the DS, since access to it from above is limited by the air filter pipe and the absorber, which will also have to be removed to replace the DS.
Location of DS on VAZ 2114
Removal of the DS is performed in the following sequence:
- We drive the fourteenth into the pit;
- We remove power from the battery (for better lighting, leave the hood open);
- We climb into the inspection hole and find the DS, clean the dirt accumulated on it with a rag;
- We disconnect the contact block (the block is jammed with a spring retainer, there is a button on the block to disconnect it);
- Using the 21st key, unscrew the DS from the mounting socket;
Now let's talk about how to properly connect a new DS. It is important here that the device rod fits correctly into the fixing sleeve, otherwise rotation will not be transmitted to the sensor.
There is no science here - if the DS fits into the seat the first time, then everything is in its place, if something prevents it from moving forward, then the rod did not get into the bushing.
The threaded connection of the new DS must be tightened carefully so as not to damage the plastic body of the device.
That's all. Note that replacing the DS on VAZ 2115 and VAZ 2113 cars is carried out in a similar way.
When constantly using cars of the “tenth” family from AvtoVAZ, the question often arises as to why the speedometer does not work on the VAZ-2115. This sensor is vital, because not every driver has a developed sense of speed to move with a non-working device.
However, this feeling is quite well developed in security cameras that record speed limit violations on city and suburban roads. A car enthusiast can detect and fix this malfunction on his own, but this will take a little time.
How to remove the VAZ 2115 speed sensor (step by step)
- First of all, turn off the ignition and open the hood.
- To facilitate the removal procedure, dismantle the adsorber. To do this, simply unscrew the nuts securing this unit, and then move it to the side.
- Next, tighten the fastener and remove the connector with wiring.
- After completing these steps, we proceed to dismantling the device. The device is rotated counterclockwise until the speed sensor is completely unscrewed. Using a “21” wrench, remove the sensor from its seat.
where is it located and how to check
If the cigarette lighter does not work on your Priora, first of all you need to examine the elements of the electrical circuit. The primary cause is knocking out fuses that burn when there is a short circuit. In this case, it needs to be replaced. However, in order to carry out the necessary work, you first need to know where this element is located. Today we’ll talk about which fuse goes to the cigarette lighter of the Lada Priora and how to find out about its malfunction.
Where is he located
AvtoVAZ installs uniform fuses for cigarette lighters in Prioras, regardless of generation and configuration. Whether it is a basic configuration or a luxury one, the same part is always installed, and it is located in the same place. To find out the location, you will need the electrical circuit diagram found in the owner's manual. Finding the required element in it will not be difficult: No. in the circuit is F13, current strength is 15A. It is located in the fuse and relay box. Finding it is not so difficult:
- Look under the dashboard on the driver's side.
- Find a niche covered with a special lid.
- Twist three locks.
- Remove the cover.
And here in front of you are several fuses that are responsible for various components of the car. We find the one we need and dismantle it, after which we need to check it. Next, let's talk about how to do this.
Checking the fuse
The primary method is visual inspection. It is enough just to dismantle the part and inspect it for the integrity of the wire. If it is damaged, then a malfunction has been detected, but if not, but you still suspect the fuse, you need to arm yourself with a multimeter. You can test an element in two ways:
- resistance measurement. If you have removed the fuse, visually inspected it, but did not find a problem, you can immediately measure the resistance. We enable the corresponding option on the multimeter and take measurements at the terminals. If the device does not respond and there are zeros on the screen, then the part is faulty;
- voltage measurement. It is necessary to select the appropriate option on the device, turn on the cigarette lighter circuit and measure the voltage at the outputs. If the indicators are zero, it means the part needs to be replaced.
Thus, there is absolutely nothing complicated in checking the cigarette lighter. If you are convinced that the element has failed, you need to install a new one and test the operation of the node again. If the new part burns out, you will have to examine the circuit in more detail. There is probably some serious damage somewhere that is causing the short to occur. If you cannot understand the cause yourself, be sure to contact specialists who will conduct a detailed diagnosis of the unit.
How to install a new speed sensor on a VAZ 2115 (step by step)
- We clean the sensor installation site from dirt and dust.
- Then we install a new sensor. In this case, you should act carefully, since the controller body is made of plastic, so even minor mechanical impacts can damage it.
- Next, mount the sensor into the seat so that its grooves coincide with the bushings, otherwise you will not be able to fix the device securely.
- Screw the sensor clockwise. There is no need to tighten the device too much.
Speed sensor drive
The main causes of odometer malfunction
If we summarize all the reasons for odometer malfunction, they can be divided into:
- natural wear and tear of the mechanical odometer mechanism;
- tampering with the odometer during mileage correction;
- failure of the electronic digital odometer control circuit;
- malfunction of the odometer indicator panel;
- on-board computer software control failure;
- loss of communication with the dashboard via CAN bus;
- sensor failure.
As you know, all causes do not happen at the same time. How can you determine with high probability the specific cause of a malfunction? Let's try to figure it out.