Most buyers of domestic vehicles purchase cars with standard equipment, without power windows and a sound system. These devices can then be installed independently. The diagram for installing a window regulator on a VAZ 2107 on the left front door will help you carry out the procedure without a technician and save money at the service station. The instructions are also relevant if the mechanism is jammed or does not work correctly. Disassembling the element will allow you to identify the cause of the breakdown, as well as modify or replace damaged parts.
DEVICE OF WINDOW WINDOWS VAZ 2107
Every car enthusiast knows what a window lifter is. Its functions are simple: open and close the window, thereby regulating the microclimate and level in the cabin. There are two types of window lifters: manual (colloquially crutches or meat grinders) and electric, controlled from the dashboard or individual buttons.
At the manufacturer's factory, the VAZ 2107 was equipped with manual window lifters, which have a fairly simple design. They are based on the operation of a mechanism to which glass is attached using special fixing devices. The side windows are lowered and raised by turning a handle located inside the cabin.
The standard window lifter of the “seven” is controlled by a handle and is very inconvenient to use
WHAT ARE THE WINDOW WINDOWS ON THE SEVEN?
During its existence, the VAZ 2107 was equipped with two types of window lifters:
- Rack and pinion. They are considered more reliable. Installing this type of window lifter completely eliminates glass distortion. The mechanism works by transmitting the rotational force of the gear, which interacts with a linear rack, to the glass carriage. The main disadvantage is the need for constant lubrication, since the gears of the mechanism were made of plastic, which wears out quite quickly and can damage the entire mechanism.
Rack and pinion window lifters are considered more reliable, but require constant lubrication - Cable ones - due to their design, they are weaker and more often fail. The fundamental element of this type of window lifter is a cable attached to the twisting mechanism. The device operates rather slowly due to the low functional properties of the drive, which with force overcomes the resistance of the sealing rubber bands. It may also happen that it begins to overheat and at some point simply fails. The advantage of this type of mechanism is its good maintainability, but too frequent need for repairs practically eliminates this advantage.
Cable window lifts are more likely to fail, but are highly repairable
WINDOW WINDOW FAULTS AND WAYS TO ELIMINATE THEM
The operation of the window lifter is configured and adjusted by the manufacturer, so you should interfere with it extremely carefully and carefully, otherwise the mechanism may jam, crackle and crackle.
From personal experience, I advise you to carefully study the device and read the detailed troubleshooting instructions before starting to independently repair the window lifter mechanism. Even though many of them seem quite possible to fix with a screwdriver and a wrench, in some cases it may be necessary to completely replace the window regulator.
Before you begin self-repair, you need to study the structure of the window lifter and the principle of its operation.
WINDOW CLEARING
At first glance, the creaking of the window regulator does not seem to be a serious malfunction, but you should pay attention to this signal, since this is the first sign that the mechanism is wearing out and may soon break. Methods to combat this symptom are extremely simple, accessible to everyone and do not take much time:
- lubricate the window lifter - lubricants from any manufacturer, widely available in car dealerships, are suitable for these purposes;
At the first sign of squeaking, the window regulator must be lubricated. - Replace the rubber bands in contact with the glass. When the window is open, dust and sand inevitably enter the car interior, which scratches the glass and rubber bands, resulting in a squeaking sound. The entry of dust and moisture through the gap between the glass and the seal can subsequently lead to jamming of the mechanism, so it is necessary to regularly monitor its cleanliness.
WINDOW WINDOW IS JAMMED
The main reasons that the VAZ 2107 window lifter is jammed are as follows:
- failure of the welded joint connecting the cable bracket and the glass strip to which it is attached. In this case, you need to disconnect the window lift cable and weld the bracket;
- The cable is tangled or twisted inside the window lift mechanism. You can try simply removing and reinstalling the cable. In case of failure, the entire mechanism will have to be replaced;
- wear of the window lifter gears indicates a clear need to replace them.
Worn gear needs to be replaced
GLASS FALLS
It happens that the glass falls and does not stay up. The reason for this may lie in the weakening of the tension roller, which creates the proper tension in the cable. To fix the damage, it is necessary to restore this mount. Another cause of the malfunction may be that the end of the cable has come out of the fastener. Then you need to remove the window regulator and try to wind the cable again.
It’s easy to check whether you carried out the repairs properly: in good condition, the window lifter handle rotates freely and effortlessly, the glass rises easily, without getting stuck and without any extraneous sounds.
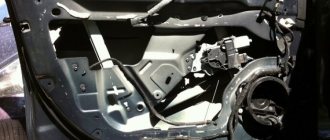
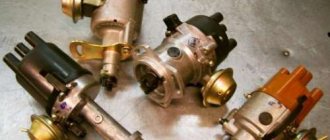
Diagram for installing a window regulator on a VAZ 2107 left front door
A week ago, the window lift cable broke again. For a long time I didn’t want to change it, because on sevens there’s a whole system, damn it. I wanted to buy an electric one, but the finances were a waste) It was decided to change it after all. By the way, this is the second time the same one is torn on the driver's side. The first time I couldn’t change it myself, I resorted to the help of my uncle. Now out of boredom I tried it myself and it worked.
In general, we need: - Window regulator - Head for 8 / key for 8 - Head for 10 / key for 10 - Spare door trim clips - Hands. Experience. Skills.
We buy a window regulator
bought
We are dismantling the car trim, everyone knows how to do it, so no photos. Remove the old window lifter by unscrewing the 3 8mm nuts.
Then we take it out, the process is not easy) If not, then above the window lifter there is a 10 nut that secures the glass guide, unscrew it and move it. Then, after taking it out, unscrew the 4 screws that secure the glass to the cable
Open the window regulator box. We untangle it, but under no circumstances remove the iron fastener. and put it on the rollers. I started from the top right. Here is the sketch drawn
Once we have put the cable on the rollers, we put the window regulator itself in place, removing the iron retainer. We tighten the cable with the lower right roller and do not forget to tighten the glass guide.
Perhaps without experience you will not be able to immediately install everything as it should be, because it is difficult to adjust the cable perfectly.
We assemble the door trim into place.
How to change the window regulator on a VAZ 2107
Replacing and repairing a window regulator on a VAZ 2107 is a fairly simple task that anyone can handle with the help of detailed instructions. You should start repairing the seven at the moment when the first signs of a malfunction appear. In order to replace an old window regulator with a new one, you only need to prepare a small set of tools.
Replacing the window regulator on a VAZ 2107 yourself will help you better understand the design of your car and save your money. The car owner will not have to pay a technical center for easy repairs and waste time waiting if he copes with this task without assistants.
Completeness
| Power window R160 front right Power window R160-01 front left Screw M5 Screw M6 Bolt M6 with locking skirt Locking washer Adapter plate right Adapter plate left Decorative plug Plug retainer Self-tapping screw fastening the plug Packaging Passport | 1 1 4 4 4 8 1 1 2 2 2 1 1 |
The warranty period for the products is 3 years from the date of manufacture.
Overall dimensions in packaging: 53.5*17.5*7 cm.
Weight: 2.725 kg.
Data sheet for electric windows "FORWARD" R160 for VAZ-2104, VAZ-2105, VAZ-2107.
DESIGN FEATURES
Before you start replacing the window regulator on a VAZ-2107, you should carefully study the design of this part. There are two types of manual window lifters:
- Rack and pinion. The gears of this mechanism are plastic, which is why the mechanism quickly wears out and fails. Moreover, the mechanism is more bulky and takes up more space under the door card. This design has its advantages - skewing the glass is impossible, and the raising and lowering of the glass element is much quieter than with other mechanisms.
- Cable. In such a window lifter, the main element is a cable, with the help of which the glass moves up and down. The load is taken on by the rotating mechanism blocks. This design is quite simple and has a significant advantage - maintainability. In order to repair or replace any parts, you won’t have to put in too much effort. But the system also has a drawback - it is not very reliable.
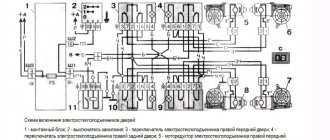
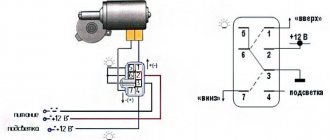
In some stores you can purchase electric windows for the VAZ-2107 to make every trip even more comfortable. However, it is worth considering that connecting this device will require a little more time. All actions are carried out strictly according to the scheme.
It is also necessary to remember that any intervention in the electrical system must be carried out carefully, in accordance with the instructions of the electric window manufacturer.
WINDOW WINDOW FAULTS AND WAYS TO ELIMINATE THEM
Having studied the structure of the window regulator in VAZ 2107 cars, you should also learn about the “diseases” of the system. The reason for their appearance is a flaw in the design and the use of low-quality materials. These shortcomings were not identified during testing on special stands.
In addition, manual window regulators are quite difficult to repair manually. You can disassemble them in a couple of steps, but in order to bring the parts into working condition, you will need a real workshop. There are several types of malfunctions of the mechanism in the VAZ-2107 door.
Window creaking
This malfunction is accompanied by a characteristic sound. It can be confused with the sounds of the usual operation of the Zhiguli mechanisms, but special attention should be paid to this sign. It appears when something goes wrong with the window regulator. The cause of the breakdown is a lack of lubrication on the internal parts.
If you “start” the problem, the window regulator may break. Also, when assembling and disassembling the system, it is recommended to replace the rubber bands or simply wipe them, removing dust and small grains of sand that scratch the mirror.
Window regulator jammed
With such a malfunction, the side windows cannot be moved. The mechanism wedge occurs quite often in Zhiguli cars. There are several reasons for this problem:
- Failure of the welded connection between the glass strip or cable. In this case, you will have to unfasten the cross and clean it, and then re-weld the bracket and make sure the system is reliable.
- The correct winding of the cable on the block is lost. It is recommended to carefully unwind the cable. If this fails, you need to prepare for a complete replacement of the mechanism. This failure is fatal.
- The lift mechanism jams, causing the gear teeth to grind down too quickly. You can get by with minor repairs and simply replace failed parts.
Glass falls
A typical malfunction for the seventh model Zhiguli is considered to be the fall of the side window. It does not fall to the lowest position. The reason is a weakened tension cable, due to which the glass simply sags. In the best case, it will be enough to tighten the cable or straighten it by placing it in the fastenings.
In the worst case, you will have to install a new cable and wrap it around the fasteners.
How to fix the problem with your own hands
- 1. Remove the door trim;
- Remove the control knob of the element, having first released it from the plastic retainer;
- After removing the lock, you need to remove the handle and install a new one.
If the equipment requires complete replacement, you need to practice dismantling the mechanism. The diagram for dismantling the VAZ 2107 window regulator will tell you in detail about each step.
- Lower the glass to the limit;
- Removing the handle requires removing the locking split washer. For this procedure, you will need a screwdriver, which needs to push the cut edges of the part apart and disengage it;
- Remove the trim from the doors. This will provide access to the main components of the door;
- Slightly unscrew the tension roller mounting bolt, move it slightly and loosen the cable;
- Remove the cable;
- Unscrew the 3 lifting mechanism mounting nuts;
- Remove the entire mechanism.
Equipment dismantling has been completed. Now it remains to decide what to do next. If you decide to completely replace the mechanism, then installing the window regulator will proceed in the reverse order.
When replacing a window regulator, please note that the ends of the cable must be secured with wire.
SEQUENCE OF REPLACING THE WINDOW WINDOW
Before you start replacing the door mechanism, prepare a few tools:
- Key for 8 and 10;
- Phillips and flat blade screwdrivers.
Despite the most common “diseases” of the Zhiguli mechanism, it is easily repaired even in the field. If you have spare parts and the necessary tools, you can repair the window regulator without additional help. You need to know step by step how to remove and place parts.
Regardless of whether the rear door or front door requires repair, the process for replacing window regulator parts will be similar.
Removing the window handle
Iron handles and handles in Soviet-designed cars should be handled with particular care. And plastic handles break quite often, but, in contrast, they are easy to remove and replace:
- Release the handle from the retaining ring.
- Use a flat-head screwdriver to carefully move the outer ring and then remove the retaining ring.
- Slowly remove the handle.
Removing the window regulator
At this stage you will have to perform a little more steps:
- Lower the glass to its lowest position. If you have already removed the handle, you can do this with a key.
- If you plan to reinstall the lift in the future, the cable should be screwed to the drum using thin wire. At the same time, it must be left in the guides so as not to waste time in the future installing the cable into the grooves. In new mechanisms, an installation bracket is installed to simplify fastening.
- Loosen the bolt that holds the lower roller.
- Move the bottom roller a little higher to gradually release the tension on the cable.
- We remove the cable, leaving it hanging on just one roller.
- Unscrew the screws that secure the window regulator to the metal plate in the door.
- We get the mechanism.
Installing a new mechanism
When purchasing a new replacement mechanism, check its quality before installation. After all the parts in the mechanism are replaced, they need to be lubricated and put back in several steps:
- We install the mechanism and fix it by tightening the three standard nuts;
- We throw the cable over the rollers and only after that remove the wire;
- Adjust the degree of cable tension using the lower roller, and then tighten the nut;
- Check the window regulator for functionality. If the glass moves slowly, the tension should be loosened;
- We check whether the glass rises all the way;
- Install the door card;
- We put the door handle in place, and then the window handle.
The process of dismantling and replacing the device
How to remove and replace mechanical joints with electric ones? Before installing an ESP, you need to take into account that this is not an easy task; it will require a lot of effort and time. Therefore, before you start replacing, think about whether you can complete it. If you doubt this, it is better to entrust the matter to specialists.
So, how to remove mechanical and install electrical joints:
- First, you need to completely lower the joint venture all the way down, after which the handle is removed. To remove the handle, remove the lock washer located between the door trim and the handle itself. To do this, you need to push the edges of the washer apart using a flat head screwdriver and then disengage it from the handle.
- After this, the door trim on each door is dismantled. Having done this, you will be able to see the technological hole and gain access to the structural elements of the joint venture. Using a 10mm wrench, you will need to unscrew the screw that secures the tension pulley. The bolt is unscrewed so that it can be moved back and the cable tension can be released. When the cable weakens, it must also be removed from the rollers.
- Then, using a size 8 wrench, you need to unscrew the three nuts that secure the mechanism for opening and closing the windows. After unscrewing, this mechanism is dismantled through the technological hole in the same way as you removed the cable. If dismantling the mechanism is impossible, you will need to unscrew the nut that secures the glass guides with a 10mm wrench and move it away. When the old SP mechanism is dismantled, you will also need to unscrew the four screws that secure the glass to the cable. When all these steps are completed, the dismantling procedure can be considered completed; now you can install new joint ventures or begin repairing old ones. Before installing the ESP, you need to make sure that all components are in full working order. If defects are found as a result of diagnostics, the damaged parts are replaced with new ones.
- As for the installation itself, before performing the process you need to carefully read the installation and connection manual, it should be included in the kit. In order to prevent possible short circuits in the on-board network during work, it is advisable to disconnect the battery; to do this, open the hood and reset the terminal.
- Next, the glass must be raised all the way to the top and secured in this position; tape can be used for this. After this, you will need to choose a location to install the drive; as a rule, it is installed at the bottom of the door opening. Attach the drive to the future installation location and make markings for fasteners. Using a drill, you will need to drill the corresponding holes.
- Then the electric motor is installed in the selected installation location, the device is mounted in the door. ESPs are usually supplied with self-tapping screws for installation, but we recommend using nuts with a washer instead of them for more reliable fastening.
- Once the drive is installed, you will need to put two nuts between the door as well as the brackets for that motor. This will avoid possible chafing of the cable along the edge when using ESP. The cable itself is placed in its regular place between the rollers. In accordance with the instructions, it is necessary that the branch pipes from the cables intersect inside the door. If we are talking about a rack and pinion mechanism, then, of course, this point can be ignored.
- The next step is to select a location for mounting the control buttons. It would be best to install them on the center console or on the door handle. In the place where the buttons are installed, you will need to make holes corresponding to their size.
- When the strip is installed, the glass will need to be lowered completely down and secured to the installation strip. At this stage you need to be extremely careful, since there is a possibility of damage to fragile elements.
- After completing these steps, the wiring is connected. You also need to read the connection instructions, which are included in the package. All components are connected in accordance with the diagram. To begin with, the wiring should be brought to the center console of the car through a special corrugated hose, which will protect the wiring from external influences. The wires are usually connected to the cigarette lighter power circuit, but if you do not want to load this circuit, you can lay a separate cable to the battery.
- Then, through the holes for the control keys in the center console, it is necessary to bring out the wiring, connect the devices to the electrical circuit and install them in the seat. When you connect the power circuit of the system to the electrical network of your VAZ 2107, it is imperative to protect the circuit with a safety device. At the same time, it is desirable that the electric windows can be operated while the engine is running, this will save the battery charge.
- The wiring that is installed in the cabin must be insulated using plastic tubes. When the installation and connection of the wiring is completed, you need to reconnect the battery and check the functionality of the mechanism, and if necessary, adjust it. To do this, lift the glass as high as possible and make sure that there are no gaps. When the adjustment is completed, it is necessary to install the door trim in place; all assembly steps are carried out in the reverse order. In the place where the handle was installed, you need to install a special plug.
We recommend: We replace the timing chain: when and how, at what mileage, determining wear, etc. » AvtoNovator
Photo gallery “Do-It-Yourself Replacement”
REPLACING THE CABLE
In order to replace the cable if it breaks, you must follow the short instructions:
- Remove the door card, and then remove the cable from the guides.
- Apply a generous amount of lubricant to the cable before installing it.
- First, pull the cable along the upper roller with the lower branch, and bring the upper branch to the lower roller.
- At the top of the cable, fold a small loop and pull it to the hidden roller and secure it in a few movements.
- After the cable is secured to all rollers, check how the window regulator works.
The installation is complete.
REPLACING ROLLERS
The seven window lifters have four rollers:
- The first is a tension roller. It maintains the cable in a certain state of tension, but over time it “relaxes”;
- The second and third are fixed on the glass. The left and right rollers transmit lifting torque when controlling the movements of the cable;
- The fourth is fixed to the door and is motionless. It takes the lifting force.
In order to dismantle the rollers, you need to remove the door card and simply unscrew the nuts that secure them. They also need to be installed carefully. After new parts are installed, the structure must be reassembled.
Design Features
Most owners of the seventh new generation model are confident that the process of replacing a window regulator is somewhat complicated. This is because the glass is connected to the supports and cable in not one, but 2 places. This decision required adding another video. Now there are 4 of them used (three for direction, one for tension).
It is quite possible to make the replacement yourself if you have simple tools:
- Keys (8, 10).
- Phillips screwdriver.
Design and technological nuances
For owners of other Lada classics, replacing a window regulator on a VAZ 2107 may seem unnecessarily complicated. The cable is connected to the solid glass brackets in two places, which necessitated the use of another roller - here there are 4 of them: one tensioner and three guides.
The repair operation is quite feasible on your own if you have a minimum amount of tools:
- open-end wrenches for “8” and “10”;
- Phillips head screwdriver.
Step-by-step replacement sequence on the front door
To install a new window regulator, you must first dismantle the old mechanism.
Preparatory work:
- Remove the three bolts that secure the handle to the door.
- Remove the handle.
- Remove the door trim.
Before dismantling the factory lift, tie the two branches of the cable with wire.
This is necessary so that the cable does not fly out of the grooves in the drum, and the mechanism can be reused.
Removal of the structure is performed as follows:
- Lower the glass within one turn of the glass lift handle so that you can reach the cable clamp and the glass supports through the technological door openings.
- One fixing screw needs to be unscrewed completely, and the other one should be slightly loosened at the bracket securing the cable to the supporting protrusion. Take him out.
- Raise the glass to its highest position and secure it using a regular screwdriver. You can use other available means for this.
- Take a 10mm wrench and slightly loosen the nut that secures the tension roller. It is located at the bottom center of the door.
- Remove the cable from the tensioner and three guide reels.
- Remove the three nuts that secure the window regulator to the door.
- Unscrew the 2 nuts securing the guide groove and move it to the right.
- The final stage is the removal of the window regulator from the door.
After the mechanism is removed, you can check how the rollers rotate.
Repair
Fixing breakdowns will not take much time if you use a step-by-step algorithm of actions. Necessary tools for this:
- Screwdriver Set;
- awl;
- key to 8;
- pliers;
- wrench;
- knife.
To get to the window regulator, the inner door trim is removed. Once access to internal parts is gained, repairs are made.
Removing the window lifter handle
The handle breaks when the element is worn out, there is a manufacturing defect or careless operation. Repair instructions:
- Remove the plastic handle retainer by tightening the bolts with a screwdriver.
- Release the retaining ring.
- Remove the handle and screw on the new product.
- Check functionality.
Removing the window regulator
Actions are carried out according to the following algorithm:
- Lower the window all the way. Unscrew the window lifter handle.
- Remove the plugs, bolts and handle trim. Disconnect the door handle.
- Remove the facing panel. You will have access to the power window.
- Tie the cable with wire so that it is securely fixed to the guides.
- Remove the roller by first unscrewing the bolt. Loosen the cable and replace the roller if necessary.
- Unscrew the screw that holds the mechanism itself and remove it.
Installing a new window regulator
The new mechanism must necessarily have a bracket that secures two branches of cables. It cannot be removed until a full installation has been completed.
In general, the installation process looks like this:
- Installing and fixing the case in its “own” place.
- Installing cables around the rollers.
- Fastening the glass clips with a cable. It is fixed with screws using 2 brackets.
- Installation of the guide groove.
- Cable tension.
- Now the bracket that secures the branches of the cable is removed.
- Installation of door trim and handles.
The cable can be routed around the rollers in two ways through the rolling support (upper or lower). If the line goes through the lower roller, then the cable is routed as follows:
- Left guide roller (lower).
- Left guide support (top).
- Central tension reel (bottom).
- The guide element is at the top right.
If the front window regulator is being replaced, then you can loop it through the upper coil in the reverse order.
Stretching process:
- Lower the glass to the down position.
- Turn the handle all the way in the direction of lowering the window.
- Adjust the cable tension by moving the required roller.
- The bolt clamp that secures the roller.
Please note that the tension should be sensitive. The cable should not be overtightened, but it should not be allowed to dangle either.
If a creaking noise appears after installing the new mechanism, then do the following:
- Loosen and remove the cable from under the rollers.
- Cross the lower and upper branches that come out of the mechanism drum.
- Repeat the installation and tensioning procedure.
The device of window lifters "Seven"
How to install electric windows on a VAZ 2107, what circuit to use, how to change the ESP yourself, in what cases is repair required?
We will give answers to these questions below, but first let’s get acquainted with the design of mechanical joint ventures:
- a handle with which you can raise and lower the glass;
- finishing sleeve with a special place for the handle;
- so-called handle rosette;
- mechanism for raising and lowering windows;
- lower and upper rollers;
- fixing plates;
- mounting bolts for the plate, as well as bolts and nuts for fixing the lower roller;
- a cable used to open and close the windows;
- a special bracket that fixes the glass in one position;
- tension roller.
As for electric joint ventures, in this case the device also includes a control unit with buttons, a drive or gear motor, as well as an electrical circuit connecting all the elements.
Brief instructions for replacing the mechanism
In general, the procedure for replacing a window regulator looks like this:
- The door trim is removed.
- The cable is disconnected from the clips that hold the glass.
- The cable is removed from the rollers.
- Next comes the removal of the guide chute and the lift mechanism.
- Installing a new window regulator.
- Threading the cable.
- Fixing the glass brackets and tensioning the cable.
- Reinstalling the door trim.
To summarize, we note that the process of replacing a window regulator on a VAZ-2107 is a completely feasible task for the car owner. During the repair process, the main thing is to carefully follow all the recommendations and installing a new mechanism will not be a problem for you.
Sources
- ladaautos.ru/vaz-2107/kak-proizvoditsya-zamena-steklopodemnika-na-vaz-2107.html
- 7vaz.ru/remont/pomenyat-steklopodemnik-vaz-2107.html
- drive2.ru/l/4756861/
- bumper.guru/klassicheskie-modeli-vaz/stekla/steklopodemniki-na-vaz-2107.html
Briefly about the change procedure
A simplified process for replacing a defective window regulator in the front door of a VAZ 2107 looks like this:
- remove the door trim;
- disconnect the cable from the clips securing the glass;
- loosen and remove the cable from the rollers;
- dismantle the guide chute and the window lift mechanism;
- install the housing of the new glass lifting mechanism;
- thread the cable along the contour;
- fix the glass brackets relative to the cable;
- pull the cable;
- install door trim.
How to replace a window regulator on a VAZ-2107
Window regulators in any car must be in good condition, even if they are used very rarely. From the factory, the VAZ-2107 is equipped with cable lifts that are manually activated. If an electric drive is installed on the car, this already indicates that modifications have been made by the car owner. In this article we will consider the question of how to replace the window regulator on the “seven” yourself.