02/27/2022 7,504 Transmission
Author: Victor
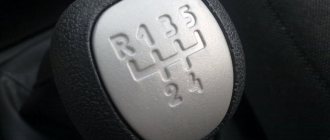
The situation when reverse gear does not engage on a VAZ 2109 is one of the most common problems with this car model. In addition, the VAZ 2108/09/099 “Samara” and VAZ 2113/14/15 “Samara-2” cars were equipped with the same type of gearbox (gearbox), so this transmission malfunction is typical not only for “Nines”.
Often, an attempt to engage a gear is accompanied by a strong crunch of gears, and if the gear is able to be engaged, the gearbox makes noise when moving in reverse. Other owners are faced with a situation where the gear shift lever moves forward all the way, but reverse gear does not work. At the same time, there are no complaints about shifting forward gears.
[Hide]
Causes
The reasons why reverse gear engagement is poor or difficult may be as follows:
- loosening of the fastening clamp of the rocker, due to which the length of the rod is not enough to fully engage the gear;
- jamming of the reverse speed lock;
- spring breakage and debris getting into the guide grooves of the gear selection mechanism;
- spontaneous loosening of the selection mechanism mounting bolts;
- the clamp bolt is cut off;
- wear of the clutch disc and release bearing;
- incorrect adjustment of the clutch and clutch pedal;
- low oil level in the box or the need to replace it.
Clutch
When the clutch discs wear out, the pedal moves up and its position becomes higher than the others. In this case, when turned on, a crunching sound may be heard and the lever does not move, as if it is resting against an obstacle. You should not force the assembly, as this can lead to more serious damage - the gears will fly.
It is typical for such wear that the clutch pedal falls to the floor and you can hear from drivers that the VAZ 2109 does not engage the gears. Usually this applies to all gears, but only first and reverse can fail.
You can check by removing the rubber plug. The destroyed disc leaves fibers that look like tangled strands of hair. If such a phenomenon occurs, then a new clutch disc should be installed.
Due to constant loads, the cable stretches and must be periodically adjusted and tightened. In this case, the VAZ 21093 does not engage the first and second gears, and the rear may also fail. To fix the breakdown, you need to drive into the pit and tighten the cable. If it is worn out, replace it immediately. You can do this yourself.
A similar breakdown can also manifest itself in the failure of the gears to engage while the engine is running. Sliding along the splines is limited and fixation does not occur.
avtoexperts.ru
Any gearbox has a complex structure with many interconnected parts, and the failure of even one part immediately affects the performance of the gearbox as a whole.
So often the cause of a gearbox malfunction is such a breakdown as one of the speeds being knocked out.
In this article, we will look at the main reasons for the question of why transmissions fail.
In order to make it easier to understand the reason for knocking out a certain speed, you need to briefly consider the principle of operation of the gearbox.
How does a manual transmission work?
A conventional manual gearbox consists of 3 shafts. These are the primary, intermediate and secondary shafts. The secondary shaft is located coaxially with the primary shaft, inside which there is a bearing into which the end of the secondary shaft fits, allowing it to rotate independently of the primary.
The intermediate shaft is a single unit with gears cast on it. It has a rigid connection through a gear to the input shaft, which causes it to rotate along with the gears of the gears.
When the gearshift knob is in neutral and the clutch pedal is not depressed, the input and intermediate shafts rotate.
On the secondary shaft of the gearbox there are gear blocks, 1st and 2nd, as well as 3rd and 4th, 5th gear and reverse gear are usually located in the rear compartment of the gearbox housing.
The blocks, in turn, consist of a hub, a gearshift clutch and 2 synchronizers. The hub has splines inside, the same as on the secondary shaft, thanks to which it can move forward or backward, depending on the gear engaged.
The couplings have a groove on top where the gear shift fork is installed. The fork itself is rigidly mounted on a slider, which is mechanically connected to the gear shift knob. The slider has three recesses into which a spring-loaded ball fits to fix the slider either in the neutral position or in the position of one of the speeds for which it is responsible.
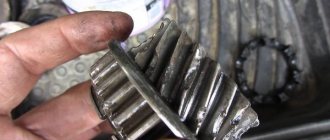
As mentioned above, the secondary shaft also contains gears 1.2.3 and 4, which are in constant engagement with the gears on the intermediate shaft. The gears have a loose fit on the output shaft and rotate around the shaft without engaging with it.
When any of the speeds is turned on, the hub with the clutch on it moves along the shaft splines towards a freely rotating gear, for example, 1st gear and, thanks to the synchronizer, blocks it, forcing the secondary shaft to rotate.
The secondary shaft is rigidly connected to the drive to the drive wheels; this can be a cardan on a rear-wheel drive car, or a CV joint in a front-wheel drive version. The rotation of the shaft is transmitted to the drive, which in turn drives the drive wheels, causing the car to move.
Reasons for speed loss:
• Wear or breakage of the synchronizer blocking ring;
• Worn shift fork;
• Loosening of the gearbox fastening to the clutch housing;
• Wear on the clutch or gear teeth of one of the gears;
• Loosening the secondary shaft shank nut;
• Wear of the blocking nuts of the sliders or grooves in the body of the slider;
• Breakage of the springs of the slider fixing balls;
How to adjust the link?
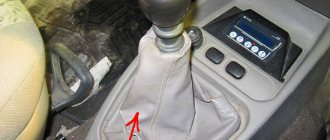
You should drive the car onto a lift, pit or overpass. It is not recommended to carry out the procedure alone; you will need an assistant to switch the lever. You must proceed as follows:
- Crawl under the bottom, loosen the clamp located on the gearbox rod and remove the drive from the rod.
- Pull off the boot or remove this part altogether, unscrew the screw on the cardan.
- Use a hammer to carefully knock down the cardan shaft and remove the boot, if this was not done initially.
- If necessary, replace the oil seal.
- Installation is carried out similarly, but in reverse order.
After the above steps, you will need the help of a second person. He should sit behind the wheel, set the gearbox lever to neutral and tilt it slightly to the right. It should be held in this position until the universal joint clamp is properly tightened.
First gear does not engage when driving
Often, when you turn on first gear while the car is moving, it jams and does not work. There are no problems when starting to move from a place. Some “experts” even put forward the theory that you should only start moving from the first gear, and should not use it during maneuvers.
This problem occurs because the injectors do not have time to equalize the torque of the gears, and the driver forcibly tries to connect them. The flywheel spins much faster than the drive shaft and the teeth can fly if the force is large.
Don't rush to press the lever. Bring it to neutral, push it lightly into first gear, and wait for the synchronizers to do their job and the gear to engage.
For old boxes there are instructions for switching with re-gas. When downshifting while driving, move the handle to neutral, step on the gas, increase the speed, and then smoothly change gear. This method is used by owners of preserved vintage cars, the price of which has recently increased significantly.
Troubleshooting
Many transmission malfunctions that cause the reverse gear to disappear or fall out can be eliminated without removing the unit from the car.
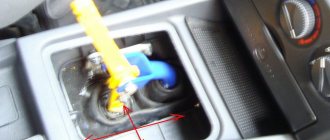
If the cause is a loosening of the bolt securing the clamp on the rod, then to correct the defect it is necessary:
- Place the car on a lift.
- Completely loosen the clamp nut.
- Place the gearshift lever in the fully engaged reverse gear position.
- Fully engage reverse gear at the gearbox using the shift rod on the crankcase.
- Tighten the clamp mounting bolt.
Backstage adjustment
If tightening the clamp does not help get rid of the problem, then you need to check the condition of the shift drive parts. One of the reasons why the reverse gear does not engage may be a poorly adjusted rocker.
To make adjustments to the mechanism, you may need the following tools:
- two wrenches with a size of 13 mm, preferably a socket design;
- any wrench or 10 mm socket;
- small hammer;
- slotted screwdriver.
Since the cause of malfunction of the link can be wear of parts, spare parts may be needed:
- universal joint of the rocker;
- Sometimes the shift rod seal may need to be replaced.
Two people are required to adjust the rocker or replace parts of its drive. One person must change gears from the passenger compartment, and the second must adjust the travel of the shift rods.
The order of work is as follows:
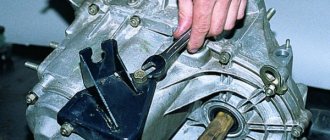
- Provide access to the bottom of the car by placing it on a pit or a lift.
- Using a 13 mm wrench, loosen the clamp installed on the gear shift rod.
- Remove the rod from the box rod.
- Using a screwdriver, carefully remove the boot.
- Using a 10 mm wrench, unscrew the fixing bolt on the cardan shaft.
- Knock off the cardan shaft with light blows of a hammer. It is important not to damage the shaft.
- Remove the universal joint seal boot.
- If there is an oil leak, the sealing gland on the box rod must be replaced.
- Install a new boot (or leave the old one if it is intact) and install the universal joint on the shaft.
- Align the hole on the cardan with the notch on the shaft.
- Tighten the 10 mm clamp and install the boot completely in place.
- Install the rod on the cardan rod and adjust the gearshift lever travel.
- The second person should sit in the driver's seat, set the gear shift lever to neutral, move it slightly to the right and hold it in that position.
- After this, you need to tighten the 13 mm clamp nut.
Replacing and adjusting the gearbox driveshaft
So, if only reverse does not work, and all other modes do not fail, then you will need to replace the universal joint and adjust it. To do this, prepare a new spare part, a gear selector shaft seal, a set of keys, a hammer and several screwdrivers of different sizes.
Carry out the work according to the instructions:
- Place the machine on an overpass or over a pit. Find the gearbox from below and loosen the clamp bolts on its drive rod. Remove the actuator completely from the stem.
- Using a screwdriver, pull the boot towards the unit. Often during this step the boot is completely damaged, in which case it can be removed and then a new one installed. Unscrew the fixing screw on the universal joint.
- Carefully tap the driveshaft off the assist shaft with a hammer. Remove the boot if you have not damaged it previously. Install a new oil seal on the speed shaft.
- Install a new boot, place the cardan on the shaft so that the position of the fixing screw coincides with the recess on the shaft.
- Tighten the retaining screw and place the rod on the rod, but do not tighten the clamp.
- To make the adjustment, ask an assistant to move the gearshift lever to the neutral position and a short distance to the right. He should hold it in this position while you tighten the clamp.
If the reason for the failure of the reverse gear was hidden in the cardan of the carriage, then you will no longer have problems after this repair.
Problems with reverse gear on automatic transmission
In practice, gearbox malfunctions associated with engaging reverse gear occur on both manual and automatic transmissions. "Automatic machines" have different designs. Robotic boxes are similar in design to “mechanics”. But the automatic transmission has its own list of breakdowns when it works hard or the reverse gear has disappeared.
- The fluid level is below normal, or it is contaminated and has lost its working qualities. The automatic transmission device is sensitive to the quality of the lubricant and its level. Therefore, it is better to start finding out the cause by checking the transmission fluid. An excessive oil level also contributes to improper operation of the unit. The service life of the fluid is limited to a mileage of 60 thousand km, but sometimes it is necessary to change it more often, as the lubricant becomes cloudy and contaminated.
- Wear of friction discs. The correct operation of reverse gear, as well as the “D” (drive) mode, depends on this. Worn clutches may prevent 3rd, 4th and reverse gears from engaging. In this case, eliminating the breakdown consists only of replacing the clutches.
- The splines on the drive drum are cut off. The car can move forward, but it will be impossible to go backward.
- Worn friction brake band. There is no reverse movement, but forward movement works.
- The brake band piston cuffs are torn or worn. This will only be noticeable when you engage reverse.
- Control solenoids or hydraulic units are jammed.
Sometimes the lack of communication between the torque converter and the oil pump gear also affects the reverse operation.
How to repair a VAZ 2109 gearbox?
Second gear is not detected.
When you start the car, noise comes from the gearbox and you hear crunching noises.
- the fifth gear or reverse gear has failed;
- The release bearing or the input shaft bearing is faulty.
Any transmission fails.
When driving at 9, there is a hum, when I press the clutch the hum does not stop. What's humming, bearings?
Hello everyone, help me, on 09, speed 2 stuck and won’t let go, what should I do? but we already sorted it out, now it’s set to 3 speed again, what should I do?
Possibly a bearing. Soon he’s still walking freely along the shaft. The shaft must be together with the internal part of the bearing. spin, and he rotates freely in it. It is also likely that this is the reason for the rumble.
I have a similar situation. I went through the box twice. I changed all the bearings, but the noise never went away. I'm already starting to get used to it.
The situation is exactly like this, it’s like my car in the video. Most likely you need to make a mistake in 5th gear, the only question is how to check. But one idea has appeared, you can remove the 5th gear cover, open two nuts, remove the 5th gear gears, close the cover, add oil, and then everything will be clear. I’m thinking about doing this one of these days. Report the results.
I checked the gearbox twice, but the second speed doesn’t turn on, I don’t know what to do. Please tell me!
Do not remove the 3.4 gear synchronizer hub. What to do? I read somewhere that you just have to film. And she sits there like a cast woman.
Sergey, check the release and clutch
The rear one flies out, I can’t figure out what’s wrong
The speed slips due to wear of the synchronizer (teeth on bronze gears).
I have this problem: there are 2 washers on the secondary shaft, one is a little thicker, the other is thinner, can someone tell me - which one comes first in order during assembly?
the thin one is placed under the bearing, the thick one is on top, there is a bushing and a needle on it
Why does the second speed turn on poorly? The rest work well and don’t make noise.
The situation is this: you squeeze the clutch, the noise disappears, the reverse speed does not work as well, when driving the noise does not disappear, what could be the reasons?
The third and fourth gears are poorly engaged
Tell me. Impact at start, as if there were huge gaps between the gears. The grenades are ok, I replaced the airbags, I also changed the satellite axle along with them and the six-pole axle, I replaced the clutch assembly. They say: sampling of backlashes and the box on metal. Can the problem be solved somehow?
This situation occurred when there was a blow to the gearbox body of the VAZ 2109. The 2nd and 4th gears stopped turning on and the idle speed stopped. What could happen? With the car turned off, all gears are switched on
Help! There is no neutral gear, what's the fun?
The problem is this: 2nd gear slips out when you let off the gas on the VAZ 21101, what could it be? Can I change the gear shift rod lock balls?
I can’t turn on the rear, the lever on the shaft turns, what can I do?
Mikhail, this is a disease, this is synchronicity!
I switched from first gear to second and can’t turn it off, what could be wrong?
Release bearing or input shaft bearing. Check the reverse gear
In the VAZ 2109, the second gear shifts into gear all the time with a crunch, you can only turn it on slowly, what should you do about it? And the clutch began to disappear.
There is a noise in the transmission as if the high-speed sprockets are hitting each other when driving in neutral and when pressing the clutch, what could be?
At first the rear one turned on poorly, but now only the third and fourth ones turn on. What should I do?
Guys, I ran into this problem. 2nd speed went out, changed the primary and secondary shafts along with gears. Everything worked well until the gearbox was removed and the release was replaced. I collected everything, drove about 300 kilometers, and the noise started. It looked like it was on the release side, he figured it out okay. Tell me what this could be? And yet, the right CV joint begins to rotate at increased speeds.
There is no reverse gear, tell me what to do and how much does it cost?
We've gone through the gearbox and the gears won't turn on!
Second gear does not engage
How to change gearbox oil
If you need to change your oil, then first of all, buy it.
A four-speed gearbox will require three liters of transmission fluid. You will need to pour 3.3 liters into a five-speed gearbox. If you are changing the oil for the first time, then buy 80W-85 class fluid. It is perfect for use in the VAZ-2109 gearbox. Car owners prefer to purchase Lukoil brand products. The work of changing the oil in the box is carried out as follows:
- Place the car on an overpass or over a pit, warm it up slightly so that the liquid is not viscous. Locate the oil drain plug on the bottom of the box.
- The unit has a rubber cap that needs to be cleaned along with the breather. After cleaning these parts from dirt, return them to their place.
- As soon as the preparatory work is completed, place the container, twist the plug with a wrench, and begin draining the transmission oil.
- The waste liquid will drain completely within half an hour.
- Screw on the plug, tighten it well, but do not strip the thread.
- Under the hood, find the transmission dipstick and remove it. In place of the probe, stretch a hose, at the other end of which a regular watering can or funnel is installed. Pour transmission oil into the box through the hose. On older units, the fill plug is located next to the drain plug.
After the work is completed, check the lubricant level with a dipstick and take a control measurement after 2-3 days. If necessary, add oil; if it becomes critically low, inspect the box for leaks.
Disassembly
Having removed the gearbox, you can proceed directly to the main thing - disassembly. This will allow you to change damaged elements as you work, identify existing faults and solve problems on your own.
- Clean and thoroughly wash all external surfaces of the gearbox.
- Place the box in a vertical position and remove the back cover.
- Remove the clutch cable bracket, then use a rubber hammer to knock the rear cover off the gearbox.
- Remove the old gasket. She will be replaced.
- Engage any of the two gears - 3 or 4.
- Unscrew the bolt that holds 5th gear, then turn it on.
- Simultaneously turning on the indicated speeds will allow you to fix the shaft and prevent it from turning.
- Unscrew the nut on the secondary shaft, and then on the primary one.
- Remove the 5th speed synchronizer along with the fork.
- Remove the fork from the coupling. Remove the synchronizer as carefully as possible. If you allow the clutch to move away from the hub, the spring-loaded balls that secure the synchronizer will simply fall apart.
- Remove the 5th speed synchronizer locking ring.
- Remove the 5th speed driven gear from the output shaft.
- Remove the thrust ring located on the needle bearing.
- Remove the needle bearing itself from the 5th speed gear.
- Remove the drive gear from the drive shaft and remove the bearing plate.
- Now the needle bearing bushings should be removed from the secondary shaft, and the thrust washer should also be removed.
Jewelry work
- Take out the ring that secures the input shaft bearing, and then a similar ring for the secondary shaft.
- Unscrew the locking plug and remove the ball and locking spring. Next you can get a couple more clamps.
- Remove the rear engine mount.
- Unscrew the reverse gear lock plug, tilt the box and thus remove the lock ball and spring.
- Remove the clutch housing and gearbox housing mounting bolts.
- Acting as carefully as possible, separate the two units. To do this, there are grooves in the crankcases into which the ends of a screwdriver are inserted. By shaking, you can disconnect the elements without any problems.
- Remove the gearbox housing.
- Unscrew the bolt securing the 1st and 2nd speed shift fork.
- Remove the fork and stem.
- Unscrew the bolt securing the 3rd and 4th speed forks.
- Separate the rod head from engagement with the lever, remove it along with the fork from your gearbox.
When disassembling the box into parts, be sure to pay attention to the condition of the elements. If you detect faults in time and replace gearbox components, you can get by with inexpensive but very effective self-repair
Disassembled gearbox
Old gearbox oil or low level
If the car is not new, then who knows if the gearbox oil was changed and when? You need to change the oil and pray that something worse doesn't happen. If there is a leak, drop by drop a day and you may not notice how the oil leaks out of the box. As a rule, this happens through the gearbox gasket or shaft seals. Over time, the box reacts to this with increased noise, but you might not have noticed this either. Both changing the oil and replacing gaskets with seals is best done at a service station, or on your own if you have a “green” understanding of what you are doing.
Is the gearbox humming - a serious problem or a design feature?
A manual transmission is a simple design, reliable in operation, economical in maintenance and repair. In addition, the list of advantages of manual transmissions can be supplemented by a relatively low cost compared to analogues, as well as maintainability: almost any problem can be fixed either independently or with the help of specialists, without making a complete replacement.
All of the above advantages begin to fade as soon as an incomprehensible hum, howl, or creaking appears in the gearbox. It’s immediately worth noting that extraneous noise in a manual transmission is a common phenomenon. It affects not only representatives of the domestic automobile industry, but also foreign cars completely assembled abroad.
When assembled well, any manual transmission should operate smoothly without creating noise. If a squeak or hum appears, then you need to look for the cause in a small, or maybe serious, problem with the system. There is no point in postponing diagnostics and repairs, since a manual transmission is one of the main components and assemblies of a modern car.
Extending the service life of gearboxes
You will be able to use your car for many years without going to car repair shops if you can follow basic recommendations. They will extend the service life of the gearbox, minimize possible problems, breakdowns and the need for repair work.
Transmission shaft assemblies
There are only two recommendations.
- Always try to monitor the oil level in the gearbox. If it drops, be sure to top it up immediately, do not delay the procedure until later. When the oil becomes unusable, change it completely, rather than fill in the missing amount.
- Avoid aggressive use, do not jerk the gears sharply, accelerate smoothly, and brake similarly. A simple caring attitude towards the gearbox will allow you to avoid wear and tear and numerous breakdowns.
As you can see, solving problems with checkpoints is not so easy. Therefore, the best option is to prevent their occurrence.
Reinstalling the gearbox
Gearbox assembly:
- we change all non-working elements;
- workers clean with a rag;
- assembly is carried out;
- degrease parts with threads;
- if necessary, lubricate the elements;
- change gaskets;
- insert the balls and bearings into place;
- we assemble the synchronizer;
- We put all the springs in place and tighten the bolts. When assembling, lubricate all connections with sealant;
- attach the box to the engine;
- add oil;
- connect the battery;
- we start the car and check it.
The VAZ 21099 gearbox is adjusted during assembly. Also, after installing the gearbox, you need to adjust the gearshift lever
It is important to properly adjust the gearbox and gear lever
It should be remembered that prevention can help avoid repairs and troubles along the way. Taking good care of the gearbox is the key to its long-term operation.
Big trouble
Sometimes the reason for poor gear shifting lies in a more serious problem than described above. We are talking about damage to the spring, which is present in any box. A piece of the spring gets stuck in the groove and prevents the gear from changing normally. In some cases, reverse gear disappears completely, and sometimes works intermittently.
The problem is quite serious, because you will have to go deep into the unit, and not every car owner can do this. It is better to contact a car service if the reverse gear on the VAZ 21099 is difficult to engage. The technician will conduct an inspection and decide on further actions. You can replace the spring or install a new gear shift mechanism assembly. The second option is more preferable, since a separate spring may soon break again.
There are several reasons why the reverse gear on a VAZ 21099 does not engage. The breakdown must be identified and repaired in a timely manner in order to prevent serious consequences.
VAZ 2109 gearbox repair
You shouldn’t attempt to repair the gearbox on a VAZ yourself, even if you are well versed in the structure of your favorite nine. Why? Because the safety and comfort of driving largely depends on how correctly the car’s gearbox works. One broken gear and an error in its repair can damage the entire gearbox. And in this case, repairs will cost you really dearly.
HOW TO REPAIR
If you are interested in repairing a gearbox on a VAZ 2109, contact our service center and you will get an excellent result. Why should you choose us? For example, because we work only with original spare parts and components that our employees bring from Togliatti.
It is no secret that the cause of further malfunctions in the operation of any repaired component or vehicle system is often not the technician’s mistake, but a defect or unsuitable part. Choose our service and you will be spared such unpleasant surprises. All original spare parts have a high level of performance and decent quality.
How to properly repair a nine box? So that you can be sure that you will not have problems with it in the future. At our service center you will be offered a guarantee, the duration of which will be 10 thousand kilometers. This means that you can have absolutely peace of mind about the performance of your car’s gearbox.
ADVANTAGES OF COOPERATION WITH A SERVICE CENTER
We do not try to deceive our clients, and therefore we offer fixed prices for repair services.
Regardless of how many parts are needed to repair your transmission, you will know the cost of the service in advance. As you know, many services try to inflate the price, and for this purpose they talk about the cost of repair services only after they dismantle the gearbox. What remains for the car owner? Just agree to pay. Our craftsmen have extensive experience, and therefore are ready to carry out high-quality repairs of VAZ gearboxes in just 2-2.5 hours. We are ready to cooperate with other service centers and offer fixed prices to them as well. Bring the gearbox to us and we will repair it for you. Pay attention to additional services, the list of which includes converting a regular gearbox into a sports gearbox!
Box nuances
The VAZ 2114 uses a five-speed manual gearbox. It is quite simple in design, which allows you to independently carry out preventive and repair work.
Device diagram
Experts recommend identifying a malfunction at the initial stage of its occurrence, since delaying means wasting even more time, effort and money.
Features of replacing transmission fluid
Transmission oil must be changed at regular intervals, usually every 15-20 thousand kilometers. However, it may exhaust its resource earlier. This can be determined using a probe. Take a piece of white cloth and use a dipstick to transfer a drop of oil onto it. It is necessary to change the lubricant in cases where a drop of oil:
- colorless or has a black tint;
- contains metal particles or grains of dust;
- opaque and viscous;
- sticky to the touch;
- absorbs into fabric for a long time;
- cloudy or foamy.
Most often, reverse gear is difficult to engage if the oil has become cloudy. This is a sure sign that it has entered the engine. If the problem is not detected in a timely manner, you will soon need to carry out a complete gearbox repair or even an expensive transmission replacement.
Recommendations from experts
Sometimes the driver is forced to drive a car with a faulty gearbox in order to get to the repair site. But how to turn on the speed if the clutch is faulty or the synchronizer is worn out?
- If first gear does not work, you can carefully move away in second gear.
- If difficulties arise when turning on the engine while the engine is running, you can do this with the engine stopped and then start it. But this method can only be used by experienced drivers, as it can damage the transmission.
- Double squeezing and re-gasping. It is necessary to set the gearshift knob to the neutral position, then press the clutch pedal, and lightly press the gas (up to 2500 rpm according to the tachometer). After this, you need to slow down and disengage the clutch again, and then engage the gear. If this does not work, then you need to repeat all the operations again. While driving, experienced drivers know how to change gears without a clutch mechanism.
- When engaging reverse, the lever may not reach all the way. Then you need to slightly release the clutch pedal, the gear will turn, the teeth will engage, and the handle will reach the end.
- After pressing the pedal, it is recommended to wait 3 seconds and then engage reverse gear.
- You can try turning on the reverse by first setting the handle to 4th, then to the rear.
- Repeatedly squeezing the clutch and returning the gearshift lever to neutral sometimes also helps solve the problem.
Manual transmission malfunctions: why did the gear start to slip out?
Most often, in order to get to the repair site, you can simply not use this gear. With modern multi-stage gearboxes, the gap between the stages is not very large, which makes it possible to freely dispense with one gear. And the wide dynamic range of a modern injection engine makes it possible to use crankshaft speeds from 1200 to 5500 rpm. You can get to the garage, but the defect must be eliminated.
Reasons for knocking out a gear
Wear of power unit supports.
The power unit swings much more than it should, and instead of the driver turning gears on and off, the jumping gearbox does it itself. More often, gearboxes with rigid rod control drives react to such a defect.
With such a defect, it sometimes knocks out paired gears, for example the second and fourth, since the direction of turning on (and off) these gears is the same. Although this does not always happen: some gears are worn more, others less, and, accordingly, the possibilities of keeping the gear engaged are different. Plus, dynamic jerks in second, for example, gear are much stronger than in fourth.
The treatment is simple. It is necessary to replace the power unit mounts - and quickly, because it is not only the gearbox that is suffering. Due to the increased mobility of the unit, tubes, hoses, cables, and wiring harnesses that connect the power unit with the rest of the car components are bent and may break, and believe me, there are a lot of them.
The drive mechanism is worn out.
A severely misaligned or worn drive does not allow the gear to be fully engaged. And if it is not fully turned on, it will pop out at the first opportunity. The transmission is more prone to knocking out when driving without a load (coasting): when the engine spins the wheels, the engagement of the clutch teeth is much “stronger” than when the engine is braking. Or as people say: “Try to pull out the gear under the gas or when releasing the gas - and you’ll understand everything.”
Clutch.
But the clutch has practically no effect on knocking out gears. But if the clutch is not depressed enough, it makes it difficult to engage the gear completely. However, such a defect cannot be called gear knockout.
Internal gearbox defects
The cause of wear on the teeth on the couplings may be a malfunction of the clutch mechanism or its drive, when the engine flywheel is not disconnected from the gearbox input shaft. Naturally, this knocks out the gear whose parts have damaged teeth. Most often, a gear will be knocked out in such a situation during sharp acceleration in this gear or intensive engine braking.
A possible reason for the gear being knocked out could also be weakening of the synchronizer springs. This cause can only be accurately diagnosed after completely disassembling the gearbox.
The gear can also be knocked out due to large axial play of the shafts, when the forks simply do not “press” the clutches to the full engagement position. Hence the next reason: wear of the forks, leading to the gears not being engaged. It can also knock out a gear due to severe wear of the gear selection mechanism.
conclusions
If a defect such as gear knockout occurs, you should immediately divide the causes into external ones, which you can try to diagnose and eliminate on your own, and internal causes. The latter require dismantling and qualified disassembly and troubleshooting of the gearbox. Therefore, I would advise you to contact a service whose specialists have already gotten their hands on repairing these cars, or a specialized company for repairing gearboxes.
Of course, some car enthusiasts drive holding the shifting gear with their hand, but this is not the case at all. There is no point in delaying repairs, because one day the transmission may not turn on at all, and that’s not so bad. It can also jam, and as a result, the car will have to make its way to the service station on a tow truck.