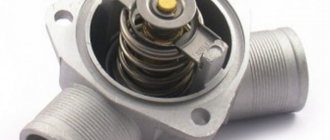
An electric starter simplifies the life of modern motorists; before, when they did not yet exist, the car was started using a “crooked starter” or starting engine. Nowadays, modern drivers do not have such hassle. But there are situations when the starter still fails and the car has to be started from the pusher. In fact, the list of starter malfunctions is small and diagnosing a breakdown is not difficult, because its design does not include many parts. First, you should understand the design of the starter and the principle of its operation.
as you can see from the picture above, the device includes
:Two covers: front and back. I think there is no need to describe their purpose.
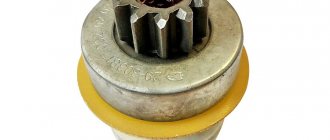
Bendix
- This is not just a gear that meshes with the flywheel, it is also an overrunning clutch. The overrunning clutch is needed at the moment when the engine starts to run, and the starter is still in the working position. The fact is that the engine speed is much higher than the starter speed, and the overrunning clutch allows the starter to rotate at the speed of the flywheel without damaging it.
Gearbox in starter
needed to increase the number of revolutions. That is, during operation, the bendix rotates faster than the armature due to this gearbox. Thanks to the gearbox, the starter has a small size and a high number of revolutions.
On the stator and rotor windings
voltage arrives and the armature begins to rotate, thereby turning the engine flywheel. A solenoid relay is needed to pull out the bendix and hold it in the working position.
The brush assembly is an important part; brushes are placed on it, to which voltage is applied and transmitted to the armature commutator plates.
Working principle of a car starter:
After switching the key in the ignition switch to the “start” position, the contacts in the contact group close, and through the starter relay, power is supplied to the traction (also holding) relay. The Bendix engages with the flywheel crown. At the same time, the voltage goes to the starter motor and the engine rotates. When the engine is running, the overrunning clutch disconnects the drive gear from the electric motor. Well, then, the driver releases the ignition key and enjoys the running engine.
Before proceeding to check the starter, you need to make sure that the battery is charged. If the starter turns sluggishly, or when you turn the key the panel goes out and the relay clicks, it means that the battery is discharged, there is oxidation at the starter or battery terminals, and the wires may also be damaged.
If nothing happens when you turn the key, then most likely the contact group is to blame (located in the car’s ignition switch and is responsible for closing the necessary contacts when the key is turned) or the wires going from the battery to the starter. You need to use a tester or a “control” light to check the voltage on the wires connected to the starter.
Starters: how they work and how to repair them
The history of the starter
Initially, the car was born without a starter - the engines were started with a crank, and this was considered the norm. Actually, the cars of the dawn of motorization had enough other, more pressing problems, against the background of which turning the handle before the trip was not the most significant. However, the difficult and unsafe starting of the engine by hand was still an obvious bottleneck of the first self-running carts, and in 1911 the American mechanical engineer Charles Kettering proposed the design of an electric starter. And already in 1912, the first car powered by Kettering’s invention, the Cadillac Model 30, was produced.
1 / 4
2 / 4
3 / 4
4 / 4
However, despite this, a technical revolution did not occur - which can be traced at least by the famous Ford T, which, produced in millions of copies, was wound up with a handle until 1919... Actually, the reason was to a large extent that Charles Kettering, crowned the inventor of the starter, proposed to Cadillac a completely different design than is used everywhere these days!
Pictured: Charles Kettering
Its design was complex and unreliable, since the starter, after starting the engine, was not disconnected from the crankshaft, but switched to generator mode, and the leading American automakers of that era reacted coolly to the idea. The reason for Cadillac's support for Kettering's invention lay in the personality of the company's founder, Henry Leland, whose close friend was seriously injured in 1910 by the reverse jerk of the crank when the ignition was too early and died as a result...
Leland vowed that an alternative to manual starting would be found, and welcomed Kettering with open arms, whose starter was pompously called a “World Wonder” in the Model 30 advertising brochure!
A technical mini-revolution in the automobile industry, thanks to the starter, did happen - but four years later, in 1916. Namely, when another American engineer, Vincent Hugo Bendix, proposed dividing the generator and starter into two separate units, and connecting the latter to the engine only for a short time - using an overrunning clutch, known to this day as “Bendix”.
Starter design
All car starters are very similar to each other. If you understand the device of anyone, you will understand them all. Be it a Matiz or a Kamaz...
The basis of any starter is a simple electric motor. Current is supplied to the rotor (aka “armature”) by powerful copper-graphite brushes, and the magnetic force of the stator is provided either by electromagnets or permanent magnets. The electrical circuits of most modern starters do not have any fundamental differences - all starters are connected to the car's electrical system at three points - power plus from the battery, ground through the body, and control plus from the ignition switch. In fact, only the power expressed in dimensions differs.
On the cylindrical body of the starter there is a smaller “barrel” - this is the so-called “retractor relay”. It performs two functions - in fact, it supplies power to the starter, having powerful contacts that can withstand currents of hundreds of amperes, and also engages the starter shaft with the engine shaft through a rocker arm and a Bendix overrunning clutch.
This clutch works on the principle of a classic bicycle hub - that is, the starter can turn the engine, but once the engine has started, it will not “drag along” the starter, spinning up at destructive high speeds.
Visual 3D animation of the starter design
More noticeable differences between one starter model and another lie in the design of the front rotor support. The classic device is when the rotor axis is installed in the starter on two bearings - support bushings made of a bronze-graphite alloy. These bushings are located, respectively, in the front and rear starter covers.
In principle, this “double-support” design is the most reliable and correct. But there are often “single-support” starters (in garage jargon they are often not very correctly called UNSUPPORTED), in which the rear support of the rotor shaft is located, as it should be, in the rear cover of the starter, but the front cover is missing altogether.
Articles / Practice We charge a dead battery in 10 minutes: experiment Kolesa.ru Many of those who are not shy about getting into the “guts” of their car with tools know in practice about a very curious, useful, but at the same time strange and poorly explained... 239751 9 62 04/18/2016
In this case, the front support becomes the engine clutch housing or gearbox housing, into which the support sleeve is pressed. The starter is installed in its place in the car - and the shaft rests on two bushings, as it should. As a rule, such a solution is used to reduce the size of components, and in principle, as long as everything is in order, it is no worse than the classic one. But if the front support bushing in the gearbox housing breaks, it is much more difficult to replace it - this is done by car and sometimes in very inconvenient conditions. Whereas in a two-bearing starter, the bushings are changed on a workbench, where everything is visible and easily accessible.
Another fundamental design point that distinguishes starter models from each other is the gearbox. More precisely, its absence or presence, and if present, its type. The fact is that the transmission of torque from the starter rotor to the engine flywheel can be carried out directly or through a gearbox built into the starter.
The “direct” option is when the Bendix gear, which rotates the engine flywheel crown, is located directly on the axis of the starter rotor. This design is quite archaic, characterized by excessive dimensions and weight, as well as huge current consumption, but it still occurs. Gear starters are much more efficient, lighter and more compact. In them, the moment is transmitted to the flywheel crown either through one intermediate gear or through a planetary gear with even greater deceleration.
"Planetary" starters are the most common today. With them, to start the engine, a battery with almost half the capacity and starting current required for the same motor with a starter operating directly is enough.
Starter repair example
Let's move on from theory to a real unit that requires repair. In our case, the symptoms of the malfunction were as follows: the starter began to rotate the engine very sluggishly, regardless of the state of charge of the battery. At the same time, being removed from the engine and connected by starting wires to the battery, it rotated vigorously. The well-functioning engine somehow managed to start even with such sluggish rotation, but at some point the starter stopped completely and emitted smoke...
After removing the back cover, a couple of tablespoons of black dust spilled out of the starter housing. Therefore, the first diagnosis is brushes. We remove the brush assembly, remove the housing with magnets (which auto electricians among themselves call a “bulb”), and take out the rotor.
After blowing all the parts with compressed air and washing them in gasoline, it became clear that the brushes were almost completely worn out, and their remains were almost short-circuited with graphite powder. The force of the springs pressing the remains of the brushes weakened, the contact resistance increased, the brush holders and springs heated up until they turned blue, melted, the coils closed and the brushes froze.
1 / 2
2 / 2
We pick up the brush assembly as a sample and go to the nearest office for the repair of starters and generators, where we ask them to pick up a similar part. The complete brush assembly costs us 400 rubles, which, considering the cost of a new starter from 4 to 5 thousand, is quite inexpensive!
We clean the rotor and assess the condition of the commutator - the slip ring along which the brushes operate. Wear is noticeable to the naked eye (shown by arrows in the photo), but the commutator can still work after replacing the brushes. We do without a groove, sanding it with fine sandpaper - that's enough.
In general, wear of the rotor commutator is a serious problem. In principle, under normal conditions, the commutator of any starter is capable of replacing a couple of sets of brushes, but if its contact lamellas become very thin, the rotor goes to waste. This part is expensive, it is not easy to purchase it separately, and it is rational to replace it only for free - if a similar starter with a living rotor turns up from old stocks of auto junk at home or from friends... Because if the collector is completely killed, there is usually no living space on the starter.
We inspect the overrunning clutch, otherwise known as “Bendix” (the name, by the way, comes from the manufacturer Bendix). We rotate its gear manually. It spins one way, but not the other. We move it back and forth along the axis of the shaft - it moves easily, without jamming. In our case with the Bendix everything is okay, that’s how it should be.
Meanwhile, the failure of the overrunning clutch is also a serious malfunction, since it is easy to buy the required modification only for starters of common models - problems may arise with finding a “Bendix”... The main typical reason for the malfunction of the clutch is the wear of the springs and rollers inside it, due to why it slips without blocking when rotating in the working direction. As a result, the starter hums and spins, but the crankshaft stops. This malfunction is easily diagnosed - the Bendix rotates manually in both directions, when it should only rotate in one direction. In a good way, the overrunning clutch in this case must be replaced, since it has a non-separable design. Although some enthusiasts flare its body, stretch the “trampled” springs, and cut new rollers from hardened rods, the result of this fuss is most often short-lived.
Articles / Practice Overhaul of a Mitsubishi turbodiesel with a mileage of 500 thousand kilometers: cylinder head No one can avoid this. Sooner or later He will knock on your... cylinder head or cylinder block. It is a major engine overhaul. The times of “millionaires” have long since sunk into oblivion, and large-scale... 12831 0 1 09/28/2016
Since the rotor has been removed, we simultaneously assess the condition of the planetary gearbox. We take out the gears, wash them with gasoline, and inspect them. Everything is in order, there are no complaints about the gearbox. Apply a light coat of CV joint grease to the gears and their bearings.
Note that the gearbox is a fairly reliable starter unit. It happens that the axes of the satellite gears are cut off or the outer gear ring bursts - but this happens rarely and most often due to initial defects in the metal or its processing, and not because of the loads during everyday work. For example, in planetary starter gearboxes, the outer gear ring, called the “crown,” is often made of plastic and is quite durable (in our case, as can be seen in the photo below, the “crown” is metal).
As a gear lubricant, ideally, special compounds for planetary gears or special consistent low-temperature compounds are required, but they are expensive and rare - it is irrational to buy them for a one-time job, where you will only need one gram out of the entire expensive tube. Therefore, it is quite acceptable to use a common lubricant for CV joints or a good imported lubricant for hub bearings. The main thing is to apply it in a very small amount - there is no need to fill the gearbox! The abundance of lithol, which thickens strongly in the cold, is pressed between the teeth of the gears, causing an excessive current surge and even threatening to break the plastic “crown”...
Now there is more tricky work to be done. It would be unwise not to evaluate the condition of the solenoid relay contacts once the starter has been removed and gutted. But if to disassemble the starter we only needed 8, 10 keys, and a Phillips screwdriver, then we can only open the traction relay with a 100-watt soldering iron. Wires come out of the relay, pass through the contact pins in the cover, and are soldered externally. Therefore, after unscrewing the two Phillips screws of the cover, it will be possible to lift it only by heating the solder one by one on the two contacts, shown in the photo with arrows. In fact, this is a simple procedure, and it can be done many times if necessary.
We are lucky - our contacts are in order. We lightly refresh them by rubbing them with a wad of sandpaper held in the “duckbills.” After this, we warm up the pass-through pistons on the lid one by one with a soldering iron, and sharply slam the lid on the table - by inertia, the remains of the molten solder fly out of the pistons, the holes are freed, and now the lid can be put back on the protruding wires and soldered back.
By the way, a serious mistake made by car owners who carry out repairs and maintenance of the starter themselves is to lubricate the solenoid relay core. In this unit, lubrication is not needed at all - at most, you can lightly coat the core and its socket with engine oil and wipe it almost dry - purely for the sake of reducing the likelihood of corrosion. And any greases in this unit are contraindicated - in the cold, even the best and cold-resistant ones can jam the core. The gap between the solenoid relay must be clean and dry!
Articles / Practice Knocking is not good: adjusting valves with nuts, why and how correctly Those were the glorious times when every second owner of a classic Lada car knew how to adjust the engine valves of his car! And it was not considered something extremely difficult, and in every city... 24392 5 26 09.19.2016
We assemble the starter in the reverse order, not forgetting to lubricate (also without fanaticism!) the rear rotor bushing. Can the unit be installed on a car? You can, but first let's do one more thing!
The fact is that in the newly acquired brush assembly the brushes are even parallelepipeds. And the collector is cylindrical, and even has acquired the shape of a not quite regular cylinder due to wear. And, in a good way, the working edges of the brushes should have semicircular grooves to increase the contact area, plus they should get used to the real profile of the commutator.
Therefore, to prevent the first activation of the starter on the engine from causing excessive heating of the commutator and brushes due to the passage of large current through the reduced contact patch, we will carry out a light grinding-in. Let's take the wires for “lighting up”, and with their help we connect the starter, lying on the table, to the battery, and turn it idle for a minute or two, intermittently.
That's it now. We install the starter on the engine and enjoy a quick and confident start.
Survey
Have you ever had to deal with starter repair?
Your voice
Total votes:
The starter spins at idle. It works, but does not turn the engine.
Again, first of all, the solenoid relay may be the culprit; it should be replaced.
The freewheel (Bendix) may slip. Because of this, the relay attracts the clutch into engagement with the flywheel, but rotation from the armature is not transmitted to it.
A broken overrunning clutch lever can also cause the starter to idle. In this case, you should disassemble the starter and replace the lever.
Also, there are cases when nothing in the starter is broken, but simply dirt has got in or is missing. All you need to do is disassemble the starter, wash it with gasoline, clean and lubricate it, especially the places where the freewheel slides.
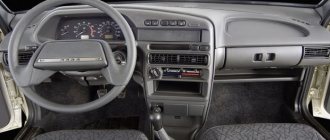
Where is the starter located?
In a car, the starter is located at the junction of the engine and transmission mechanism. The place where these parts of the car equipment are connected is covered with a plastic housing made in the shape of a bell.
Access to it varies depending on the machine model:
- from below, from under the bottom of the car;
- from the engine compartment, under the hood.
The mechanism is fixed according to the standard with three or two bolts.
Location of the starter in the car: red arrows show mounting bolts and electrical wiring connections
The starter is cracking and a mechanical sound is heard.
If a mechanical sound is heard from the starter area, like the starter wants to engage the flywheel, but it doesn’t work, then there are two possible breakdowns:
The flywheel crown has worn off. Everything is simple here, you need to remove the starter and look through the hole that appears at the flywheel teeth. They should be clear and not heavily worn. Severe wear will be noticeable immediately; you don’t even need to go to a specialist.
If the ignition key has already been released, the engine is running, and the starter continues to rotate, then you should “dig” towards the following faults:
Contact Group.
Perhaps the contact group has shorted contacts or the return spring has broken.
They could also close the contacts of the solenoid relay, causing it to constantly receive current.
The overrunning clutch or starter solenoid relay springs are loose or broken.
Starter, its purpose
A starter is a small device that converts electrical energy from a battery into mechanical energy. The name explains the purpose and design of the starter. When starting the car for the first time, it “starts” the engine, after which the car starts.
Visually: this is a compact electric motor with a mechanical drive. When current is applied, it begins to rotate the crankshaft at a specific frequency (rotation speed depends on the season; in winter, more current and speed are required) in order for the engine starting system to turn on.
In addition to its basic functions, the starter can regulate the starting of the car, protecting it from theft. It is on it that blockers are installed that prevent you from starting the engine without a key.
The starter turns, but is sluggish
Sluggish rotation of the starter does not always indicate a malfunction. First of all, you need to check the battery, its terminals and wires going to the starter. Possibly poor contact or oxidation. You also need to check the “mass” wire coming from the negative terminal of the battery to the engine or gearbox.
If this is observed at low ambient temperatures, then the culprit may be oil filled out of season. It is difficult for the starter to turn over the engine, which is filled with thick oil. All you need to do is use the oil according to the season.
The starter may have poor contact between the brushes and the armature. This is what causes sluggish rotation. Either the brush holders have oxidized and cleaning them will correct the situation, or the brushes are worn out and need to be replaced.
What is it and why is it needed
A starter is a car mechanism that is designed to rotate the crankshaft of an internal combustion engine using electric current from the car's battery. In simple words, it is an electromechanical part that allows you to start a car engine.
At the dawn of the automotive era, in order to start a car engine, you had to manually crank the engine crankshaft at a certain frequency. Many still remember how on old Soviet cars, the driver inserted an unusual object resembling a poker into the front part of the car, namely into the bumper or under it. Then, with a sharp rotation of this handle, he started the engine of his “iron horse”. It’s good if he “grabbed it” the first time, but if not, then he had to pull this poker for a very long time, remembering all the relatives on his mother’s side who were the designers of his car. This poker was popularly called a “crooked starter” .
Over time, people got tired of “twitching” in front of the car to start it, and engineers came up with an electric version. Now the crankshaft rotated using the car's own electricity.
How to check the starter for performance?
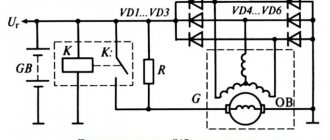
To test the starter you will need a battery and one good wire (or key). The starter housing is placed on the negative terminal of the battery, and the wire connected to the positive terminal is closed to the terminals on the traction relay, which are shown in the figure. If you want to check the operation of the solenoid relay, then the wire is connected to the first terminal, and to check the rotation of the starter to the second.
In general, the service life of the starter ranges from 70 to 200 thousand kilometers and problems with it rarely arise, because it doesn’t work that much.
What is a car starter
Externally, the autostarter is a small electric motor equipped with a mechanical drive. Its operation is provided by a 12-volt power supply. Although different car models have their own modifications of devices, they basically have the same connection principle in the on-board system.
The photo below shows a common device connection diagram:
1) starter; 2) mounting block; 3) contact group of the ignition switch; 4) battery; A) to the main relay (pin 30); B) to pin 50 of the electronic control unit; C) to the main fuse block (F3); Short circuit – starter relay.
Main faults and causes
A car starter rarely fails suddenly. Usually its breakdown is associated with a combination of factors that negatively affect its operation. Basically, device failures are cumulative. Conventionally, all faults can be divided into two types. Is this a mechanical or electrical problem?
The description of mechanical failures includes:
- Sticking contact plate of the retractor relay;
- Natural wear of bearings, as well as fixing bushings;
- Deterioration of the bendix race in the seats (this defect is provoked by the load on the rollers when the internal combustion engine starts);
- Wedge of the Bendix fork or retraction relay rod.
As for electrical faults, they are most often associated with wear on the brushes or commutator plates. Winding breakage also often occurs as a result of burnout or short circuit. If the winding breaks, it is easier to replace the mechanism than to try to find the location of the breakdown. If the brushes are worn out, they are replaced, since these are consumables for electric motors.
Mechanical breakdowns are accompanied by extraneous sounds, each of which will correspond to a specific breakdown. For example, due to increased play (wear in the bearings), the starter knocks when starting the engine.
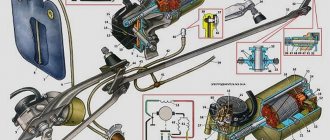
A detailed analysis of the starter and its repair is discussed in the following video:
REPAIRING THE STARTER WITH YOUR HANDS
Installing an electric starter on a motorcycle
Among the Soviet motorcycles, Dnepr motorcycles from KMZ are the best suited for tuning in the form of installing electric starters. After installing the electric start system on the engine of this bike, there is no need to equip the latter with a car battery. To do this, this MT only needs a battery with the power that it comes with.
There are several ways to install an electric starter. The above mechanism is either welded to the motor of the Soviet iron horse with argon, or screwed using studs.
The electric starter on the Ural motorcycle is installed according to the same principle as on the Dnepr. Note that the use of welding is best suited, since the manufacturer of the starter rings provides a calibrated jig. However, when using the welding method, the gearbox may encounter some problems associated with the need for change.
Installing an electric starter on a motorcycle can also be divided into separate design methods. The simplest option is when one ear of the product is “seated” on the upper left pin, and the stretch plate is mounted on the upper right pin.
Note that the installation of electric starters in the Urals or Dnieper involves the use of elongated studs. Automatic engine start Dnepr, Ural, etc. will function as reliably as possible if its main element stands exactly in the middle. There is no need to cut off the upper thrust, centering boss of the box.
An electric starter on a motorcycle will introduce some inconvenience after installation. The crown that is already installed often prevents the box from shrinking into place. To solve this problem, you need to reduce the clutch fingers by a couple of millimeters.
The flywheel also needs to be adjusted. When installing an electric starter on a motorcycle, it is needed so that if there is a large gap, the teeth do not get cut off in just one season. In addition, a small gap will result in a squeaking or squealing sound when starting the engine. This can also lead to the engine refusing to start at all.
Important things in the process of installing an electric starter on a Ural/Dnepr motorcycle
The left hole for mounting the stud can be screwed directly. The right one is already done on the spot. By determining the location of the right hole during installation, securing the starter to the plate and putting the plate on the left pin, you can avoid significant “hemorrhoids”. When you thread the right-hand pin, having first shortened it using a grinder, make sure that the gear is pulled out of the starter. Some missed points can be solved in the future using a file.
An electric starter is installed on a motorcycle after you have provided for the possibility of adjustment in advance. A hole of approximately 12-14 mm is drilled on the plate for further installation of an eccentric bushing into it. If both bushings rotate at the same time, the plate needs to be lowered or raised slightly. Still, it is better not to turn the bushings. They are repressed with a rotation. The electric starter installed on the motorcycle can be slightly moved to the left or to the right after minor adjustments. This brings with it a whole host of conveniences in installing an automatic starter on the left ear, stretching to the right.
Summarize
By gathering together knowledge about the structure of a car starter and the principle of its operation, you can understand the principle of its operation.
- Retractor, retracts the anchor, pressing the plate to the heels and throws out the bendix.
- By closing the power bolts, current is supplied to the winding of the electric motor, which rotates its shaft with the bendix.
- He, in turn, spins the flywheel of the internal combustion engine crankshaft to a speed sufficient to start it.
- A running engine rotates the flywheel at high angular speeds, this unlocks the Bendix overrunning clutch and it rotates freely in the opposite direction.
- The driver, having released the key, de-energizes the windings, and the entire car starter circuit returns to its original state.
Share:
Repair of starter retractor relay
On most starter models, the solenoid relay is non-removable. It is assumed that if it breaks, it is simply replaced with a new one.
For most models, relays are sold in auto stores or can be ordered online. But you need to be absolutely sure of interchangeability.
It is best to take the part with you when going to the store.
In some cases, the relay can be repaired, but not always. For example, if there is a break or short circuit in the windings, you should not rewind it. But if the contacts burn, the unit can be repaired.
Burnt contacts.
To repair, you need to remove the relay cover. For non-separable options, it is necessary to flare the connection between the housing and the cover with a screwdriver, and also unsolder the contacts going to the windings.
Attention! When disassembling, take pictures or draw a diagram so that you do not mix up the contacts during reassembly. Before assembly, be sure to clean all contacts from dirt and degrease.
Remove the core and spring from the relay. Unsolder the contacts on the cover. Unscrew the screws holding the cover. For non-separable models, you will need to carefully flare the housing with a screwdriver.
Remove the nuts from the copper bolts and pull them out. If the deposit is small, then clean the surface of the contacts with sandpaper. In case of severe corrosion, it is better to use sandpaper.
The surface of the contacts should be smooth and without slopes. Clean the seat, removing dirt and carbon deposits. Also wipe the inside of the lid with a rag to remove carbon deposits.
The contact plate does not need to be cleaned. Simply remove it from its place and turn it over to the unused side. Also check the pressure spring, it might be loose.
Assembly is carried out in reverse order.