How to repair or replace the trunk lock on a Lada Kalina
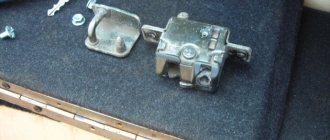
- Changing the larva
- Now let's change the lock
- Install the activator
- Connection options
- Let's sum it up
Hi all!
The domestically produced Lada Kalina car is still in demand on the market. The car is affordable and also quite reliable for the money. But problems happen. One of them is Kalina’s faulty trunk lock. It can be repaired or replaced. It is not necessary to contact a car service for this. Better to save money. And do the work yourself.
There is nothing complicated here. To change or restore the trunk lock of a Kalina station wagon, hatchback or sedan, follow the instructions.
Features of opening the trunk of the Lada Kalina
Owners of the Lada Kalina car are almost unanimously surprised: with all the bias towards Europe, the trunk lock of the Kalina hatchback in the basic configuration for some reason can only be opened with a key. For many, the situation immediately became quite common: the driver gets into the car, starts the engine, and then remembers that he needs to put something from the passenger compartment into the trunk. Further actions are similar to a joke.
You need to turn off the engine, remove the key from the ignition, get out of the car, and so on. If you imagine all this in an environment of time shortage, one can only feel sorry for the owner. In addition, if someone happened to approach the trunk of a car with something heavy in their hands, the procedure for opening it with a key turned into something difficult. Another problem could have arisen: in regions where real frosts occur in winter, the lock cylinder would at times freeze tightly.
What’s interesting is that any car owner sees a separate button on the Kalina key, which for this brand of car replaces the standard key fob. She's supposed to open the trunk. If you press and hold such a button for a couple of seconds, you can hear a click - this is a signal that everything is in order with the electrical package control unit.
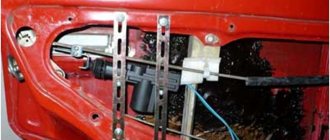
Then another interesting detail became clear: the craftsmen who climbed under the trunk trim to understand the internal structure realized that there was still a place for the lock activator and even a standard electrical connector for wires. And then the same craftsmen began to solve the problem of how to modify Kalina to increase the comfort of use. The complete trunk lock drive is not available for sale as a single set, so the parts will have to be obtained separately.
Methods for installing the trunk lock activator
The first option is to saw off one “tongue” from Kalina’s lock.
Particularly gifted craftsmen do this without any removal of the lock, right on the spot, using an angle grinder. You have to work very carefully. If you don’t have a grinder, the same steps can be done with a hacksaw. It just takes much longer, and one can only guess about the physical effort required for such a process. If you are not confident in the intricacies of your own work, it is better to remove the lock for modification. In this case, it will be easier to work with both a grinder and a hacksaw. The second option is to replace the lock. Many car owners installed a trunk lock for their Lada Priora instead of the original one. This option is perfect for those Kalina owners who do not have the desire and/or ability to cut anything. All other steps for installing the Kalina station wagon trunk lock activator are extremely simple.
- A rotary washer is installed on the plastic activator pusher, then the entire system is secured with a locking ring.
- The complete activator is placed in a standard place.
- The activator wires are connected to the corresponding connectors. Naturally, all electrical work is carried out only with the battery disconnected. The point is not what can “knock” an electric current: 12 volts of direct current for a person is just nonsense. But capricious electronics, if something suddenly “shorts”, may suffer. In the best case, problems with functionality will begin, in the worst case, something will completely fail.
- The next stage is installing and adjusting the rods.
- A check is in progress. First, the lock itself, regardless of whether the original one was modified or another one was installed (from Priora). All detected problems are corrected. The activator is being tested.
If everything worked perfectly, then it is quite possible to install the trunk trim in place, if only there were “hedgehogs”. Car owners are advised, since they had to remove the trunk trim, to also check which parts are making noise, knocking or vibrating. If such small problems are discovered, they can be solved by installing plugs from pieces of foam rubber of the required size. This will not only solve the problem with the lock, but also increase comfort when driving the car.
Installation of the activator: preparatory work
Since there is space for a trunk lock activator in Kalina, it makes sense to use it. Absolutely any activator will do. Of course, for those who are interested in the quality and long service life of the entire device, it is better not to stop at extremely cheap options. Experienced car owners still advise choosing domestic Kalina electric lock drives, regardless of body type. They are somewhat more expensive than similar products made in China or Taiwan, but still more reliable. Main parameters of the activator:
- 12 volts;
- two-pin;
- lock-unlock functions.
In order for the system to open doors by pressing a button to work fully, one activator will not be enough. You will also need such a thing as a rotary washer. According to many car owners, the easiest way is to grind it yourself. You will need a steel plate and a machine. There are quite enough drawings with dimensions that will show what kind of rotary washer for the Kalina activator should be on various auto forums.
It is possible that after the washer is manufactured, it will have to be modified when installing the activator. The activator installation technique itself will require some tricks. For example, the first step is to remove the trunk trim. It is secured with pistons, which immediately became unusable for most car owners. Conclusion: pre-purchase of “hedgehogs” for subsequent installation of the trunk trim in place is mandatory.
Another nuance lies in the types of locks on the Lada Kalina. Firstly, locks on cars produced before 2010 and after differ in their design. Accordingly, the types of activators will differ slightly. This issue is resolved upon purchase. Secondly, most of those who independently installed the lock activator for Kalina station wagon either modified the lock itself or replaced it with another one. It remains to figure out why this is needed and how it is done.
The bottom line is that the trunk lock is equipped with two “tongues”. After modifying the lock to open it with a button on the key, the existing problems were partially solved, but a new one arose. If, when opening the trunk with the key button, someone did not support the trunk lid in time, it would lower, as a result the trunk would close again. And only on one “tongue”. And this meant that the key fob certainly became useless. Now it was possible to open the trunk again only with the key. This is where two options for solving the problem appeared.
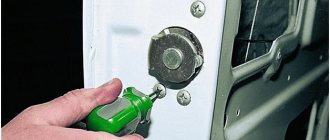
How to dismantle the lock to replace the cylinder?
You can gain access to the lock mechanism by removing the plastic upholstery inside the luggage compartment. This protective component is fixed by means of two bolts, which are located in the places where the special handle is installed. They are also called latch caps. They are pryed off with an ordinary screwdriver.
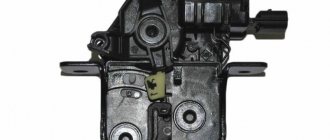
Structurally, the trunk lock in the Lada Kalina is made of two parts, regardless of the body type, hatchback, station wagon or sedan. They are presented in the form of a cylinder and the unlocking mechanism itself. If it is necessary to replace the trunk lock, then the dismantling of these components is carried out in a separate order.
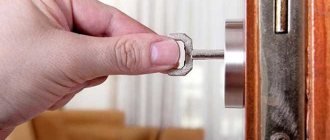
When you only need to replace the larva, this can be done in a few simple steps. Here you will need a screwdriver and a socket.
- By unscrewing the bolts, we release the necessary part of the body.
- Next, remove the retainer using a screwdriver. It is attached directly to the body of the larva itself.
- It is recommended to remove it very carefully, while holding the spring.
- Installation of a new element is carried out strictly according to the reverse manipulation algorithm.
If there is a need to replace the lock itself, the operation becomes a little more complicated due to the need for additional actions.
- First, the door lock is unscrewed using a screwdriver. This is not difficult since the element is held in place with only two screws.
- Now we pull the trunk lock outward, and it freely comes out of the landing niche.
As you can see, removing the trunk lock is not difficult.
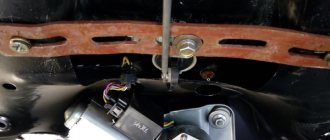
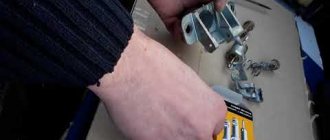
Removing the lock, drive and latch of the trunk lid
To remove the lock, remove the four pistons by prying them off with a screwdriver.
. and remove the lock drive trim.
. disconnect the rod from the lock drive.
Squeezing the clamps, disconnect the lock wire block from the rear wiring harness block. We use a marker to mark the position of the lock relative to the trunk lid.
Using a socket or a 10mm wrench, unscrew the three nuts securing the lock.
Remove the trunk lock with rod and wires. We install the trunk lock in the reverse order according to the previously marked marks. To remove the lock drive, disconnect the lock rod from the drive (see above).
We use a marker to mark the position of the lock drive relative to the trunk lid.
Using a 8-mm socket, unscrew the two nuts securing the lock drive to the trunk lid.
Remove the lock drive.
Using a screwdriver, remove the retaining ring.
Remove the pressure lever.
. and remove the lock.
Remove the pusher with the washer and spring.
We take out the cylinder lock mechanism. We assemble and install the lock drive in the reverse order according to the previously applied marks. To remove the lock retainer.
How to install the activator
The only way for the viburnum to get into the trunk is to turn the key and press the button. Naturally, doing this is not always convenient. Weather, busy hands and other troubles contribute. At this stage, many car enthusiasts begin to think about the trunk activator. It is quite possible to do this, you just need to try a little.
The Kalina station wagon trunk lock activator is easy to install. It is enough to take a self-drilling screw and secure it on one side with it and on the other with a wire holder. To check the device, you need to connect it to the standard connector.
The only problem in all this work may be the back door being picked up at the wrong time. After the current stops supplying the activator, it closes with the first latch, but the trunk is not completely closed. In order to get into the so-called fifth door, you will have to use the key again.
A lock with a button is not difficult. But during work it is necessary to assemble the circuit and stretch the wires. In this case, one programmable alarm channel (additional) should be used.
There are two main connection options. First: the button goes to +12 on the activator, bypassing the relay. The advantage of this connection is its simplicity and the absence of unnecessary elements, the disadvantage is the need to run additional wires.
Installing the activator using the second method is more labor-intensive. You will have to use additional elements, namely diodes. In addition, there is a need to search for “mass”. The main advantage is the use of a minimum number of wires.
Many experts prefer the first option due to its simplicity. The wire can be copper PV-3 with a square cross-section. It must be pulled along the left side and thresholds. The switching can be crimping and electrical tape on top.
A standard pink-red wire is used to control the activator. It must be connected to the relay, wrapped and hidden under the BUS mounting frame. All operations are carried out with the negative battery terminal removed. This is how the electric trunk lock drive is mounted.
Advantages and options for upgrading car locks
The technique is simple, the only thing needed is to make a rotating plate and a rod for it yourself. The wiring should be routed to the electric lock and connected to a special control unit. When disarming the car, the electric trunk lock will be activated after the fifth door opening button is unlocked.
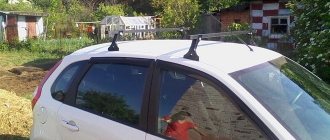
The entire installation task is based on connecting the electric lock to two wires. You can purchase the part at any auto store. The trunk end must be additionally hidden to prevent water from getting into it. Otherwise, it will periodically short out during rain.
An important attribute is the trunk hinges. Wires are often broken in this place, so their condition must be carefully monitored.
Before installing the electric drive, the trunk lid trim is removed. The main thing is not to damage it during this process. It is recommended to choose a lock that will not need to be modified during operation.
An important step in the installation process is wiring; you can use those wires that are standardly suitable for the fifth door of the car.
Power is taken from the cigarette lighter. An important point is the installation of a protective fuse. The wire is laid along the threshold; it will take approximately 3.5 meters. Then the installation takes place.
It is advisable to choose an option that does not require drilling additional holes. The procedure consists of connecting the wires according to the diagram. Important: you can use the wire that goes to the trunk light.
Any option for modifying your own car has its pros and cons. It was already discussed at the beginning why exactly it is worth modifying the trunk lock of the Kalina hatchback and station wagon. Now about the possible options. Installing the trunk lock activator alone solves one problem - the issue of using the key.
True, you no longer have to remove the key from the ignition. That is why the issue of installing a trunk release button for Kalina hatchback and station wagon remains relevant. This modification option has its drawback: you will have to run the electrical wire through almost the entire car. Most car owners are willing to put up with such inconveniences, since they are one-time use.
DETAILS: Replacing lamps on a Mazda 3 Photo instructions on how to change the front lamps on a Mazda 3
The Kalina hatchback trunk lock drive and the issue of modification are a matter exclusively for the car owner. It is possible that it is impossible to independently modify the trunk lock of the Kalina hatchback, and there is nowhere to turn. In some regions, purchasing a lock for a Lada Priora car can be difficult. According to many motorists, this disadvantage can somehow be put up with.
For particularly skillful car owners, options for controlling door opening/closing mechanisms, including the fifth door, are available. For example, the simplest option is one in which all the doors of the car are unlocked simultaneously.
How to install the activator
The only way for the viburnum to get into the trunk is to turn the key and press the button. Naturally, doing this is not always convenient. Weather, busy hands and other troubles contribute. At this stage, many car enthusiasts begin to think about the trunk activator. It is quite possible to do this, you just need to try a little.
The Kalina station wagon trunk lock activator is easy to install. It is enough to take a self-drilling screw and secure it on one side with it and on the other with a wire holder. To check the device, you need to connect it to the standard connector.
The only problem in all this work may be the back door being picked up at the wrong time. After the current stops supplying the activator, it closes with the first latch, but the trunk is not completely closed. In order to get into the so-called fifth door, you will have to use the key again.
A lock with a button is not difficult. But during work it is necessary to assemble the circuit and stretch the wires. In this case, one programmable alarm channel (additional) should be used.
There are two main connection options. First: the button goes to 12 on the activator, bypassing the relay. The advantage of this connection is its simplicity and the absence of unnecessary elements, the disadvantage is the need to run additional wires.
How is the activator installed?
The only way to get inside the trunk of a Lada Kalina is this manipulation - turn the key and press the button. This action is not always associated with convenience. For example, in bad weather or when your hands are full, this is not easy to do. This circumstance prompts owners to consider purchasing and installing an activator. Installing this useful element is quite simple. Here you will need a self-tapping screw, which will secure the device we are considering. To check the functionality of the activator, you should connect it with the standard connector from the on-board network.
How to install the activator
The only way for the viburnum to get into the trunk is to turn the key and press the button. Naturally, doing this is not always convenient. Weather, busy hands and other troubles contribute. At this stage, many car enthusiasts begin to think about the trunk activator. It is quite possible to do this, you just need to try a little.
The Kalina station wagon trunk lock activator is easy to install. It is enough to take a self-drilling screw and secure it on one side with it and on the other with a wire holder. To check the device, you need to connect it to the standard connector.
The only problem in all this work may be the back door being picked up at the wrong time. After the current stops supplying the activator, it closes with the first latch, but the trunk is not completely closed. In order to get into the so-called fifth door, you will have to use the key again.
A lock with a button is not difficult. But during work it is necessary to assemble the circuit and stretch the wires. In this case, one programmable alarm channel (additional) should be used.
There are two main connection options. First: the button goes to +12 on the activator, bypassing the relay. The advantage of this connection is its simplicity and the absence of unnecessary elements, the disadvantage is the need to run additional wires.
Installing the activator using the second method is more labor-intensive. You will have to use additional elements, namely diodes. In addition, there is a need to search for “mass”. The main advantage is the use of a minimum number of wires.
Many experts prefer the first option due to its simplicity. The wire can be copper PV-3 with a square cross-section. It must be pulled along the left side and thresholds. The switching can be crimping and electrical tape on top.
A standard pink-red wire is used to control the activator. It must be connected to the relay, wrapped and hidden under the BUS mounting frame. All operations are carried out with the negative battery terminal removed. This is how the electric trunk lock drive is mounted.
Let's get started!
- The task is to put the spring on the rod of the “lift” or trunk shock absorber, depending on who you say. To do this, you need to unscrew the hinge-mount. This is best done using a vice.
- We clamp the rod in a vice using fabric or other gasket that will prevent damage to the rod.
- Carefully unscrew the hinge and put on our springs. It is recommended to cut two turns to achieve the desired effect. Although everything needs to be looked at locally, it all depends on the length and stiffness of the spring.
- You can install washers or rubber gaskets under the springs, thereby eliminating contact between the spring and the elevator.
- After this, the spring is either fixed, for example, with electrical tape, or remains “free floating”.
- Some experimenters use a valve spring from a VAZ, adding one washer at the top and bottom; it is advisable to use rubber ones.
Next, this entire structure is returned to its place and checked. Be prepared for the lid to close with some force that was not there before. This is because of the springs that provide resistance. The disadvantage of the design is that over time the springs “sit down” and cease to perform their function; here, in principle, there are options. You can either find a stiffer hardened one, or stretch this spring from time to time, making it stiffer. You can also find suitable springs and change them from time to time.
How to remove the lock and replace the cylinder
Unfortunately, malfunctioning trunk and hood locks are far from the only surprises awaiting Kalina buyers. A broken door lock can be much more frustrating for the driver and his passengers. This problem is typical not only for the sedan, but also for the Lada Kalina station wagon and hatchback. Having discovered a breakdown, you should immediately begin replacing the faulty part.
Before installing a new lock, it is necessary to disassemble the door trim. Having carefully dismantled the covering, take a screwdriver and unscrew the 3 fastening screws of the inner door handle. Next, disconnect the handle and set it aside. After that, using the same screwdriver, we unscrew the door lock rod.
When replacing the door lock in a Lada Kalina station wagon, sedan or hatchback, you must remove the outer part of the lock. To do this, dismantle the outer handle and unscrew the 2 fastening nuts. Then unscrew 2 more mounting screws from the outside of the door. Having done this, we have full access to the rest of the locking mechanism.
DETAILS: Alternator belt tension Kalina 8 valves. Installing a generator without a fret tensioner Kalina
Unfastening the plastic clip, carefully disconnect the door lock release button. Then we pull out the corkscrew washer to gain access to the internal drive rod. Next, we insert a new lock into the door hole, connect the lock button and the internal drive rod. At the final stage, we assemble the structure in reverse order.
Replacing the locks has helped many owners of Lada Kalina with hatchback, station wagon and sedan body types. Many experts advise doing such work immediately after purchasing a Lada. What to do is up to you.
Lada Kalina rear door repair
Removing the rear door trim
| 1. Unscrew the lock button by hand | 2. Having turned the inner handle so that the screw securing it to the lever is accessible, use a Phillips screwdriver to unscrew the screw and remove the handle. For the current full text about illegal actions in Ukraine, see here |
| 3. Using a screwdriver with a thin blade, pry up two decorative plugs and remove them from the holes in the armrest handle. | 4. Using a Phillips screwdriver, unscrew the two screws securing the armrest handle |
| 5. Remove the handle | 6. Use a screwdriver to press out the power window handle socket. |
| 7. Pull out the latch and remove it. | 8. Remove the handle and socket from the shaft. |
| 9. Using a screwdriver, placing soft material under it, press the lower edge of the upholstery away from the inner door panel, overcoming the resistance of the pistons. It’s better to start from the bottom, gradually moving the screwdriver around the entire perimeter of the upholstery. | 10. Remove the rear door trim |
| 11. Location of ten pistons on the inside of the upholstery | Install the rear door trim in the reverse order. |
Replacing rear door glass
Remove the rear door trim. We lower the glass so that we can unscrew the screw securing the decorative glass trim.
| 1. Use a flat-head screwdriver to pry up the edge of the inner glass seal. | 2. Lift the seal up, applying the necessary force, and remove the inner glass seal from the inner door panel. |
| 3. Bend over the edge of the seal and use a Phillips screwdriver to remove the self-tapping screw securing the decorative glass trim. | 4. Using a slotted screwdriver, press out the upper corner of the decorative trim and remove it. |
| 5. Remove the lower part of the seal from the door. Raise the glass. | 6. Using a 8mm socket, unscrew the bolt securing the glass guide at the end of the door |
| 7. Take out the guide. Roll down the window | 8. From the outside of the door, use a slotted screwdriver to pry up the decorative retainer of the glass seal. To avoid damaging the paint, place a soft material under the screwdriver, for example, a piece of fabric folded several times. |
| 9. Pull out the retainer from the outer seal and remove it. | 10. Remove the outer glass seal by pulling it off the front decorative clamp and lifting it up. |
| 11. Using a 8mm head, unscrew the two bolts securing the glass holder to the window lifter slider. | 12. Remove the glass from the door. Install the rear door glass in the reverse order. |
Install the activator
To get into the luggage compartment on Kalina, you need to turn the key and also press the button. It's not convenient to do this.
In such a situation, it makes sense to install an activator. It's not difficult to do. This can really be done with your own hands.
The activator is attached using a self-tapping screw and a wire holder. Check the device first. To do this, connect the device to the standard car connector and test it.
The main problem with the activator's operation is that the back door may not be picked up in time. When the current stops flowing to the activator, the trunk closes with the first latch, but the compartment may not be completely closed. To get into the trunk, you will have to pick up the key again.
Electric drive: easy installation option
Removing the fifth door opening button is the easiest thing. It is more difficult to seal the remaining hole. This can be done using a special putty. One of the tricks is to process the hole cavity so that the surface becomes as rough as possible.
Of course, all dismantling work can be carried out only after the installation of the electric drive is completed, as well as the installation of the trunk opening button in the cabin. The trunk lock drive and how to install it are all relatively clear. Both the location and the connector of the wires in Kalina are determined in advance for this.
But where to install the button will have to be decided by the owner himself. The two most popular places are the dashboard in front of the gear shift and the driver's door. The first method is convenient because the button can be reached from almost anywhere in the cabin. The button on the driver's door is primarily a convenience for him.
Once the location for installing the button has been selected, it is time to install the electrical wiring. About 4 m of wire will be required. The connection point is located under the rear seat. The connection is made to connector 13, it is signed, so searching will not cause any difficulties. The work can easily be done independently. Thus, it became clear how to make a trunk lock drive.
- Replacing the door lock of a VAZ 2114 Photo instructions on how to change the door lock of a VAZ 2114
- Replacing the rear brake pads of a VAZ 2109 Video instructions on how to change the rear brake pads of a VAZ 2109 VAZ 2108
- Changing the oil in a VAZ 2107 gearbox: how to do it yourself
- Replacing the rear silent blocks of a VAZ 2110 Photo instructions on how to change the rear silent blocks of a VAZ 2110