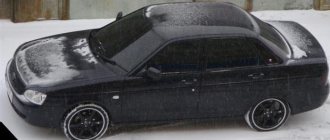
The standard sound insulation of the Priora car leaves much to be desired. Car enthusiasts strive to correct this deficiency with their own hands, since extraneous sounds irritate and distract the Lada Priora while driving.
They make noise on the doors, floor, arches, ceiling, engine compartment, hood, trunk, panels, dashboard - after this the Priora becomes a quiet car. The source of extraneous sounds can be a malfunction of the engine, its components, malfunction of suspension parts, brake system, steering, etc. Unpleasant sounds occur when driving on gravel roads due to vehicles passing by, especially heavy vehicles. To get rid of unpleasant sensations, it is necessary to modify the standard sound insulation. You can do this yourself. Depending on the body type: hatchback, sedan, or station wagon, the Shumka technology is slightly different. Read the article to the end and we will tell you how to do it correctly!
It is necessary to purchase materials and acquire tools in advance.
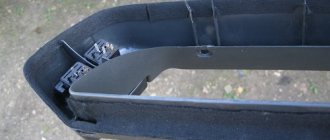
How to soundproof doors
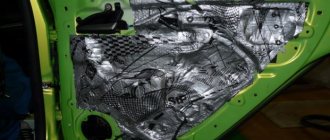
To perform soundproofing of Lada car doors, you need to remove the handles and trim material. Eliminate the stock version. Then clean the surface from dirt and degrease. Before use, warm up with a hair dryer. It is applied to the surface in separate elements. Make sure all wires fit freely into the holes. Next, you can apply vibration insulation and sealant to them. A noise absorber must be placed on top. Glue anti-creaking on the border of the material. Reinstall the trim and handles. Start soundproofing the Priors from the front doors, then the rear ones. The anti-corrosion coating should not be damaged.
Result
Is it worth soundproofing the doors? According to the results of a survey among VKontakte users, about 70% of car enthusiasts noticed a positive effect. About 16% saw little benefit from the intervention, and 14% noticed no difference at all.
The same ratio of votes can be seen in the poll on the website Lada2111.rf.
According to the results of popular research, the effect of soundproofing doors will reduce wheel noise by only 1-2 dB (depending on the car). The only noticeable difference will be in the sound of the acoustics.
To reduce the noise level in the cabin by 2-4 dB (a difference of 1 dB is barely noticeable or not noticeable at all), it is necessary to take a comprehensive approach to car sound insulation, work on all parts of the body (floor, doors, roof, trunk, etc.). ), wheel arches and fender liners. It would also be useful to install additional door seals on LADA cars (instructions for XRAY, Vesta, Granta/Kalina/Priora, Largus and Lada 4x4).
What do you think about the soundproofing of doors on the Lada? Help us also evaluate the standard sound insulation of the Lada Granta or Lada Largus.
Keywords: Lada Granta doors | Lada Priora doors | Lada Kalina doors | Lada Largus doors | doors 4x4 | soundproofing of Lada Granta | sound insulation of Lada Priora | sound insulation of Lada Kalina | sound insulation of Lada Largus | soundproofing 4x4 | Lada Vesta doors | sound insulation of Lada Vesta | doors lada xray | sound insulation lada xray | Niva doors | soundproofing Niva | universal article
8
Found an error? Select it and press Ctrl+Enter..
First layer of vibration isolation
It is necessary to prepare the surface. Determine the required sheet size. The larger it is, the fewer joints you will end up with. Before use, the material is heated with a construction hair dryer on the side where it is treated with bitumen. Then the layer is applied to the base, fixed and straightened using a roller. To obtain a better result, it is recommended to use another layer. Lay it out overlapping. Depending on the quality of the chosen substance, the area that needs to be covered depends. On average it is 50-100%.
Bring music back to the salon
Soundproofing doors solves two problems at once. It is made as one of the elements of complete sound insulation, as well as to obtain higher quality sound from the audio system. For some, music may not be something decisive, but musical compositions and many different extraneous sounds are simply incompatible. The acoustic systems are located precisely in the doors, which is why it is so important to carry out such an operation. This will make the acoustics sound more real and natural. This is especially true if the car has good sound and a radio.
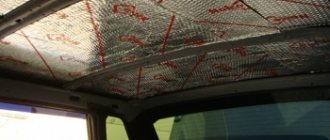
Roof
The roof and hood of the Lada Priora are the easiest elements to start working with. The standard sound insulation of the ceiling of a Lada Priora car consists only of upholstery. The work begins with preparing the base by dismantling the factory cladding. One can be removed through the rear door or through the luggage compartment. The adjacent plastic covers are also removed. The surface is cleaned of dirt, dust, and treated with a solvent or degreaser. Allow the surface to dry. Prepare a piece of insulating material of the required length, a hair dryer, a knife, and a roller. Try to minimize the number of segments. Preheat the sheets with a hairdryer. When the surface warms up and becomes sticky, fix it on the ceiling. Roll with a roller. Next, apply a layer of material that absorbs sound waves. Splen is most often used. It retains heat well and has an adhesive backing. It is not difficult to fix it on the ceiling of the priors. Splen is applied to the entire surface. To consolidate the insulating effect, you can supplement the cladding with a layer of bitoplast.
After finishing, the upholstery is installed in the reverse order. Keep in mind that the thickness of the layers of noise-absorbing material of the Prior should not be too bulky. Otherwise, the bolt holes for the passenger handles will not line up. In general, for a prior you will need 2 sheets of splen, 2-3 sheets of bitoplast, 2.5-3 sheets of insulating material.
Task: installing sound insulation for a Lada Priora car in the “Gold” configuration
The first thing we decided to do for complete sound insulation was to cover the roof of the VAZ car. We carefully remove all unnecessary elements from the roof, including the sheathing on the roof of the vase. Now you can make the first layer of sound insulation on the car ceiling. We install a high-quality damper from SGM Alumast Alfa to neutralize vibration on the vase roof. How much work does this cost us? You yourself can guess by the appearance of the roof in the photo and the effect achieved. The roof of the Lada Priora is not only protected from vibrations, but has also become stiffer. The use of vibration on the roof significantly reduces the overall sound background in a hatchback car. Then you need to make another layer on the roof. For this purpose we use a thick layer of Violon WELL sound insulator. It eliminates unwanted sounds. After installing it, it is almost impossible to push through the roof of the car, and raindrops will definitely not cause any discomfort to anyone. After assembling the upper part of the interior and hatchback of the car, all we have to do is take on the lower part to achieve a similar effect.
Soundproofing stages
The front and rear row of seats are removed. The central tunnel is being removed. Remove plastic trim and floor covering. Clean the surface from dirt and treat the interior with solvent. The first layer is a heated vibration-isolating layer. Roll over the top. The next layer of material is overlapped. Instead of this material, mastic made from bitumen is suitable. There is no need to cover technical recesses in the floor. Application of splen or bitoplast. They are applied to the entire surface of the floor by priors. To avoid rattling, it is recommended to weigh down plastic elements with pieces of noise-absorbing composition. Cover the joint area with anti-squeak. Install factory sound insulation on the Prior floor.
Removal
When you have purchased the required number of seals, you can begin to work.
Article on the topic: Do-it-yourself noise insulation of VAZ 2110 (Video)
The first step is to remove the old rubber elements, after which the installation of new parts begins.
Let's tell you more about the dismantling procedure.
- Remove the plastic trim panels installed on your vehicle's door sills. To do this you will need a thick screwdriver. Remove carefully, being careful not to damage the plastic caps. But it’s better to buy new ones in advance if you can’t carefully dismantle the threshold.
- Now remove the old pieces of rubber from the seats. Simply tear off the sections that are torn off by hand.
- Remaining rubber can be cleaned off with any available tool. Only be careful with sharp objects so as not to damage the metal and paint layer.
- Very small residues and traces of glue are removed using solvents. Make sure that the solvent you choose will not damage your paintwork.
- Go over the doorway with a vacuum cleaner, remove all dust and dirt. Take special care to clean the bottom part. If wet cleaning was used, wait until everything is thoroughly dry.
Upcoming work
Installation
This process cannot be called complicated. You are not required to have any special training or extensive experience. Although you should at least be able to handle glue.
Working with the back door
Each stage is performed consistently and carefully to achieve the desired result and create comfort inside the cabin.
- Even if you have already measured the required length of the seals for your doors, we advise you to do it again. Anything can happen.
- Cut the required length, plus leave a couple of centimeters of reserve. Although if we are talking about a ready-made set of rubber bands, you won’t have to cut or leave anything. Skip the first two points.
- Insert a tube made of silicone or polymer inside the sealing tape. They are sold everywhere, so there should be no problems finding them.
- The length of the tube must match the length of the rubber. This tube will serve to create the necessary elasticity and allow the elastic to press more tightly to the door. This way, ventilation gaps will not appear, and the cabin will become much quieter.
- A shaped side rubber seal is glued to the bottom.
- If the tape is solid, you can start putting it on from either side, as is more convenient for you.
- If it is a measuring rubber band, then start from a point between the door overhangs, or 30 centimeters from the bottom of the threshold. Moving up or down is a personal choice for each master. There is no difference here.
- Push the figured profile all the way down. To do this you will need a rubber or wooden hammer. He's a mallet.
- When the seal is installed around the entire perimeter, an extra piece will be revealed. Cut the tube straight and end-to-end, and make the elastic itself seem slightly deformed. It's like you tore it off by hand. This will avoid the unpleasant phenomenon of siphoning through the joint.
- Replace the pistons; if some were damaged during removal, replace them with new, intact ones.
- Replace the plastic cladding removed from the threshold.
- The second contour of the seal is glued along the edges carefully, but as tightly as possible, after which time is given for the glue to dry completely.
Article on the topic: Self-replacement of the crankshaft oil seal on a VAZ 2114
Almost immediately you will feel the difference between the old and new seal. This is a useful exercise that allows you to get rid of unpleasant sounds, knocking, whistling and cold air flowing directly onto your feet.
Trunk
Particularly relevant for Priora hatchbacks and station wagons. Soundproofing the trunk begins with removing the flooring of the interior space and the trunk lid. The surface of the body is cleaned, washed, treated with a degreaser and solvent. Soundproofing of the Lada Priora trunk is carried out according to the standard scheme. A vibration-insulating base is applied in two layers, which is preheated to a sticky state. Then splen and bitoplast are laid. The layers are rolled with a roller.
It is especially important to perform high-quality sound insulation of the luggage compartment arches. It is worth paying attention to plastic elements. The holes must be left open. The wires are insulated with anti-creaking, and the plastic parts are made heavier.
Work order
In Lada Priora, sound insulation is performed in the following order:
To perform soundproofing of the interior, it will be necessary to remove all the front seats, as well as the center console, remove the steering wheel and dashboard
Interior with the above items removed
- As soon as all the disturbing elements are removed from the interior, we remove the carpet and remove all the factory sound insulation of the engine shield, located on the interior side, photo above
- Then we apply Bimast Bomb to the engine shield in the cabin.
- Accent or Splen of your choice can be applied over this to absorb sound waves from the engine, stereo speakers and other sources.
Engine shield treated with vibration absorber from the interior
We remind you that before applying the vibration-absorbing material, the entire surface is thoroughly wiped from dust, dirt and preservation, then thoroughly degreased with a solvent or alcohol
- Before installing the material in place, it is cut out, then the carefully prepared pieces are heated with a hairdryer, only after that they are applied to the surface
- And after applying the material to the desired surface, it is rolled with a roller (roller) from the center of the attached part to the edges in order to expel all the air, and our material is more tightly attached to the surface
- Inside the engine compartment, soundproofing material is glued to the hood, in addition, to the front shield, all planes that do not have stiffeners, as well as in places that can be glued without removing the engine and dismantling its components
- We cover the motor shield on the engine side with insulation from the top to the point where the shield connects to the floor of the car, in this case we use the material Bimast Bomb or Bimast Super;
- The hood cover is insulated with bimast, and on top there is splen for thermal insulation
- After the soundproofing materials have been applied, we put all the removed parts back in their places, and the work can be considered complete
- Additionally, you can watch the training video
After such a small modification, the noise level inside the car is noticeably reduced, and the ride becomes much more pleasant and much more comfortable. And when all the work is done yourself, this means money saved for more pressing purposes, plus you will be absolutely sure of the quality of sound insulation of your favorite car.
The standard sound insulation of the Priora car leaves much to be desired. Car enthusiasts strive to correct this deficiency with their own hands, since extraneous sounds irritate and distract the Lada Priora while driving. They make noise on the doors, floor, arches, ceiling, engine compartment, hood, trunk, panels, dashboard - after this the Priora becomes a quiet car. The source of extraneous sounds can be a malfunction of the engine, its components, malfunction of suspension parts, brake system, steering, etc. Unpleasant sounds occur when driving on gravel roads due to vehicles passing by, especially heavy vehicles. To get rid of unpleasant sensations, it is necessary to modify the standard sound insulation. You can do this yourself. Depending on the body type: hatchback, sedan, or station wagon, the Shumka technology is slightly different. Read the article to the end and we will tell you how to do it correctly!
It is necessary to purchase materials and acquire tools in advance.
Hood and engine
Sound insulation of the engine compartment of the Lada Priora
— the front instrument panel is removed;
— we also remove the factory insulation;
— use a photograph to record the position of all wires and bearings;
— wash the surface, clean it with sandpaper, treat it with a solvent;
— heat the first layer of the vibration isolator to a sticky state and fix it;
- rolled out with a roller;
- second layer - splen, bitoplast;
— insulate the wires with anti-squeak;
- Reassemble the panel in reverse order.
Sound insulation of the hood
In addition to the standard set of materials and tools, you will need factory insulation with clamps. Clean the surface, treat with solvent, and dry. The first vibration-isolating layer, preheated. Roll it out with a roller, then lay the splen. The next layer is standard insulation.
Lada Priora is not a good Shumka. This is easy to fix on your own. The procedure will not take much time and money - if you do it yourself, it will take a couple of weeks and 5 thousand materials. If you do it in a hotel, the price will be from 25,000 rubles.
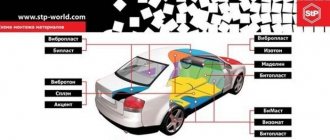
Materials
There is no need to invent sound insulation or use building materials, even if their price is lower; today special sound insulation materials have been developed specifically for cars:
- Vibration-absorbing materials (vibroplast, bimast) - serve to dampen body vibrations
- Sound-absorbing materials (accent) - serve to dampen sound waves, their porous structure causes sound attenuation
- Soundproofing materials (Splen) - completely reflect sound waves
- Thermal insulating materials - maintain the temperature inside the car interior (here you don’t need to look for separate materials, sound absorbers and sound reflectors, they will additionally serve as insulation)
- Anti-creaking materials (Bitoplast and Madeline) - to eliminate squeaks, crickets and rattling
Manufacturers' recommendations (different methods)
Floor soundproofing installation diagrams with materials:
Bimast Bomb Premium (4.2mm)
Shumoff Mix F (6.2mm)
Accent Premium (8-10mm)
Barrier (10 mm) or Splen (10 mm)
| Shvi layer | Material | STP (thickness, mm) | Shumoff (thickness, mm) |
| 1 | Vibration isolation (vibration damper) | ||
| 3 (optional) | Soundproofing (soundproofing membrane) | NoiseBlock (2mm) | Germeton A30 (3mm) |