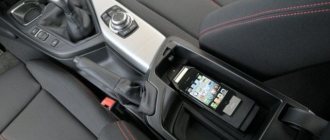
Connecting via Bluetooth to the radio
I suggest you study step-by-step instructions on how to easily connect via Bluetooth to a radio and apply the knowledge gained in practice! First of all, let's create a pair between the smartphone and the radio. Both devices must have a built-in Bluetooth adapter and be visible to each other.
#1 Setting up Bluetooth on your phone
Before you start connecting your phone to the radio in your car via Bluetooth, make sure that Bluetooth is turned on on your smartphone. These steps are almost identical for iPhone and Android:
- Go to settings and check the “Bluetooth” parameter.
- Make sure that the option for your phone to be found by other devices is enabled.
- Check in the settings so that the smartphone is visible at all times. Some smartphones are configured in such a way that they remain online for only a few minutes.
- Important: if the connection with the radio is not established for some time, the phone may also go out of sight. The first time I struggled with this question for a very long time, forgetting about this nuance.
#2 Checking the radio
Now let's check if the radio is ready to connect to the phone. Most cars have a Bluetooth button to trigger gadget detection. Some machines use voice commands for this.
And once, when I tried to help a friend solve this problem, not a single method helped us. It turned out that it was necessary to activate the menu on the screen and follow the instructions there. If such difficult situations arise, in order to find out how to turn on Bluetooth on the radio in your car, you should read the car manual. This section is usually called "transferring audio from your phone to your audio system" or "connecting devices to your infotainment system."
By the way, even if your car does not have a built-in wireless adapter, you can still connect your smartphone to the car radio. In this case, an external USB-Bluetooth module is connected. It is inexpensive (from 150 to 500 rubles), and looks like a flash drive.
#3 Connection
There are two options for connecting: the phone searches for the radio and vice versa. In the first case, we select our radio in the smartphone from the entire list of gadgets around. For example, I regularly see someone’s computer and a pair of someone else’s headphones.
In the second option, we launch detection on the radio and follow the instructions on the screen - they differ for different models.
- Once connected, the password will appear on the screen.
- To connect Bluetooth to the radio in your car, enter the password on the phone screen, and then they will be paired.
- If there is no screen, password information can be found in the manual. Many cars are equipped with standard options, like “111” or “1234”.
If the car is an old model or used, then the connection may not occur the first time due to poor compatibility or device malfunctions. In case of any problems, carefully repeat all steps again.
Now the gadget is connected to the audio system and connected to the radio. And we have two wonderful opportunities:
- receive calls through the car audio system.
- listen to music from your phone memory or from the Internet.
We talk about each of them in more detail below!
By the way, we talked in detail about the Bluetooth adapter for car radios in our other article.
Setting the clock (time display)
General information
1. In Lada Vesta, the clock is located (can be displayed) both on the display of the on-board computer (instrument panel), and the radio (radio), or the screen of the multimedia system.
2. The time can be set either manually or synchronized automatically: on the on-board computer via the GLONASS system, in the radio - via RDS (radio station), in the multimedia system - via GPS signals.
3. If automatic synchronization is enabled, then you need to set the time zone (except for settings in the radio).
4. Manual, precise time adjustment is possible only when synchronization is disabled.
Question: Why does the clock keep getting lost and showing the wrong time? — due to enabled synchronization (see points 3 and 4 above)
Note: To configure the permanent display of the clock on the Lada Enjoy Pro MMC screensaver, see here
SETTING THE CLOCK (TIME) ON THE BOARD COMPUTER DISPLAY
Note: for a complete description of how to control information display modes on the on-board computer screen, see here
Settings are controlled on the right steering column switch using buttons 1 and 2 . The buttons can be pressed briefly or for a long time.
Initial state (example):
Long press key 1 to enter settings mode. The mileage mode will blink on the left side of the display:
Next, perform one short press on the same button 1 . This is the mode to enable/disable time synchronization (UTC SYNC):
"on" - enabled
"oFF" - disabled
Switching between “on” and “oFF” is carried out by long pressing the button 1.
(If the setup is complete, then briefly press the button once to exit 2.)
If, after turning on time synchronization, you need to set the time zone , then after “on” lights up, briefly press button 1 . In this mode, the clock icon blinks and the current time zone is displayed on the right.
A long press on button 1 turns on the editing mode (the time zone digit will start flashing simultaneously with the clock icon). Decrease or increase the time zone value by briefly pressing buttons 1 and 2 . After setting the desired value, long press button 1 - this will save the setting. Then briefly press button 2 to exit the settings completely.
If you have turned off synchronization and want to set the time manually , then while in the “oFF” (off) mode, briefly press button 1 to enter the time setting mode:
To move between tens, units of hours and minutes, long press the button 1.
hours minutes
To increase or decrease values, briefly press buttons 1 and 2 . To save and exit the settings, after the minute units editing mode (Fig. above), a long press of button 1 will return the display to the initial settings mode:
A further short press of button 2 will return the display to its original state
Note: if you do not press any buttons for a minute in the settings mode, the display will return to its original state automatically.
SETTING THE TIME ON THE OLD TYPE MMS (with the CityGuide navigator)
In order for the clock in MMS to correctly display the current time, you first need to decide in which mode the clock will operate: either manual settings or GPS synchronization. If the settings are manual, then synchronization must be disabled. (see below)
Enabling/disabling synchronization and setting the clock
In order to enable/disable automatic time synchronization, it must be enabled/disabled both in the main settings of the multimedia system and in the settings of the CityGuide navigator:
Go to Menu → Miscellaneous → Settings
Next, select System → Time ...
Next, check or uncheck the box next to “Install by GPS”
If you enabled this feature, then immediately set your time zone.
Click the Time to save the settings.
Exit Navigator to the MMS main menu.
Click the Settings
Next is the General Settings
Then enable/disable synchronization (indicated by the arrow below)
If you have disabled synchronization, then adjust the time (circled) using the left-right arrows.
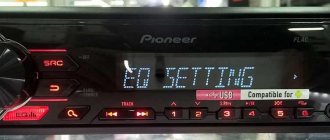
SETTING THE TIME ON THE RADIO (RADIO)
To start setting the time, you need to enable/disable RDS CT time synchronization (i.e. via VHF channels of the radio station).
Press and hold the encoder (large main button) while in the main window (playback window)
You will be entered into system settings. Rotate the encoder knob to select the RDS CT
Turning RDS CT on and off occurs by briefly pressing the encoder.
Now, if you have disabled synchronization, rotate the encoder knob until the SET TIME
Select this parameter by briefly pressing the encoder. The hours and minutes setting will open.
Rotate the knob to set the hours, and with a short press, change the setting to minutes and their value. Return to the main screen by briefly pressing the DSP button and check that the time is displayed correctly.
Note: If you do not press anything for a long time during the settings, the settings will exit automatically
Video
Source
Bluetooth: hands-free calling in the car
My personal opinion: talking on speakerphone using the car’s standard speakers is very comfortable. Nothing distracts you from moving, your hands are free, and the wires do not get tangled. With the help of Bluetooth systems, you can not only receive calls, but also dial numbers.
The methods for connecting and setting up a speakerphone in a car via Bluetooth are the same as for connecting music. Many cars are equipped with a “Hands Free” system – this is what you need to connect to. Different models have many options: screen control, voice commands.
If you have strangers in the cabin, and you do not want the details of the conversation to be heard by anyone else, then you can purchase a wireless headset. We can recommend the following models:
- For example, the budget option SmarTerra will cost only 350 rubles. They look like this.
Touch panel of the Vesta multimedia system
This technology combines many options and has an mms screen of almost 18 cm diagonally. Matches with vehicle panel. Multimedia in Lada Vesta includes all the parameters of standard equipment. Such panels are used in foreign cars and VAZ models. The display is designed on a resistive basis. The mms screen does not pay attention to changes in temperature in the cabin. Switching options in mms, updating and controlling is carried out even in severe frost without removing gloves.
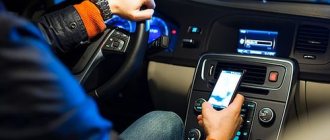
How to turn on and listen to music in a car via Bluetooth?
Listening to music from your phone in the car via Bluetooth is a real pleasure. To do this, just turn on music playback on your phone; some machines additionally allow you to control tracks from the screen or by voice. You can also use downloaded files from your playlist.
- For me, however, it is more convenient to launch an online service, for example Yandex Music or Apple Music. When the question of how to connect an iPhone to a car via Bluetooth has been resolved, then Apple Music is the best option. The program is paid, but provides access to a huge library of music and has a user-friendly interface.
- Another high-quality service is Yandex Music. The application is paid, but if you use a browser, you can listen to music for free. There is a nuance: on iPhone in Yandex Music, tracks do not switch automatically, which is very inconvenient.
- But you can also use other services, there are more than enough of them: VK music, YouTube music, and so on. If you connect an Android phone >
Now you know how to connect your smartphone to your car wirelessly. When my phone does not connect to the radio via Bluetooth, simply following these instructions helps. I hope you find it useful too!
How to connect your phone via Bluetooth to your car: 2 comments
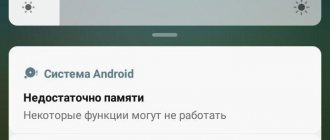
Good afternoon Please tell me why the radio is connected to the phone only for calls, but cannot play music!
Hello, Oksana! There are different problems, most often you need to delve into the phone settings. For example, in Android there is an item in the Bluetooth settings A2DP.
Compared to the multimedia system installed on a luxury vehicle, the Lada Vesta’s standard radio looks modest, but its functionality allows you to enjoy your trips to no lesser extent.
Price of touch radio
Having compared two types of standard car radios on the Lada Vesta, the question arises: how much does a normal radio tape recorder cost? The initial price of a car radio is 20 thousand rubles, and may increase depending on the installed additional programs and applications. A high-quality device should be purchased from trusted company websites.
At the moment, two types of Lada Vesta radios are installed in VAZ cars. This is the standard Vesta radio, which is included in the starting configurations, and the MMC, which is typical for the TOP models. And although the standard model looks very modest in appearance, thanks to its functions it also allows you to fully enjoy musical works.
Key Features and Controls
The Lada Vesta radio is located in the standard central location of the dashboard. Main controls and information transmission:
- radio button;
- monochrome display;
- functional music control buttons (previous/next track);
- MUTE mutes the sound;
- SCAN combines several functions;
- DISP – clock display;
- RADIO, AUDIO – switching the radio to radio broadcasting modes and playing music media;
- buttons numbered 1 to 6 are responsible for switching radio stations and other functions;
- multifunctional rotating washer;
- buttons to start and end a call using the Hands free function;
- RESET resets the current settings and reboots the system;
- microphone;
- SD card slot;
- The AUX connector is designed to connect an external sound source to the audio system;
- The USB connector allows you to connect external devices (mobile phone, MP3 player).
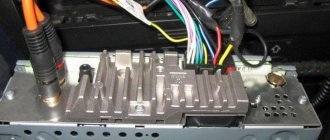
Lada Vesta head unit
The built-in battery of the car radio is capable of maintaining audio and radio settings for up to ten days, even when the car's battery power is turned off.
Setting up the radio
The radio receiver of the standard radio operates in three frequency ranges: FM, AM and VHF. To make it easier to search for radio stations, the radio panel has six buttons, each of which can be assigned a specific radio station. For the FM band, you can store up to 18 stations. The search is carried out both manually and automatically.
Audio system functionality
The Lada Vesta car radio works together with four factory speakers installed inside the car. The device menu pleases with a solid number of settings. In addition to several equalizer modes, you can choose how to play tracks: in order, scattered within one folder or all folders, repeat track, repeat folder.
The SD memory card size must not exceed 16 GB, otherwise the audio system will not read it. The number of folders on the card should be no more than 256, and files – no more than 1024.
Hands free system
Thanks to the built-in Bluetooth, the Lada Vesta audio system can operate in telephone mode, which allows the driver to receive incoming calls without being distracted from the road. When you press the button with the green handset, the hands-free mode is activated and finds nearby mobile phones with bluetooth enabled. Then the radio displays a password that must be entered on the phone. To disable this mode, just click on the “red tube”.
Alternative car radio with touch screen
Car radio with touch screen The touch radio on Vesta is installed on a more expensive version of the car in the luxury configuration or as additional equipment. It is a device with a resistive seven-inch sensor. The main advantages of such a display are the ability to view photos and video files, install a navigation system, and display images from the rear view camera.
Replacing the original radio
The development of car radio production technology has led to the emergence of multimedia systems. MMCs are steadily making their way into the automotive industry through design, features and improved sound quality. Car service employees can replace the standard push-button model in a Lada car with an MMC. You can try to install the sensor device yourself.
The connector on Vesta is standard. Photo source: https://www.drive2.ru/l/512218213111562977/
Sequencing:
- The standard radio is removed from the socket. To do this, first remove the plastic wells of the dashboard by unscrewing two screws at the top of the panel.
- Remove the plastic cover, which is secured with four bolts.
- Unscrew the bolts and remove the housing from the mounting socket.
- Remove 4 connectors from the back of the case.
- Installation of the touch model begins with connecting hidden batteries. Assemble the device in the reverse order of disassembly.
After installing all the elements in place, they configure the radio - determine the display screensaver, set or change the smartphone wallpaper.
↑ Description of the radio and controls
The radio for the Lada Vesta is located, as always, in the center of the front panel. The description of the characteristics of the standard Lada Vesta radio is as follows:
- there is a button to turn on the radio;
- it is also equipped with a monochrome display;
- The Lada Vesta device also has functional radio control buttons (that is, you can turn on both the track playing before and the next version);
- there is MUTE, which allows you to completely turn off the music;
- SCAN allows you to perform several functions at once;
- DISP allows you to show the time;
- there are also keys responsible for switching the Lada Vesta push-button radio from the radio playback mode to the playback mode of internal and external media and back;
- buttons corresponding to a serial number from one to six are responsible for switching radio stations, setting the time and other functions;
- Additionally, there is a washer that rotates and performs several functions at once;
- buttons responsible for starting a call and connecting with the phone and ending the call;
- RESET allows you to reset the settings that are already on the standard radio and reboot the system;
- if necessary, you can use the microphone built into the system;
- there is a slot for an SD memory card;
- the available AUX connector makes it possible to work with external speakers;
- The USB connector available here makes it possible to connect devices such as a player, cell phone, and so on.
Interestingly, if we talk about the battery of the radio, it is capable of storing radio settings for a maximum of ten days, and this without a connected battery.
It is interesting that if we talk about the multimedia system on the Lada Vesta, it has only three control keys. In order for the MMC to start working, you need to press the rotating encoder, which is designed for several functions at once.
A large number of commands on Vesta multimedia are performed by pressing a special touch screen. In addition, the radio processor can also perform several actions at once. MMS Lada Vesta in the form of an update provides that here, in addition to the main one, you can also install additional software (various applications, navigation, etc.), which can be purchased both from an official dealer and through the website.
Key assignment
The keys on the panel are arranged in 4 rows, they are separated by function. Each of them has a symbol - a drawing or inscription.
In the top row, the first button on the left turns the power on and off. To the right of the button there is a hole for a hidden regulator with a function for canceling settings. Below are three small holes for the microphone. The main place of this row is occupied by a black and white display screen. To the right of it is a slot for a storage card. The rightmost key controls the display.
Radio connectors in Vesta. Photo source: https://www.drive2.ru/l/512218213111562977/
In the row below, manufacturers installed:
- quick mute button;
- phone on and off buttons;
- a key that turns on viewing tracks of an external drive.
The third row from the top is the basis for controlling audio playback. Here there are keys for turning on the radio signal and signals from external devices, keys for rewinding tracks, as well as a handle for smoothly changing the volume. It is also used to search for radio stations.
The bottom row contains 6 keys for controlling music playback from external media.
↑ Radio functionality
A review of the standard MMC Lada Vesta radio proves that the standard radio practically does not lag behind in its functions. So, for example, it works with all four of its factory speakers that are installed in the cabin.
In addition to several equalizer modes at once, there are additionally several ways to play tracks at once: for example, repeating an entire folder or repeating only one track, scattering among all folders or one, playing in order, and so on.
Since the player has the ability to view a memory card, it is important that it does not weigh more than 16 GB, otherwise the audio system will not read it. In addition, there are restrictions on folders and files. For example, there should be no more than 1024 files, and no more than 256 folders.
Problems with the standard radio
Users note shortcomings in the device - they consider the volume of the speakers insufficient.
There are complaints about the external antenna of the radio. The antenna pin mount, according to reviews, requires reinforcement; it needs to be made more reliable. If the fastener breaks, it is difficult to restore it.
MMC connector. Photo source: https://www.drive2.ru/l/477421418871521651/?m=477467323481981340
The antenna cable port is located under the instrument panel. Therefore, when changing the antenna, remove the panel and place the adapter in the radio compartment.
The device does not have a slot for laser discs; you can only use a flash drive or SD card. This problem concerns people who have a lot of disks for outdated models.
In cold weather, audio playback freezes. This problem is resolved by rebooting. To do this, a hidden regulator was installed on the front panel.
↑ Bluetooth and Handsfree
Thanks to such a convenient function as Bluetooth, the standard tape recorder can operate in telephone mode, which allows the driver to answer calls without being distracted by a mobile phone. If you press the key with the green handset, the phone mode turns on and finds nearby phones with Bluetooth functionality.
Next, a password is displayed on the radio screen, which you must enter on your mobile phone. And in order for this mode to be disabled, just press the button with the red tube.
↑ Push-button radio
In addition to multimedia with a touch screen, the plant installs a simpler audio system on the Lada Vesta. This standard radio has a monochrome display, the size of which is 4.3 inches, RDS, USB, AUX functions, as well as the ability to communicate with the phone when your hands are busy.
Also, along with the radio, four speakers are installed in the car. By the way, such a radio, like its touch-screen counterpart, has a lot of possibilities.
The standard radio offers the following modes:
- “Radio” mode, which offers both automatic and manual selection of the desired radio station.
- There is also an “Audio” mode, which allows you to listen to music via your phone via Bluetooth, a USB drive, or an SD card.
- “AUX” mode, which makes it possible to play audio using an external drive.
- Using the same Bluetooth, speakerphone can be enabled.
- By quickly pressing the enconder, you can adjust the audio parameters.
Both changing settings and switching various functions of the device is carried out by rotating the encoder.
By the way, in the glove compartment of the car, next to the cigarette lighter, there is a USB connector, which is successfully used for a Flash Card and a player with a memory capacity of no more than 1024 MB. In addition, using the same device, you can at the same time connect your phone and, if necessary, recharge it. By the way, the touch radio also has the same connector.
As you can see, even the standard device has undergone many changes. And, of course, the new equipment of Vesta with its new MMC is much more interesting. If you don’t have enough money for one, you can always replace it with an alternative Lada Vesta radio, which has a more economical price.
Review of the Lada Vesta head unit
There are two versions of the device - with button control or touch control. It is better to start getting acquainted with the car radio with the push-button version.
The device is installed to the right of the dashboard. The design of the device fits well into the interior of the car. All controls are designed for quick recognition of function and use. Customizable buttons are hidden so that they cannot be touched accidentally.
Standard wiring. Photo source: https://www.drive2.ru/l/551272041496445905/
The Vesta radio has the following functions:
- radio broadcasts with search and fixation of the necessary programs;
- play music recordings from an SD card, flash drive or smartphone;
- indication of time on the liquid crystal display;
- Speakerphone;
- talking on the phone without taking time away from driving the car.
Calling functions, as well as changing modes, is carried out from the keyboard.
↑ Radio with touch screen
The old radio, if desired, can always be replaced with a new, more modern model. The instructions state that this multimedia from Lada Vesta is equipped with a special touch screen that is not afraid of temperature changes and responds to the slightest touch.
In addition, a special multimedia Lada Vesta is installed on the steering wheel, which allows you to control the radio without being distracted from the road. Using special keys on the steering wheel, you can answer a call, end a call, turn up the music or, conversely, make it quieter. Moreover, you can press the keys even with gloves on!
What other functions are typical for this system? This:
- a radio system that allows you to memorize several radio stations at once;
- the ability to listen to audio, and this can be either using USB flash drives or playing from a phone, or from an external HDD via a USB channel;
- The multimedia also has a phone mode that allows you to talk hands-free via Bluetooth;
- you can install a navigation application on the radio and use it for Russian roads;
- If you connect a flash drive or SD card, you can not only listen to audio, but also watch videos with small pictures.
As you can see, the functionality of such a system is enormous, and, compared to a standard radio receiver, this device is many times more convenient.
The radio manufacturer warns that the more different folders and files there are on the media, the longer the files will take to load. In this case, it is recommended to use external media that contains only video files, pictures and audio files.
The manufacturer categorically does not recommend placing *.bin resolution files on the media. Such files can lead to loss of functionality and damage to the firmware.
At the same time, the audio player window is intuitive. All files are played on six speakers, and the sound is at a truly decent level. You can make adjustments using the equalizer.
The driver can also listen to music via his phone via Bluetooth. But, unfortunately, information about the melody being played is not displayed on the multimedia screen.
↑ Problems and their elimination, as well as how to remove the radio from Lada Vesta
If the driver presses several options at once, or during a sudden temperature change, the radio may freeze. In this case, you will have to first press RESET and then reboot the radio. If even after this the radio does not start working, you will have to contact a service center.
The radio is removed only for repairs or subsequent dismantling. Before doing this, you need to disconnect the wire terminals from the car battery.
First you need to remove the central trim. In this case, the console is held on by clamps and can be easily snapped off. Disconnect the wires from the emergency lights and remove the plastic cover.
Next, the screws and air ducts are turned out, for which a screwdriver and a T20 nozzle are used. Using the same tools, the screws are unscrewed and the radio is removed from the socket. At the last stage, all that remains is to pull the tape recorder towards you and disconnect the connectors with wires.
Why bluetooth doesn't work
Most often, failure occurs due to the fault of Sony smartphones. We have already looked at how to connect bluetooth to the Lada Vesta, so it’s worth trying the pairing again.
Connection may not be possible when the Bluetooth function in Vesta is not activated in the radio. Press the button to accept the call, the system begins to function. If this does not resolve the problem, it is best to contact your dealer. Also, this problem may appear after trying to connect several phones. There may be other reasons why Bluetooth does not work on Vesta, including a factory defect.