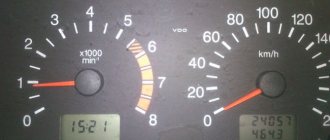
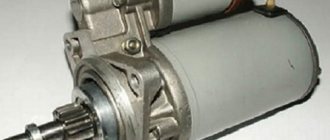
A malfunction of the generator rotor of VAZ 2108, 2109, 21099 (37.3701) cars primarily leads to the disappearance of the charging current and discharge of the battery. On the instrument panel after starting the engine, the battery discharge light will be constantly on, indicating that there is no charging current. The voltmeter needle is in the red zone or on the border with it. If you check the voltage at the battery terminals with a voltmeter (multimeter, tester, etc.) with the engine running, it will be below the required 13.6 V. Tools necessary for checking the rotor
Multimeter, tester, voltmeter, etc.
If they are not there, then the control lamp is a 1-5 W, 12 V light bulb with wires soldered to it .
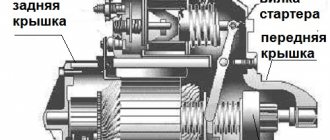
Checking the generator rotor of VAZ 2108, 2109, 21099 cars
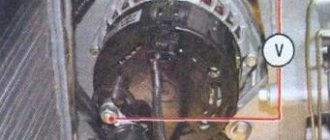
Checking for short circuits and open circuits can be done without removing the generator from the engine or removing the rotor. We remove the voltage regulator and, through the window that opens, carry out the manipulations described below.
Checking the short circuit of the rotor excitation winding to ground
— We press the plus of the multimeter in ohmmeter mode one by one against the slip rings, and the minus on the generator housing (“ground”).
If the rotor is working properly (there is no short to ground), the resistance should tend to infinity.
When using a test lamp, it is necessary to pass through it, in turn, the plus from the battery to each of the contact rings of the “excitation” winding of the rotor. The minus will be the generator housing, since it is installed on the car and connected to the battery negative. If the rotor is working properly, the control lamp should not light up - plus and minus do not appear anywhere. Otherwise it will burn.
checking the excitation winding of the generator rotor 37.3701 of VAZ 2108, 2109, 21099 cars for a short circuit
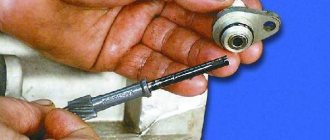
Next, we check the “excitation” winding for a “break”.
The plus of the multimeter (in ohmmeter mode) is on one contact ring, the minus on the other.
When the excitation winding is in good condition, the resistance is in the range of 5-10 Ohms.
If a test lamp is used, then we connect the plus from the battery through it to one contact ring, and the minus with another wire to the second contact ring. The lamp should be on. If this is the case, then the “excitation” winding is working.
checking for a “break” in the excitation winding of the generator rotor 37.3701 of VAZ 2108, 2109, 21099 cars
The rotor winding leads that have come off the slip rings can only be seen after removing and disassembling the generator. In some cases they can be soldered. Most often, the faulty generator rotor 37.3701 of VAZ 2108, 2109, 21099 cars should be replaced.
winding terminals and contact rings of generator 37.3701 for VAZ 2108, 2109, 21099 cars
Notes and additions
— Usually, when looking for problems in the operation of the generator, the fault of the rotor is the last thing to start sinning. Similar symptoms (the discharge light is on, the voltmeter needle drops, low voltage) can occur if the voltage regulator or diode bridge is faulty. First of all, you should check them, then start checking the rotor.
Five more articles on electrical equipment of VAZ cars
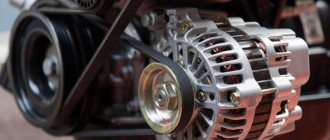
In this post, I will tell you what the generator consists of, how to check its main elements, and, accordingly, how to attach a domestic generator to a 102 engine.
So, the main elements: 1. Rotor 2. Stator 3. Diode bridge 4. Voltage regulator 5. Capacitor
We also need a multimeter with a short circuit detection mode (continuity).
Read more about each element below.
Rotor
1) To check the rotor winding (excitation winding), it is necessary to measure the resistance between two slip rings, ideally it should be 4.3 Ohms at +20°C, but it can fluctuate from 2 to 5 Ohms.
2) Next, check that the winding is not shorted to ground. We “ring” each contact ring on the rotor body. The multimeter buzzer should be silent. (You can also check using a regular 12V light bulb and a battery).
Stator
1) Using the same multimeter, we check whether there are any breaks in the stator winding; to do this, we alternately “ring” the terminals of the stator winding with each other (the buzzer should sound).
2) Then we check whether the stator windings are shorted to ground. We ring each winding terminal on the generator housing, if the buzzer is silent, then everything is ok
Diode bridge
The most confusing thing in my opinion To check all the diodes (valves) of the rectifier unit, we connect
the plus of
the power source (battery) through a light bulb (12V, 1-5 W) to the B+ contact of the generator, and
the minus
to ground.
If the light is on, then there is a short circuit in the block of both positive
and
negative
diodes.
Carrying out generator repair work
Car parts, no matter how well they are looked after, become unusable over time, and the VAZ-2110 model is no exception.
In this article we will talk about repairing such an important mechanism as a generator. To carry out repair work you will need the following tools:
- 17mm socket wrench with special extension;
- wrench 10;
- ohmmeter;
- three-jaw puller;
- a mandrel for extruding the bearing located in front;
- a mandrel for pressing out the bearing located at the rear.
Often the repair of the VAZ-2110 generator is directly related to dismantling, performed in the following sequence:
- Raising the vehicle to the required height or placing it on an inspection pit.
- Dismantling the battery by loosening the old terminals.
- Using a 17mm socket wrench, unscrew the nut that secures the generator, which is equipped with an adjusting bar.
After following these steps, it will not be difficult to properly repair the transport generator.
Dismantling the VAZ-2110 model generator
Dismantling begins with the following steps:
- removing a special shield that serves as protection against contamination and is located in the engine compartment;
- removing the drive belt;
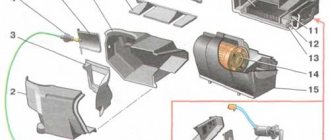
- disconnecting the wire from the stator, both central and terminal 67, namely:
- removing the protection cap;
- Using a 10mm wrench, remove the nut securing the tip;
- Using a 19-mm socket wrench, unscrew the generator retaining nut with the bracket;
- After removing the long bolt, you get the generator.
It is worth noting that when dismantling the generator, you should be especially careful not to lose the buffer bushing.
Self-diagnosis
Thus, we smoothly approached the issue of control. If you do not know how to check the functionality of a unit in your car, first conduct a visual diagnosis of the condition of the device. If the inspection does not reveal external damage, a more detailed diagnosis is necessary. First check the winding for insulation damage, for this you will need a multimeter or a test lamp.
Before checking, one wire from the lamp must be connected to the armature shaft, and the other should alternately touch the collector plates. However, it should be remembered that when checking, the ends of the wires must be well insulated. When the armature winding is shorted to ground, the lamp should blink.
To check inter-speed faults, a special induction device is required. The core of the device in this case is made of metal, and the coil is powered by industrial alternating voltage. The anchor is installed in the core prism, after which it must be rotated around its axis, and the iron plate must be connected to the metal. If there is no short circuit, then no current flows in the winding (the author of the video is the Ramanych channel).
However, in the event of a short circuit, an electromotive force will appear in the closed coils. The alternating voltage will create a different magnetic field, so if it exists, there will be oscillations in the iron plates connected to the armature. The presence of vibration may indicate a short circuit in the coils; if this is the case, then the only way to solve the problem is to rewind the armature.
Checking the generator for serviceability
To perform such work it is necessary:
- Carefully remove all contaminants from the generator.
- Connect the wire with a positive charge to the terminal, and the wire with a negative charge to the generator itself.
- Testing positive diodes occurs as mentioned earlier.
- Check how carefully the brushes adhere to the contact rings.
- After removing the brush holder, apply several pressures to the brushes themselves. If any difficulties are observed in their movement, they must be replaced;
- We check the rotor winding for the presence of a short circuit.
To do this, you need to connect the ohmmeter to the generator and to the ring on the rotor; if the value is zero or close to that, then there is a short circuit.
It is worth paying attention to the fact that it is not always necessary to do a complete renovation. In some cases, it will be enough to replace the failed part.
Checking the rotor winding
To perform this operation, it is necessary to dismantle and disassemble the unit. When performing a self-test, do not forget to set the device to the circuit resistance measurement mode. Additionally, a value of no higher than 200 Ohm is set. These routine maintenance works are carried out in 2 stages:
- Measuring the resistance value of the rotor windings. To do this, we attach the probes to the rings of the moving part of the engine and determine the value. This will make it possible to determine the probability of a winding circuit break at a value above 5 ohms. If the device shows less than 1.9 ohms, a turn short circuit has occurred. Most often, the chain breaks at the junction of the rotor winding lead to the ring. You can determine the defect by moving the wire with a probe at the soldering points, as well as by detecting darkened and crumbling wire insulation. In the event of a break or short circuit (short circuit), the wires become very hot, so the breakdown can be detected by visual inspection.
- A circuit test is performed to detect a short circuit to the frame. We position the generator rotor conveniently for operation. Then we bring one probe to the rotor shaft, and attach the second to any ring. If the winding is working properly, the resistance reading will go off scale. If it shows low resistance, this part should be sent for rewinding. When rewinding the rotor, it is important to maintain perfect balancing.
Bearing check
Many motorists know that often the cause of generator problems is problems with bearings. Diagnosis of this part begins with a careful external examination. Serviceable bearings should rotate easily. If damage is found, such bearings require replacement.
Typically, these situations include the following:
- if the generator makes howling sounds, it must be dismantled in order to troubleshoot the stator;
- if the generator does not make characteristic sounds, then it is enough to tighten the fastening nut;
- if after tightening the generator begins to make howling sounds, it means that the brushes and contact rings require wiping with a rag previously soaked in gasoline;
- If even after all the manipulations the generator is noisy, then replacement is inevitable.
We call the diode bridge
When the multimeter probes are positioned as in the following photos, the resistance should be infinite; if the probes are swapped, it should be within 700 Ohms.
Procedure for checking negative diodes
Checking the positive diodes
Now the auxiliary diodes
Procedure for checking negative diodes
Checking the positive diodes
Now the auxiliary diodes
Improvements to the regulatory mechanism
Work to modernize the VAZ-2110 generator consists of:
- Removing a special tablet from a standard device, and taking a similar part from a foreign-made relay, followed by its installation in a standard device. The contact parts of the mechanism are welded to the body.
- Before carrying out modification work, it is necessary to bend the leads of the components. The mechanism parts are secured using standard screws. Soldering is done so that the element is completely covered with tin.
- Finally, the nuts are sealed to prevent them from loosening during the movement of the regulatory mechanism.
Using the tips given in this article, any motorist can easily carry out repair work on the VAZ-2110 generator with his own hands. To do this, you must carefully carry out in detail, step by step, all the necessary steps to dismantle and replace the generator mechanism on the car.
Therefore, we wish all motorists good roads and less hassle associated with car repairs.
Source
Relay regulator
The relay regulator maintains the optimal voltage value in the standard electrical circuit. In fact, it is precisely this that prevents the voltage from increasing to critical values. To carry out the test, start the engine, connect the multimeter and set the “voltage measurement” value.
After this, it is necessary to measure the power supply of the on-board network directly at the battery terminals or at the contacts of the generator itself. The values should be between 14–14.2 V.
Then you need to press the accelerator and take the measurement again.
Note! The readings should not change by more than 0.5 V. Otherwise, this will indicate incorrect operation.
Replacing the slip rings of the VAZ 2110 generator on your own
Replacing the slip rings of the VAZ 2110 generator is necessary if there are various types of defects on their surface. Because of them, the rings cannot efficiently perform their most important function - tightly connecting the parts to each other so that contact occurs between them. Very often, individual parts of the generator break. If you change it completely, you will have to spend a considerable amount of money. Therefore, you can repair it by replacing broken parts. On a VAZ 2110, replacing the slip rings of the generator is a simple procedure and you can handle it yourself.
Methods for eliminating anchor breakdowns and defects
If the surface of the mechanism shaft is worn out, then the knurling procedure will correct this problem. The mechanism itself is mounted in a lathe, and the worn journals are processed. Their diameter will increase due to the iron that comes out of the formed depressions. When the processing is completed, the harnesses must be sanded so that their dimensions correspond to those that are to be used.
When the collector wears out, its defective elements must also be eliminated. This component is subject to turning, after which the insulation is cut into the plates at a distance of 0.8 mm. In this case, the width of the groove should be no more than 0.6 mm; a milling machine is used to cut through the insulation.
After milling is completed, the armature steel must be treated with a special nitroglyphthalic varnish, and the winding must be treated with insulating varnish. In this case, drying of these elements should be carried out at a temperature of about 110 degrees for 10 hours. Not every service station will provide such conditions for repairs, so it will not be possible to repair the anchor at home.
Steel rings and their advantages
Replacing slip rings on a VAZ 2110 generator
There is no point in installing copper rings, as they wear out very quickly. Therefore, it is better to opt for steel rings, which have a number of advantages:
- They hardly wear out, so the brushes remain in almost perfect condition for a long time.
- They are easy to install.
Note: by the way, for more reliable fixation, they are first lubricated with a flux solution, and then washed with soda.
What causes rings to wear off?
Alternator rings for VAZ 2110
The following generator parts can cause slip ring failure.
Stator
- On its inside there should be no traces from the rotor that would appear during its operation. Otherwise you will have to change it.
Note: You also need to check the bearings, as this problem often appears when they are broken. Sometimes even the generator cover can also get broken. This problem urgently needs to be fixed by replacing the damaged part with a new one.
Of course, if you are sure that the stator is completely intact, then you should not carry out such manipulation. But if there is even the slightest suspicion that it is malfunctioning, then it is better to check it. A faulty stator can lead to rotor failure again.
Bearing
- See if the generator bearing located on the rotor rotates correctly. It should rotate freely on the slip ring side without jamming.
- If it dangles too much or, on the contrary, is very tightly clamped, then it needs to be compressed.
Lid
- The generator cover on the slip ring side may have damage, cracks or other defects.
- In this case, it needs to be replaced, otherwise it will have a bad effect on the contact rings, leading to their abrasion.