SEE THE ROOT
It is easier to replace headlight bulbs on the right. The battery prevents access to the left headlight; it is often better to remove it. Especially if your hand is calloused and your fingers are not like a pianist’s. And yet, in most cases, it is possible to fasten the spring latch of the H4 lamp, although not the first time. Access to the turn signal is more or less acceptable.
To replace the fog lamps, you will have to lie on the ground and unscrew the corner screen fasteners under the bumper. The work is dirty and terribly unpleasant, especially in the slush. The question is, what prevented you from providing technological windows in the mudguards, as is done on many French cars?
DEVICE AND PRINCIPLE OF OPERATION
An engine, similar to a living organism, is able to “live” for a long time only on the condition that it consumes pure raw materials for its functioning. In terms of the fuel system, the fuel filter is responsible for organizing the purity of the gasoline entering the car engine. This part, simple in structure, performs functions of great importance for any transport. In particular, this Lada Largus unit allows:
- prevent large fractions from entering the injector and cylinders along with gasoline;
- filter out a considerable amount of small fractions also present in the fuel;
- extend the service life of both the engine and the entire fuel system.
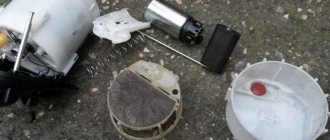
REMOVAL AND DISASSEMBLY OF PETROL PUMP – LADA LARGUS BLOG
We remove the fuel module if any of its elements fail. We show replacement of the fuel pump, strainer or fuel level sensor for the possibility of repairs in road conditions and in the absence of original spare parts.
In the car interior, we raise the seat cushion of the second row.
We lift the plastic cover and remove the carpet from the hatch.
We take out the fuel tank flap and move it to the side.
Use a slotted screwdriver to press out the lock...
...and disconnect the wiring block from the fuel module cover. Next, you should relieve the pressure in the power system. To do this, we start the engine. After working for a few seconds, it will stop due to lack of fuel. The pressure in the system will be relieved. Turn off the ignition.
Squeeze the clamps of the fuel pipe tip and remove it from the fitting of the fuel module cover. The fuel module is fixed in the tank with a clamping ring screwed onto the neck of the tank. The easiest way to unscrew the module's clamping ring is to use a mounting spudger.
Resting against the depressions of the hole made in the body floor panel, use a mounting spatula to push the ring by its protrusions counterclockwise. The procedure may have to be repeated several times, resting on different protrusions around the circumference of the ring. And when assembling, when wrapping the ring, this must be done.
Remove the pressure ring. With the tank removed, a simple device bent from a metal rod in the form of a bracket will help you unscrew the clamping ring.
Device for unscrewing the clamping ring
We remove the fuel module from the tank by removing the float of the fuel level indicator sensor from the hole in the fuel tank.
We take out the rubber o-ring of the fuel module. We drain the remaining fuel from the fuel module into a previously prepared container. Cover the hole in the fuel tank with thick paper or polyethylene. Further disassembly of the fuel module is not provided. The car's developers expect to replace the entire module if any of its components fail. However, in extreme circumstances, you can clean the fuel pump inlet strainer, replace the fuel gauge sensor or replace the fuel pump.
Disconnect the fuel gauge sensor wire block from the connector on the inside of the fuel module cover.
Release the fuel level indicator sensor lock.
Remove the fuel level indicator sensor.
Use a screwdriver to release the three cup latches...
...and remove the glass from the filter housing.
The connection of the fuel pressure regulator channel is sealed with a rubber ring.
The cup contains a fuel pressure regulator 1 and an anti-drainage valve 2.
By pulling, remove the strainer from the fuel pump. Now it can be washed or replaced.
Using a screwdriver, press out the lock of the fuel module cover...
New Lada: Model range LADA Largus – Saturn-R: LADA dealer in Perm (Perm region)
...and remove the lid.
Remove the spring from the guide.
Disconnect the fuel pump wire block from the connector on the inside of the fuel module cover.
We remove the fuel pump from its socket in the fuel filter housing. Heating the plastic corrugated tube on the pump nozzle with a stream of boiling water from a kettle...
...remove the tube from the pump connection. We assemble and install the fuel module in the reverse order.
Before installing the module, check that the sealing ring is positioned correctly on the flange of the tank neck. Carefully, so as not to move the o-ring, install the module into the tank.
When installing, we orient the fuel module so that arrow 2 on its cover is located opposite arrow 1 on the tank. Pressing down on the module cover, screw the pressure ring onto the tank neck until the module cover is pressed tightly against the neck. Then we turn the clamping ring to the position at which arrow 3 on the ring is located opposite arrows 1 and 2. We put the tip of the fuel tube onto the fitting of the module cover until the spring clamps of the tip click. After installing the module, turn on the ignition and check the tightness of the connections. When installing the fuel tank flap cover, orient it like this...
...so that arrow 1 on the cover is located opposite groove 2 made in the body floor panel.
Replacing the fuel pump assembly for Lada Largus
When the pressure in the Largus fuel system decreases, you should first of all pay attention to the performance of the fuel pump, since it is this part that is responsible for the normal operation of the system. If it turns out that the pressure is weak, then the reasons may be as follows:
- Reduced pump efficiency
- The mesh (strainer) of the fuel pump is clogged
If the problem is in the grid, then we change it to a new one, which you can read about in the following reviews on Lada Largus repairs. In the meantime, let's look at the procedure for replacing the assembled fuel pump module on Largus. And for this we may need the following tool:
- flat blade screwdriver
- two short screwdrivers (phillips preferred)
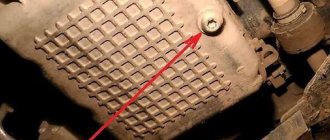
So, the fuel pump on Lada Largus cars is located in the gas tank, and to get to it, you need to remove the back seat and pry off the plastic plug, as is clearly demonstrated in the photo below:
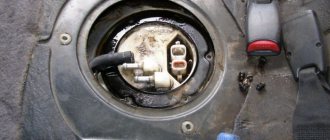
After this, disconnect the power plug from the module.
Now, using two screwdrivers, press the fitting clamps on both sides and disconnect the fuel pipes from the pump.
Now all that remains is to unscrew the plastic ring that secures the fuel pump in the tank. This can be done either using a screwdriver, carefully twisting the ring counterclockwise, or using long-nose pliers to try to unscrew it.
Now you can easily remove the fuel pump module assembly, carefully removing it from the tank so as not to damage the fuel level sensor.
After this, you can replace the pump with a new one. You can change both the module assembly and the motor itself separately. The price of a new one can reach up to 8,000 for the original, and sometimes even more. Although, a non-original one can be bought from 4,000 rubles.
When to change
You will not be able to know if the fuel filter is dirty unless you regularly check its integrity and condition. Due to the specific design, the fuel cell on Largus is endowed with a “heroic resource”. As AvtoVAZ says, fuel filters together with the fuel pump are designed for the entire period of operation of the car, that is, about 160 thousand kilometers. But is this true? Based on practical experience, no.
Considering the average statistics, we can highlight the following:
- a mesh filter in the nozzle of the injection system, which passes fuel through itself after primary and fine cleaning, can last no more than 30-45 thousand kilometers;
- The main fuel filter has a service life of 80-120 thousand kilometers.
Experienced car repairmen advise every Largus owner to dismantle the entire fuel pump module and check the level of filter contamination every 20 thousand kilometers. The check is also carried out if:
- slight loss of traction;
- problems with the fuel system;
- reduction or increase in fuel consumption.
The main difference between the fact that it is the fuel filter element that is dirty is the gradual appearance of the symptoms described above.
Replacing the fuel pump Lada Largus (VAZ Largus)
If engine power decreases, increased noise occurs, or noise is periodically heard when the fuel pump is operating, then most likely the fuel pump has failed. Pre-check the pressure in the fuel supply system. If the pressure in the system is less than 3 kgf/cmg, this may be caused by a malfunction of the electric pump, fuel pressure regulator, or clogged filter elements. In some cases, the fuel pump module can be repaired, but to do this it must also be removed from the vehicle. If all indirect signs indicate that the pump is faulty, then it must be removed and replaced. You will find information on how to do this in this article.
Gearbox malfunctions and methods for eliminating them
Any mechanism has a tensile strength, especially if it operates under variable loads. It is necessary to take into account the driver's driving style, which significantly affects the durability of the part. Summarizing the accumulated experience and analysis of breakdowns that occur during the operation of the car, gearbox faults can be grouped into several main groups: noise in the gearbox, difficulty engaging the gear and spontaneous shutdown of the transmission.
Noise and difficulty shifting gears
The main causes of noise in the gearbox include:
- low oil level;
- water entering the system;
- wear of bearings or gears.
To fix the problem, you should add or replace the oil in the gearbox, replace the bearings and gears with new ones.
Difficulty shifting gears can be caused by the following factors:
- faulty gearbox control rod;
- loosening of fastenings;
- deformation of control drive parts;
- wear of synchronization rings;
- incomplete disengagement of the clutch.
Spontaneous transmission shutdown
The reasons for spontaneous shutdown of the gearbox are usually:
- gear wear;
- damage occurs on the rubber supports of the box;
- wear of the synchronizer rings.
These faults can only be corrected by replacing them with new parts. Do-it-yourself transmission repair requires high qualifications and a set of special tools. Only a competent specialist can remove and disassemble this part correctly.
If the gearbox malfunctions, it is better to contact a service station, where they will not only repair the unit, but will also give you a guarantee that you can use in the event of a subsequent gearbox breakdown.
Problems when paying with bank cards
Sometimes difficulties may arise when paying with Visa/MasterCard bank cards. The most common of them:
- There is a restriction on the card for paying for online purchases
- A plastic card is not intended for making payments online.
- The plastic card is not activated for making payments online.
- There are not enough funds on the plastic card.
In order to solve these problems, you need to call or write to the technical support of the bank where you are served. Bank specialists will help you resolve them and make payments.
That's basically it. The entire process of paying for a book in PDF format on car repair on our website takes 1-2 minutes.
If you still have any questions, you can ask them using the feedback form, or write us an email at
Connection and installation of car alarm pandora dx 50 on lada largus
The Lada Largus does not have a can tire (there is only a lin tire). Therefore, all connections are made analogue.
You can connect the ground to the standard place behind the instrument panel.
masses
Connect the parking brake switch to the black connector of the instrument panel.
Handbrake
You may have to insert a diode into the break in the handbrake wire and make the connection according to the figure below.
Connect the tachometer to the black connector of the instrument panel.
tachometer
Do not forget to select the method of monitoring engine operation in the Alarm Studio program - an analog tachometer. Otherwise, if you leave the default value - digital tachometer, then there will be no auto start, since the alarm will not be able to determine whether the engine is running or not.
Setting up the Alarm Studio program
It is also possible to connect to the generator wire for engine control. In this case, the car alarm should be connected to the pin 13 wire of the black connector on the instrument panel - orange wire. In the Alarm Studio settings, you should allow control of engine operation via the generator and assign one of the additional alarm inputs as a “charging lamp”.
Setting up the Alarm Studio program
In the harness of the gray connector of the instrument panel, connect the limit switches of all doors
Door switch
You may have to use decoupling diodes to connect to the limit switch. In this case, we use the following connection diagram.
You can also connect to the door switches on the BCM, located to the left of the steering column.
Signals from the door and trunk switches are located on the wires in pins 30 and 40 of the green insert of the black 40-pin BCM connector.
Door and trunk limit switches
It may also be that the car is missing limit switches for all passenger doors (or only the rear doors). Then it is necessary to install additional sensors. It is possible to install both an original limit switch and a non-original one.
Opening and closing the central lock is carried out by connecting to a button on the central panel. Negative impulse control.
Locking the lock unlocking the lock
You can also connect to the central locking control wires in pins 17 (closing) and 8 (opening) in the brown insert of the black 40-pin BCM connector.
The warning light is connected to the hazard warning button on the center panel, brown wire. Management of potential negative potential.
Emergency crew
Steering control can be done by connecting to the wires on the BCM.
Turns
It is convenient to connect to the power wires for autostart behind the dashboard.
12ignitionassstarter
Electric fuel pump circuits can be used as a blocking mechanism. The fuel pump can be blocked at the fuel pump relay under the hood (white wire) or in the driver's threshold.
Gasoline pump
After all the connections have been made, it is necessary to record the idle speed in the Pandora DX-50 memory. To do this, enter the programming mode at level 1-3 and perform the steps described below.
Operating principle
In the Lada Largus model, the design of the filter component has an unusual solution, so replacing the fuel filter can cause a number of minor difficulties. The unit consists of two components that ensure cleaning of the fuel entering the system. They are located in the pump itself and represent a single module that can be replaced entirely. The manufacturer has included an enviable resource in the filter component, which, if the owner complies with regulatory requirements, can reach 160 thousand km.
If there is a need to replace the filter, you will need to dismantle the fuel pump, and this procedure is quite labor-intensive and painstaking. In such a situation, a reasonable action would be to replace the fuel filter, that is, the entire module, consisting of two components. Frequent disassembly procedures of this unit, for example, to replace one of the components, are extremely undesirable for the fuel pump and its associated infrastructure.
Lada Largus fuel pump does not work - the main reasons
1. The first thing to check is the fuel pump itself.
To do this, check whether voltage is coming to the fuel pump block. This can be done simply using a regular lamp or multimeter. If the light comes on, then voltage is going to the block, then you will have to disassemble the fuel station and look at the pump.
Fuel pump fuse Lada Largus
This is another common reason why the Lada Largus fuel pump does not work. The Largas fuel pump fuse is located in the mounting block under the hood.
We open the mounting block and find fuse F3 at 25A. This is exactly what it should be like from the factory. We check the fuse, if it is burned out, replace it with a new one.
Fuel pump relay Lada Largus
A faulty fuel pump relay on the Lada Largus is also a common failure in domestic station wagons.
You can also find the Lada Largus fuel pump relay in the mounting block under the hood marked K4 in the diagram.
Connector Lada Largus fuel pump
Another common breakdown is the Lada Largus fuel pump connector. This is due to poor contacts, which over time can oxidize, heat up and melt the pad. If measures are not taken, the contact will disappear completely, completely cutting off power to the fuel pump. The way out of the situation is to replace the block, which has the article number:
4631148764668 Connector for fuel pump module “LADA Largus”
And if the contacts of the fuel pump module are burnt, you will also have to buy the upper part of the pumping station:
Russia BAPFP11 Fuel pump upper part of housing
Fuel pump Lada Largus 16 valves article number and 8 valves
The Lada Largus fuel pump for a 16-valve engine comes under the article number 172024388R.
8-valve engines and 16 valves have the same fuel pump and are no different. It would be more correct to say that this is not the fuel pump itself, but the fuel station assembly. The manufacturer intends to completely replace the entire fuel station without any repairs.
However, this does not mean that a new electric element of the fuel pump cannot be purchased and replaced. Here are some items for ordering the Lada Largus fuel pump itself:
BM FP0007 Kraft KT800080 Gallant GL.FP.1.2
Replacing the fuel filter
- We fold back the stern seat cushion and open the hatch cover.
- Turn off the pump power fuse.
- We start the LADA Largus engine and give it the opportunity to exhaust the fuel present under pressure in the circuit. The unit will stall.
- Turn off the power by removing the terminals from the battery.
- Disconnect the fuel lines leading to the pump module.
- Unscrews the locking disc.
- Having freed the pump assembly inside the mounting socket, we remove it and replace it with a new analogue. If you only need to replace the mesh filter, perform this action.
- After assembling the structure using the reverse algorithm, we must check the tightness of the system.
Disassembling the module: replacing (cleaning) the fuel filter, fuel pump and fuel level sensor
The fine fuel filter (housing), the coarse filter (mesh), the fuel pump, and the fuel level sensor are located in the fuel module complex, which is located in the fuel tank.
Note: According to the regulations, replacement of individual parts of the fuel module is not provided, and in the event of failure of any of its components, the module is replaced as an assembly. However, in an emergency, to replace the fuel pump, clean the fuel filter, or replace the fuel level sensor, the module can be disassembled.
To disassemble the fuel module and replace parts, remove it from the vehicle. (see here)
Disconnect the fuel level sensor wire block from the cover
Remove the fuel level sensor by sliding it in the direction of the arrow
Fuel level sensor 1 – resistor; 2 – slider; 3 – sensor wire block; 4 – float; 5 – float lever
Using a screwdriver, press out the three plastic clips...
...and remove the glass from the fuel module body. Here is a fine fuel filter (housing) and a coarse mesh filter
Remove the rubber o-ring of the fuel pressure regulator.
The glass contains a fuel pressure regulator 1 and an anti-drainage valve 2 .
Having overcome the force of the clamps, remove the fuel strainer.
Wash, blow out, or replace the strainer
Note: to replace the fine filter, some car enthusiasts used a non-original filter with art. LF249M (see photos and dimensions)
Using a screwdriver, press the cover latch...
. answer the lid to the side
remove the spacer spring
Disconnect the fuel pump block from the connector on the inside of the cover.
Remove the fuel pump from the fuel filter housing.
Note: Fuel hoses are secured to the fittings of the pump and filter housing by heat shrink.
After heating the plastic corrugated tube on the pump nozzle, remove the tube from the pump nozzle. Use a stream of boiling water from a kettle or a hair dryer for this.
Attention : before using a hair dryer, thoroughly blow and dry the parts to avoid fuel ignition!
Note: After removing the hoses from the fittings, it may be necessary to replace the hoses to ensure a good seal. Some car enthusiasts used corrugated fuel pump hoses for VAZ.
To install and secure the hose on the fuel pump after removal, some car enthusiasts use regular clamps (but not the worm type)
11 mm. The clamp must be secured so as to ensure a tight connection and at the same time not crush the plastic hose.
We assemble and install the module in the reverse order.
Some misconceptions about the fuel pump (from Behind the Wheel magazine)
The slightest loss of pump seal will immediately lead to a fire, since its brushes constantly spark.
The gas pump is not a sealed structure, and its internal parts, such as the anchor or brushes, are constantly bathed in gasoline. But combustion is impossible: the concentration of fuel vapors is much higher than the stoichiometric one, and therefore it is impossible to ignite them.
Cars with fuel injection need to be refueled more often, but you can’t drive “with a light bulb” at all.
Many people believe that if the tank is not full, the pump will definitely start sipping air instead of gasoline and quickly die. The pump is placed in a plastic cup that prevents fuel from draining during acceleration and roll. The glass is pressed by a spring to the lowest point of the fuel tank. In addition, internal partitions in the fuel tank prevent the ebb and flow of gasoline. What if the fuel runs out? And there will be no troubles: as soon as the pump stops creating pressure, the engine will stall, and the controller will turn off the power in a couple of seconds.
A motor running “dry” instantly fails.
When the internal combustion engine stalls, power is removed from the electric fuel pump very quickly. Therefore, he does not have the physical ability to thresh for a long time in a “dry” mode. In addition, we ran the pumps “dry” for about ten minutes - and nothing: cold body, low current consumption, even noise. Therefore, the pump will not die from lack of gasoline.
Gasoline plays the role of a lubricant in the electric gasoline pump.
The lubricity of gasoline is negligible. It plays the role of a coolant rather than a lubricant.
Excessive pressure in the fuel line is harmful, so when replacing, it is strictly forbidden to install a more powerful fuel pump.
The bypass valve (pressure regulator) in the fuel module monitors the amount of pressure generated by the fuel pump, sending excess fuel back to the gas tank. Therefore, a more efficient pump will not cause any harm. It’s another matter if you installed a weaker engine than standard: when operating at maximum modes, the engine may not have enough fuel and it will begin to “shut up”.
On cars converted to gas, fuel pumps especially often break down.
There are horror stories on online forums: the gas pump on cars with gas equipment is always running, pushing gasoline in a small circle, and therefore fails more often. But this is a normal mode, no different from a working one. Trouble could arise only if there was a complete lack of gasoline in the tank, but this already resembles sabotage. However, the pumps are also not afraid of short-term dry operation.
Parameters of some gasoline pumps installed on Lada cars (operating modes) (tests of the journal Behind the Wheel)
REPLACEMENT OF PART
Replacing the fuel filter on a Lada Largus is not so difficult if you know where it is located and how to carry out the repair correctly. It is worth noting that even an amateur car repairman can carry out the replacement procedure, since the whole process is extremely simple. The event does not require any special preparation, except for taking the following measures:
- Place the car in a reasonably spacious and level place, securing it securely (handbrake, wheel stands, etc.);
- prepare a basic car repair kit: a set of keys, a pair of screwdrivers, rags and gloves;
- purchase a fuel pump assembly or a fuel pump “mesh” separately in advance (for example, a similar part from Renault Logan will do).
The replacement procedure itself takes no more than half an hour, of course, if you are not going to completely disassemble the fuel pump and try to clean the filter using “old-fashioned” methods or replace it with a homemade one. Moreover, it is undesirable to do this only because by incorrectly cleaning or assembling the fuel pump, you can provoke more serious damage to the fuel system of your Lada Largus. Is it worth it? Most likely no.
So, the algorithm for replacing the fuel filter is as follows:
- Remove the rear sofa cushion and lift the plastic hatch underneath. For ease of work, you may need to move the carpeting to the side.
As you can see, replacing the Lada Largus fuel filter is quite simple if you know its design features and location in the car. We hope the material presented above was useful to you. Good luck on the roads and in repairs!
Removing the fuel module
We will perform all the steps as if we were trying to replace a fuel pump:
- We tilt the sofa cushion and remove it. We lift the plastic hatch and move the carpet forward. Remove the round cover from the hole;
Getting rid of unnecessary details
Understanding electricity
First - the pipe, then - the clamp
By removing the module assembly, you can replace the mesh filter. Be careful not to lose the O-ring installed between the module and the tank.
Replacing the filter mesh
On the Lada Largus, the coarse fuel filter is a removable mesh in front of the pump. Replacing it will be simple:
- We snap off the glass latches (3 pcs.);
Let's start disassembling the module
The very first element in the fuel tract
Installation of all modules and components is carried out in the reverse order. If the mesh is not badly damaged, it can only be washed and dried. Car chemicals based on xylene or ethoxylated alcohols will help.
We disassemble the module in order to replace the filter
The main thing to remember: first disconnect the brown connector. Then remove the level sensor by unfastening the clamp with a screwdriver.
Disassembling the pump module
Similar clamps hold the top cover. Having removed it, disconnect the white connector (see photo). How to remove the lower part of the module is discussed in the previous chapter. But you will have to tinker with the nozzles: when putting them on or removing them, the fittings must be held above the steam.
The most difficult operation
No one was able to achieve results right away.
Instead of standard pipes, black, shiny and beautiful, you can buy corrugated hoses from a VAZ-2110 car. This replacement is proven.
>
What is the best way to deal with the flask?
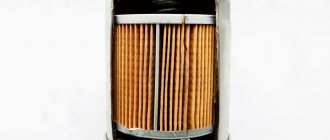
On the Lada Largus, the fuel filter is a flask containing paper. This flask is not sold separately and cannot be replaced. But it can be cut to remove the filter element completely.
Fuel filter housing
At the last step, both halves are glued together, and drying is done under pressure (on ties).
For gluing, use any petrol-resistant sealant.
So, we have an “empty” filter housing that is being installed in place. After assembling the module, it can be used, but there is a condition: after 1000-2000 km the module will have to be replaced. Follow our advice if the engine has run for 150-160 thousand and you don’t feel sorry for it anymore.
What not to do!
It would seem that you can drive for a long time with a cleaned bulb, you just need to insert a new filter into the fuel line. This is usually done by taking a filter from Renault Logan (phase 1).
Fitting the filter into the line under the hood
It turns out this:
- If the flask is empty and an “external” filter is added, the engine starts and stalls after 2-3 seconds;
- If the flask has not been cleaned, adding a new filter is useless: the load on the pump increases, and that’s all.
Let the reader draw his own conclusions.
Alternative option
Below is a flask that looks almost the same as the original Lada Largus fuel filter.
JS Asakashi brand components
This flask can be installed instead of the standard one. You just need to shorten the fastening elements (tubes) by about 20 mm. We were talking about filters for Nissan cars:
- JS ASAKASHI FS22001
- JAPANPARTS FC-130S
- PATRON PF3924
161Akb-Pomosh › Blog › Replacing the fuel pump Largus Van
Initially, the car did not keep idle speed when “cold”; the only thing that helped was to keep the engine at low speed until it warmed up. Since the Largus was being painted, this did not bother me much, until it stopped starting altogether - the starter turned, but to no avail. In this case, I wouldn’t have to rack my brains and go for diagnostics, but I couldn’t drive under my own power, and I didn’t really want to drag it on a cable. As a result, after studying the mat. parts on the Internet)) was done: 1. All relays and fuses have been checked.2. The throttle was cleaned and the small o-ring was replaced (it already had a square shape and microcracks. I didn’t change the big one, it looked in good condition).3. Cleaned the DPKV, measured the resistance - 243. It seems to be normal for the K4M engine. It was very difficult to get it; personally, it took me an hour of time and a little swearing)).4
I paid attention to the immobilizer operation indicator - it stopped blinking if you inserted the key into the ignition. An experienced technician would say. What about the fuel pump? Can I check it? But I didn’t want to believe that at 104,000 km it died - I didn’t want to, because before that on other cars of different brands I ran 150 t.km. In short, after listening to whether the pump worked before starting the engine, I decided to remove the fuel module from the gas tank
I won’t post photos of the whole process, there’s a lot on the internet, but I couldn’t find how to get it out of the van. Maybe it will be useful to someone.1. Remove the negative terminal from the battery.2. Remove the rubber carpet in the cargo compartment, if there is one.3. The floor of the cargo compartment is divided into three parts; unscrew the part that is closer to the right cargo door. You will need a Torx key, I don’t remember how much, take a set because you will need 2 sizes.4. Part of the floor goes under the plastic bulkhead - so as not to unscrew it, I simply lifted it up and secured it to the ceiling with a rope.
5. I had a LOT of dust in the well of the fuel module (3 centimeters), so it is advisable to vacuum it or blow it with air so that it does not get into the tank. I took a photo of the fuel pipe that fits onto the Module; the inside is terribly dirty.
6. Then everything is standard - I took out the module, pulled out the fuel pump (I threw plus and minus on the battery and fuel pump terminals - it doesn’t work, so it needs to be changed). I bought a pump from a VAZ 2110 in a nearby store, along with a cleaning mesh - 550 rubles. I read that there was still a need to change some kind of module for fine cleaning - I didn’t bother, in the future there are plans to convert the car to gas.
What is the purpose of the filter?
The uninterrupted operation of 8-valve and 16-valve motors is ensured provided that the fuel supply system operates correctly. Thus, longer preservation of the components of the cylinder-piston group is achieved. The filter is designed to be “responsible” for ensuring the cleanliness of the fuel entering the engine chambers.
This implies the presence of the following functions among the tasks of this element:
- prevent the penetration of solid particles of various origins into the engine along with fuel, which can cause rapid wear, not only damage to the walls of the liners, but also cause irreparable damage to the engine;
- take care of maximizing the service life of the unit.
The need to replace the air filter on Largus
It has long been undeniable that the air filter in the air duct plays a significant role, because along with its fuel “colleague” it ensures the purity of the mixture sent to the combustion chambers. The power characteristics of the LADA Largus engine directly depend on this factor. Operating a car involves no alternative and gradual clogging of the component we are considering. You should not wait until the filtering function completely stops, because the operation of the motor will be impossible, and the harm to it cannot be overestimated. A Lada Largus with a dirty air filter will be prone to increased fuel consumption and an unjustified reduction in power. The manufacturer deliberately placed the air filter in the most convenient location. So that the owner is not lazy to look into it and assess the degree of clogging. If the fact of contamination is obvious, then resort to replacement as soon as possible. This work will be feasible even for an owner who has just embarked on the path of a car enthusiast.