Rarely the owner of a car with a diesel engine has not encountered a situation where the fuel froze in winter.
To combat this popular problem, different methods are used, but one of the most effective is the use of heating the fuel filter.
The heating system is used in diesel vehicles. It is required to heat the fuel filter to a temperature that prevents the formation of paraffins.
To protect the filter from cooling and accelerate heating, a thermal insulation layer is used. The device makes it possible to start the engine even at high negative temperatures.
It is worth using heating when the temperature drops below +3C. It usually takes 5-10 minutes for the filter to warm up. The heater can be equipped with a timer to adjust the time.
System advantages:
- Possibility of installation in any car running on diesel,
- simplicity of design, drivers know firsthand how to make a fuel filter heating with their own hands,
- economical energy consumption,
- savings on winter diesel,
- engine protection, since without heating its service life is significantly reduced.
Most often, heaters are installed on cars of the following brands:
- Russian GAZ, ZIL, PAZ, ZAZ.
- foreign BMW, Audi, Fiat, Citroen, Mazda, Skoda, Mercedes, Peugeot, Opel.
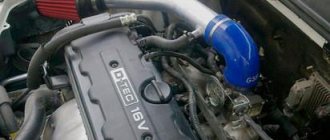
Diesel engine fuel heater
Let's say right away that many modern cars with diesel units have heating systems already installed from the factory, and their happy owners are unlikely to have to worry about their four-wheeled friend not starting in the cold or stalling on the road.
However, manufacturers may underestimate the severity of our winters, or the car may not be equipped with anything like that at all, since it was imported from countries with a warm climate.
In this case, you need to think about installing special heaters. And here a logical question arises: on which of the fuel system components is it best to mount these devices?
Everything is like in the well-known proverb - where it is thin, it breaks. The most vulnerable from the point of view of freezing and the influence of paraffin crystals are: fine filter, separator filter, fuel line and tank.
Today we will briefly look at the diesel fuel heater and several types of such heaters, namely:
- flow-through;
- bandage;
- tape;
- heated nozzle.
Let's start in order.
Flow-through fuel heater for diesel engines
The flow-through type is used to heat fuel lines and is usually installed in a section of the fuel line in front of the fine filter.
It is worth noting that this type is an auxiliary heater, since it is most useful only while the car is moving.
In-line diesel fuel heater
Flow-through heaters can be either electric or use hot liquid from the engine cooling system.
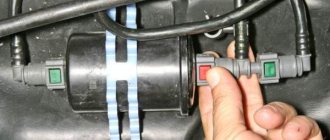
Bandage fuel heater for diesel engines
To eradicate the problem of fuel freezing in the bud, it is necessary to use several types of heaters. One of the most vulnerable elements of diesel engines is the fine filter.
It is he who has a hard time when paraffin crystals begin to form in the frozen diesel fuel. To solve this issue, it is recommended to insulate it first, and for this there are so-called bandage heaters.
They are pads with electric thermoelements that are mounted on top of the filter and secured with ties.
Diesel Fuel Heater
Tape heater
Another useful type of heaters are tape heaters. These are flexible elements that perform their role well in various sections of the fuel line. They can work both while driving and before starting the engine.
Diesel Fuel Belt Heater
Heated nozzle
Well, the last type that we will consider today. Heated nozzles are special devices with a heating element that are installed directly on the fuel intakes. Thanks to them, in severe frosts there is no fear of diesel fuel thickening at the point where fuel is taken from the tank.
Heated fuel intake nozzles
It must be said that there are complex systems that include most of the above types of heaters. They can be controlled either manually or automatically based on temperature sensors overboard, in the engine compartment and along the fuel route.
So, dear readers, we have found out that you should not be afraid of buying a car with a diesel engine, even if you live in a region with a harsh climate.
Modern technologies make it possible to almost completely solve problems with starting and operating diesel engines in cold weather.
By the way, don’t forget to subscribe to the blog to receive new articles and give links to it to your friends.
And I, in turn, will try to publish only the most interesting materials for you.
We heat the fuel from the engine cooling system
A composition heated in a tank or separator can easily lose fluidity when passing along the entire highway, and even at high vehicle speeds. In this case, the car enthusiast can choose and make with his own hands any layout of the diesel fuel heater using simple technologies:
- basic insulation of the fuel line with building materials;
- installation of an electric flexible heater by winding or applying it to the surface of the unit;
- installation of a heat exchanger in front of the fine filter element.
The last method is to make a part that has two independent contours. The simplest example of such a device consists of two tubes of different diameters. The thinner tube is welded and centered inside the larger one. The outer circuit consists of pipes for passing diesel fuel. The small circle of the cooling system is connected to the indoor unit. Variations of this design are possible, where the circuits intended for diesel fuel and hot antifreeze can be swapped. More complex specimens contain an internal block made of a spiral type. High reliability of diesel starting in winter conditions can be ensured only with comprehensive modernization. Its essence lies in the use of several of the methods described above, which heat the components of the fuel system.
An effective way to make starting easier
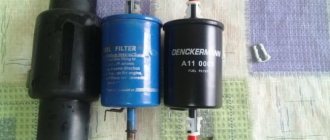
The most effective way to facilitate engine starting is to heat the fuel filter, in the housing of which paraffin deposits accumulate. Crystallized paraffin clogs the microscopic holes of the filter element, which prevents the normal flow of fuel through it. The supply of diesel oil is partially or completely stopped, which leads to various problems. In this case, as already mentioned, the engine does not start well, there is a significant decrease in power, and interruptions in normal operating mode.
Why is it necessary to heat up the diesel fuel filter?
As already mentioned, in the cold season, owners of cars with diesel engines face a number of problems:
- cold engine start;
- significant reduction in diesel engine power;
- the occurrence of failures in the operation of the diesel engine.
Paraffin, which is part of diesel fuel and crystallizes when the temperature drops, is to blame for these negative phenomena. Paraffin crystals are larger in size than the pores in the fuel filter elements, so the filter's throughput is completely or partially lost. As a result, the supply of diesel fuel stops or is carried out in incomplete quantities, which leads to the occurrence of the listed problems.
From artisanal methods to modern ones
Relatively recently, our motorists used homemade methods to combat paraffin, that is, heating with blowtorches or torches, and also mixed fuel with gasoline and kerosene. Today, these methods are gradually being forgotten due to their inconvenience and a number of negative consequences.
What to choose: depressant additives or electric heaters?
Additives
The most relevant methods of combating paraffin today are the use of special additives for diesel fuel (depressants), as well as devices that provide heating on an electric or antifreeze basis. As a result of the use of depressant additives, the formation of large paraffin crystals is prevented, but the cost of diesel fuel increases. In addition, additives are not always effective. In particular, they should be used only until the cold snap occurs: if they are added to the fuel after the temperature has dropped to -5°, crystallization of paraffin already occurs, and depressants have no effect.
Heaters
The most effective way to combat crystallization in any weather conditions is combined and electric systems that heat the fuel and melt the existing paraffin crystals. Such a heater is usually installed on a critical component of the fuel system, that is, on the coarse and fine fuel filters. In this case, an electric heater located on the coarse filter is responsible for heating before starting, required in order to accumulate the amount of diesel fuel necessary to warm up and start the diesel engine. Heating during operation is carried out by a heated return, which can function together with heated antifreeze moving in the fuel intake.
The electric heater is switched on by the driver directly from the passenger compartment. The power of such a filter heating device can vary in accordance with diesel fuel consumption within the following limits:
- 15-150 W if the rated supply voltage is 12 V;
- 25-275 W with a supply voltage of 24 V.
Such heating ensures that the fuel filter is heated to the required temperature and the crystals melt literally within three to five minutes, even if the ambient temperature is -40°. If a combined heater is used, after the return flow and coolant in the fuel intakes are heated to 40-50°, the electrical heating of the fuel filter can be turned off.
Installing a fuel filter heating device increases the vehicle's maximum mileage, and equipment costs are offset by a number of factors:
- use of expensive additives;
- reduction of diesel wear during cold starts;
- saving battery energy resources, etc.
Body preparation. Film application technology.
If you do not know how to prepare a car for painting, we recommend that you first watch a video that details the technological process of the upcoming work and it will not be difficult for you to perform a similar operation with your car. By removing all defects from the damaged surfaces of body parts, you will be able to distribute the material more accurately and evenly, otherwise the vinyl will swell or there will be folds.
Tuning VAZ 2110 - how to do it correctly.
You will learn how to modify the brake system of the seven in our article.
You will learn how to properly polish your car in the material at https://avtopolza.ru/kuzov/polirovka-avtomobilya-rukovodstvo-dlya-nachinayushhix/ link.
There are two methods of gluing vinyl - “wet” and “dry”. Let us dwell in detail on the “wet” method.
Wet film application technology
Having prepared the body for vinyl wrapping by eliminating surface defects, degrease the area where the pattern will be applied with a weak solution of white spirit. Pay great attention to determining the future location of the vinyl. Please note: Moldings and uneven vehicle surfaces can be a hassle when applying vinyl.
When applying the sticker to the car body, do not remove it from the backing or tear off the mounting film. Once the location is chosen, mark it with masking tape. Carefully peel the white paper off the vinyl. Carry out this operation with an assistant so that the sticker itself does not come off along with the base. Spray the area intended for vinyl with soapy water. Soapy water will allow you to adjust the position of the sticker on the surface and make it possible to get rid of air bubbles between the material and the paint surface of the car. After attaching the vinyl decal to the car, press it evenly against the body using a rubber squeegee. When driving air from the middle to the edges, do not try to glue the entire pattern as quickly as possible. Having secured the central part of the material to the surface, smoothly proceed to gluing the edges. Using an industrial or regular hair dryer will allow you to apply the film to the body faster and more reliably. After the vinyl has dried (15-20 minutes), remove the mounting film from it.
Congratulations! Now there is a new image on the surface of your car!
Do-it-yourself solutions for a flow-through heater for standard diesel fuel
Methods for implementing reliable fuel supply to an engine using heating have been known for a long time. The main fuel supply units that need to maintain temperature conditions are:
- Coarse filter or separator.
- Fine filter.
- Pipeline main.
- Fuel intake.
In auto stores you can find a wide range of already upgraded components or additional elements to standard units. The only obstacle to their acquisition may be the cost, which is quite high. Experienced car enthusiasts claim that they carry out some work on organizing fuel heating themselves. At the same time, the service life of such devices is in no way inferior to factory samples, and in some cases they can even surpass them in terms of efficiency. According to their functional purpose, the following types of heating elements are distinguished:
- bandage – for fine filters;
- flow-through – installed in front of the filter in the fuel line section;
- flexible tape - heats filters and lines;
- rod - it is possible to make a similar diesel fuel heater with your own hands for subsequent installation in a separator or fuel intake;
- heated nozzles - used to heat separators and fuel traps.
It is also possible to independently replace the standard fuel intake units in the fuel tank with heated products. This, of course, will cost more than homemade devices, but it means saving at least 1500-2000 rubles for the work.
How to make heating of diesel fuel in a car tank with your own hands?
The mechanism that ensures the reliable supply of flammable liquid from the vehicle’s standard tank must be heated. You need to understand that in severe frosts, diesel fuel begins to lose fluidity already at the inlet of the fuel intake. Therefore, before starting the engine, it is necessary to preheat the fuel composition and ensure its working condition in cruising mode.
Vintage light bulb dipping method
In past times, when one could only dream of the current abundance of automotive accessories, diesel owners created a positive temperature field in the fuel tank using an ordinary 12 V light bulb with a power of 50-55 W. For this, in addition to the light source, we used:
- Electrical wires with a cross section of 2.5mm².
- Switch.
- Fuse.
The lamp is immersed through the neck of the tank directly into the fuel. Be sure to place it next to the fuel intake device. Only in this way will it be possible to effectively dissolve crystallized paraffin and ensure the stability of the flow of fuel into the pipeline. To prevent homemade heating of diesel fuel into the tank with your own hands from causing harm, a fuse must be included in the control circuit. Today this method looks archaic, but who knows what situation we might unexpectedly find ourselves in on a long journey? Perhaps this is how you can get out of an emergency situation when there is nothing suitable at hand.
Wire heating
The option is more reliable and effective than the one described above. Based on its operating principle, it can be compared to the functioning of a heater that is built in to heat seats . The implementation scheme is simple and accessible to any car enthusiast:
- Make holes in the body of the intake mesh, up to 8-10 pieces on one side; they must be located opposite each other with a certain pitch offset.
- Prepare a special wire made from a material with high resistivity, for example, nichrome.
- Create a heating structure by threading the wire through the holes.
- Drill two holes in the intake cover to install the terminals and connect the wire to them.
- Connect the heating element to the vehicle's on-board network.
It is necessary to include a fuse in the electrical circuit, as well as a relay to automate the heating process.
Not as an advertisement: store alternative from Nomakon
The Nomakon group of companies offers motorists special nozzles for fuel intakes of the NTP-100 . The device is capable of functioning in both pre-launch and mid-flight modes. Kit includes:
- Coarse filter.
- Vibration-resistant and fireproof heater.
- Device for fastening at the end of the fuel intake pipe.
- Electrical installation kit.
This type of diesel fuel tank heater can be installed by yourself without the help of specialists. The electrical connection depends on the type of device control.
- When manual, directly to the vehicle’s on-board network through a switch.
- If automatic, go to block SPA-101.
The slot filter and the fuel in the intake tube heat up in 3-4 minutes before starting. This is enough for dewaxing to occur and the fluidity of diesel fuel to return to normal.
Engine preheater manufacturing and installation.
- One of the most important and labor-intensive processes is the manufacture of a heat exchanger; for this you need to make an expansion tank from a piece of pipe and plates using solder and a blowtorch. Make three holes on the top of the tank and solder nuts to them, and on the sides there are pipes, one at the top and the other at the bottom. Example in the photo.
- Install the spark plugs into the heat exchanger housing.
- Insulate the heat exchanger using splen or other insulation to avoid wasted energy and reduce the time it takes to warm up the liquid.
- The heater will be able to operate in three modes: at mild frosts of 0 - -5 degrees one candle will turn on, at -5 - -15 degrees two candles, severe frosts above -15 degrees three candles. To do this, connect two glow plugs with a jumper, and one should remain independent.
- Then you should connect the device to the car battery; the device must be connected with wires with a total cross-section of at least 5 squares. The wires are connected through breakers 16 and 32A, respectively; this must be done for safe operation of the device in different modes, with the expectation that one candle will consume 15A, and two 30A. Depending on the number of candles involved, power consumption can vary from 180 to 670 W.
- The engine pre-heater is installed in the lower radiator pipe on a small circle, and an electric pump for pumping coolant is also installed there.
You need to warm up the antifreeze in the morning for no longer than 10-15 minutes; this is enough for the liquid to warm up a little. After starting the engine, do not turn off the heating; it warms up the car much faster.
Cold winters in Russia are not uncommon. And anyone who owns such a wonderful means of transportation as a car, convenient and comfortable just in the cold season, knows how difficult it is to start it in the morning in severe frost. Plus, a cold start wears out the engine much more and faster, and regular engine warming, although necessary, is very harmful.
What can be done in such a situation? It's simple - preheating the engine will solve the problem of starting the engine in the morning and save the car owner's nerves and time. Plus, you can make it yourself
We cannot ignore the fact that a factory heater is still more reliable and safer than a homemade one, but the option with homemade engine heating is also an option, and has every right to exist. And in this case, only its owner is responsible for the safety of the car.
Heating of the coarse filter
The filter heating circuit can be implemented and diesel fuel fluidity can be ensured by the following modifications: the drain valve is replaced with a glow plug or the heating element is mounted in the body of the fitting through which fuel is supplied. In the process of implementing these schemes, you will need special equipment in the form of a lathe or contact specialists who can produce handicraft parts.
Please note that removing the drain valve will not allow you to subsequently remove excess water from the fuel supply system that may be present in the diesel fuel. You should resort to this heating method only if you are completely confident in the quality of the diesel fuel being filled.
To carry out the work, the coarse filter (separator) is removed. After this, you need to machine a sleeve from steel, which will act as a substitute for the drain cap. Next, a thread is cut to securely attach the element to the filter housing. After this, a hole is drilled in the bushing and an internal thread is cut with a tap, through which the stud will be attached.
Then the glow plug is screwed in, the positive wire is fed to the heating element, the negative wire is fed to the stud. The finished solution is screwed into the separator body. All work related to the implementation of the electrical circuit implies the same requirements that were put forward when creating heating of the fuel intake from the on-board network of a diesel vehicle.
We also recommend reading the article on how to increase the power of a diesel engine. From this article you will learn about how you can increase the efficiency of the engine by installing a special tuning box and the main advantages compared to chip tuning.
There is also a simplified method for installing a glow plug, which does not require recessing individual additional elements. To install a glow plug in the valve fitting, you need to drill a hole, cut a thread in it and screw in the glow plug. The power supply is connected in the same way. It should be added that the second scheme is similar to factory solutions for heating diesel fuel.
Thermos - seventh place in the ranking
An ordinary thermos, preferably a large one, will help keep you warm inside the car. Or rather, not he himself, but his contents. Hot tea has a good effect on blood circulation and does not constrict blood vessels, such as coffee. It’s best to carry just a thermos with a hot thyme drink. This tea will warm you up very quickly. As is known, the substances contained in this herb growing in the mountains are very beneficial for the human body. Since ancient times, frostbitten travelers were warmed with just such tea, giving it to drink.
To warm up, you can drink a cup of hot tea or coffee
The British would advise drinking a little grog or mulled wine. But in addition to hot water, then you need to take a bottle of semi-sweet wine with you on the road. Ideally, the wine should be boiled, but in road conditions it can simply be mixed with hot water. It will not only help you stay warm in winter, but will also lift your spirits. But it’s better not to get carried away with alcoholic drinks, such as vodka, while sitting in the car. They only provide illusory warmth, but in reality the consequences can be disastrous. “Under alcohol” you can easily fall asleep and freeze.
You can also mix linden honey with hot water, which you can keep in the glove compartment of your car. A spoonful of honey mixed with hot water will warm you better than any other remedy.
Varieties
Heaters for fuel or diesel engines themselves are presented in a huge variety on the modern market. Such a wide choice is due to great demand - most of Russia is characterized by a continental climate and significant temperature changes. Cold winters are common, creating additional challenges for car owners. All heaters can be divided into types depending on what exactly they heat:
- antifreeze or antifreeze;
- the oil that fills the crankcase;
- filters;
- the fuel supply line itself.
The devices can use gasoline poured into a separate tank, diesel fuel from a gas tank, or electricity for heating. The most advanced of them are capable of simultaneously heating the engine and the interior. The cost directly depends on the manufacturer, functionality and performance characteristics, while the driver needs to take into account the additional costs of installing it.
Difficult choice
To answer the question of which diesel engine preheater is best to purchase, you need to take into account various nuances. This includes the frequency of use of the vehicle, the characteristics of the vehicle itself, as well as the conditions of its operation and the service life of the engine.
If the climatic conditions are satisfactory, then there is no particular need for the device. Also, if the car is in a heated garage most of the time, then a heater is unlikely to be needed. It’s another matter if the car is operated in a harsh climate, where winters are usually long and frosty. Then the preheater will be truly in demand.
Naturally, a modern new car will easily start even in cold weather, but the wear of its engine parts will accelerate, since they are subjected to additional and heavy load. Therefore, those car enthusiasts who want their vehicle to last as long as possible should take care of it and purchase a diesel engine pre-heater.
Reviews from those who already use the device are mostly positive. Some people prefer domestically produced models, while others choose only imported ones. Both have their advantages and disadvantages.
Let's look at the brands that are most in demand among car enthusiasts.
Design features of engine heaters for diesel engines
Since high-power trucks are mainly equipped with diesel engines, it is necessary to warm up not only the power unit and the cabin, but also the living compartment.
For this purpose, heating systems are additionally equipped with:
- devices for heating fuel lines;
- heated air intake;
- a heating device that is mounted on the fuel filter and complements the functions of the main equipment.
Video: preheater operation
On his official channel, video blogger Ruslan Ochirov showed in detail the process of using an engine heater installed on a Nissan car.
Connection rules
To correctly install this device during work, you should follow the manufacturer’s instructions. Some models have nuances during installation. They should be taken into account. In most cases, it is enough to allocate 1.5 hours of free time to properly install the device for heating antifreeze in winter. Before starting work, you need to stock up on a canister of this technical fluid, since during the manipulations you will have to carry out the procedure of draining the old antifreeze.
First, you should drive the car to the inspection hole and remove the filled liquid from the system. When this work is completed, you can move on to the main steps for installing the heater. Before this, it is necessary to carry out the procedure of flushing the cooling system channels. It is best to use hot water for this.
Next, you need to check whether the car has a coolant drain valve. If this element is present, then it is worth using it. In some machines it is not provided by the manufacturer. Then you need to find the technological plug, which is located in the engine compartment. Often it can be found directly on the power unit block. It must be unscrewed, after which the fitting should be removed.
The fitting should be inserted into the hole in the engine. However, during this operation there is a high risk that the pads may fall out. To avoid this, you should use a heat-resistant silicone-based sealing material.
If the car has a special tap for draining antifreeze, then the steps listed above are performed in a similar way. Then you need to install the heater in its place and then secure it. After this, you should connect the device inlet and the liquid intake point into a single whole. To solve this problem you will need a hose. Reliable fastening of the elements is ensured if you use conventional clamps.
Next, you need to connect the installed device to the power unit. This manipulation should be performed in such a way that the outlet is located at the site of the hose rupture. After this, the next step is to connect the tee. It is secured using conventional sealant. For greater reliability, you can use clamps.
The hose that will be laid from the heater directly to the tee should not have any bends. This means that it is necessary to lay it in the shortest possible way. Otherwise, you may encounter cracks, which will provide poor heat transfer. Next, the hose must be secured to the connected device, and the other side must be installed in the internal combustion engine.
How to install a diesel fuel heater?
Installation nuances and safety rules that must be observed during installation:
- It is not allowed to connect the boiler (combustion chamber with heat exchanger) to a large cooling circle of a diesel engine if a non-banding device is used. This will cause the device to warm up all the antifreeze, and this will take a lot of time.
- You cannot turn on the heater after installation if there is no antifreeze in the cooling system.
- Before installing the heater, it is important to check the integrity of the heating system power cable. It is recommended to lay it in the area of the engine cooling radiator, closing the plug (if the device is connected to 220 V) with a plug (to avoid the accumulation of dirt and moisture on the contacts).
- It is recommended to install the heating system after draining the coolant and only after the engine has cooled down. Otherwise, you may get burned.
What will you need?
Before installing a diesel engine preheater, you must prepare:
- set of wrenches;
- two screwdrivers - with a flat and a Phillips tip;
- adhesive sealant;
- stationery knife;
- container into which antifreeze will be drained;
- adapters, if necessary.
Algorithm for installing electric heaters
Self-installation of an electric heater is carried out as follows:
- A container is placed under the drain hole of the cylinder block into which the refrigerant will be collected. Use a wrench to unscrew the plug. After this, the consumable material is drained.
- Then the user needs to measure the distance between the inlet line and the cylinder head connection area, as well as the upper hose and the inlet and cylinder plug.
- A bracket is installed on which the heating device will be fixed. The unit must be installed so that the system does not come into contact with the engine and other engine mechanisms. The drain plug must be replaced with a fitting, and sealant must first be applied to its threads. If the installation of the device is interfered with by the ignition module, it should be moved to another location, having first disconnected the wires.
- The fitting, which is located on the cylinder block, is connected to the device line using a special inlet hose secured with clamps.
- A heater tee is inserted into the cut in the sleeve, with the help of which the upper line is connected to the cylinder head.
- The outlet hose is connected to a tee, and the connection point is fixed using clamps.
- The power cable is being laid. If it is long enough, the wire must be laid along the body (for example, under the wing), otherwise the conductor is extended.
- Then antifreeze is poured into the cooling system.
- The correctness of the actions performed is diagnosed.
Parallel heater installation diagram with component identification
Step-by-step instructions for installing autonomous heaters
Step-by-step algorithm for installing an autonomous device:
- The pressure in the fuel system is relieved. To do this, you need to disconnect the block with wires from the fuel pump or remove the fuse (relay) from the socket. If there is no fuel in the tank, then there is practically no pressure in it.
- The fine filter device is disconnected from the supply lines. It is first recommended to place a container or a rag under this unit, as fuel will begin to come out of it.
- The housing of the filter device, which is pre-cleaned and degreased, is wrapped with a heating plate or cloth.
- Then a heat-retaining material is applied to the component, which will not allow heat to escape to nearby devices.
- The system is connected directly to the battery or other active conductor in accordance with the diagram.
Autonomous heater connection diagram
How to assemble a flow-through fuel heating and install it on a diesel engine with your own hands
We will focus our interest on the class of electric heaters. Liquid ones are often abandoned due to the inability to heat at the start and the lack of control over the temperature at the outlet of the device. Structures mounted on the output manifold have the same significant disadvantages.
Methods for implementing electric heating
Experience shows that it is difficult to make a mid-flight electric heater at home - you need a powerful heating element of a specific configuration and reliable thermal insulation. It is no less difficult to satisfy the special requirements for the compactness of the device; it is much easier to use proprietary solutions.
Donor car
Some French and Korean diesel engines are equipped with flow-through fuel heating from the factory. Taking their standard design as a basis is an excellent solution. Regardless of the car manufacturer, the device configuration is standard, since it was developed by the same company - Delphi. However, it is not possible to find a part for sale using the original article number 9305-117B. According to the component codes of individual machines, the unit is available for purchase:
- 31394-H1950 (Hyundai-Kia) – 1,700 rubles.
- 1579.Y6 (Peugeot-Citroen) – 1,800 rubles.
An important feature of the device is the ability to operate in automatic mode: when the fuel inlet temperature is above +2°C, the automatic system turns off the heater. Total power – 150 W. The diameter of the fittings is 10 mm.
Solutions from specialized companies
For the consumer basket, universal heaters are always available from companies specializing exclusively in the production of heating means for diesel engines:
- Manual EPT-150S (NPP Platan), 12/24 V – 1,600 rubles.
- Manual Sever-S MiniMax (CFH 007), 12/24 V – 2,900 rubles.
- Manual Nomacon PP-101 (12 V)/PP-102 (24 V) – 4,700 rubles.
- Automatic Nomacon PP-201 (12V)/PP-202 (24V) – 6,800 rubles.
At the starting price, only EPT-150S can compete with standard flow-through heating of cold diesel fuel. The Russian model preheats in 5-10 minutes and starts working, providing a temperature difference between the inlet and outlet within 15...20 °C.
Unlike Delphi, the device can be installed on trucks: there are three configurations of connection fittings to choose from: diameters 8/10/12 mm. Disadvantage: manual control. It is based on a high-resource ceramic heating element.
Another closest competitor to Delphi, but in terms of functionality is Nomacon PP-201/PP-202. The Belarusian development is attractive due to its automatic mode: at a fuel temperature of +5°C, the automatic switches off the heating element. Passenger fitting – 9 mm, cargo fitting – 12 mm. The obvious downside is the price.
Electric heating installation
The essence of installing an electric heater from any company is the same - integrate the device into the fuel line. There is no need to hastily cut the power supply system tubes; it is better to read the recommendations of manufacturers and mechanics:
- Install near the fine fuel filter.
- Avoid using conventional metal clamps.
- Install using quick release clamps.
The ideal solution is to remove the “quick release” from the filter element and install it at the inlet of the heater. Connect the heater output to the filter input using a section of fuel line with two quick-release clamps. It is not difficult to connect a diesel fuel instantaneous heater with your own hands if you follow the main rules:
- Provide a four-pin VAZ relay and a 30A fuse in the power supply circuit of either an automatic or manual device.
- A button-switch will not interfere with the automatic machine.
- Wire cross-section – at least 4 mm2.
- The control plus should appear after the ignition is turned on.
Features of installing Delphi electric heating
Special recommendations for installing heating systems from specialized companies are given in full by them: on the technical side - a pipeline with two “quick connectors”, on the electrical side - no comments. The technical component of the installation of parts from Hyundai-Kia or Peugeot-Citroen is identical. The only recommendation is to look for a 10 mm hose in car catalogs and mount the unit.
Complex electrical aspects of the installation of equipment from Delphi are observed in terms of searching for a special block. Both a plastic housing and contact elements are required. A comprehensive solution from Hyundai-Kia under code 8999900026AS will cost 1,100 rubles. Expensive. An alternative is auto disassembly or purchasing new components one by one:
- Block 6541.S9 – 300 rubles.
- 2 terminals 6541.E6 – 100 rubles.
Diesel fuel filter heater (bandage with button)
| 2 900 | |
| Filter heating 12V d=78-91 mm / h=52 mm (button) | 2 900 |
| Filter heating 12V d=90-105 mm h=82 mm (button) | 3 200 |
| Filter heating 24V d=73-86 mm / h=67 mm (button) | 4 300 |
| Filter heating 24V d=78-91 mm / h=52 mm (button) | 4 700 |
| Filter heating 24V d=90-105 h=82 mm (button) | 4 900 |
| Filter heating 24V d=117-125 h=80 mm (button) | 6 900 |
Refinement of the fine filter
The fine filter loses its throughput even with a relatively small degree of paraffinization of diesel fuel. This does not allow the engine to start and can lead to malfunctions of the fuel injection pump, the fuel chamber of which is not supplied with fuel. Among the methods for heating diesel fuel with your own hands, heating this fine filter element stands out.
Copper wire is wound in frequent turns around the body of the filter element. Contacts for supplying current are connected to its ends. The negative wire is supplied from the battery, a relay and a power button are installed on the positive one. It is optimal to make the positive contact from the ignition switch in order to avoid discharging the battery if the driver forgets to turn off the heating himself.
Causes of problems starting a diesel engine
The starting problem is due to the fact that at negative temperatures, paraffin crystals form inside the diesel fuel, causing it to turn into jelly. The fuel filter becomes clogged, reducing its throughput and reducing the amount of fuel entering the engine. The engine power decreases and it stalls.
In order to prevent thickening, you can add gasoline, kerosene or special additives to diesel fuel, but this method does not always help and has a number of limitations and contraindications. Moreover, low-quality and counterfeit additives can cause irreparable harm to the engine. Do not forget about the low quality of diesel fuel or its inadequacy for the season - these factors also have a negative impact on the fuel filter.
Do-it-yourself solutions for a flow-through heater for standard diesel fuel
Methods for implementing reliable fuel supply to an engine using heating have been known for a long time. The main fuel supply units that need to maintain temperature conditions are:
- Coarse filter or separator.
- Fine filter.
- Pipeline main.
- Fuel intake.
In auto stores you can find a wide range of already upgraded components or additional elements to standard units. The only obstacle to their acquisition may be the cost, which is quite high. Experienced car enthusiasts claim that they carry out some work on organizing fuel heating themselves. At the same time, the service life of such devices is in no way inferior to factory samples, and in some cases they can even surpass them in terms of efficiency. According to their functional purpose, the following types of heating elements are distinguished:
- bandage – for fine filters;
- flow-through – installed in front of the filter in the fuel line section;
- flexible tape - heats filters and lines;
- rod - it is possible to make a similar diesel fuel heater with your own hands for subsequent installation in a separator or fuel intake;
- heated nozzles - used to heat separators and fuel traps.
It is also possible to independently replace the standard fuel intake units in the fuel tank with heated products. This, of course, will cost more than homemade devices, but it means saving at least 1500-2000 rubles for the work.
Improved fuel intake
To ensure a reliable supply of consistency from the tank in severe frosts, the mechanism must, of course, be heated, since diesel fuel begins to freeze already in the storage container. Before starting the internal combustion engine, it is necessary to warm up the train in advance and bring its capacity into working condition.
There are quite a few methods for creating a positive temperature field in a tank. Previously, a widespread method was to immerse a light bulb , with a power of about 55 W, directly into a container next to the fuel intake mechanism. The light source dissolved crystallized paraffin, which ensured stable fuel throughput.
Another option is do-it-yourself electric heating of diesel fuel , the operating principle of which is identical to the heater built into the seat. The embodiment is as follows:
- drill thin holes in the body of the intake mesh, located opposite each other with a certain offset in pitch (quantity - up to 5 pieces on one side);
- take a wire made of a material with high resistivity (for example, tin);
- form the structure of the heating element by passing plastic material through the holes;
- Connect the ends of the wire to the power supply network.
Worth remembering! When connecting any type of diesel fuel heater to the electrical network with your own hands, you should :
- integrate a fuse into the circuit;
- install a control button;
- install a relay to automate operation.
12V antifreeze heater
Nuances that must be taken into account when assembling the heater with your own hands:
- The heating device is powered from a 12-volt source, which is a battery (on trucks it is a 24V battery). During the cold season, the battery discharges quickly, so in winter you can use an additional transformer to power the unit.
- All contacts and conductors must be carefully insulated to eliminate the possibility of current leakage and short circuits.
- It is recommended to additionally wrap electrical circuits with electrical tape, this will increase their service life.
What will you need?
To complete the task you will need:
- two pipes made of thin metal - the diameter of the first should be 8 cm and the thickness - 1 mm, the diameter of the second is determined by the dimensions of the hoses of the car’s cooling system;
- two heating components (you need to make them yourself);
- set of wires;
- 10 amp safety device and switch to activate and deactivate heater;
- soldering iron with consumables or welding machine;
- scissors for cutting metal;
- steel sheet 1 mm thick;
- grinder for cutting pipes or other similar tool.
Algorithm of actions
| Image | Step |
| |
| |
| |
| |
|
Installing a homemade heater
After assembling the heating equipment, the following steps are performed:
- The device must be wrapped with electrical tape.
- The pump is installed in the cooling circuit of the vehicle in the direction of the flow of consumables.
- After this, you need to connect one cable to ground, and the second to the positive terminal of the battery. A 10 amp fuse device must be used to protect the power line. For simplified operation, you need to install a switch.
- To operate two heating devices, you will need a 12-volt battery with a parallel connection. It is possible to use a 24-volt battery, but in this case the connection must be in series.
The photo shows a heating system connection diagram
Fuel intake heating
Diesel fuel freezes already in the fuel tank. For this reason, preheating it when there is a big minus outside the window allows you to restore the fluidity of diesel fuel. You can raise the temperature in the fuel tank in different ways. One of the simplest is the solution to lower a regular 50-watt light bulb into the tank, which is located near the fuel intake. During operation, the light bulb heats up, the paraffin dissolves, and the system is able to pump diesel fuel.
The second way is to independently build an electric heating of diesel fuel with your own hands. Such heating will be similar in principle to a heating coil. To solve the problem you will need to get to the fuel intake grid. Then small diameter holes are drilled in the body at an equal distance from each other. It is recommended to make about 5 such holes on each side.
Please note that independent implementation of this electric heater circuit must be carried out taking into account the fact that the design must necessarily have a fuse. You will also need to equip the circuit with a special button to turn on the heating. An additional element is a relay for automatically turning off the current supply.
Next, you will need a wire whose material has high resistance. Tin wire works well for this task. The specified wire must be threaded through the prepared holes in the housing, creating a heater. The free ends will need to be connected to the power supply when finished.
"Teplostar", "Binar" and "Kamaz"
Since 1995, the companies Teplostar and Advers have been producing diesel engine pre-heaters jointly. Among the models you can find both liquid and air devices.
The most common of them were diesel engine pre-heaters “Binar” and “Teplostar”, as well as air devices “Planar”. They are all compact in size, easy to install and operate, and display temperature data very accurately.
Domestic models are distinguished by reasonable prices and decent quality. Sometimes such devices are purchased for installation on trucks. But for Kamaz they use special pre-heaters for the Kamaz diesel engine that have long proven themselves.
The battery with such a device will never run out, since the standard stove is constantly running. If you need to wait for loading/unloading, there is no need to heat up at idle, wasting a large amount of fuel. At the same time, the engine life will be saved by 400 kilometers each time (this is exactly how much is allocated for wear of parts during a cold start for Kamaz).