Owners of cars from the domestic automobile industry have a kind of hobby for repairing, minor modernization, and tuning their combat vehicle. Such work as: removing a headlight, replacing optics with a new one, failure of lighting devices - on Priora deserve a separate discussion.
The headlights on the Priora are equipped with bulbs that burn out once a season. Lada Priora cars also have a problem: sometimes the headlights sweat, which means you need to remove them and glue them. Adjusting the headlights is not the least important in traffic safety; for this purpose, an electronic and manual corrector is provided. The factory headlight of the Priora car (Bosch and Kirzhach) underwent changes during restyling; in addition, there are many Chinese analogues, for example, black headlights. Tuning is also problematic without removing them from the mount. The price of headlights varies - starts from 5,000 rubles for a factory headlight. Read the article to the end and find out the subtleties in this matter!
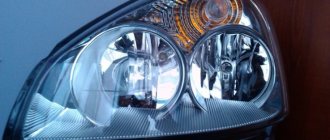
Bosch headlight from Priora - looks like this
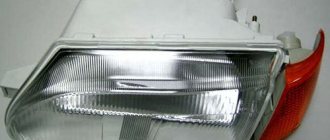
Priora car headlight: Bosch and Kirzhach - what is the difference
Let's highlight two manufacturers (not taking into account the copies of Chinese origin) that have a number of differences. Popularly known as kirzhach, bosh. There is a significant difference between them: Kirzhach - a corrugated inner surface of the well, a cast low-beam lamp reflector without a cutout, glass (plastic) attached with a refractory sealant. The marker lamp is located at the bottom of the reflector well. Two separate plugs for the rear of the optical device. The device from the Bocsh brand has a smooth inner surface of the well, a low-beam lamp reflector with a cutout, and a low-melting sealant is used to fix the glass (plastic). The size lamp is placed in the upper part of the well; one plug from the rear of the lighting unit is used. Minor differences in design, quality of parts, presence of a chrome-plated rim of the signal amplifier of the rotary element. The number of taillight design variations available to the buyer is numerous.
Why film
The main reason is failure, failure to perform the direct functions of the device. There may be a lot of reasons for replacing the headlights on a Prior. Broken outer glass, loss of tightness, fogging of lenses from the inside, deterioration of the reflector itself, breakdown of fixing elements. Replacement, repair of old contacts, installation of a new type of light bulbs. To solve them, you will have to unscrew the entire module from the car body, which will make it more convenient to repair and modernize optical devices. The block is not completely dismountable: to separate the glass from the body, it is better to heat the joint with a hair dryer until the sealant softens. Next, remove the melted sealant as much as possible using improvised means. We try to separate the glass with a screwdriver, clean all the separated parts from the old glue with a knife and sandpaper. The glass is seated back onto the sealant.
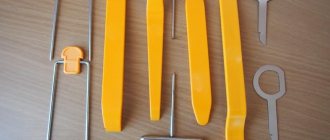
What tools will you need?
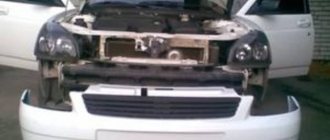
Headlights play an important role in the design of LADA Priora. Therefore, when removing a headlight for its subsequent replacement, it is necessary to know well the sequence of disassembly and assembly of the structure. To remove the headlight unit on a Priora, many people go to a gas station. However, this procedure is so simple that if you have certain tools, you can fix it yourself.
In this case, the following tools will be required for work:
- 8 or 10 mm wrench;
- ratchet;
- Phillips screwdriver;
- extension.
Polishing headlights on Priora
As their service life increases, sand, small stones, dirty water, and road chemicals negatively affect the light conductivity of the outer glass of lighting fixtures, and overall efficiency decreases. The solution will be restoration and polishing of the glass surface. When you decide to polish glass, thoroughly study the technical side of the process, materials, stages of work - everything affects the result. If you are not confident in your abilities, it is better to entrust the work to professionals, otherwise the result of the work done may be worse than the original result. If, nevertheless, you decide to polish the optical devices of your car, first remove the entire module, remove dirt, and protect surfaces that cannot be treated.
For polishing use:
- Abrasives;
- Sandpaper (1000 - 4000 units);
- Circles: felt, fabric, foam rubber;
- Polishing pastes.
First, a rough layer of plastic is removed with a depth equal to the depth of chips and scratches. As a result, the protective layer of varnish applied by the manufacturer will be erased, which must be restored after polishing. Applying a special varnish is a rather technically complex process. Another option is to stick a protective film, otherwise the result of your work will disappear in a couple of months. Change the sandpaper to finer sandpaper every 2 - 3 minutes. We monitor the removal of traces left by the previous number of abrasives. After each change of sandpaper, you must thoroughly wash the surface. The dried surface is ready for polishing.
Important: polish the tool used at low speeds to avoid overheating and clouding of the plastic; it will be impossible to restore this.
Using polishing wheels, we bring the glass surface to the desired shine. Polishing is often carried out due to varying degrees of wear on the vehicle's optical devices, for example, one headlight was damaged in an accident and was replaced with a new one.
Conclusion
When done correctly, the process of replacing headlights is simple. When disassembling and assembling the flashlight, it is important to follow the exact sequence of actions.
Car owners in the domestic automobile industry have a unique hobby - repairing, minor modernization, and tuning their combat vehicle. Such work as: removing a headlight, replacing optics with a new one, failure of lighting fixtures - on Priora deserve a separate discussion. Prioru headlights are equipped with bulbs that burn out once per season. There is also a problem with Lada Priora cars: sometimes the headlights sweat, so they need to be removed and glued. Adjusting the headlights is not least important for traffic safety; electronic and manual correctors are provided for this. The factory headlight of the Priora car (Bosch and Kirzhach) underwent changes during the restyling, in addition there are many Chinese analogues, for example, black headlights. Tuning: It is also problematic to perform without removing them from the holder. The price of headlights varies - from 5,000 rubles for a factory headlight. Read the article to the end and find out the subtleties in this matter!
Why do Priora headlights sweat?
The most common problem with the optics of domestic cars is moisture getting inside. The headlight sweats due to loss of sealing of the unit. The back cover has lost its tight fit relative to the surface of the case. To fix the problem, it is better to remove it entirely. Open all existing plugs and dry thoroughly in a warm, dry room. Seal the gaps between the covers and the body (use different types of seals, silicones, sealants). Some car enthusiasts advise spraying a small amount of alcohol inside. After drying, reassemble and install on board your car.
Useful tips
Car owners often encounter such a problem as Priora headlights fogging up. In this case, lighting technology does not provide high-quality illumination of the road. This problem must be eliminated using modern methods. The reason for this is that there are small channels in this part of the beacon assembly.
Find them and wipe them with a thin thread.
In this case, there is no need to change the headlights. It is not necessary to turn off the headlights completely even if a crack appears in the glass. In this case, it is necessary to carefully coat it with sealant.
How to remove a taillight on a Priora and glue vinyl
Car enthusiasts often have a desire to highlight the uniqueness of the vehicle on the road in every possible way. To achieve the goal, the owners are upgrading the taillights on the Priora. They change the color of the vinyl film glued on top and install additional LEDs. Additional modifications to the design of the light signaling system must comply with safety standards.
It will be easier to work by removing the rear light. What is not difficult:
- You need to disconnect the wiring connector going to the light on the trunk side;
- unscrew the three plastic wing nuts;
- remove the lantern;
- pull out the wires along with the rubber seal through the mounting hole.
That's it, the lantern is removed, you can put the lantern in the reverse order. Before dismantling or installing the lamp, it is recommended to disconnect the wire from the terminal. Pasting vinyl is a procedure somewhat similar to the process of tinting car windows. You need to remove dirt, wash the glass of the lantern, remove greasy stains and stains using window cleaners. Cut a piece of vinyl of the required size (with a small margin), moisten the surface of the lantern with a soap solution (without fanaticism). Glue the prepared piece of vinyl, removing the protective layer, remove air bubbles, and remove excess moisture. The remaining vinyl around the edges of the tail light can be cut off with a sharp utility knife.
Step by step guide
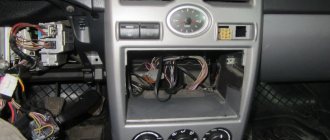
Removing a headlight on a Priora is a simple process, but it has its own characteristics, which you should familiarize yourself with in advance.
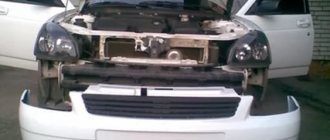
- To completely detach the headlight from the existing brackets, you must first remove the bumper. In order not to unscrew excess nuts and bolts, you can try to partially remove the bumper. After removing the bumper, you need to unscrew the mounting bolt from the top and then from the bottom.
- The third projector holder is located on the side. A Phillips screwdriver is required to remove the projector from this mount.
- After working with a screwdriver, all that remains is to unhook the clamp and the harness from the headlight unit itself. To make removal easier, you can pry the latch with a thin screwdriver.
- After all the above steps, you can easily remove the headlight; it will no longer hold anything.
Reassemble the projector in reverse order.
In addition, we recommend reading our specialist’s article on how to replace a low beam lamp.
We also recommend reading our specialist’s article, which describes in detail how to change the low beam lamp on a Priora.
You can learn how to adjust the headlights yourself from the detailed material from our specialist.
How to remove a headlight on a Priora without unscrewing the bumper
When carrying out any kind of tuning, installation, or dismantling of the main lighting fixtures, you will inevitably have to remove the entire light fixtures. Before installing the front and rear lighting devices, be sure to disconnect the wire from the terminal and the wiring harness going to the lighting unit itself. Dismantling the front bumper completely is not necessary; it will be enough to disconnect the upper part of one side from the car body. Thus, installation of front optical modules will be simpler and less labor-intensive. What tools will you need?
Work order
- Disconnect the negative cable from the battery.
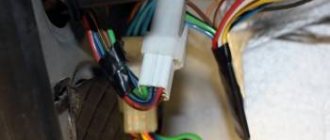
- Disconnect the two electrical connectors of the headlight unit.
- If there is a fender liner, unscrew it on the side of the bumper, usually 2-3 outer screws.
Using a 10mm wrench, unscrew the two bolts of the upper headlight mounting.
Unscrew the 2 bolts securing the decorative radiator grille.
Lifting it and sticking your fingers into the gap between the grille and the bumper, release 2 latches on each side
We unscrew the bolt of the lower fastening of the headlight unit.
Unscrew or loosen the 2 bolts of the upper bumper mounting and slightly pull the bumper towards you.
Using your fingers or a screwdriver, carefully pull the edge of the decorative trim — the “eyelash” — away from the headlight unit. In the resulting gap we see a plastic tab-latch, with the help of which the edge of the eyelash is attached to the edge of the wing.
CAREFULLY remove the tongue from engagement with the wing, without applying extra effort, it’s easy to do with your fingers!
We move the trim to the center of the car and remove it.
I HIGHLY recommend that before removing the eyelash, lubricate it along the entire arc of attachment to the bumper with silicone grease.
Using a “10” socket, unscrew the nut securing the headlight to the bracket.
Use a screwdriver to pry up the hydraulic corrector cylinder retainer, turn it and remove it from the headlight housing.
We carry out the assembly in the reverse order without using brute physical force. When installing the eyelash in place, we push its lower edge with a screwdriver.
If you work very leisurely, the entire procedure for dismantling and installing the VAZ 2110 front headlight will take 20 minutes.
Tuning optics on domestic cars is a fairly common phenomenon, due to the not-so-perfect design of cars, which includes the Lada Priora. Therefore, many try to independently change the appearance of the car.
Tuning optics is a process that seems simple only at first glance.
Many car enthusiasts who do their own tuning forget that when changing optics, they must comply with technical safety requirements and GOST standards.
The headlights illuminate a specific area of the road and are adjusted on a special stand. Customizing or using more than two additional headlights, especially when it comes to fog lights, may be illegal.
Adjusting Priora headlights using a corrector
Adjusting the light beam is extremely important for safe, comfortable driving. If you have a suitable place and desire, you can carry out the procedure yourself at home. You will need to place the car on a flat horizontal surface at a distance of five meters from the wall to the car. Check the operation of the manual corrector located directly on the back of the block (small movable wheel). At the level of the middle of the headlights, draw a horizontal line on the wall (L. 1), approximately 65-75mm. Below we draw a line (l. 2). Two vertical lines in the middle of each headlight (l. A) (l. B), another vertical line strictly in the middle between them. There should be 1 person in the car, the tire pressure should be within normal limits and be the same everywhere. The low beam turns on, we try to adjust the light. Close one headlight tightly. We turn the corrector wheel until the horizontal and oblique beams of light intersect at the point of intersection of lines A. and B. with line L. 2. Electronic adjustment in the car interior should be zero.