Restoring a plastic car bumper that has split into several parts, with missing fragments or broken fasteners is best left to professionals. Do-it-yourself bumper soldering repair makes sense for small cracks, chipped area up to 10 cm², provided that most of the pieces were collected. Before you solder the bumper on your car yourself, you need to find out what is it made of, select the appropriate tool and solder. In this article we will describe in detail how to solder a plastic bumper in different ways, depending on the material and the degree of damage.
How can you solder a bumper on a car?
To properly solder a bumper with your own hands, first of all you need to find out what it is made of . Markings on the inside of the part will help with this. Depending on the material, the optimal repair technology and type of solder are selected. The latter should match the composition of the part as much as possible.
You can solder a plastic bumper with your own hands, using ready-made filler rods for different types of plastic or “donor” material from pieces of another bumper, fragments of lockers (for polypropylene bumpers), etc. Using fiberglass and epoxy or polyester resin, you can seal most types of plastic.
When using incompatible materials, the defect may worsen, for example, if the melting temperature of the repair plastic exceeds the melting temperature of the bumper material!
This table will help you determine the material and select solder for bumper repair based on the markings:
| Bumper markings | Bumper material | What is the best way to solder? | Soldering Features |
| PAG6, GF15, GF30 and ABS | Hard plastics (acrylic nitrile styrene, polyamide, etc.) | A hot air gun, a torch or a powerful soldering iron that provides heating of 500 ℃. Gluing with composite material is possible. | Hard plastics have a high melting point and must cool naturally. |
| PP or PPTV | Polypropylene | An ordinary 80 W soldering iron, a hair dryer with a nozzle. | Polypropylene can be soldered well even without the use of reinforcing material (if there are no holes), and it is important to observe the temperature regime. |
| PVC | Polyvinyl chloride | A PVC bumper can be soldered with a rod, but the seam needs to be reinforced due to the not very high strength of the connection. | |
| PUR | Polyurethane | Hot air gun or soldering iron with precise temperature control, hot stapler. | When repairing a polyurethane bumper, it is important to prevent the part from overheating. Polypropylene is difficult to weld and solder, so the seam must be properly reinforced. |
| No markings | Fiberglass (fiberglass and polymer resin) | Fiberglass and resin | Fiberglass parts are glued together using glass fabric impregnated with polyester or epoxy resin, applied in several layers. |
In conclusion
Almost any car enthusiast can repair a bumper using glue at home, without causing damage to the family budget. In terms of reliability, a sealed part will not be inferior to a sealed one.
There are many options available on the market and everyone can choose the right adhesive composition.
We recommend watching another method for repairing bumpers in this video:
A car bumper is not only a decorative element, it performs an important practical function. This part is used to protect the body from damage in minor accidents. It is the bumper that is the first to suffer in case of unsuccessful parking, hitting a high curb, or in a number of accidents. If a crack occurs, you can find out how to seal the bumper and carry out the repair yourself.
Content:
Tips and life hacks for soldering a bumper
The tips below will help you properly repair a crack or hole in the bumper. Thanks to them, you can achieve high seam strength and durability.
- When choosing how to solder a bumper on a car with your own hands, consider the melting point of the material.
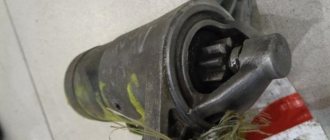
The lower it is, the more accurate the adjustment of the heating of the tool must be so as not to damage the part. For example, ABS can be soldered with almost any hair dryer, and polyurethane can only be soldered with a stable temperature of about 200 degrees. To prevent overheating, it is better to first set the temperature below the operating temperature, and then increase it gradually. Reinforcing a bumper crack with copper wire - As a reinforcing material, use mesh or brackets made of corrosion-resistant metal. The best option is stainless steel, copper or brass.
- Cracks with smooth edges that close tightly and do not reach the edge of the part can be soldered without an additive. The melted plastic will give a fairly strong seam.
- To repair polypropylene bumpers, you can use homemade filler tapes, cut from lockers (fender liners) using metal scissors. For other materials, fragments of similar bumpers that can be found at auto dismantling yards are suitable.
- If you want to do without dismantling the part, you need to carefully remove the chamfers on the crack, since it will not be possible to solder the bumper without removing it. This option is suitable for polypropylene bumpers, which are easily soldered without reinforcement.
- Focus on strength rather than beauty, and leave a raised area in the seam area, since it is possible to solder a bumper without painting only if it is originally unpainted polypropylene or polyurethane. Other materials will still have to be puttied and painted after repair, after leveling the surface.
When painting the bumper yourself after soldering, be sure to consider the type of plastic and use the appropriate primer. If the technology is not followed, the bumper will quickly peel off. It is best to give the bumper to professionals for painting, since without a spray-drying chamber and a spray gun, high-quality painting of the part is impossible.
Rules for choosing an adhesive composition
When preparing to solve the problem of how to glue a bumper, it is important to correctly and carefully consider the purchase of the main component, we are talking about the fixing mixture. The solution must be fully suitable for the material from which the part is made, and also meet other generally accepted requirements.
Initially, a person checks whether the glue can create an integral structure, whether it will not burst in severe frosts, and how high its resistance to increased temperatures is.
As the vehicle is driven, the layer will certainly become exposed to an aggressive environment in which drops of oil or gasoline occur; the frozen seam should not be destroyed under the influence of these reagents.
Answers to frequently asked questions
How to solder the fastening (ear) of a plastic bumper?
In order to reliably solder the bumper fasteners without loss of strength, the repair site must be reinforced with reinforcement. You can use wire mesh, hot staples, or regular construction staples for this.
How to solder a large crack on a car bumper?
A large crack must be sealed, ensuring that its edges are tightened and reinforced. Large holes and breaks can be repaired using composite material (fiberglass or fabric + polyester resin).
Is it possible to solder a bumper with a metal rod?
It only makes sense to use a non-melting metal rod as a heating element. You should not solder plastic parts with metal solder.
Preparatory activities
Before you glue the plastic bumper, you will need:
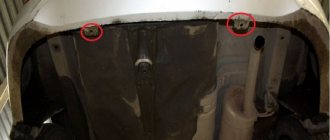
- Remove the cracked body element from the car.
- In the body kit that has burst, you will have to drill holes at the ends of the crack. This will prevent further damage to the part.
- Wash and dry the body kit thoroughly. Degrease the working surface of the bumper.
- Using sandpaper, remove the paint in an area from 3 to 5 cm from the edges of the crack. Apply a layer of soil to the damaged area.
- The places where the connection of the restored body element will pass must be carefully sanded. If you have a milling machine, then grooves in the form of a Latin letter V are made on the edges of the crack, which makes the gluing more reliable.
- If the body kit is cracked in many places, without removing it, you will need to fasten all the elements together (using a construction gun), and only then dismantle the element.
Additional tuning elements
Motorists, trying to give their vehicle a unique design, tune the bumper. Basically, these alterations concern the installation of the following elements:
- Lip. It is a kind of protrusion, which is located at the bottom of the protective structure. It is made of fiberglass and polyurethane foam, as a result of which the lip is primed and painted to match the color of the car.
- Diffuser. Decorative trim for the lower part of the rear bumper. Foamed PVC is used to create it. Markings are created on the material, after which the sheet is heated with a construction hairdryer and the parts are given shape. They prime and paint, and then attach it to the car using sealant.
- Fangs. A decorative element that is installed on both metal and plastic body elements. For mounting on “plastic”, fiberglass is used. To install fangs on iron parts, use metal and a welding machine.
Also, to give the car an individual look, stickers are placed on the bumpers, or parts are covered with carbon fiber.
Damage - what are they?
In addition to the fact that the bumper performs a protective function, it also serves as a decorative element.
It is not surprising that it is so important for us to keep him in good condition and provide him with decent care. Even if damaged, it is completely repairable, and this alone can save you several thousand rubles instead of purchasing a new product.
The presentable appearance of the front bumper is lost over time, because today they are made of flexible but fragile plastic. Experts classify several types of damage to this element:
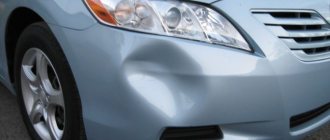
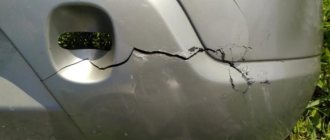
- cracks, which are considered rather unsafe damage. During operation, due to constant vibration loads, they increase in size, and this may be accompanied by unpleasant knocking sounds;
- scratches - as a rule, they begin with small ones, but constantly become larger, becoming cracks over time;
- dents - appear due to mechanical impact and lead to the creation of other deformations;
- various chips that occur after contact with sharp hard objects.
Final work
After the glue has dried and checked the tightness of the resulting seam, you need to remove traces of the work.
To do this, they begin the final stage of restoring the damaged body part. It consists of the following steps:
- Remove the foil from the outside of the bumper.
- Using a grinding wheel or sandpaper, polish the seam to the level of the rest of the bumper surface.
- If necessary, fill the uneven areas with putty. To do this, use wide and narrow spatulas.
- A layer of primer is applied to the treated surfaces.
Paint the treated area
It is important to ensure that the painted area does not stand out on the surface of the body kit
Damage to the bumper spoils the appearance of the car. Restoring a broken body kit can be done at a service center. On average, for 5,000 rubles, you can seal a crack and remove traces of repairs. To save money, the operation is performed at home. The car enthusiast will need to be patient and careful, which will lead to an acceptable result.
Welding with a hot air gun
This is a more effective way of joining polymer parts, used not only for repairing bumpers, but also for restoring a variety of plastic products. It allows you to more reliably fasten elements, spending much less time on work than with soldering. To use this technology, you need to prepare the same tools with materials as for soldering, excluding the metal mesh. In addition, for repairs you will need:
- hot air gun with a power of 1600 W with the ability to regulate the temperature of the supplied air from 100 to 700°C;
- Universal welding rods compatible with most plastics.
Advice. If you buy or rent a heat gun, make sure it has overheat protection with an automatic shut-off.
The technology for welding a broken bumper is very similar to soldering and differs only in the last stage:
- Having carried out the preparatory stage, align the edges of the cracks, secure them with clamps and grab them with a soldering iron, as described in the previous section. Reinstall the broken parts in the same way.
- Using a soldering iron, cut the crack along its entire length, making a recess where the welding rod will fit.
- Take a hair dryer heated to 400-600°C in one hand (depending on the type of plastic), and a welding rod in the other. Place its end at the beginning of the cut crack and heat it with a hairdryer at the same time as the surface of the bumper, holding the tool at an angle.
- When the rod begins to soften, begin to place it in the groove without stopping heating. Fill the cavity completely.
- For reliability, make several transverse seams, placing the softened rod directly on the inner surface of the body kit.
Note. To cut a crack, instead of a soldering iron, you can use a cutting or abrasive wheel mounted on an electric drill. But such work requires caution so that the potholders do not fly off.
If possible, use special welding nozzles for a hair dryer, into which a plastic rod is immediately inserted, so you do not need to hold it with your hands. Upon completion of the work, the repaired bumper must be repainted and polished.
Advice. If you were unable to get a hot air gun, you can use a special hot glue gun that welds plastic with thinner rods.
Photo of welding a bumper with a rod
How to restore the shine and uniformity of paintwork at the site of a crack
The original shade is quite difficult to repeat, this is because the fixing mixtures make adjustments to the condition of the base. Even with careful sanding and priming, the problem area becomes slightly visible.
The part is also not completely painted, and in this case it is simply impossible to achieve the ideal combination. Polishing soft wheels on a grinder or drill can help get rid of fading; professionals often use colorless acrylic varnish for their work.
Mismatches of tone can be avoided or minimized, but many people will find the work painstaking, and you need to be patient.
Is it necessary: when is it advisable to repair a plastic bumper?
One such case is an incorrectly painted product. The paintwork on the bumper must be plastic. Only in this case the varnish and paint will not crack from a simple bend or a small dent, which can be easily straightened by heating. To find out if your part is painted well, inspect the crack to see if the layers have peeled off from each other.
A clear separation of paint and primer indicates that inappropriate components were used to paint the bumper. We talked about how to paint plastic at home in a series of summer articles
Let us repeat that in this case it is important to acquire a special primer and paint with plasticizers
Sealing process - preparation
Before sealing the bumper with fiberglass, we recommend conducting a trial compatibility test on a small area of the damage. To determine how to glue the body bumper, carefully study the manufacturer's instructions. The adhesive material must match the surface type of the part.
If there are body kits at the site of damage, they must first be secured and only then removed. At the same stage, accurately determine the material of the spare part to select the desired adhesive base.
This information is on a stamp on the inside of the product. When the mixture is selected, all that remains is to use it correctly in order to correctly restore the spare part after damage.
In order for the repair to last as long as possible, the bumper will have to be pre-treated. The part is disconnected in advance.
Carry out mandatory training:
- thoroughly clean the car buffer from dirt accumulations;
- remove residual oil and dust;
- let the parts dry;
- wipe it with a chemical to degrease it;
- grind the broken surface with an abrasive or a grinding machine;
- if the cracks are too deep, we recommend drilling them out, protecting the spare part from increasing damage.
With the listed procedures, you will achieve stronger adhesion of the glue to the surface, which will guarantee the quality and long service life of the part.
How to glue a bumper: let's get started
Once the surface has been pre-treated, it is time to begin the bulk of the restoration process. Cover the damaged area of the spare part with a primer and wait until the substance dries completely.
The second option: seal the crack on the bumper from the outside so that glue does not leak out of it. To do this, use foil. Once the adhesive has dried, the material must be removed.
Primary gluing from the inner surface of the buffer is carried out with a composition having reinforcing properties. To do this, we recommend using a composition based on epoxy resin with a high degree of adhesion.
If you have previously decided to abandon priming work, then carefully move the damaged areas towards each other
Sometimes the cracked parts are held together with metal staples. However, fixing the two parts from the outside is done with standard paper tape. He will carefully secure the edges of the surface at the same level before painting. After gluing the hole from the inside, the tape will be easier to remove than the staples.
When both parts of the car are securely fixed, apply the adhesive mixture to both parts of the damaged part. Before it dries, glue a metal or synthetic mesh to strengthen the seam.
This can be a painting mesh, which also needs to be treated with adhesive on top. It is impossible to predict the drying time, since each chemical composition takes its own time to dry.
Final stage
When the crack is glued and the adhesive solution is completely dry, the car buffer remains visually unattractive. There is no need to sound the alarm - this is natural, because there is still finishing work ahead.
Let's get started:
- Remove any excess compound on the plastic, carefully cut it off or sand it.
- Prepare the surface of the spare part for further painting. To do this, use a primer, putty or other materials for this purpose.
- The car buffer must be painted according to technology. Such paints are available in car dealerships.
Detailed work on painting a bumper with your own hands in the video:
Results
Repairing a buffer at home is not a difficult task. Therefore, if you have minimal experience in this matter and follow all the instructions, you can quickly restore the part. And you won’t have to spend money on paying a car mechanic.
Glue for car parts has significant advantages. It is cheap, its purchase will not affect the family budget. The method of sealing a cracked buffer with an adhesive mixture is in no way inferior to sealing.
We recommend watching the video instructions on how to glue a bumper with glue yourself:
Mechanical impact on a car bumper as a result of an accident or collision with a high curb leads to the need for repairs. In order not to spend money on car service services, many car owners prefer to do the repairs themselves. Detailed instructions on how to properly glue a bumper with your own hands at home will help you avoid mistakes.