During the operation of a vehicle, the air filter suffers the most, because it is responsible for purifying the air coming from the external environment. Most brands and models of cars, regardless of the country of production, are equipped with parts of a similar structure. Finding them under a car hood is not difficult. Below we will tell you how to properly install an air filter on a Lada.
air filter for Lada Priora
Part Features
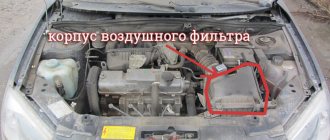
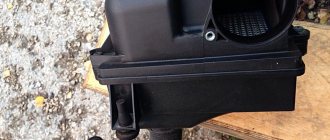
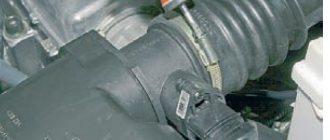
The Priora air filter is presented in the form of a small black plastic box with a streamlined shape. Upon visual inspection, you can distinguish a corrugation and a wide pipe, which is directed towards the engine.
The Lada Priora air filter is located in the central part of the hood, directly in the front area, and contains 16 valves. The external environment has a detrimental effect on it - chips and cracks appear. In most cases, this unit must be dismantled for updating due to deformation or replacement of cleaning elements. The air filter is attached to the metal base using rubber supports.
Regularly checking and installing the air filter is an important step that should never be skipped. If the housing breaks down, there is a possibility that air flows will enter not only the motor, but also through the cracks formed. Stones can get into such holes, which will subsequently be directed into the engine. For this reason, the integrity of the cleaning part and the box is important.
Installing the air filter takes only 15-20 minutes, after which the engine runs much better. Manufacturers recommend replacing and installing a new block every 30,000 kilometers traveled.
Problems with a clogged filter
A filter clogged with dust will reduce the air supply to the cylinders, which will affect the quality of the fuel mixture. The fuel will not burn completely.
This threatens:
Overheating of the engine and burnout of its elements, pistons and valves. Since unburned fuel will accumulate in subsequent cylinder operation cycles and burn with the newly received fuel.
Reduced engine traction properties because incompletely burned fuel will not create the required pressure during the power stroke.
An increase in fuel consumption is associated with a decrease in engine power. Since it will be compensated by an increase in fuel supply. By pressing the gas pedal.
List of tools
Replacing the air filter on a Priora is carried out using the following tools:
- wrench (10);
- screwdrivers of various modifications;
- pliers.
After preparing the necessary instruments and components, you can safely begin to consider the procedure for dismantling and replacing the unit.
Before removing the part, we recommend disconnecting the negative terminal from the battery. This is done using a wrench.
Filter installation
The filter is located in a plastic housing. The housing cover is secured with four bolts. In the corners.
You can disconnect the pipe from the air flow sensor; it is attached to a clamp. Without it, it will be more convenient to clean the filter housing from dust.
The filter is installed in such a way that the corrugations align along the movement of the car. When installing, you must seal the rubber band with your hands. It should sit evenly along the edges of the body.
Then the lid is closed and the screws are tightened. There are no complications during installation. It is important that the filter fits tightly. And air leaks were not allowed. Then the air flow sensor is installed.
Step-by-step instructions for high-quality dismantling
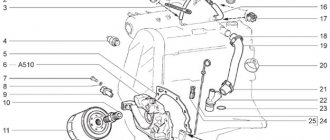
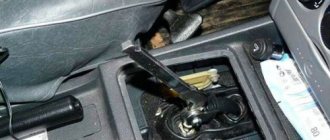
The air filter on the Priora is connected to the mass air flow sensor. This component is necessary in a vehicle to determine the correct amount of air flow. Based on such information, the electronics unit responsible for control calculates the correct proportions for fuel preparation. The air filter is attached to this unit using wires. To remove the wiring harness, lift up the special clamp. Most often it is colored yellow.
Next, using a screwdriver, you need to loosen the steel clamp that tightens the outlet tube from the filter. With leisurely movements you can disconnect it from the box. The air filter on the Priora has three rubber supports that are connected to the metal body of the car. During dismantling, they can also be pulled out. To prevent this, the air filter mount (rubber supports) can be lubricated with automobile oil or a silicone mixture.
If the air filter mounts in the form of rubber supports have come out of their grooves, you can return them to their place using pliers. Use pliers to pinch the ends of the supports and place them in the grooves.
Air flows enter from below through a special pipe. During the dismantling process, carefully pull the housing upward until the input element appears. Pull the pipe and it will detach from the body.
The instructions on how to correctly install the air filter after changing the component are characterized by the reverse sequence of actions.
Changing the cleaning element
To change the cleaning unit, you do not have to completely remove the housing. The air filter is installed after removing the terminal from the battery.
Removing the cover to change the filter
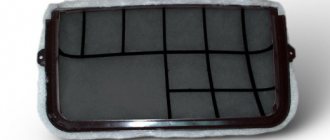
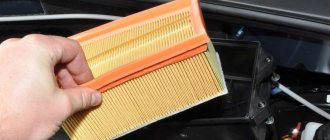
The air filter is attached to the housing cover, which can be removed simply by unscrewing 4 screws. After dismantling the cover, pay attention to the corrugated air duct; it must be slightly bent. The filtration element is attached to the body with special rubber seals.
Once separated from the seals, you can begin cleaning and replacing. Cleaning work is carried out using a vacuum cleaner. In addition to the block, the seat also needs to be cleaned.
Replacing components is a simple process; any car enthusiast without experience or specialized knowledge can handle it.
Priora diagnostic connector: features and placement
Lada Priora: fuel consumption
Removing and installing the air filter VAZ 2170 Priora
- Repair manuals
- Repair manual for VAZ 2170 (Priora) 2004+.
- Removing and installing the air filter
The air filter is removed to gain access to other units in the engine compartment, as well as if it is damaged.
You will need: a 10mm wrench, a flat-blade and Phillips-blade screwdriver, and pliers.
1. Disconnect the wire from the negative terminal of the battery.
2. Disconnect the wiring harness connector from the mass air flow sensor (see “Replacing the air filter element” ).
| 3. Loosen the clamp securing the air supply hose... | 4. ...and disconnect the sleeve from the mass air flow sensor. |
| 5. If you are removing the air filter to replace it, and the new filter does not have a mass air flow sensor installed, remove the two sensor mounting bolts... | 6. ...and remove the sensor from the filter... |
7. ...and its O-ring.
| Note If you remove the air filter not for replacement, but to gain access to other units, the mass air flow sensor does not need to be removed. |
| 8. Squeeze the tapered shanks of the supports with pliers and remove the three rubber supports of the air filter from the holes. | 9. Remove the tip of the air intake hose from the bracket by pulling it towards the left headlight... |
| 10. ...and remove the air filter assembly with the air intake pipe. | 11. If necessary, remove the air intake hose from the adapter spacer. |
12. If you are replacing the air filter, remove the rubber air filter supports from the holes in its housing by squeezing the conical shanks of the supports with pliers (see paragraph 8). Install the supports on the new filter in the same way as when removing them, lubricating their shanks with engine oil to make installation easier.
| Note The manufacturer recommends cutting off the supports with a knife, in which case you will have to replace them with new ones. |
13. When installing rubber supports in the upper cross member of the front end, first insert the lower half of the support from the air filter side into the hole, and then, using a screwdriver, push the remaining lower part of the support into the hole.
14. Install the air filter and all removed parts in the reverse order of removal.
↓ Comments ↓
1. Car structure
1.0 Car structure 1.1 General information about the car 1.2 Passport data 1.3 Car keys 1.4. Controls 1.5. Heating and ventilation of the cabin 1.6 Ensuring a comfortable air temperature in the cabin 1.7. Doors 1.8. Passive safety equipment on the car 1.9. Seats
2. Recommendations for use
2.0 Recommendations for use 2.1. Safety rules and recommendations 2.2 Running in the car 2.3 Operating the car during the warranty period 2.4. Preparing the car for departure
3. Problems along the way
3.0 Malfunctions along the way 3.1. The engine does not start 3.2 Malfunctions of the fuel injection system 3.3 Idle speed has disappeared 3.4. Interruptions in the operation of the 3.5 engine. The car moves jerkily 3.6 The car accelerates poorly 3.7 The engine stalled while driving 3.8. Oil pressure dropped to 3.9. Engine overheating 3.10. The battery does not recharge 3.13. Knocks in the engine 3.16. Wheel puncture
4. Maintenance
4.0 Maintenance 4.1. General provisions 4.2. Inspection work 4.3. Lubrication and filling works 4.4. Diagnostic work 4.5. Repair and adjustment work
5. Engine
5.0 Engine 5.1 Design features 5.2 Possible engine malfunctions, their causes and solutions 5.3 Useful tips 5.4 Checking compression in the cylinders 5.5 Removing and installing the decorative engine casing 5.6 Removing and installing the engine splash guard 5.7 Installing the piston of the first cylinder to the TDC position of the compression stroke 5.8 Replacing the drive belt gas distribution mechanism and tension roller 5.9 Replacing the power unit supports 5.11. Replacing engine seals 5.13. Engine cylinder head 5.15. Engine repair 5.16. Lubrication system 5.17. Cooling system 5.18. Power supply system 5.19. Design Features
6. Transmission
6.0 Transmission 6.1. Clutch 6.2. Gearbox 6.3. Front wheel drives
7. Chassis
7.0 Chassis 7.1. Front suspension 7.2. Rear suspension
8. Steering
8.0 Steering 8.1 Design features 8.2 Possible steering malfunctions, their causes and solutions 8.3. Steering column 8.4. Steering linkage 8.5. Steering gear
9. Brake system
9.0 Brake system 9.1 Design features 9.2 Possible malfunctions of the brake system, their causes and solutions 9.3 Bleeding the brake system hydraulic drive 9.4 Removing and installing the vacuum brake booster 9.5 Replacing the brake pedal axle bushings 9.6. Main brake cylinder 9.7. Front wheel brakes 9.8. Braking mechanisms of the rear wheels 9.9. Pressure regulator 9.10. Brake hoses and tubes 9.11. Parking brake
10. Electrical equipment
10.0 Electrical equipment 10.1 Design features 10.2. Battery 10.3. Mounting block (relays and fuses) 10.4. Generator 10.5. Starter 10.6. Ignition switch (lock) 10.7. Electronic engine control system (ECM) 10.8. Ignition system 10.9. Lighting, light and sound signaling 10.10. Windshield cleaner 10.11. Washer reservoir 10.12. Electric fan of the engine cooling system 10.13. Electric motor of the heating and ventilation system fan 10.15. Cigarette lighter 10.16. Instrument cluster 10.18. Electronic anti-theft remote control system 10.19. Immobilizer 10.21. Replacing sensors and switches
11. Body
11.0 Body 11.1 Design features 11.2 Possible body malfunctions, their causes and solutions 11.3 Removing and installing windshield frame lining 11.4 Removing and installing soundproofing upholstery in the engine compartment 11.5. Removing and installing bumpers 11.6 Removing and installing the fender liner and protective wing cover 11.7 Removing and installing the front fender 11.8 Removing and installing decorative sill trims 11.9. Hood 11.10. Trunk lid 11.11. Doors 11.12. Seats 11.13. Seat belts 11.14. Rear view mirrors 11.15. Interior fittings 11.16. Instrument panel 11.17. Heater 11.20. Body care
12. Applications
12.0 Appendix 12.1 Appendix 1. Tightening torques of threaded connections, Nm 12.2 Appendix 2. Fuels, lubricants and operating fluids 12.3 Appendix 3. Nominal filling volumes 12.4 Appendix 4. Basic data for adjustments and monitoring 12.5 Appendix 5. Spark plugs used on vehicles 12.6 Appendix 6. Lamps used on a car 12.7 Appendix 7. What you need to have in a car 12.8 Appendix 8. Tools used when repairing a car
13. Electrical diagrams
13.0 Electrical Diagrams 13.1 Diagram 1. Instrument Panel Harness Connections 13.2 Diagram 2. Vehicle Front Wire Harness Connections 13.3 Diagram 3. Engine Electronic Control System (ECM) Harness Connections 13.4 Diagram 4. Vehicle Rear Wire Harness Connections 13.5 Diagram 5. Light Harness Connections license plate light 13.6 Diagram 6. Left front door wiring harness connections 13.7 Diagram 7. Right front door wiring harness connections 13.8 Diagram 8. Rear door wiring harness connections
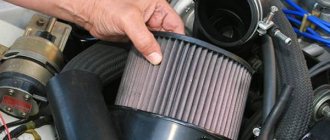
Zero resistance filter for Priora
This is where it’s worth talking in detail about air resistance. All mentioned consumables operate with a resistance of 5-7%. That is, they suck in and process air not at such a high speed as the injector “would like” to receive it for a good saturated fuel-air mixture.
A zero-resistance filter reduces the considered indicator to 0 - and the dynamics increase, the engine operates “at full”, almost at 100% efficiency, the maximum speed becomes higher than that declared by the manufacturer. In real life, there is no fairy tale without bitterness: you will have to pay for choosing this option.
It is made of several layers of cotton fabric, the structure of which contains many pores; paper content is minimal. The fabric is attached to an aluminum body. Available dry or impregnated (the impregnation is an oily composition). In the second version, you have to get a spare part every 3 thousand kilometers.
“Nuleviki” are installed either in a regular place or separately. If the “zero” standing in its regular place still brings some benefit to the use of engine power, then standing alone does not contribute to this at all.
First of all, it creates a real clutter under the hood, located just above the engine. According to the law of physics, the air temperature above (just above the engine) is always higher than below. This hot air absorbs and removes the fuel-air mixture. The problem is: hot air is more rarefied, the molecules are located at a greater distance from each other. The injector, receiving rarefied air, again forms a fuel-air mixture with a huge proportion of fuel. Consumption increases, and for good acceleration you will have to burn a lot of gasoline. There is no benefit from this.
When choosing a spare part for your Priora, you should be guided by common sense and the “Do no harm” principle. This part is not that expensive, so if the manufacturer suits you, purchase several consumables at once and you can put them aside for storage. If the filter is good, does not become dirty ahead of time, you see that the engine is not harmed by dust and dirt coming from the air flow, then the consumable is good.
How and when to change the cabin filter in LADA Priora
The air conditioning systems of Lada Priora cars use cabin filters. The purpose of the devices is to effectively clean the air flow entering the car interior. Below we will look at how to replace the cabin filter on a Priora and in what cases it needs to be changed.
Before changing the purifier, you need to know its location.
A device designed to filter the air in Lada Priora cars is installed in a special niche in the engine compartment under the windshield of the car.
The cleaner is placed vertically, so to gain access to it you need to remove the hood seal. The location where the filter is located does not depend on whether the car is equipped with air conditioning or not.
When is it necessary to change?
Now let's look at how often you need to replace the purifier in the Lada Priora.
According to official regulations, the old filter must be replaced with a new one every 10 thousand kilometers if the vehicle is used under normal operating conditions.
When they are harsher and you often drive your car on dusty roads in large cities, then you need to change the cleaner every 5-7.5 thousand kilometers.
By what signs can you determine that it is time to make repairs and install a new cabin filter:
- the air inside the car has become dirty;
- car windows sweat a lot, even in dry weather and no humidity outside;
- a damp smell appeared in the car interior, which intensified when the heating system was activated;
- the glass blowing became weaker.
Filter selection
Lada Priora cars can use several different cleaners - Panasonic and Halla.
Analogs
If you do not want to overpay or you are not satisfied with the performance of the original filter, take a closer look at analogues. They are not inferior to, and in most cases even superior to, original components in quality.
Consider the following options:
| Brand | vendor code | Price, rub.) |
| JS Asakashi | A0029 | 200-250 |
| Fortech | FA021 | 200-300 |
| Sakura | A2412K | 230-250 |
| BIG Filter | GB9597C | 210-270 |
When purchasing, you should be guided by similar requirements: check the packaging for compliance with the original one and make sure that there is no external damage on the part itself.
If you have questions, ask the seller for a product certificate (if you purchase VF in a salon). It is better to carefully inspect the part in advance than to accidentally purchase a low-quality Chinese fake.
Original
Most car owners prefer to buy and install original spare parts. When the Lada Priora is released, a LADA air filter under article number 21120110908082 is installed at the factory. A filter from the BIG brand can also be installed out of the box. You can find it by catalog number GB-320.
The price of the original air filter for the Lada Priora injection engine (16 valves) is from 200 to 400 rubles.
Please read the packaging carefully before purchasing. Make sure that the box is made of high quality, it contains only official logos, and there are no extraneous images or inscriptions. Check the filter for damage, including torn bellows. This way you will avoid buying a fake at the price of the original.