V-belt (profile A) Used on “Classic”, Samara, Niva 710 mm cars - VAZ 2108-21099 with a carburetor engine and generator drive. Of the most common 715 BRT cat. number 2108-3701720-01RU,
820 mm - VAZ 111, 1113 (OKA) - generator drive The most common are BRT 1111-3701720-01RU (geared), BRT 1111-3701720RU (simple).
840 mm - used on LADA 4×4 in a variant to drive the power steering pump (vehicles of new years of production)
940 mm - the generator drive of the VAZ Classic 2101-2107 of their modifications, the VAZ 2121 NIVA, the generator drive and the steering hydraulic pump drive of the VAZ 21213 (costs 2 belts) in a variant version a poly V-belt is installed, we will consider it below. AvtoVAZ 21010-1308020-82 (geared), BRT 2101-1308020RU (can be either simple or geared).
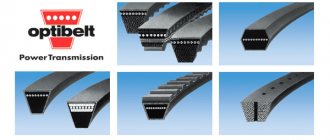
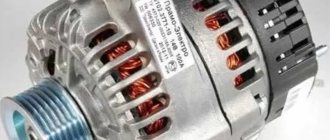
Poly V-belts (ribbed) are used to drive the generator and auxiliary mechanisms.
6PK698 - drive of the VAZ 21093 generator with an injection engine, 2113-2115 with an 8-valve injection engine. The belt tension is produced by a generator, without additional rollers or mechanisms. BRT 21082-3701720RU
6PK742 - drive of the VAZ 2110-2112 generator without power steering, found on the first production LADA Priora. BRT 2110-3701720RU
6PK823 Lada Granta - generator drive. Engine 2116, 8 valves. There is no belt tensioning mechanism. Elastic belt used 6PK823SF
6PK882 - drive of the LADA Kalina (1118) generator with an 8-valve engine, the belt tension is carried out by a mechanism.
4RK913 - drive of the generator and air conditioner Lada Largus, engine 1.4 BRT 4RK913RU
5K990 — alternator belt Lada Largus BRT 5K990R
6PK1005 - Lada Kalina (1118-1119) generator and power steering drive.
6PK1015 - drive generator and power steering VAZ 2110-2112 with a 16-valve engine, LADA Priora, Priora2 with a 16-valve engine, LADA Kalina, Kalina2, Kalina-cross with a 16-valve engine, LADA Granta with a 16-valve engine. Motor VAZ 21126, VAZ 21127
6PK1025 drive of the generator and air conditioning compressor of VAZ 2110-2112 with a 16-valve engine, LADA Priora, Priora2 with a 16-valve engine, LADA Kalina, Kalina2, Kalina-cross with a 16-valve engine, LADA Granta with a 16-valve engine. Motor VAZ 21126, VAZ 21127
5РК1110 — generator drive LADA Largus engine 1.4. BRT 5RK1110RU
5PK1747 - generator drive, power steering, air conditioning LADA Largus 8 valve engine. BRT 8200833541RU
6PK1822 - drive of generator, power steering, air conditioner LADA Largus 16 valve engine BRT 8200598964RU
5PK1885 drive of generator and auxiliary mechanisms LADA 4x4 21214, 21230, Chevy Niva 2123
—> Auto-moto-bicycle equipment —> Posted: 12/16/2015
LOCATION
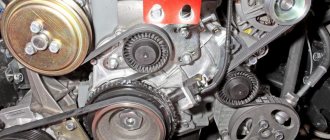
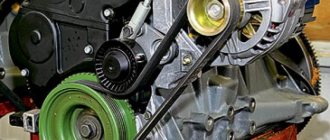
Finding the Alternator belt in a VAZ 2114 is not difficult; when you open the hood, it is immediately visible. There are 2 criteria by which you can easily see it - firstly, it differs from all other belts in that one of its sides is toothed, and secondly, it connects not only the crankshaft and camshaft, but also passes through several small auxiliary parts . If you still don’t understand where it is, let’s first find the generator itself, it is located to the left of the car engine, not far from the right headlight, on the right side of the passenger compartment - accordingly, the belt is located on the generator itself (logically).
Also, before talking about changing, it is necessary to mention that in any case, no matter how carefully the car is operated, and no matter how often you drive it, the alternator belt will begin to deteriorate. Perhaps it will slide, or maybe it will be eaten away, it doesn’t matter, the main thing is that in any case it will become unusable. Therefore, its condition must be monitored very carefully, because no one wants it to break on a long journey.
Wheels for VAZ 2107
Car wheels perform more than just basic operational functions. It’s hard to imagine the stylish appearance of a car without well-maintained and attractive wheels. When choosing a product to install tires on, a number of factors must be taken into account.
Decisions about tuning should never be made at the expense of the technical characteristics of the car. The selection of wheels for the VAZ-2107 will be successful if you take into account a number of technological and design features of the model.
Throughout the entire period of serial production, the VAZ 2107 was equipped with stamped wheels with a diameter of 13 inches (R13) for standard 175 // 70 R13 tires. Export versions, as an exception, were equipped with light alloy models of the same size.
In addition to diameter, car wheels have a number of other parameters:
- width;
- bolt drawing;
- departure;
- centering hole.
The nominal width of the VAZ-2107 rim of different models ranges from 5 to 5.5 inches. This size is important for the vehicle's stability; The coefficient of adhesion to the road surface depends on it. Symbol 5.0J or 5.5J.
The bolt design in production models is indicated by the symbols 4x98, where 4. is the number of holes for fastening the bolts, 98. is the diameter in millimeters of the circle on which they are located. Simply put, 98 mm. this is the distance between the central axes of opposite holes. Novice motorists underestimate another important parameter. The diameter of the hole affects the reliability of fastening the wheel to the hub; this must be taken into account when choosing fastening bolts.
Departure. this is the distance between the plane of contact of the disk with the hub and the plane that conventionally cuts the rim in the center. There are positive and negative overhangs. In the first case, the wheel is recessed into the arch, in the second it is shifted to the outer limit or even protrudes beyond it. The nominal offset of VAZ-2107 wheels is positive and amounts to 29 mm (ET29).
CHANGING THE GENERATOR BELT
Surely, if you are looking for tips on how to remove the alternator belt and then put it back in place, you have already encountered the problem of its malfunction. Know that in order to perform the replacement correctly, you do not need to contact a car service; you can easily perform this procedure yourself . So, first we need to decide what tools we need to replace the alternator belt:
- Socket wrenches for 17 and 19, you can also use open-end wrenches;
- 10mm socket;
- Special tension wrench;
- Flat screwdriver;
- Ratchet wrench.
Attention! Before starting work, be sure to remove the negative terminal from the battery.
Further work must be performed according to the following instructions:
What types of snow blower belts are there?
To create snowblowers, gear parts are used. In terms of reliability, they are in no way inferior to chains, at the same time they are much more convenient to use and have less weight. Spare parts of this type perfectly transmit the rotational element to the shafts and are easy to fix in a small space.
Quite often, a gasoline snow blower and snow blowers of other types differ in that wedge strands with a cross section and a trapezoidal profile are placed there. They perform many functions, so it is impossible to do without its use when creating equipment.
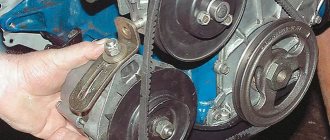
REMOVING THE ALTERNATOR BELT
- First, you need to put the vehicle on the handbrake with fourth gear engaged;
- Next, open the hood and remove the protective cover from the belt, now you need to loosen the tension, then you can remove it;
- Now we remove the generator drive pulley from its place, while leaving its bolt in place. Remove the vehicle from gear.
- Then, you need to turn the crankshaft clockwise, while you need to keep an eye on the mark and the flywheel, they are visible in the hole in the clutch housing. You need to twist it until it becomes parallel to the middle strip of the scale;
- When the mark is in the indicated position, you need to unscrew the tension roller, by the way, with the help of it the tension is released. Now we remove the damaged spare part.
What non-standard sizes can be supplied?
Some car owners practice installing wheels with a diameter different from the standard one.
For example, installing 16-inch wheels on vehicles with wheel arches for 14-inch tires may cause:
- damage to the paintwork of the body;
- breakdown of plastic inserts on wheel arches;
- failure of drilling valves.
After installation, non-standard wheels should not touch body parts or wheel arches. This will not only damage the plastic and paint. But this can also cause other problems. Constant friction of the tire against the wheel arch cap leads to rapid grinding of the tread. This requires premature tire replacement.
When choosing custom tires, consider the following points:
- low-profile tires improve car handling, but when driving on roads with poor-quality surfaces, the likelihood of damage to the suspension increases significantly;
- a larger profile may simply not fit into the arch and damage the car body;
- non-standard profile height requires adjustment, adjustment of the speedometer, otherwise the data it displays will be incorrect.
To install wheels of larger diameter, in some cases it will be necessary to expand the wheel arches with a special roller. This will enlarge the holes and the new wheel will no longer rub the plastic fender liner protection.
WHAT DO YOU NEED TO KNOW?
You have successfully removed the belt from your fourteenth, now in order to install a new one, you need to purchase it. You can buy a new part in any store that sells parts for domestic cars, it doesn’t cost very much, 100-400 rubles, this amount depends on the region of the country.
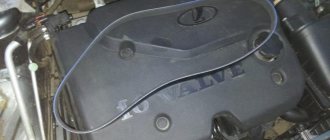
Important: before you run to the store, be sure to find out what the size of the alternator belt on the VAZ 2114 is in your case. If for some reason you cannot take the measurement, you can take the old one with you for demonstration and purchase the same one.
DIN 7867
Poly V-belts with profiles: PH, PJ, PK, PL, RM correspond to this European standard. They are also used in:
Let's start looking at the dimensions of each profile.
The rubber products in question with the PH profile have a length from 1140 to 2404 mm, a height of 2.7 mm and a pitch of 1.6 mm.
| L | h | p |
| 1140 | 2,7 | 1,6 |
| 1219 | 2,7 | 1,6 |
| 1260 | 2,7 | 1,6 |
| 1580 | 2,7 | 1,6 |
| 1600 | 2,7 | 1,6 |
| 1653 | 2,7 | 1,6 |
| 1845 | 2,7 | 1,6 |
| 1874 | 2,7 | 1,6 |
| 1890 | 2,7 | 1,6 |
| 1915 | 2,7 | 1,6 |
| 1930 | 2,7 | 1,6 |
| 1951 | 2,7 | 1,6 |
| 1980 | 2,7 | 1,6 |
| 1992 | 2,7 | 1,6 |
| 2404 | 2,7 | 1,6 |
This ribbed belt profile has a length from 356 to 2489 mm, a height of 4 mm and a pitch of 2.34 mm.
| L | h | p |
| 356 | 4 | 2,34 |
| 381 | 4 | 2,34 |
| 406 | 4 | 2,34 |
| 432 | 4 | 2,34 |
| 457 | 4 | 2,34 |
| 483 | 4 | 2,34 |
| 508 | 4 | 2,34 |
| 559 | 4 | 2,34 |
| 584 | 4 | 2,34 |
| 610 | 4 | 2,34 |
| 660 | 4 | 2,34 |
| 686 | 4 | 2,34 |
| 711 | 4 | 2,34 |
| 737 | 4 | 2,34 |
| 762 | 4 | 2,34 |
| 786 | 4 | 2,34 |
| 813 | 4 | 2,34 |
| 838 | 4 | 2,34 |
| 864 | 4 | 2,34 |
| 889 | 4 | 2,34 |
| 914 | 4 | 2,34 |
| 965 | 4 | 2,34 |
| 991 | 4 | 2,34 |
| 1016 | 4 | 2,34 |
| 1054 | 4 | 2,34 |
| 1092 | 4 | 2,34 |
| 1143 | 4 | 2,34 |
| 1168 | 4 | 2,34 |
| 1194 | 4 | 2,34 |
| 1219 | 4 | 2,34 |
| 1245 | 4 | 2,34 |
| 1270 | 4 | 2,34 |
| 1295 | 4 | 2,34 |
| 1321 | 4 | 2,34 |
| 1372 | 4 | 2,34 |
| 1397 | 4 | 2,34 |
| 1461 | 4 | 2,34 |
| 1473 | 4 | 2,34 |
| 1549 | 4 | 2,34 |
| 1600 | 4 | 2,34 |
| 1626 | 4 | 2,34 |
| 1651 | 4 | 2,34 |
| 1702 | 4 | 2,34 |
| 1753 | 4 | 2,34 |
| 1778 | 4 | 2,34 |
| 1854 | 4 | 2,34 |
| 1930 | 4 | 2,34 |
| 1956 | 4 | 2,34 |
| 1981 | 4 | 2,34 |
| 2019 | 4 | 2,34 |
| 2083 | 4 | 2,34 |
| 2210 | 4 | 2,34 |
| 2286 | 4 | 2,34 |
| 2337 | 4 | 2,34 |
| 2489 | 4 | 2,34 |
REVERSE INSTALLATION
When you have purchased a new part, it is time to figure out how to install the alternator belt. This procedure is performed in the following order:
- We put the new generator belt on the camshaft pulley, now we tighten both branches;
- The part that is not tensioned is tightened by the roller, put on the pump and crankshaft pulley, then we tighten the belt by reverse rotation - counterclockwise;
- We turn the crankshaft about 2 turns, check the positions of the marks, they should be in the middle;
- If the marks do not match, repeat the entire procedure until you can set them correctly;
- You need to unscrew the crankshaft bolt and put the generator pulley in its place, then tighten it with the bolt. This is done by turning the roller counterclockwise;
Checking the condition of parts
No matter what generator
installed on the Gazelle, the causes of the malfunction, as a rule, can be of the same nature.
The generator brushes should not have chips or cracks; when pressed with a finger, they should freely sink into the channels of the brush holder, and return to their original position under the influence of the spring.
The length of the brushes should not be less than 4 mm, and if there is severe wear, they are replaced with new ones.
The stator is checked for short circuits between the turn windings and the housing.
This is done by connecting one terminal of the control light to the housing, and the second is alternately connected to one of the three terminals of the turns. In this case, if there is a short circuit to the housing, the indicator light will light up. Having discovered this type of malfunction, it is eliminated or the stator is completely replaced.
To check the stator for a short circuit between the turns, a test lamp is alternately connected to the two terminals of the windings. Moreover, if the light bulb lights up, then there is no break in the turns.
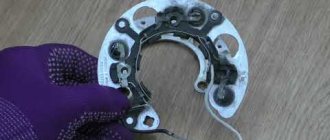
The generator rectifier unit should be cleaned of dust and dirt deposits. Next, you should check the diodes using a test lamp. Due to the fact that diodes of different polarities are placed in each section, they are checked with different battery connection polarities. If a faulty diode is detected, the rectifier unit is replaced.
Adjusting belt tension
Incorrect tension of the alternator belt can have an extremely negative impact on the operation of the components and assemblies that depend on it. Thus, too weak a tension will lead to its slipping, leading to unstable operation of the generator (due to poor transmission of torque) and interruptions in the on-board network (including rapid battery discharge).
On the contrary, an excessively tight belt tension can cause excessive stress on the generator bearings, thereby leading to their rapid wear or even destruction. It is for this reason that the tension value is extremely important and should be checked periodically.
In order to correct it and return the belt to normal operating condition, you need to:
- loosen the generator fasteners from below and from above;
- turn the adjusting bolt and thus tighten the tension (to increase the tension, rotate the bolt to the right, to loosen it, to the left);
- Using a wrench, turn the crankshaft several turns and check the tension;
- If the tension is OK, tighten the generator fasteners.
VAZ 2114 generator belt tension
The tension check itself can be done by simply pressing the belt with your hand. If it is tensioned correctly, its deflection will be about 8 mm. If the deflection is greater, the tension should be increased; if it is less, it should be weakened.
You can check the correct tension in another way - just put the multimeter in DC voltage measurement mode with a limit of 20 volts and measure the voltage at the battery terminals with the engine running. Stable readings will indicate that the belt is tensioned well (which means that rotation is transmitted smoothly to the generator). If the voltmeter readings fluctuate, the belt tension should be adjusted.
Another clear sign of proper belt tension is that it runs silently. If it moves smoothly, without making a whistle, hum or other extraneous sounds, then everything is fine. If any noise is heard during its operation, it means that the tension was performed incorrectly (in some cases, the cause of the noise may be jamming of the generator, as discussed above.
That is why, if after repeated attempts to adjust the belt tension it is not possible to remove the whistle, you should pay attention to the condition of this device).