The low cost and availability of gas is the main reason why car owners are massively switching to alternative fuels and installing gas-cylinder equipment. Among them there are also owners of old cars with a carburetor engine, who are also not averse to saving on fuel and increasing the respectable (but also fearsome) resource of a decrepit engine. But the design features of gas equipment on a carburetor, which are usually classified as generations, do not allow the installation of an arbitrarily selected configuration of a gas installation on a vehicle with a carburetor. There are a number of differences here that are worth considering carefully.
HBO for a carburetor car
The engines of any car are divided into carburetor and injection. These are fundamentally different devices: the first sucks in a mixture of fuel and air due to the difference in pressure, all remote adjustment is absent or minimal. An injector, on the contrary, is a high-tech modern means of injecting fuel into the engine through separate nozzles, one for each cylinder. The process at all stages is corrected by an on-board computer, which, with bundles of pressure, temperature, oxygen and other sensors, collects information about the state of affairs, analyzes it and automatically controls the supply of fuel through solenoid valves in units and lines.
Mixer
Supply the engine with the required amount of gas and air. This happens in various ways through the carburetor diffuser, or by creating a diffuser in the design of the mixer itself.
For each type of vehicle there is a specific mixer model.
Mixer 300-489 FIAT Punto2 Mixers can also be divided into several groups: 1. Mixers installed in the upper part of the carburetor; 2. Mixers - spacers that are installed in the middle part of the carburetor. 3. Fittings, so-called inserts, inserted into the carburetor using drilling. 4. A fork-shaped system consisting of tubes that are inserted into the carburetor without drilling. 5. Mixers for injection systems of various modifications. Faucets, options and costs
Selecting a gas generation system compatible with the carburetor
Since LPG is built into the fuel delivery system to the engine, it is important to take all these features into account. New generations of gas installations (starting from 3) are equipped with their own electronic brains, which fully simulate the necessary settings and form the optimal injection of a gas-air mixture of a suitable composition for a smooth and accurate ride and ensuring the integrity and safety of the mechanism.
To do this, they have their own sets of sensors and lambda probes that measure the level of oxygen content sorted into tubes, valves, injectors, gearboxes and manifolds. At the slightest change in the desired parameter, the sensor will immediately inform the software unit about this, which will properly respond by opening/closing a specific electrovalve. The carburetor circuit is devoid of all these advantages - there is simply not even a simple on-board computer that can diagnose and adjust the operation of the chassis, there are not even sensors, except for the most basic ones. LPG is installed through a special adapter-mixer, or directly - by making inserts directly into the carburetor and bringing out the main pipes for supplying gas there. Only two sensors are connected: to the carburetor throttle valve and an oxygen lambda probe in the intake manifold. Their readings set in motion a single electronic valve that regulates the flow of gas from the reducer. This is the operation scheme of 2nd generation gas equipment, which is optimally suited for carburetor versions of the engine.
Even older car models (for example, old Soviet ones) do not have even that minimal electrification and all adjustments are carried out manually, by rotating two screws on the gearbox housing, and another on the gas supply hose from the cylinder. The valve is the most ordinary mechanical one, without power blocks or sensors. Their functions are performed by a one-sided vacuum membrane in the reducer, which, at a certain value of vacuum, opens for a certain period of time, allowing a portion of gas into the collector. All adjustments are very simple - the portion size depends on the degree of opening/closing of only one dispenser screw, which is once set, then adjusted only together with carburetor maintenance (or if there is a malfunction). The most simple and accessible, but ineffective operating principle of 1st generation LPG is still relevant today, thanks to the significant prevalence of cheap and reliable carburetor engines in old cars.
Balloon
Made of 3-4mm thick steel to ensure safety even in case of accidents. Currently, cylinders are produced in various sizes depending on the engine size.
A cylindrical cylinder is the most common shape in first-generation LPG installations.
Cylindrical cylinders, options and cost Toroidal cylinder - designed for mounting in a spare wheel storage area. This shape allows you to conveniently place the cylinder in a car while maintaining useful space, for example in a station wagon. Toroidal cylinders, options and cost There is a variation in the cost of cylinders; toroidal options are best for installation.
Step-by-step diagram of installation and connection of a gas installation
The undeniable advantage of 1-2 generation gas equipment is cheap and easy setup, without the need to connect dozens of bundles of cables and injectors.
Anyone with the minimum skills of a car mechanic and the simplest necessary tools can handle the installation. Those who are not even motivated by this to roll up their sleeves and lift the hood to carry out the installation themselves will be pleasantly surprised by the prices in car services for such a service with the help of in-house specialists. Especially when compared with the cost of installing injection systems.
Any LPG model compatible with a carburetor consists of:
- A gas cylinder filled with liquefied propane or methane. There are cylindrical and toroidal varieties, differing from each other in shape and size. Since this is a volumetric unit, it is installed either in the trunk, or if the dimensions allow for a spare wheel. Several small cylinders fit under the hood for cars with high ground clearance.
- Multi-valve (representatives of the 2nd generation also have a ventilation box through which the gas is filtered and released in an emergency), the regulation of the fuel supply from the cylinder is combined with a composition filter, separating large mechanical impurities. The valve is located directly on the cylinder to which it is screwed.
- Line - a copper or plastic tube running from the fuel tank to the gearbox. Equipped with a valve for manually shutting off the gas supply under high pressure. Often there are configurations with an additional filter.
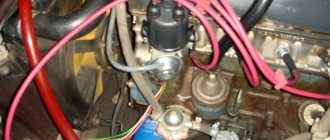
- The evaporator reducer is one of the key points in the operation of gas equipment. Liquefied gas stored in cylinders is completely unsuitable in its raw form for use by a motor, so in the reducer it is transferred into the free gaseous phase (evaporates) and the pressure is normalized to the operating parameter. All these procedures are accompanied by a sharp expansion of the gas and, accordingly, a decrease in temperature. In this regard, a somewhat unexpected problem may arise - an icy gearbox that is not able to function normally (which is why in the cold winter the engine is first started and warmed up on gasoline and only then is gas connected). To avoid regular freezing of the gearbox, it is placed closer to the stove and connected to the cooling system so that it warms it up by circulating liquid.
- The dispenser at the outlet of ready-to-use fuel from the gearbox is filled with a certain portion and only then allows the gas to pass further. Depending on the generation and configuration of the gearbox, it can be mechanical (the dispenser is adjusted only by a screw), vacuum (with an additional tube into the manifold and a membrane, adjustment is carried out by changing the vacuum in the manifold) and electric (2 generations, then it comes with a small power unit).
There are two main options for connecting to the carburetor: with a mixer or directly. The first method for those who do not have any tools is to simply screw the ready-made adapter to the mounting connectors on the carburetor body. In the second case, a hole is drilled into both chambers, a corresponding thread is cut into them with a special tool, onto which the fittings are screwed.
Equipment setup
Reducer-evaporator diagram
As an example, consider the configuration option for a popular gearbox from Tomasetto (Tomasetto AT-07 electronic). Adjustment of 2nd generation Lovato gearboxes and its full analogues, such as Atiker and Torelli, is performed in a similar manner.
Before starting work, make sure that all engine systems are in good condition. The air filter has been changed, the ignition has been adjusted, and the coolant level is normal. Drain the condensate from the gearbox, if it is not new, make sure it is in good condition.
In order to adjust second-generation gas equipment with your own hands, you need to warm up the engine to operating temperature on gasoline, switch to gas and turn off the engine. From now on, we will separate the tuning options for different types of engines.
Correct adjustment of 2nd generation HBO on a carburetor with your own hands
- Using a flat-head screwdriver, tighten the screws of the gearbox and dispenser until they stop (without much effort), and then unscrew:
- membrane sensitivity 2-3 turns;
- “greed screw” of the first chamber until fully open, the second by 1 turn.
- Start the engine on gas. Gradually tighten the sensitivity screw to find the moment the speed drops at a lean mixture. Attention! A drop may occur when the mixture is enriched. Therefore, if, when unscrewing the screw, the speed increases, and then falls again, it means that this is working on a rich mixture. Now, by screwing the screw back in clockwise, you need to set the peak of increased engine speed - this way the idle speed will be found (800-850 rpm). If higher, adjust the quantity screw on the carburetor itself to the desired readings.
- Use the accelerator to increase engine performance around 3000 rpm. Use the “greed screw” of the first chamber to set the moment when, when it is tightened, the drop begins, and when unscrewed, the speed increases. Release the accelerator and revoke the throttle; if the internal combustion engine develops low speed (there is a dip), unscrew the screw of the first chamber of the power register by 1/8. At the same time, adjust the sensitivity screw as indicated in point No. 2. Check by re-gasping again.
- The second chamber of the carburetor operates at increased engine speeds from 3000 rpm (depending on the engine brand). Therefore, the “greed screw” of the second camera must be set to approximately the same position as the first.
- Next, you need to carry out control tests on the move under different loads (lifts, sudden accelerations).
Setting up 2nd generation HBO on an injector
- Unscrew the screw of the power register and membrane by 2-3 turns, tighten it until it stops.
- Start the engine. Raise the engine speed to 3000-3500 rpm, by tightening and unscrewing the dispenser, find the peak of maximum engine speed. From this position, screw in the register screw 0.5 turns.
- Release the accelerator and revise the throttle. If the engine starts to choke, unscrew the metering bolt 1/8. And so on until finding the optimal speed set.
- Then, gradually tightening the membrane sensitivity screw, find the moment the speed drops, loosen the screw by 1/8.
In this case, it is convenient to use a lambda probe emulator. The setting can be considered correct when the indication on it (LED) glows red at idle. If this condition is not met, you can unscrew the x/x screw until the engine speed stabilizes. Also, if you have a device (gas analyzer), you can use it to adjust the gas equipment even more accurately.
5. Make further adjustments during sea trials. If the car does not develop enough power, slightly release the gas supply with the register screw.
Connection
The installation diagram for the gas equipment has been completed, all that remains is the connection: the only element requiring electrical wiring and power supply in the first generation is the gas/gasoline switching valve.
To do this, you will need to install the solenoid valve on the gasoline line and combine its wiring with the gas supply switch cable.
The connected cord is led out into a button on the driver's seat; usually they try to position it so that it can be pressed without being distracted from the road - after all, the driver usually switches to the gas while driving, having gained a certain speed.
Possible malfunctions on HBO2
The following is a table of possible HBO2 malfunctions, as well as methods for eliminating them.
| Problems | Cause | How to find? | How to fix it? |
| DSV doesn't want to run on gas. Doesn't start well or doesn't start | Gas is not flowing well | Check the output of the multivalve gas equipment to the gas supply | Carry out repair or replacement |
| Check the gas valve output | Blow out the line. The filter or valve may need to be replaced | ||
| Check the gearbox output. When checking the gas supply, note that it should be in the form of a white mist. | Carry out repair or replacement | ||
| Incorrect amount of gas supplied to engine | Adjustment problems | Correct the adjustment | |
| The gearbox is broken | Carry out repair or replacement | ||
| Problems with the tightness of the intake system | Remove the air leak | ||
| Gasoline comes with gas | Check the gasoline valve | Carry out repair or replacement | |
| The gas reducer constantly freezes | Coolant is not circulating well | Either the liquid is weak or there is not enough of it | Add more antifreeze |
| Valve sealing problems | Gas continues to escape when the gearbox stops | Repair or replace valves | |
| The engine does not warm up well | Find additional ways to warm up | ||
| The engine does not work during auxiliary strokes | The idle system has become unusable | Check auxiliary operation using gasoline | Repair carburetor |
| Poor adjustment | Fix adjustment problem | ||
| The reducer is filled with gas condensate | Remove condensation | ||
| The engine is unable to make revolutions after the auxiliary stroke, or it stops working altogether | Low gas | Excess debris has accumulated on the valve, filter or line | Clean everything from dirt |
| Fuel does not ignite | Ignition works intermittently | Check the spark plugs |
There are a lot of problems with the operation of HBO. Each breakdown is corrected individually.
HBO 2 is indispensable for monitoring the gasoline transfer process. That is why, at the slightest problem, it must either be repaired or replaced.
Fuel switch
Gas/gasoline switch is a device designed to switch the operating mode of a vehicle from one type of fuel to another at the moment when a certain number of vehicle engine revolutions is reached.
Switch K-5 Tamona All switches are divided into three main groups.
1. For injection engines. This type of switch has three positions: petrol, gas and automatic mode. 2. For carburetor engines with the installation of an electronic gearbox. In these switches, the “GAS” position is equipped with an automatic shutdown of power from the shut-off valves. 3. For carburetor engines with the installation of a vacuum reducer. And on this gas-gasoline switch there are two toggle switches. One for switching the type of fuel, the second for pumping gas before starting the engine.
The cost of switches usually does not exceed 1000 rubles.
Switches, options and costs All switches come with a wiring diagram and mounting kit.
Injector operation emulator
When installing LPG, the gasoline supply is interrupted by turning off the injectors. The standard ECU initiates injector shutdown as a break in the injectors, turns on the fault lamp (Check Engine) and puts the engine into emergency mode (the latter rarely happens).
The injector operation emulator is used to prevent the ECU from seeing the injectors breakage.
Let's look at its diagram.
Injector operation emulator circuit When running on gasoline, the circuit is closed, and when running on gas, the circuit opens and runs through the load resistors, thereby not indicating to the ECU that the wires are broken.
The emulator is selected according to the number of engine injectors, usually 2, 4, 6 injector models.
The cost of such an emulator is within 1500 rubles.