On a modern car, several systems and a large number of sensors simultaneously monitor the operation of the engine and adjust its behavior when internal and external parameters change.
If any malfunctions or irregularities appear in the operation of the internal combustion engine, they are recorded by the control unit (ECU) and stored in memory. These errors may appear as lights on your dashboard. Most often we are talking about Check Engine.
One of the errors that motorists may encounter when connecting to the ECU with a scanner is P0113. You should know what it means, what symptoms it is accompanied by and how to eliminate it on your own.
What does code P0113 mean?
P0113 is triggered when the engine control module (ECU) reads a high voltage signal in the Intake Air Temperature (IAT) sensor circuit.
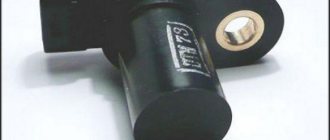
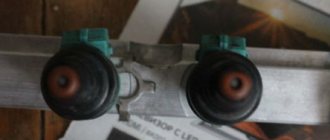
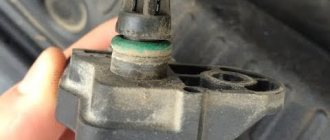
On most cars, the DTVV is located in the air intake housing. Inspect the intake air system and look for a barrel-shaped sensor with a two-wire connector.
If you don't find two wires, the IAT may be integrated with the mass air flow sensor (MAF). The temperature sensor can sometimes be found on the intake manifold.
Symptoms of malfunction
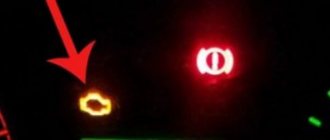
The main driver symptom of P0113 is the MIL (Malfunction Indicator Light). It is also called Check engine or simply “check light”.
They can also appear as:
- The “Check engine” warning light on the control panel will light up (the code will be stored in the ECM memory as a malfunction).
- The vehicle engine may become unstable under load or acceleration.
- The engine runs on a fuel mixture that is too lean or too rich depending on the outside temperature.
- But more often, no symptoms are felt.
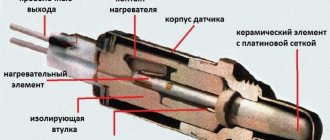
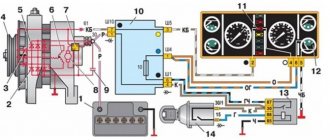
IAT connection diagram
The electrical circuit for DTVV is shown below:
The sensor is calibrated and produces a voltage proportional to the air temperature. Higher temperatures result in higher voltage being applied to the ECU because the internal resistance of the IAT decreases as it heats up.
Errors associated with high circuit input signal are mainly caused by faulty generators that create excess voltage. Although there may be other reasons, such as short circuits that "leave" current into a particular system from other, unrelated systems operating at higher voltages.
Note that in the case of short circuits, there are likely to be other seemingly unrelated fault codes present.
Diagnosing a "high input" code will always involve thorough testing of the charging system as a first step, followed by isolating the circuit from all other possible voltage sources while checking resistance, continuity, and voltage reference.
On which cars is this problem most common?
The problem with code P0113 can occur on different machines, but there are always statistics on which brands this error occurs more often. Here is a list of some of them:
- Audi (Audi a4)
- BMW
- Cadillac
- Chery (Chery Tiggo)
- Chevrolet (Chevrolet Aveo, Captiva, Cruz, Lanos, Lacetti, Malibu)
- Chrysler (Chrysler Voyager, Pacifica, PT Cruiser, Sebring, 300c)
- Citroen (Citroen C4, Berlingo)
- Daewoo (Daewoo Nexia)
- Dodge (Dodge Intrepid, Caliber, Caravan, Stratus)
- Ford (Ford Galaxy, Kuga, Mondeo, Mustang, Transit, Fiesta, Focus, Fusion, Explorer)
- Honda (Honda Accord, SRV, Fit, Civic)
- Hover
- Hyundai (Hyundai Grand Starex, Porter, Santa Fe, Solaris, Sonata, Starex, Tucson, Elantra)
- Infiniti
- Isuzu
- Jeep (Jeep Grand Cherokee)
- Kia (Kia Bongo, Rio, Sorento)
- Land Rover (Land Rover Freelander)
- Lexus (Lexus rx300)
- Mazda (Mazda 3, Mazda 6, Mazda cx7, Demio)
- Mercedes (Mercedes w203)
- Mitsubishi (Mitsubishi Galant, Lancer, Pajero, L200)
- Nissan (Nissan Almera, Qashqai, March, Sentra)
- Opel (Opel Astra, Vivaro)
- Peugeot (Peugeot 307, 308, 407, Partner)
- Pontiac (Pontiac Grand AM)
- Rover
- Seat (Seat Alhambra)
- Skoda (Skoda Octavia)
- Ssangyong (Sangyong Kyron, Rexton)
- Subaru (Subaru Impreza, Legacy, Forester)
- Suzuki (Suzuki Grand Vitara)
- Toyota (Toyota Avalon, Avensis, Camry, Corolla, Land Cruiser, Rav4)
- Volkswagen (Volkswagen Passat, Touareg, Touran, Transporter)
- Volvo
- VAZ 2107, 2110, 2111, 2112, 2114, 2115
- Volga Chrysler, Cyber
- Gazelle Business, Chrysler, UMZ 4216
- Zaz Chance
- Lada Granta, Kalina, Niva, Priora
- Tagaz Tager
- UAZ Patriot
With fault code P0113, you can sometimes encounter other errors. The most common are: P0095, P0096, P0097, P0098, P0099, P0102, P0107, P0108, P0110, P0111, P0112, P0114, P0118, P0123, P0127, P0138, P0238, P0303, P0316, P034 0, P0351, P0453, P0708 , P1135, P1155, P1400.
How to resolve error P0113?
The circuit is simple, just two wires going from the ECU to the IAT sensor. If you have a diagnostic scanner or adapter, you can use it to read the temperature directly. Otherwise, you can use a digital multimeter, a thermometer, and a jumper wire such as a thin wire or paper clip.
A table of temperature sensor resistance for your specific year, make, and model vehicle will be especially helpful. You can often find them online.
Sensor check
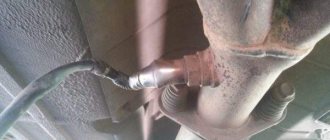
- With the key in the off position, disconnect the DTVV. With the multimeter set to resistance (ohms) mode, measure the resistance at the sensor terminals. If you get an open circuit or short circuit (∞ Ω or 0.0 Ω), the sensor is faulty. Replace the DTVV.
- If you measured the resistance, compare it to the temperature ⁄ resistance chart. If the engine is cold, then the temperature ⁄ resistance of the IAT should be close enough to the ambient temperature that can be measured with a thermometer. If the resistance matches the ambient temperature, you may still have a problem with the sensor. A sensor that operates correctly at ambient temperatures may be out of range at other temperatures. You can check if the sensor is faulty by measuring the resistance after changing its temperature, for example by placing it in a pan of boiling water or in the freezer.
Checking the circuit
If the sensor itself seems to be responding correctly to temperature changes, then you can begin testing the circuit.
- With the ignition key turned on (key on, engine off), disconnect the IAT sensor and check the voltage at the connector. There should be 5 volts on one of the wires. If you don't have 5 volts, there may be an open circuit or a faulty ECU.
- The other wire should read 0V. If you can identify the signal wire correctly, check the resistance to ground, which should be 0.0 ohms. An open circuit probably means you have a wiring problem. On the other hand, 0.0 ohms may still indicate a ground fault.
- If there is no reference voltage of 5 V, there may be an open circuit between the ECU and the sensor, a short circuit to ground, or a malfunction of the controller itself. If there is no signal voltage on the other wire, the sensor may be faulty, an open circuit, or a short to ground.
- In the ECU, check the reference and signal voltage. If there is no 5 V, the problem may be in the controller. If the signal voltage is low or absent, check for corrosion or open circuit in the DTVV.
- Turn the key to the off position, disconnect the ECU connector and check the resistance. If the resistance reading matches the sensor, check if the ECU is faulty. If you measure "0.0 Ω" or "∞ Ω", check for an open or short in the wiring to the IAT sensor.
- Unplug the sensor and measure the resistance again, it should now display as an open circuit, "∞ Ω". If you get any resistance, check for a short in the wiring to the IAT sensor.
- Connect a jumper to the sensor connector and check the resistance in the circuit.
- The correct reading should be "0.0 ohms". Any resistance above 1 ohm may indicate corrosion or an open circuit.
- Check resistance to ground. Any resistance below 1000k ohms may indicate a short to ground in one of the IAT sensor wires.
- If you have a diagnostic scan tool, you can perform many of these checks simply by reading the sensor readings from the ECU. Turn the ignition key to read the temperature while the sensor is connected and then disconnected. If there is no change, you have a problem with the circuit. If there are changes, you have a problem with the sensor.
Under what conditions is it diagnosed?
The error is diagnosed when the engine starts. At this moment, all sensors are read by the electronic control unit. If the density of the air entering the air duct exceeds critical values for more than one and a half minutes, the Check Engine emergency indicator lights up on the dashboard. When reading an error using diagnostic programs or a scanner, its code is issued - P0113.
If the error appeared temporarily and was accidental, then after 4 trouble-free starts the emergency indicator stops lighting. However, the error code is stored in the logs of the vehicle's electronic control unit. From there it will disappear only after 40 trouble-free engine starts.
The Check Engine emergency indicator remains lit in a constant mode if the error has not been eliminated, that is, the sensor has not been put in order. In this case, the ECU imposes restrictions on engine operation and it operates in emergency (safe) mode. As a result, fuel consumption increases, and the rear axle may be disabled in all-wheel drive vehicles. Long-term driving in emergency mode can lead to increased wear of the piston group and valves.
How to fix
In most cases, a malfunction in the sensor's power supply circuit is to blame for the error. However, you must first make sure that the sensor itself is working.
The scheme for checking and identifying problems with the sensor is as follows.
Often the P0113 error is accompanied by other errors with codes P0111, P0112 or P0114. All of them are also associated with malfunctions of the intake air temperature sensor. In this case, the presence of additional errors can help determine the cause of the malfunction without diagnosing, since all errors are related to specific sensor problems.
What does it indicate?
Error P0113 means there is a problem with the intake air temperature sensor. The specific reason for this error is the high signal level of the IAT (Intake Air Temperature) sensor.
The meter is a regular thermistor. The lower the ambient temperature, the more resistance it experiences when entering the engine. And vice versa - the higher the air temperature, the less discharged it is and experiences less resistance. Based on the data received from the IAT sensor, the electronic control unit determines the opening time of the injectors and the ignition angle, and also controls the idle speed.
Error P0113 means that the air density exceeds the maximum set level, that is, the intake air temperature is below the minimum. As a rule, the error is associated with incorrect operation of the sensor or its failure.
Reasons for the error
The causes of the error are problems with the intake air temperature sensor, but the specific cause may be related to various malfunctions of the sensor. Among them are the main sources of the problem:
- failure of the temperature sensor;
- contamination with oil deposits, which leads to a decrease in the sensitivity of the indicator;
- loss of contact in the power connector;
- broken wire in the power supply circuit.
In most cases, the malfunction is associated with a short circuit in the power supply circuit or in the sensor housing itself. In rare cases, incorrect readings of the device, and, consequently, the error P0113 that appears, are associated with contamination of the sensor by spit or oil deposits.