Without a working fuel filter, a car of this brand simply cannot exist. After all, he is the one who filters the fuel. He takes the brunt of the blow. Without a fuel filter, all metal particles would enter the Toyota Corolla system.
If the fuel filter is not replaced on time, then over time, serious malfunctions will begin to occur in the Toyota Corolla fuel system. To repair such a neglected problem, you will have to shell out a considerable amount of money. That is why it is recommended to remember that replacing the fuel filter must be systematic and timely.
Experts recommend dealing with this issue at least once every two years.
This number of replacements is enough to calmly set out on the road, without worrying that the car may become capricious. The engine will run without interruption. But even if you decide to change the filter more often, nothing bad will happen. You can't make a worse car. You will stop thinking about the problem of excessive fuel consumption, and absolutely all the performance of your car will improve.
Selecting a filter for Corolla
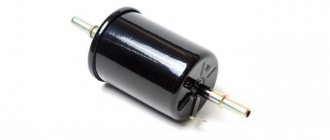
Before replacing a part, you need to select it correctly. When purchasing, you need to pay attention to the article number and compatibility of the filter with a specific modification of the car. The following original parts can be found on sale:
- For Toyota Corolla 180. Product code – 23300-28040, it is also suitable for Corolla Verso. The cost is between 1300-1700 rubles.
- For Corolla 180 and Avensis. Number – 77024-02320, the product comes complete with a pump and costs more – from 8500 to 9000 rubles.
- Original product with article number 77024-12050, suitable for most modifications of the Corolla. Cost - about 5400-5600 rubles.
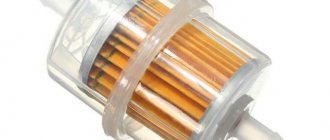
- For cars in the 120 body, a coarse filter with number 23217-0D090 is suitable, the price is 400-600 rubles.
- For modifications with the same body, the upper cover of the fuel pump housing with article number 77024-02040.
- For Toyota Corolla 150 part code 77024-12030. The price is about 4300-4500 rubles.
You can also choose high-quality Korean or Chinese analogues: the most popular are SAT ST-77024-05010, JS Asakashi FS21001 and JAKOPARTS J1332100. Their cost ranges from 500 to 1000 rubles, which allows for significant savings.
Procedure
The procedure should be carried out in several stages. First, remove the negative terminal from the battery to de-energize the power system. Then provide access to the part: to do this, you need to remove the bottom trim under the left rear seat in the cabin, this allows you to open the tank cavity cover.
Removing the fuel pump cover
The cover must be removed. Since it is attached to the caulk, you will need to pry it off with a screwdriver. Before you start replacing the filter, you need to vacuum the points under the bottom liner and the container itself.
Next, you need to open the connector that powers the fuel pump. To relieve pressure in the fuel system, you must try to start the engine several times. Otherwise, when you try to disconnect the hoses, gasoline will spray out under pressure. Open the fuel tank. Disconnect the fuel supply and return pipes. To remove the return, you will need to use a screwdriver and use it to remove the stopper; easy to recognize, yellow in color. Then you need to unscrew the 8 screws with a Phillips screwdriver and remove the pump unit.
Remove the terminal and disconnect the pipes
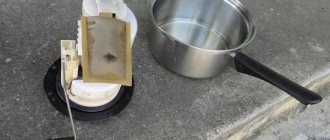
The float is disconnected, for which it is necessary to move the latch, after which the upper part is detached: to do this, you need to press the clamps, which are placed in a circle. The fuel pump must be removed and then inserted into the new filter housing. The mesh must be washed and blown with air to remove dirt, then reassemble the structure in the reverse order, not forgetting to install new gaskets.
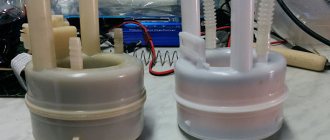
Old and new filters
These instructions are suitable for replacing the filter on a Toyota Corolla in the 120 body. If we are talking about modifications in the 150 body, then instead of a metal gas tank cap, you need to put a plastic ring on the neck, which is equipped with a rubber seal. To remove the block, you need to turn the ring counterclockwise, loosen the rubber insert, and disassemble the pump block. To unscrew the part, you can use a hammer; they need to strike accurately through the wooden pegs. The filter for cars in the 150 body has a slightly different design - it has a different intake network, and the fine filter comes separately.
Safety regulations
When working to replace the filter under the underbody from the passenger compartment, it is very important to follow fire safety rules. Within a few seconds after removing the gas tank cap, gasoline vapors penetrate into the cabin. Their explosiveness when mixed with air is mentioned everywhere. Therefore, in no case should there be sources of sparking and, especially, open fire!
When the pump unit is removed and work is being done somewhere on the table, the neck of the gas tank should be temporarily covered with a clean film or thick rag. At the same time, you should not close the car doors - the interior will be ventilated through them. It is also preferable to keep the vehicle outdoors while working.
To install a new filter on a Toyota Corolla, you don’t have to contact a service center; you can do the work yourself. To do this, you will need a canister or other container to drain gasoline and rags. You also need a pair of sealing elements (their average cost is 200-250 rubles), two screwdrivers - with a flat head and a Phillips head.
DETAILS: Replacing the VAZ 2107 gearbox
Gasoline vapors are a strong poison for the human body. Chemical poisoning may cause headache, weakness, nausea, and dizziness. In the long term, with constant contact with gasoline, it can act as a carcinogen. Gasoline is also explosive and flammable.
Therefore, the following safety rules must be observed when replacing the fuel pump:
- Do not work in a closed or poorly ventilated area;
- Eliminate any possibility of contact with open flames (do not smoke, do not illuminate the work area with fire);
- To minimize gasoline leaks, before disassembling the flask, drain all the gasoline that is possible into an airtight container;
- If a leak occurs, use cleaning material immediately. After use, to avoid the spread of toxic fumes, place in a sealable container;
- If signs of poisoning occur, immediately leave the work area and go into the open air. If the condition worsens, seek medical help.
Toyota Corolla in the back of E120
To replace you will need the following:
- Phillips screwdriver
- flat screwdriver;
- clean cleaning material;
- 8 mm head with crank (optional);
- vacuum cleaner.
Detailed replacement instructions:
- Removing the rear seats. We lift the seats (without touching the backs) and, using a little force, remove their supports from the grooves of the body;
- Closer to the left side of the body is the fuel tank hatch. Carefully lift it up, using a flat-head screwdriver to help in a circle if you do not remove it manually;
- Under the hatch, by pressing the lock button, remove the power chip and put it aside;
- Remove dust or vacuum the area under the lid;
- Relieve pressure from the system. To do this, with the fuel pump chip turned off, start the engine and let it run until it stalls.
- Disconnect the return pipe. To do this, pull out the yellow bracket (if you can't pull it up and out the first time, you can spread the ends with a flathead screwdriver to make it easier to remove) and with a little force, pull it up and disconnect it. Wipe up spilled gasoline with a clean cloth.
- Disconnect the supply hose. To do this, press on the mounting brackets on the sides of the end of the tube and disconnect. Clean up spilled gasoline using a cleaner. It can be much greater than in the previous case if the pressure is not relieved;
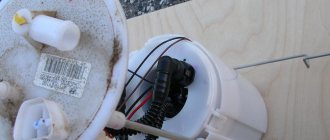
- Using a Phillips screwdriver (or an 8mm socket with a handle), remove the 8 screws that secure the fuel pump cover;
- Remove the cylinder carefully so as not to damage the fuel level sensor float;
- Disconnect the fuel level sensor terminal;
- By pressing the clamps in a circle, disconnect the top of the case;
- Disconnect the fuel level sensor. To do this, press on it until the fasteners come out of the grooves.
- Disconnect the fuel pump connector (from the pump itself, not from the upper part of the housing);
- Similarly to the upper part of the housing, disconnect the lower part where the pump is located. We will not lose the lower bushing;
- We take out the fuel pump along with the seal;
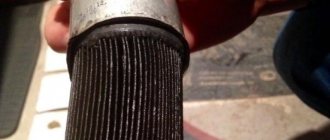
- Remove the primary fuel filter. To do this, use a screwdriver to carefully pry the fixing cap at the point of attachment to the pump, then remove the filter;
- Disconnect the outlet return fitting (at the bottom of the body) and the o-ring with the valve (at the top);
- We take a new fuel pump and install all the elements on it in reverse order.
Expert advice
To ensure that the replacement procedure does not cause problems, it is advisable to take into account the following nuances:
- It is advisable to install the original part and not an analogue, since it is guaranteed to be suitable for the selected modification and has a long service life. If the owner wants to save money and install a cheaper filter, it is better to choose Korean spare parts, since their quality is quite acceptable.
- After assembly, problems with starting the engine may occur. This is explained by the fact that the fuel must completely fill the system, and this takes time. There is no need to press the gas pedal to the floor as this will not be effective. Usually it takes 2-3 attempts to start the engine.
- During work, it is important to ensure that there are no sources of fire or sparks near the machine. In the process, gasoline vapors enter the cabin, and contact with a flame can result in trouble.
- After removing the pump unit, the inlet neck must be covered with film or a thick rag: this helps protect the gas tank from dirt and foreign elements. It is better to leave the car doors open so that the gasoline vapors evaporate before finishing work. It is advisable to carry out the replacement itself in an open area, and not in a garage.
On average, replacing a fuel filter on a Toyota King takes from 30 to 60 minutes, depending on your skills and experience. If you cannot complete the procedure yourself, it is better to contact the service.
- How to replace the fuel filter in a Toyota Camry v40
- Replacing the cabin filter of a 2014 Toyota Corolla Photo instructions on how to change the cabin filter of a 2014 Corolla
- Replacing the fuel filter on a Hyundai Accent Photo instructions on how to change the fuel filter on an Accent
- BMW E53: replacing the car fuel filter
Symptoms of clogging
It is quite difficult to identify obvious symptoms of a clogged filter element. This is due to the fact that the filter capacity decreases gradually. Therefore, its clogging can be judged only by indirect symptoms. The most common manifestations of the need to pay attention to the fuel filter are:
- the engine is unstable under load;
- the car's dynamics are gradually deteriorating;
- the power unit periodically stalls, especially during intense acceleration;
- the engine does not start the first time;
- The sound of the fuel pump has changed, it feels like it is running tight.
About changing the filter element on the 120th Toyota Corolla body
I would like to immediately warn you about strict adherence to fire safety rules when performing this operation. Before starting work you need to prepare:
- Empty container for remaining fuel.
- Rags or rags.
- New filter element.
- Seals.
- A flathead screwdriver and a Phillips screwdriver, as well as a vacuum cleaner.
To continue disassembly, you must lift the rear passenger seat of the vehicle and then remove the underbody cover. It is secured with two screws and a piston. To release them, you will need a 10" wrench and a screwdriver.
The mattress is raised on the seats and secured with seat belts so as not to interfere with further operations. Remove the layer of foam under the rug. After this, the fuel pump cover will become visible, which can be easily removed if you pry it off with something sharp. Do not begin replacement until the vacuum cleaner has removed all accumulated debris.
The pipes are removed from the fuel pump and the remaining gasoline is poured into an empty container. You must then start the Toyota Corolla engine to completely exhaust the fuel in the fuel system. After stopping the engine, turn it several times with the starter and remove the terminals from the battery.
After this, you can begin to remove the unit with the pump. You will need a Phillips screwdriver and an 8" wrench, as well as rags or rags for pouring gasoline. After removing the unit with the pump, you can begin to disassemble the filter element.
It is necessary to release two latches on the body and several latches. Thus, it can be easily removed from the housing without much effort. Remove the old one and insert a new fine cleaning element into the fuel pump housing. At the final stage, the fuel intake grid is washed and purged, and assembly is carried out in the reverse order.