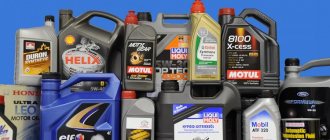
Motor oils are a thick liquid mixture of base oils and additives intended for the lubrication system of internal combustion engines.
Motor oil is a very important element. The quality of lubrication of all rubbing surfaces in the engine, as well as the period during which the oil retains its properties, depends on the quality of the engine oil.
Each car, each engine has its own recommended oils. This data is indicated by the manufacturer in the vehicle's operating manual.
There are three types of oils. Mineral, synthetic and semi-synthetic. Mineral oils are obtained by distilling petroleum. Synthetic - by organic synthesis. This is more complicated, which is why synthetics are significantly more expensive than mineral water (if you take one oil manufacturer). Semi-synthetic is, roughly speaking, mineral oil plus synthetic components.
The viscosity of the oil is indicated on the packaging (canister). For example, 5W30, where W means the oil is all-season, 5 is the viscosity at low temperatures, and 30 at high temperatures.
Low temperature viscosity is easy to calculate. It is necessary to subtract 35. 0W is used up to -35°С 5W up to -30°С 10W up to -25°С 15W up to -20°С 20W up to -15°С
High temperature viscosity is more difficult to calculate. Here you need to take into account a combination of many factors. It shows the viscosity at operating temperature, 100 - 150 degrees. The higher the value, the higher the viscosity.
All tolerances are indicated by the manufacturer in the motor oil tolerance table.
Here are the approvals for the Lada Vesta car:
What kind of oil to fill in and which manufacturer to choose is up to the car owner to decide. More expensive oil is not always better quality. Here, as they say, it comes down to taste and color. But it’s worth remembering that expensive brands are often counterfeited. There is still an opinion that synthetic motor oil is preferable for new cars.
For example, we took Rosneft Premium 5W40 for Vesta at TO-0. Purchased at an official Rosneft gas station to prevent counterfeiting. The Vesta engine was filled with Rosneft 5w30 service oil from the factory. Whether or not to do TO-0 is also up to the car owner to decide for himself. We decided to play it safe and drain the factory one and fill it with a new one after 3000 km, after running-in.
The engine oil change interval is set by the factory. At AvtoVAZ they believe that changing the oil every 15 thousand is enough. It is more correct to calculate the interval not by mileage, but by engine hours and operating conditions. Since in Russia it is hot in summer and cold in winter, there is a lot of sand, dust, uneven terrain, and so on, it is better to change it every 10 thousand mileage, or even 8 thousand. But everyone decides for themselves.
DSC_9521 (Copy)
If there is no puller, we pierce the filter housing with a screwdriver (closer to the bottom, so as not to damage the engine fitting) and unscrew the filter, using the screwdriver as a lever. We clean the filter seat on the cylinder block from dirt and oil drips. Fill the filter with new engine oil to approximately half the filter volume and apply a thin layer of oil to the filter O-ring. We wrap the oil filter by hand until the sealing ring comes into contact with the cylinder block. Turn the filter another 3/4 turn to seal the connection. Pour 4.4 liters of oil into the engine through the oil filler neck.
Attention! If your car is equipped with AMT, then the engine lubrication system capacity is approximately 3.2 liters.
How to properly replace the oil filter?
It is not difficult to replace the MF correctly in the Lada Vesta SV Cross, following simple rules. Before installing a new MF, it is necessary to check the pressure of the bypass valve. This information is written on the body of the equipment.
Oil filters for many cars are compatible in terms of mounting threads, but the pressure varies. If you put an MF with a pressure of 1.5 bar into the system, where the valve should open at 1.7 bar, then the efficiency of the filtration process will be sharply reduced. As a result, oil will constantly flow.
It is also worthwhile to inspect the landing surface under the MF. There should be no burrs on it. If they are, you should remove all defects using sandpaper. Otherwise, the oil will flow as well as in the previous case.
The third recommendation is that the filter needs to be firmly screwed into place.
It should not be unscrewed under any circumstances. But you shouldn’t squeeze with all your might either. So there is a possibility of damage to the gasket or breakage of the threads from the MF.
Recommendations for choosing a new filter
The new oil filter must meet the temperature conditions of the engine, a high level of purification of oils with different viscosities, and the ability to retain solid particles with different structures. It must also have chemical resistance to aggressive environments.
The product body must have sufficient strength, a high-quality sealing edge and valve. It must be certified. Have appropriate tightness and quality workmanship of parts.
Preparing tools and supplies
To install a new oil filter, you need to take:
- chain puller;
- head at “10”;
- hexagon on “8” and “17”;
- new oil cleaner;
- a rag;
- an empty container for draining waste material;
- synthetic motor oil;
- flashlight (if necessary).
You may also need step-by-step filter replacement instructions.
Step-by-step change process
To install a new MF, you must perform the following steps:
- Secure the rear wheels with wheel chocks for safety purposes;
- Warm up the car engine to operating temperature and turn it off;
- Remove the metal protection from under the bottom of the car, unscrew thirteen screws along the car perimeter;
- Clean the bottom plate from dirt and oil;
- Unscrew the drain plug using an "8" hexagon, drain the waste oil into a prepared container (4 liters in total for manual transmissions and 3 liters for automatic transmissions), screw in the plug;
- Using a chain puller, twist the cleaner, wipe the perimeter from oil and dirt;
- Pour 120 milliliters of oil into the new MF, put the cleaner in the place where it was;
- Tighten gently, with moderation;
- Pour oil into the part of the filler neck of the valve cover, depending on the type of gearbox (the quantity indicated above);
- Start the engine and look at the dashboard indicator (there should be no symbols).
Note! At the end, be sure to check if there are any smudges or lubricant leaks. Carry out a control measurement of the oil level.
[pp_youtube src=»https://www.youtube.com/embed/wo7RiqcErvA» ]
DSC_9613 (Copy)
Screw on the oil filler cap. We start the engine for 1–2 minutes. We make sure that the indicator of insufficient (emergency) oil pressure in the engine in the instrument cluster has gone out and there are no leaks from under the drain plug or from under the filter. We stop the engine and after a few minutes (so that the oil has time to drain into the oil pan) check the oil level in the oil pan. If necessary, bring the oil level to normal, tighten the oil filter and the drain plug.
Part size
To choose the optimal fret cap for the Vesta, you need to know its size. For each car, a hole of a different size is made in the crankcase, therefore, the plug is also selected individually for each model. The standard drain plug installed on the car has a thread measuring 16*1.5.
The size of the seals matters. A mismatch in diameter may result in engine fluid leakage.
Lada Vesta seal dimensions:
— diameter from the inside is 14.4 millimeters;
— outside diameter 20.2 millimeters;
— thickness 2 millimeters.
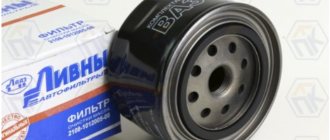
Which filter element to choose?
First of all, you need to remember that a scheduled change of engine oil is always accompanied by the installation of a new filter element. Ideally, the filter device must remove all contaminants without pressure drops in the lubricating fluid. But the real state of affairs forces us to seek a compromise between filtering efficiency and throughput.
This is facilitated by a certain mixture of natural and artificial materials, the main parameters of which are length and degree of processing. The first factor affects the strength of the material, and the second – the throughput.
The manufacturer himself recommends that all modern VAZ engines be equipped with filter elements from a number of catalog numbers:
- 21080-1012005-09.
- 21080-1012005-08.
- 21080-1012005-00.
- 21050-1012005-00.
Filtration products are produced by various companies. For example, the plant installs products from the city of Livny. Reviews from well-known auto experts provide information on resource and performance indicators. However, one cannot ignore the reviews of real car owners, who have models of the following filters in the first positions:
- Mann 914/2.
- Bosch P3274.
- Mahle OC384.
- Firework.
- Fram PH 5822.
Attention! Beware of fakes! It is better to buy the element from a trusted auto store or from a real dealer. On the Internet you can find a lot of information on the distinctive features of almost any model.
Leaks and problems
Oil burning on a Lada Vesta with a 1.8 liter engine, marked 21179, is a common problem. The manufacturer AVTOVAZ knows about this, but does not admit that this is a problem, but states that it is a design feature.
At the same time, the manufacturer allows an oil consumption of 0.7 liters of oil per 1000 kilometers. And at high speeds or sporty driving style. When the crankshaft rotates at high speeds, that is, the tachometer needle is above 3000 rpm when driving. Zhor can reach up to 1 liter.
Moreover, this does not depend on the mileage; the car can start eating oil from scratch, that is, immediately after purchase. By the way, oil burns on 1.6 engines are much less common.
There is another problem, which is also quite widespread, when car owners notice oil in spark plug wells. If the car is under warranty, then we simply go to the dealer to have it fixed.
If there is no longer a guarantee, then we do the following. We take the solvent and thoroughly wipe the spark plug well. Inside the wells themselves you can find 2 small grooves; they need to be sealed with sealant. Apply the sealant to your finger and try to rub it into the grooves; remove the residue with a rag. This is a simple way to eliminate this leakage.
Possible problems with the oil sump plug
In cases where the car owner often and carelessly unscrews the crankcase plug, the thread on it deteriorates, which leads to a violation of the tightness and the impossibility of obtaining a tight connection of the parts. You can also often hear from drivers that someone unscrewed the plug and was unable to do so because it became stuck and the splines on it were destroyed. The main cause of these malfunctions is too much tightening torque when tightening the part.
Do I need to flush the engine?
After changing the oil, flushing the engine is not always necessary: it is recommended to do this during the first change, and also if you purchased a used car and do not know what kind of oil was poured into it and when it was done.
The procedure will also be required when switching from one type of oil to another when the viscosity does not match, but this should only be done if the engine is quite dirty, for example, if low-quality oil was used or was changed at the wrong time.
It doesn’t hurt to do a flush if the engine is already quite old or the mileage has exceeded 100,000 km. This way you can remove excess deposits, what is stuck to the internal mechanisms and does not come out along with the waste.
Other cases do not require washing and can be neglected. In general, it is not recommended to do flushing too often, as it can wash away the protective oil layer, expose internal damage, chips, cracks that were previously closed and did not affect the operation of the engine.
Consequences of using old gaskets
As I already said, with each engine maintenance, which involves draining the oil from the pan by unscrewing a special cap, the gasket must be changed at the same time. The plug itself changes very rarely.
Don’t worry, the use of old seals cannot cause any damage. But keep in mind that if the seal is broken, the lubricant will gradually come out of the pan, remain under the car and spill along the road.
Experts from Germany even conducted an interesting study. Their goal was to prove the need for mandatory replacement of the seal when draining oil from the crankcase. According to the results of their testing, over 10 thousand kilometers, an average of 300-500 milliliters of lubricant was lost through the plug.
See also: High-quality body polishing with your own hands at home
This has consequences in the form of environmental damage and the need to spend more money on topping up the missing amount of engine oil.
When servicing a car, car services that are official service centers of certain automakers must include in the list of work performed not just an oil change, but also a replacement of the gasket on the drain plug.
This is definitely not the case when you can save money. Half a liter of good motor oil can cost about 500 rubles. The price of one gasket varies from 30 to 150 rubles. And what are the savings, please tell me?!
This is not the most difficult issue to maintain. But it is precisely because of this that many drivers forget about sealing the drain hole.
There is no point in looking for an alternative to a rubber or copper washer. Liquid sealants are not recommended due to the risk of them getting into the oil. Also, do not use electrical tapes, FUM tapes or other sealing materials used in plumbing or construction. There is a car store that sells gaskets made from the required material individually. Buy them. Don't experiment.
Thank you all for your attention! Subscribe, leave comments, ask questions and tell your friends about our project!
Despite its compact size, a car engine includes about a dozen systems and assemblies, which in turn consist of a large number of parts and elements. Each of them has its own specific function, and their coordinated work contributes to stable engine operation. Among other things, the engine oil pan acts as a lubricant reservoir in which oil is collected and stored. A crankcase plug is installed in the oil pan.
How to unscrew the plug
- Square - 8;
- Hexagon;
- Tetrahedron;
- Square - 9.
If unhindered removal is not possible, mechanics recommend tapping the plug head without excessive force, then unscrewing it.
The content of the article
Hi everybody! Owning a car doesn't just mean freedom of movement. This is also a whole range of activities related to car maintenance. A fairly large number of consumables are subject to periodic replacement. These include the engine sump drain plug gasket.
In fact, this small element provides protection against possible leakage of oil from the oil sump of an automobile power unit.
If you notice traces of oil under the car, it is possible that it comes out through the engine crankcase cover. Moreover, many cars often have crankcase protection.
Let's talk about this gasket, its tasks and the materials from which it is made.
Stages of replacing lubricant Lada Vesta
Changing the oil on this model is the same as on most cars. But there are always some nuances, which will be described in the article below.
This LADA model is equipped with 1.6 liter VAZ-21129 and 1.8 liter VAZ-21179 petrol engines.
Both of them have 16 valves, like other modifications:
- Lada Vesta;
- Lada Vesta Cross;
- Lada Vesta SW (Lada Vesta SW);
- Lada Vesta SW Cross.
The replacement process for these engines and modifications will be the same. But we will make a reservation that the described instructions are carried out on a car with a volume of 1.6 liters.
Draining waste fluid
To drain oil from a Lada Vesta, it is advisable to have a pit or overpass, since the main actions will take place from below the car. Therefore, we place the car above the technological ditch, go down into it and remove the engine protection from below. To do this, you need to unscrew the 13 head bolts by 10mm.
When everything is ready, we proceed directly to the drain:
- Raise the hood, then find the filler neck on the engine and unscrew the plug.
- Now we go down under the car and place a waste container in the drainage area. You can use a cut canister or an old bucket.
- There are many complaints about the original drain plug regarding unscrewing, so it is better to prepare a new one for replacement (order code 21120101106100). The old one can be unscrewed with a 8mm hexagon, but there is a high probability that the splines will be torn off. Therefore, first you can take a hammer and gently tap it through a wooden plank. After this, the plug should come out easier. If the plug does not fit anywhere, you can use a gas wrench; it is located below the pan, so there is a place to grab it.
- On cars with an automatic transmission, the pan has a different shape, as well as a plug that can be unscrewed with a regular key or a 17mm socket.
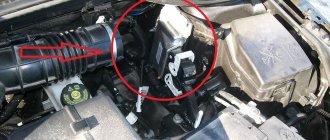
- Now you need to unscrew the oil filter. You can try to do this from above from the engine compartment. There seems to be access, but the filter often gets stuck, I don’t have enough hand strength, and I can’t get to it with a puller.
- Another option is to do it from below; installing a puller here will not be difficult. But before that, it is advisable to unscrew the crankshaft position sensor using a 10mm wrench. We also remove the wires going to it. Now you shouldn’t break anything, you can unscrew the filter itself.
To unscrew the filter element, it is advisable to have a special puller. If it is not available, you can try to unscrew the filter using improvised means. For these purposes, you can use, for example, an old alternator belt, a regular belt, a bicycle chain or a simple screwdriver.
This method will allow you to drain as much of the used oil as possible, after which you can proceed to further actions. The main thing is not to forget, everything that we unscrewed must be put back in place.
Flushing the lubrication system
Engine flushing on a Lada Vesta car should only be carried out in exceptional cases, which include:
- Purchasing a used car when you cannot be sure of the quality and regularity of lubricant replacements.
- During operation, the service replacement interval was repeatedly exceeded.
- Engine operation with constant frequent overheating, which contributes to coking and other deposits.
- In cases of switching to another type of oil, for example from synthetic to semi-synthetic.
There are several types of flushes for the Lada Vesta engine:
- Five- or seven-minute, capable of cleaning even the most difficult deposits. They must be used very carefully and strictly follow the instructions printed on the packaging. It is recommended to use them only when absolutely necessary. Since there is a high probability of causing premature wear of the sealing seals. And also clog the oil channels with particles of washed away carbon deposits.
- Special compounds that are added to the oil several hundred kilometers before the expected change. They are more gentle, but there is also a possibility of clogging of the oil channels.
- Flushing oil is the most gentle method of cleaning the engine from the inside. This composition is poured after draining the waste, the engine runs for 15-20 minutes, after which the liquid with deposits is drained. The absence of aggressive additives in the wash composition gently cleans the engine, but is not able to remove heavy contaminants.
- Regular oil that you are going to use when changing. This method is not so popular due to its high cost.
Before washing your Lada Vesta, you should weigh all the pros and cons. And also understand that it will not be possible to completely drain the liquid. Some of it will remain in the channels, which will then mix with the new oil.
Purpose of the product
A drain plug is used to remove waste oil from the engine sump. To place it, a boss is welded at the bottom point of the crankcase, in which a threaded hole is made for the plug. The latter comes with a conical thread, which does not require additional sealing, or with a cylindrical fine thread and a collar designed to install a seal ring. Typically, a magnetic tip is attached to the inner end of the product, designed to collect and extract metal particles formed during friction between metal engine parts.
What is the gasket on the plug used for?
You will be surprised, but replacing the gasket that the drain plug has is a mandatory maintenance item. Under no circumstances should you forget about this operation.
Similar gaskets are found on all machines that have an oil pan. That is, 95% of all cars driving on Russian roads. Among them:
- Hyundai Solaris;
- Renault Logan;
- Kia Sportage;
- Opel Astra;
- Kia Rio;
- Chevrolet Lacetti;
- Kia Sid;
- Nissan Almera;
- Toyota Corolla;
- Ford Focus, etc.
It doesn’t matter whether you drive a ’99 Mitsubishi Galant or a brand new Mercedes. Everywhere there is a drain plug on the pan, and therefore a gasket is used everywhere.
This gasket is installed directly on the plug, protecting against possible leakage of lubricant.
In fact, this is a one-time item. Experts and experienced motorists recommend changing it every time a complete oil change is performed.
But this is not relevant for express oil changes, when the drain plug cannot be unscrewed and the liquid is pumped out through the filler hole.
If you completely drain the compound, then use flushing oil, and then fill in with fresh lubricant, then be sure to buy yourself a new gasket for the plug.
About 30 years ago, such gaskets were not installed on plugs during car production. As a result, this caused a number of problems and malfunctions. If the plug was not tightened tightly enough, the oil began to leak out when heated and pressure increased. To avoid this, motorists tried to tighten the element more tightly. As a result, the threads were torn off, the plugs broke, they jammed, we had to cut them out, saw them out, and sometimes completely replace the oil pan. Surprisingly, the use of one small element completely solved all the problems.
As you can see, the gasket is truly an important element of the entire car engine sump.
To securely fix the plug and not cause a leak, you don’t need to apply a lot of force.