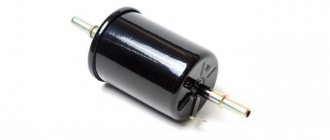
The fuel filter in the Hyundai Solaris is a filter element of the fuel system that filters out small particles, dust, dirt, rust and debris from gasoline at the stage of its supply to the engine. The procedure for replacing a filter is a multi-stage process that requires special skills and experience in repairing a passenger car. But if you are confident in your abilities, you can make the replacement yourself. Replacement work is carried out on a car with a 1.6 Gamma engine with a power of 123 hp, subject to routine maintenance.
For inexperienced drivers, we recommend replacing the fuel filter at an authorized HYUNDAI dealer.
When to change the filter?
If the Hyundai Solaris was purchased from a car dealer, then according to technical regulations the filter element is replaced every two years or every 60 thousand mileage. But the “freshness” of the car does not guarantee that everything will go according to the regulatory scheme. Low-quality gasoline can cause contamination of the filtration system ahead of schedule.
Signs of a clogged filter element:
- traffic dynamics have decreased;
- there were shocks while driving;
- The engine took a long time to start.
Causes of clogging
- unstable start of the power unit at different temperature conditions;
- increased fuel consumption, including under load;
- engine detonation at idle speed;
- acceleration is slower than usual;
- lumbago in the exhaust pipe;
- the car engine chokes as a result of an enriched or lean combustible mixture;
- The “Check Engine” light on the instrument panel is on.
- operating the vehicle for longer than the recommended period before undergoing a scheduled technical inspection;
- refueling with low-quality fuel, low-octane mixture for a long time;
- installation of non-original consumables;
- installation of spare parts from other technical equipment that are similar in appearance to factory ones;
- the machine was left idle for a long time, in the “preservation” mode, as a result of which the circuit became clogged and sediment formed.
Replacing the Hyundai Solaris fuel filter with your own hands
Replacing the Hyundai Solaris fuel filter should be carried out by specialists at a service station. The service fee is low. But if this is not possible, you can change the spare part yourself, following the instructions provided.
Important! Before starting, you need to release the pressure in the gasoline tank. To do this, simply unscrew the filler cap.
Access to the fuel module
Before starting work, it is necessary to remove the pressure from the fuel line and dry it, as it will be necessary to disconnect the hoses from the fuel block. There are two ways to do this. The first method is simple
, when the engine is turned on, the fuse that is in the power supply circuit of the pump and level sensor is removed from the fuse box. The pump stops pumping fuel and after a couple of minutes the engine stalls. After this, you need to make a couple of turns with the starter and the pressure in the line will be released.
Another method differs in the method of disconnecting power from the module
. To do this, we begin to disassemble the rear seat. The fastening bolt can be reached through the gap between the seat and the backrest. It is unscrewed by an extension with a 12-point cap. After this, the cushion holders are removed and it is removed from the cabin, freeing up space for work.
Next manipulation
. It is necessary to use a sharp knife to make a cut in the sealant that covers the fuel unit hatch that needs to be opened. Access to the module and plug connector for power supply and signal transmission from the sensor is provided. Now, in order not to look for a fuse for the fuel system, simply pull the plug out of the socket with the engine turned on and repeat the procedure for relieving pressure described above.
{banner_content}
Instructions for replacing the filter:
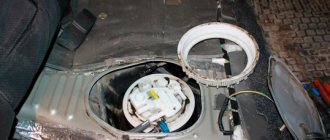
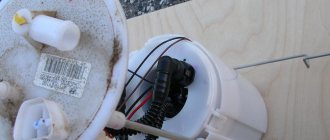
Removing the module:
- Remove the back seat. To do this, you need to unscrew the bolt to “12”, located in the middle, between the back and the seat.
- Remove the plastic cover. The plastic is placed on a sealant; to remove it, you need to heat the edges with a hairdryer.
- We pull out the wire from the connector.
- We wash the inner cavity of the hatch to remove dirt so that it does not get into the tank.
- We remove all the hoses and unscrew the bolts of the pressure washer.
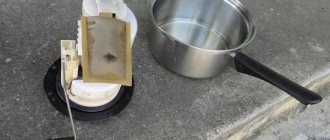
- We take out the module by hand and pour the remaining gasoline into an empty container.
Important! The module must be removed carefully so as not to bend the float of the gasoline level sensor.
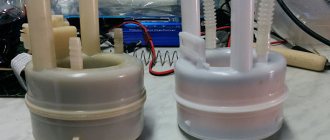
Parsing the module:
- We take out two metal brackets from the tubes.
- We bend the plastic clamps of the springs of the metal rods and remove the module cover.
- Remove the wire from the fuel pump connector.
- Bend the three tabs and lift the module.
- Remove the wire from the filter element.
- Disconnect the fuel pump from the filter.
- Remove the filter mesh from the pump.
Filter replacement:
- We put a new filter mesh on the pump.
- We take a new filter element and connect it to the pump.
- We move all of its detachable parts from the old filter to the new one.
- We connect the wire to the filter element.
Important! All rubber O-rings must be put on first. If this is not done, they will stand crooked and leak gasoline. You can learn more about how to change the fuel filter on a Hyundai Solaris in the video.
Final stage:
- Assemble and install the module in place in the reverse order.
- We turn the ignition on and off several times to create pressure in the fuel system.
- We start the engine, let it run for a while, then turn it off and start it again.
Stable engine operation at idle indicates that everything was done correctly. After completing the steps, you must ensure that the system is sealed. Hyundai Solaris is not a fancy car, but it is important to know how to change the fuel filter correctly. If this task causes difficulties, it is better to contact your dealer or specialized service station.
Part selection
The fuel filter is one of those car parts that has many analogues, and finding the right one is easy. So, Hyundai Solaris has a number of analogues of the original part.
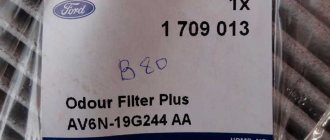
Original
Estimated prices for filters for a Hyundai Solaris car will please you with its affordable prices. The number of the original fuel filter is 3191125000. The average cost is 1200 rubles. There are no official analogues, but you can choose according to the sample.
Analogs
Possible list of analogues:
| Manufacturer | vendor code | Price in rubles |
| Nevsky filter | NF-2116 | 150 |
| SCT | ST 393 | 300 |
| Japan Cars | B30513PR\ | 300 |
| Stellox | 21-00517-SX | 300 |
| Koreastar | KFFH-004 | 300 |
| Nipparts | J1330508 | 300 |
| Zekkert | KF-5312 | 400 |
| Meyle | 37-14 323 0003 | 400 |
| Finwhale | PF716 | 500 |
| Blue Print | ADG02327 | 600 |
| Jakoparts | J1330508 | 600 |
| Filtron | PP876/4 | 800 |
| MANN-FILTER | WK 55/1 | 1000 |
| WIX | WF8359 | 1000 |
| Fiaam | FT6053 | 1200 |
Possible problems after replacing the fuel filter
Most motorists, after replacing the fuel cell on many cars, including the Hyundai Solaris, encounter a common problem - the engine either does not want to start, or does not start the first time. The cause of this malfunction is most often the O-ring. If, after inspecting the old filter, you find an o-ring on it, then the pumped gasoline will flow back, and the pump will have to re-pump it each time. If the o-ring is missing or mechanically damaged, it must be replaced with a new one. Without this part, the fuel system will not function as intended.
Cleaning old or replacing
The fuel filter is a disposable part that belongs to the category of consumables. Its design has a porous membrane that traps debris, resins, and paraffin. It is impossible to wash it. Moreover, the filter housing is non-separable, so trying to clean it and put it back will result in a headache.
But the coarse filter mesh, which is located at the outlet of the gas tank, can be washed - preferably in acetone, and then blown with a stream of air from the compressor.
Fuel level indicator FIAT Albea
The display was made with the novice user of the Fiat Albea in mind, a car that has unique stylized retro-style instrument dials with frequent tick marks. At first, they help to quickly calculate digital values based on the position of the pointer arrow. Drawn by hand, accurately copying the proportions. If necessary, you can print it on paper, cut it out and keep it handy in your car.
The fuel pressure regulator (FPR) is set to a pressure of 350 kPa (3.5 kgf/cm2).
The fuel pressure regulator is installed in the fuel module.
Exclusively, instead of the standard pressure regulator, the RDT-380 fuel pressure regulator from the Lada Kalina car, VAZ 2112 photo above is 100% suitable.
I- Option: See photo above. The module with an oval top cover has an additional fuel filter installed on the gas tank. The filter is mounted on the right front corner of the fuel tank and is covered with a plastic casing secured with 2 nuts and 3 self-tapping screws for a 8mm head.
II- Option: Module with round top cover.
III- Option: Module with round top cover.
The most difficult thing when disassembling the pump of the III-version is to pull out the “filling” from the flask (3 pins in the flask, the “filling” is mounted on them); I admit, I broke all 3 pins. And this means the bulb is scrapped (although it was already broken by someone before me, so it’s not offensive), and the second is “welded” wires to the contacts (you can bluntly bite them off and solder them, usually with tin)
Fuel module variants II and III do not have an external filter; the filter is located in the fuel module housing.
OEM codes of spare parts for the fuel supply system.
5421306 – electric fuel pump; 51709819 – fuel module; 51802835 – fuel tank (gas tank); 51808700 – fuel tank (gas tank); 51782425 – rubber seal for the fuel module (round).
Fuel filters:
Original code - 46416684; Fuel filter analogues:
Hengst H115WK; Alko SP-2125; UFI xu-3174000; FRAM 27371 15.01A; Filtron PS921; Alko SP-2125.
Symptoms of fuel pump failure - with the onset of warm weather and prolonged driving, dips in traction appear when starting at traffic lights and in traffic. The further, the process of pump failure only worsened, until it is impossible to move away, the engine runs at idle, and does not respond to the accelerator pedal. When accelerating in 2-3-4 gears above 4000 rpm. It’s as if the car is being held back, in the summer it can simply stall, especially in traffic jams, and when driving evenly on the highway, jerks are felt. The only thing that helps is stopping the engine for 10 minutes, then you can drive for a while.