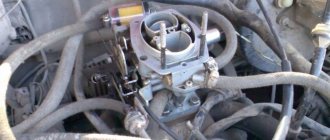
Despite the widespread replacement of carburetor systems with injection systems, a huge number of engines of the old design are still running. Many classic VAZ models are equipped with Solex or DAAZ carburetors. To regulate motor power, depending on the load, so-called economizers are installed. These devices work in a similar way to electronic control units for injection engines. Of course, it will not be possible to achieve the same parameters of engine efficiency and environmental friendliness, but the quality of operation of a carburetor engine is significantly improved.
Essentially, any economizer is a valve that is actuated by an electromagnet or piezoelectric element. It is controlled by a simple programmable computer (more like a controller), and allows you to adjust basic settings. The purpose of the economizer comes from the name: to increase the efficiency of the power unit without losing power removed from the crankshaft.
Please note that it is impossible to install an economizer on a carburetor that is not intended for this purpose. The design of the chambers is specially designed to work with controlled valves.
The economizer system also requires periodic maintenance, like the rest of the carburetor valves and jets. To understand the mechanism of operation, we will analyze popular carburetors installed on classic and front-wheel drive VAZ models.
Economizers
An economizer is an additional device in the carburetor design that automatically enriches the mixture when the engine is at full load. Unlike the idle air system economizer (IAC), these devices are designed not to lean, but to enrich the mixture if necessary. This need arises when the driver fully presses the accelerator pedal, fully opening the throttle valve, but the main metering system of the carburetor is not able to provide the required reserve of engine power. The economizer, contrary to its name (the word economizer comes from the English “economize” - “save”), serves to enrich the combustible mixture in power modes (at large throttle openings), thereby ensuring a mixture composition corresponding to these modes. Typically, an economizer consists of a jet and an automatically controlled valve, and its operating principle is to open an additional channel to allow fuel to enter the carburetor mixing chamber when necessary. Economizers can have mechanical or pneumatic drives.
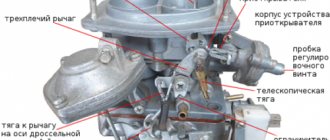
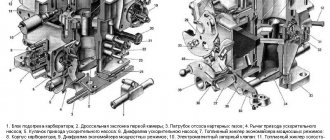
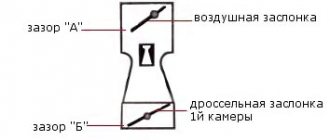
The mechanically driven economizer shown in Fig. 1, includes valve 3, rod 1 driven by throttle valve 5 and jet 4. When the throttle valve is opened by 85...90% of the rotation angle, rod 1 of the economizer moves so much that valve 3 opens under its action. With the opening of valve 3 In addition to the main jet 2, fuel begins to be additionally supplied to the atomizer 6 through the economizer jet 4, thereby ensuring the enrichment of the mixture necessary at full load.
One of the disadvantages of mechanically driven economizers is that they turn on at the same throttle position, regardless of the nature of the power change based on the angle of rotation of the throttle valve at different crankshaft speeds. Although it is advisable to turn on the economizer earlier, the lower the rotation speed.
There is no such drawback in economizers with a pneumatic drive and two mixing chambers, the diagram of which is shown in Fig. 2.
The membrane-type economizer is connected to the sub-throttle space of the primary chamber by air channel 6. The economizer jet 9 is installed in the fuel channel 10. The internal cavity under the membrane and the carburetor float chamber are connected through the ball valve 8.
When the throttle valve 5 is opened to a large angle, the vacuum in the intake pipe decreases and, accordingly, its effect through channel 6 on the membrane 7 decreases. Then the spring, constantly acting on the membrane on the left, bends it to the right and opens the valve 8. At the same time, an additional amount of fuel through the nozzle 9 through channel 10 it enters the main dosing system, enriching the combustible mixture.
Econostats
In addition to economizers, econostats are enriching devices at full load, which serve to further enrich the mixture. The need to install an econostat is caused by the possible over-leaning of the mixture by the main dosing system at high air flow rates in these modes.
The econostat interacts with the secondary mixing chamber and comes into operation at load and speed modes close to the maximum, with throttle valves 5 and 1 fully open (Fig. 2). In this case, the fuel enters through the nozzle 3, passes through the tube 11 and through the channel enters the econostat nozzle 12, which is located above the nozzle of the main dosing system.
What a half-forgotten, and for some even unfamiliar, word - economizer! Carburetors, which worked well on cars for many years, gradually gave way to various injection systems. But the automobile age is long, and sometimes someone has to deal with cars that still have room for a carburetor. Well, its normal operation is ensured by a number of additional devices, among which it is impossible not to mention the fuel economizer.
How does a carburetor work?
The following figure will help you understand its operating principle.
This is the simplest version of the carburetor, one can say that it only explains its structure and the main idea. Gasoline is in the float chamber at a constant level, which is maintained by the operation of the needle valve. Through the air filter, air is drawn into the engine cylinders. It passes through the mixing chamber, thanks to the narrowing there, in this place a vacuum is created in relation to the float chamber, in which the level of atmospheric pressure is maintained.
Due to the resulting pressure difference, fuel enters the mixing chamber. Passing through the nozzle, it breaks into small droplets, evaporates and mixes with air, resulting in the formation of a fuel assembly that enters the engine cylinders. The relationship between these components depends on the position of the carburetor damper, which is associated with the position of the accelerator pedal. The harder it is pressed on the car, the more the damper is open, the higher the degree of vacuum and the more gasoline is supplied to form the mixture.
Settings
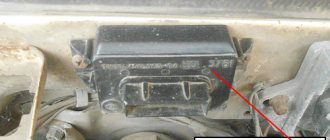
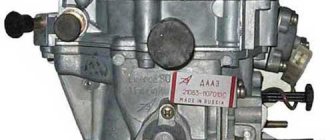
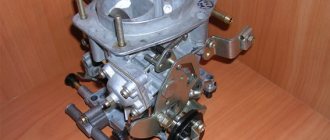
Before you begin, it is advisable to become more familiar with the type of carburetor used on your car. This must be done in order to select the correct repair kit for the device if necessary. There is a plate attached to the body of the middle part of the carburetor indicating its number; it is needed for the correct selection of spare parts. Settings can be made directly on the power unit or after dismantling it.
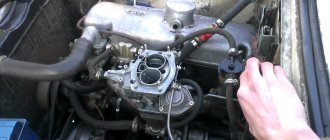
During vehicle operation, various layers of dust, dirt, and engine oil accumulate on the carburetor body, so it should be thoroughly cleaned. This procedure will be hampered by the air filter housing, which will need to be removed. First of all, unscrew the three nuts on the cover of the air filter housing with a 10mm wrench. They are removed along with the washers, after which you can remove the cover along with the air filter. The body itself is held in place with four 8mm nuts.
When the nuts are unscrewed, the housing along with the crankcase gas exhaust hoses is removed. You can start cleaning the carburetor without removing it from the engine. To do this, you can use chemicals for cleaning the engine, kerosene, and other detergents. The process will go much faster if the engine is hot. Typically, detergents come in aerosol form, making them easier to apply to dirty areas. If kerosene is used, it is poured into a plastic bottle with a small hole in the cap.
Fuel clots are the cause of high consumption
The economizer works with “clumps” of fuel. Regardless of the brand, octane number, the fuel, while in the tank of the vehicle, is subject to the intensity of environmental parameters. For example, the structure of the fuel is significantly influenced by humidity or ambient temperature, which have a direct effect on the mixture, changing it. As a result, the fuel changes slightly, expands or contracts, but the end result is the same - the formation of clots. The formation of clots is caused by the mutual attraction of hydrocarbon molecules in the fuel, which are the basis of this mixture.
The formation of such clots is observed in a zone inaccessible to oxygen saturation; such fuel does not have the opportunity to burn completely when it passes into the engine. This leads to additional fuel consumption for the operation of the vehicle, taking into account that previously formed clots evaporate along with the escaping exhaust gases. In addition, the formed clots settle on the surfaces of the cylinder walls, causing damage to the structure and significantly disrupting its operation.
Fuel Shark device
The Full Shark Economizer is a fairly simple and understandable device equipped with a powerful electrolytic capacitor. The process of connecting this fuel saver Fuel Shark is carried out by connecting it to the electrical circuit of the car through the cigarette lighter, which allows you to minimize the electrical energy expended. With an active economizer, the generator
the car operates at full power, while compensating for it through the operation of the Full Shark economizer capacitor. This device also removes excessive load from the battery and generator, compensating for the voltage deficiency in the electrical circuit, thereby saving the consumed fuel fluid and system energy. The Fuel Shark device is able to compensate with its work not only the lack of voltage in the circuit, but also the voltage for the operation of the headlights, audio system, wipers, air conditioning and even the navigator. The operation of this energy-saving automotive equipment can be compared to a small battery that can improve the efficiency of the car. In situations where there is too much load on the vehicle generator, the economizer capacitor charges and supplies additional power, thereby compensating for the lack of voltage in the overall vehicle system. The process of reducing the electrical load in the circuit releases free energy, which is subsequently used to actively operate the spark plugs. This work promotes more complete combustion of the fuel fluid, which leads to a reduction in its consumption.
From a physics point of view
However, let’s take a break from emotions and turn to the opinion of our radio engineer, who was interested in the technical description of the device. The advertising accompaniment states that the Fuel Shark economizer is equipped with a capacitor, which is designed to charge while the engine is running (so to speak, to take away unused surplus), and release the accumulated energy when necessary.
This is described very vaguely
and is more reminiscent of a pseudoscientific set of words. But even if you don’t delve into the graphs and don’t give formulas, you can note the main thing: this operation, called reactive power compensation, is only possible when using alternating current, which consumes inductance.
Setting the float chamber level
This is the first step in adjusting any carburetor. It is on this part that the consumption and stability of the engine will depend.
The level must be at the nominal level set by the manufacturer, so it is very important to follow the technology
Setting the fuel level in the float chamber: I - carburetor cover; 2 — needle valve seat; 3 - emphasis; 4 - needle valve; 5 - locking needle ball; 6 - valve needle pull-out fork; 7 — float bracket; 8 - tongue; 9 — float; 10 - gasket.
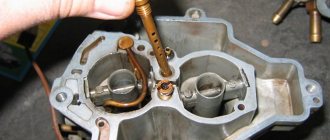
The top cover of the carburetor is removed, but before that, you need to pump up the manual fuel pump to check the set level. The nominal level is the level of gasoline located on half of the inclined surface. If it is higher or lower, then adjust the float level by bending the adjusting antennae. The XX speed is also regulated by the float chamber.
To check, just put the cover on top, start the engine and immediately turn it off. Open the lid again and check the level. After this, you can move on to the next stage.
Purpose of the economizer for carburetor power modes
EMR is necessary to saturate the combustible mixture through the carburetor. In this case, the throttle opens and the engine starts running at full speed. In this situation, the engine power increases significantly, plus there is an additional opportunity to increase speed.
Some users install an EMR economizer on the VAZ 2107 carburetor precisely to increase power. But they must be able to do this competently, since while driving the load on the engine increases, which, of course, can lead to engine failure.
Checking and replacing the forced idle economizer epkhh
Forced idle economizer system epkhx
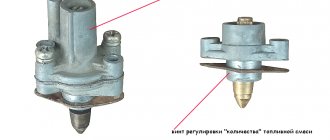
The idle system is designed to supply fuel to the throttle space of the primary chamber and turn off its supply in forced idle mode (engine braking). The system consists of an economizer, a microswitch, an electro-pneumatic valve and a control unit for the electro-pneumatic valve. The economizer, together with the microswitch bracket, is attached with two screws to the throttle body. When the ignition is turned off, the economizer valve needle closes the fuel supply channel. The needle is made integral with the diaphragm rod and when a vacuum is created in the space behind the diaphragm, it moves and opens the channel. The needle stroke and, accordingly, fuel consumption through the idle system are regulated by a screw (“quantity”). Vacuum is supplied to the economizer from the inlet pipeline through hoses through an electro-pneumatic valve installed on the right mudguard in the engine compartment of the car. The electro-pneumatic valve is controlled by a control unit and a microswitch. The control unit for the electro-pneumatic valve is located on the left mudguard in the engine compartment. The control unit, depending on the control pulses coming from the primary winding of the ignition coil, turns off the electro-pneumatic valve when the microswitch contacts are open and the engine speed is 1600 rpm and turns it on again when the speed drops to 1200 rpm. The microswitch opens the voltage supply circuit to the electro-pneumatic valve when the gas pedal is released. When the engine speed exceeds 1600 rpm and the gas pedal is released, the fuel supply through the idle channel stops.
Checking the forced idle economizer epkhh
1. If the engine does not run or idles unsteadily, it is possible that, as a result of a leaky diaphragm, the economizer valve is completely or partially shutting off the fuel supply. To check, connect the vacuum supply hose (from the inlet pipeline to the electro-pneumatic valve) to the economizer fitting. Let's start the engine. If the engine starts to run stably, the economizer valve is working properly. If not, then its diaphragm is damaged (or the hose itself is leaking).
Forced idle economizer system (EFCH): 1 – throttle valve drive lever; 2 – microswitch; 3 – economizer; 4 – mixture quantity screw; 5 – relay and fuse mounting block; 6 – ignition relay; 7 – ignition switch; 8 – ignition coil; 9 – control unit for electro-pneumatic valve; 10 – electro-pneumatic valve; 11 – hoses; 12 – inlet pipeline; 13 – economizer valve needle
2. The economizer valve may be stuck in the open position and not shut off the fuel supply (in this case, increased fuel consumption is observed). In this case, the engine runs stably at idle. To check the valve, start the engine and, in idling mode, disconnect one of the wires from the solenoid valve terminals (see “Solenoid valve - checking and replacement”). If the engine continues to run, the economizer diaphragm may not be sealed (or the solenoid valve may be faulty). To check, we remove (see below) and inspect the diaphragm; if there are breaks or cracks, replace it.
Replacing the forced idle economizer EPHH
You can replace the economizer diaphragm without removing the carburetor, but for clarity, the work is shown with the carburetor removed.
1. Disconnect the hose connecting the economizer to the electro-pneumatic valve and the wire blocks from the microswitch terminals (see “Carburetor - removal and installation”).
2. Using a Phillips screwdriver, unscrew the two screws securing the microswitch and economizer bracket.
3. Remove the microswitch bracket and remove the economizer from the throttle body.
4. Remove the gasket installed between the economizer and the housing and check its condition. If the gasket is damaged, replace it.
5. Using a Phillips screwdriver, unscrew the two screws securing the economizer cover.
6. Remove the economizer cover.
7. Check the condition of the diaphragm. If there are breaks or cracks, replace the diaphragm. If the connection between the diaphragm and the needle is non-separable, replace the economizer assembly.
Installing a forced idle economizer epkhh
1. Installation of all removed parts is carried out in reverse order.
2. After installing the economizer, we adjust the idle speed (see “Idle speed - adjustment”).
Video - Installation of the EPHH system
An increase in fuel consumption can be due to many factors, including improper operation of the EMR. If the valve spring is weakened or broken, the economizer valve will be constantly open, re-enriching the air-fuel mixture. When the gas pedal is fully pressed, this increases engine power, but in other modes, on the contrary, it leads to a drop in power. Because of this, the driver is forced to press harder on the gas, which further increases fuel consumption. If the EMR diaphragm has lost its seal or the cap is not tightened properly, gasoline will enter the intake manifold below the throttle valve and also leak out. The latter is especially dangerous because it can cause fuel to ignite.
Diagnostics and repair of EPHH
How to check the main carburetor systems, remove it from the intake manifold and drain the fuel, read the article (Carburetor). Also carefully read the article (safety precautions for car repair and maintenance), this will help you avoid fuel fires.
You can replace the EPHH or clean its jet without removing the carburetor. Remove the air filter, disconnect the wire from the economizer and unscrew it from the carburetor body. Remove the jet from the plastic drive and wash it. Using two wires, connect the EPHH to the battery; if the drive retracts more than 5 mm, the economizer is working. If not, it needs to be replaced. Don't forget to bleed the entire idle system. To do this, spray carburetor cleaner into the hole for installing EPHH and after 1 minute blow it out with a compressor.
Carry out any work related to the EMR only on a removed carburetor, draining the fuel from it. Place the bottom of the carburetor on a clean table and remove the 3 screws securing the cover and diaphragm. Remove the cap and diaphragm, being careful not to lose the spring. Remove the vacuum ignition timing regulator hose and place it on the valve. Try to suck air through this hose. If the valve is working properly, then air will not pass through. If air passes through, the valve must be replaced.
The DAAZ plant, the main supplier of carburetors for VAZ cars, does not produce spare valves, so it will either have to be removed from another carburetor, or products from other manufacturers will have to be used. To remove the valve, you will need a flat head screwdriver and a blow torch. Using a blowtorch, heat the bottom of the carburetor to a temperature of 100–120 degrees and use duckbills to pull the valve out of the seat. Do not overheat the carburetor. When the carburetor has cooled, be sure to clean all EMR passages. Before installing a new valve, heat the carburetor to 80–90 degrees. Then insert the new valve and, using light blows, through a mandrel whose internal diameter is slightly larger than the cut valve tube, press it into place. When the carburetor has cooled, install a new diaphragm, spring and EMR cover. Tighten the screws and assemble the carburetor, then install it in place.
Carburetor diagnostics after adjustment
Now you need to make sure that all settings are set correctly. To do this, you need to start the engine and watch it idle. Is he starting to trip? Next, press the accelerator sharply and also sharply release it. Can you hear any dips? If yes, the fuel quality adjustment screw needs to be unscrewed a little.
During heavy braking, the engine should continue to operate stably. If it stalls, you need to slightly unscrew the quality screw.
Thus, you now know how to adjust the carburetor on a VAZ 2106 on your own without special tools.
Experienced carburetor technicians! If you find inaccuracies in the article and want to share your experience, write your comments. Your opinion will be very useful to all readers of the site. Sixes are often equipped with DaAZ and Solex carburetors. Is there a fundamental difference in adjustment between them? Also interested in your opinion.
This article is part of a series of 9 lessons dedicated to 7 carburetors. To view all nine lessons, follow the link: //7vaz.ru/chto-takoe/karbyurator.html
The carburetor is responsible for distributing fuel throughout the system of the VAZ-2106 car. As we found out, it can be different. From time to time, the correct operation of the carburetor is disrupted, so adjustment of the device is necessary, namely switching to an economical mode. It’s not difficult to do it yourself if you have the skills and relevant knowledge. It is very important to follow the sequence and act strictly according to the instructions.
Troubleshooting the unit
Upon completion of diagnostic operations on the VAZ 2107 engine, other breakdowns that may have similar manifestations should be excluded. The econometer works by changing the pressure in the carburetor channels; damage to its tube can lead to air leaks. A modern injector electronic control system eliminates electro-pneumatic devices that are less reliable.
An accurate determination of the cause of the EPHH malfunction is only possible if the unit is dismantled and completely disassembled. The economizer is removed from the carburetor in the following order:
- Using a “10” wrench, unscrew the 3 nuts holding the filter cover and lift it up along the studs.
- Unscrew two Phillips-head screws that secure the pneumatic block with the membrane and valve. The control tube is removed from the fitting of the device.
- The device is removed from the socket and carefully inspected for damage and carbon deposits on the valve or its seat.
The operation scheme of the carburetor, which was replaced by an injector, assumes a reaction to changes in pressure in the chamber with a decrease or increase in fuel supply. The economizer implements this feedback through a flexible membrane rigidly connected to the stem and valve
When checking this block, special attention should be paid to this node
There are repair kits for sale for Solex carburetors that were previously installed on the VAZ 2107. The forced idle unit, if it does not work, can be repaired using parts from such a kit. Installation of the unit in its intended place must be accompanied by a leak test. The last thing to connect before installing the air filter is the econometer located on the control panel. The position of the arrow in the green sector indicates acceptable fuel consumption.
Question. My car (VAZ-21044i 2000 (1700i engine, GM controller 21214-1411010/10 (EFI))) has an instrument panel from a VAZ-2107 that has an ECONOMIZER. As far as I know, it instantly indicates the fuel economy mode when driving (in response to the gas pedal). On my car, when starting the engine and driving, it is constantly in the red zone (arrow on the left) and there is no response to the gas pedal. As the engine warms up and drives (20 minutes), the needle gradually drops into the green zone (arrow in the center); when driving for about 1 hour, it comes closer to the edge of the green zone. At the warranty service station they told me that it would not work because... The sensor hose is connected not at the inlet (as on a VAZ-2107 car), but at the outlet to a tee near the adsorber. Should the economizer work on my car? If YES, then how to work. If it should work like on the VAZ-2107, then tell me how to fix this problem? Car enthusiast Konstantin Vasilievich Sidko, Kiev.
Answer. Actually an “econometer”. A device that measures the vacuum in the intake pipe is quite useless for you. With the disappearance of the carburetor, which operates under vacuum, and the advent of trip computers capable of showing instantaneous and hourly consumption in particular. Back in 1984, the econometer was considered uninformative by German carburetor eight testers. You can revive it, since it is there anyway, as follows: Either in the hose from the tee you mentioned to the combination, or in the fitting of the combination there is a clogged damping nozzle. It is needed so that the needle does not twitch due to the cyclic operation of the pistons. Blow air under low pressure or pierce this jet with copper wire. It may contain debris, oil, condensate, fuel. Yakovlev Alexander Anatolyevich. Engine Design Department, Fuel Equipment and Toxicity Department
Owners of injection sevens will not find this material useful, unlike owners of Lada cars with a carburetor engine. After all, it was the carburetor models of the sevens that were equipped from the factory with such a device as the EPHH system of the VAZ 2107. If by the name of the economizer it is difficult to even imagine what it is, then by deciphering the EPHH - forced idle economizer, it becomes a little clearer what we are talking about.
Features of the device
The principle by which the fuel saver operates is based on the splitting of the formed clots.
The device is equipped with two special magnets made of neodymium alloy. The economizer generates a magnetic field through which the fuel passes, along with the resulting clots. As a result of the contact of fuel clots with oxygen, their rapid and dense combustion is observed, and there is no formation of residues, harmful emissions into the atmosphere, or carbon deposits on the walls of the engine structure. Thanks to this, fuel consumption is significantly reduced, guaranteeing an increase in the power characteristics of the vehicle. The wear rate of both the engine and the fuel system is reduced.
Carburetor repair VAZ 2107
Repairing a carburetor is considered a rather complicated procedure. Any operation requires care and precision. Moreover, to avoid contamination from entering the carburetor, all work must be carried out under virtually sterile conditions.
For self-repair, you will need a repair kit - a factory-prepared set of materials and parts necessary for the work. There are two types of standard repair kit:
- Full. Includes absolutely all possible elements that may be required to replace failed parts. It is usually purchased during major repairs or other serious faults.
- Incomplete. Allows you to carry out only one repair operation (for example, replacing jets).
When repairing a VAZ 2107 carburetor, you will need a standard set of tools and a carburetor cleaner, which can be purchased at any auto store.
Carburetors become dirty quickly. In a relatively short time, jets, channels and other small elements can become clogged with dust and impurities in the fuel. The moving parts of the device wear out quickly during aggressive driving. This primarily concerns sealing gaskets.
Typically, the carburetor repair process consists of disassembling, washing all parts, replacing worn and damaged elements, and reassembling.
Recommendations before repair
Before starting repair work, pay attention to the following points
- Work should be carried out on a cold engine to avoid the possibility of burns.
- You need to make sure that there is little fuel left in the system. Otherwise, most of the gasoline must be drained.
- Repairs must be carried out outside in dry weather or in a well-ventilated area (gasoline fumes can cause nausea and dizziness).
- You should prepare a clean place in advance for disassembling the carburetor and a container for washing it.
Read also: Land Cruiser 200 pros and cons
Depending on the symptoms of the malfunction, you should pay attention to individual parts and components of the carburetor:
- If the engine idles unsteadily or stalls, then the economizer valve needle is most likely worn out.
- If during disassembly water is found in the cavity, then the carburetor has lost its seal. It is recommended to check all hoses and connections.
- The appearance of a flame under the hood indicates a fuel leak. A thorough inspection of all carburetor elements and a search for gaps or holes will be required.
- If, when independently adjusting the quality and quantity screws, the engine does not react in any way to the turns of the screws, you should remove them and check whether the threads are broken.
- If the carburetor starts to “shoot”, you need to check all wires and terminals for short circuits.
Removing the carburetor
Any repair begins with removing the carburetor mechanism from the car. Dismantling the device is carried out strictly according to the following scheme:
- Disconnect power from the battery.
- Remove the air filter housing (it prevents access to the carburetor).
- Disconnect all fuel and air supply hoses from the carburetor.
- Unscrew the bolts securing the carburetor to the body. If the bolts do not come out, you can apply WD-40 water repellent to them.
- Place the removed carburetor on a flat surface and clean it of dirt and gasoline stains.
Video: how to quickly remove a carburetor from a car
The procedure for repairing a VAZ 2107 carburetor
To repair a particular carburetor component, you will need to disassemble the entire device, thoroughly wash all parts, dry them, inspect them and decide on replacement or adjustment. First, place the removed carburetor on a clean, level surface. Next you need to perform the steps in the following order.
- Remove the return spring.
- Using a Phillips screwdriver, remove the screw securing the three-arm lever.
At this point, disassembling the carburetor is considered complete. Metal parts are washed from carbon deposits and dirt with acetone or a special liquid for cleaning carburetors and dried with a stream of compressed air. Gaskets and other rubber elements are replaced with new ones.
All components will need to be checked for integrity - there should be no visible signs of wear or mechanical damage. Installation of new parts is carried out in the reverse order of disassembly. In any case, the following must be replaced:
- accelerator pump diaphragms;
- return springs;
- fuel valve mechanism;
- all rubber seals;
- most paronite gaskets.
Solenoid valve
The carburetor of an engine operating at idle speed stops supplying the combustible mixture to the combustion chambers, but operation requires the supply of, albeit a small amount of fuel and oxygen for combustion. Air entering the carburetor idle valve is mixed with fuel and passes into the combustion chambers. This system provides a continuous supply of gasoline, but power for different speeds requires different levels of fuel. When the engine is running, the spark plugs may flood with gasoline, which can be affected by driving downhill or engine braking. To eliminate such situations and save fuel, a carburetor solenoid valve system is provided.
How the valve works
The carburetor economizer circuit is equipped with an incoming and outgoing circuit. In this case, the circuit of the incoming circuit provides for the installation of a limit switch and a wire going to the switch. The limit switch on the throttle valve transmits information about the degree to which the gas pedal is pressed. A short to ground occurs when the gas pedal is depressed. When you press it, the contact is disconnected.
The wire coming from the limit switch and connecting the economizer transmits information about the number of pulses to the ignition coil. This allows the system to know the number of revolutions for a given minute. In this case, the carburetor is equipped with an electromagnetic valve in the idle circuit. Using the economizer, it is possible to turn the device on and off.
When the speed increases, the device cuts off the gasoline supply, closing the idle fuel jet. This achieves fuel savings. When the gas pedal is not depressed and when the speed is less than 2000 on the tachometer, the limit switch, closing to the ground wire, opens the idle speed electromagnet. The engine begins to gain speed, the circuit opens, but closes only at rpm above 2000.
And at the same time, the device will not open until the engine begins to operate at a rotation speed of less than 1800 rpm. When the car is coasting in gear, the system will not turn on - both in the case of a decrease in the number of revolutions and in the case of an increase in them. The economizer will only react based on the damper position.
Application benefits
The electromagnetic device, while doing its job, allows you to achieve the following positive results.
By regulating the supply of gasoline while the engine is running, using the idle speed solenoid valve, the carburetor reduces the mixture flow rate and closes the main fuel jet. By shutting off the supply, the dosage necessary for the smooth operation of the engine is produced through the channels of the air and mixture device. The engine, operating in such an optimal mode, does not wear out without severe overloads, and the period for major repairs of the unit increases. An optimal engine operating cycle reduces carbon monoxide emissions into the atmosphere.