Purpose
To control the engine and supply a spark at a certain moment and to the desired cylinder, a crankshaft position sensor is used. It detects the TDC position of the engine and then sends signals to the engine control unit, which sends a signal to the ignition module to supply a spark to the cylinder in which the compression stroke occurs.
The sensor is a rather important element and if it fails, the ECU will not be able to determine which cylinder needs to be supplied with spark and fuel.
Purpose of dpkv
The crankshaft sensor on the VAZ 2115 belongs to the engine electrical control system. Based on the controller readings, the ECU arranges the ignition and the order of supply of the fuel mixture. DPKV, the second name of the element is a position sensor, monitors and transmits to the ECU the location of the crankshaft at any time. By processing information about the angular velocity and the frequency of its rotation, the ECU determines the moment of passing dead spots in the cylinders and calculates the operating mode of the following systems:
- ignition supply for each cylinder;
- injector opening time;
- gas distribution correction;
- control of adjacent systems of the output path, muffler, etc.
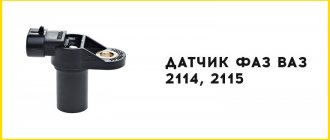
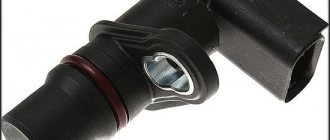
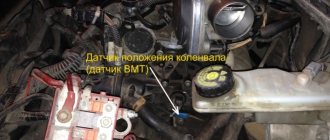
Crankshaft sensor 2115, an important component for the correct operation of the internal combustion engine, a faulty element leads to serious engine damage. Since the Lada Sputnik is equipped with injection engines, the part generates a signal to supply the ignition and to open/close the injectors; for carburetor engines, the unit only regulates the ignition operation. The sensor is located directly next to the crankshaft master or synchronization disk; the controller is mounted on a bracket screwed to the oil pump cover.
Design
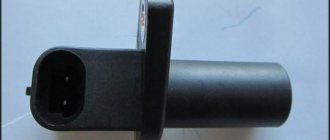
The sensor is a plastic part inside of which there is an electromagnetic element that operates on the Hall effect. A sensitive part protrudes from the sensor, which directly works with the master disk. The VAZ 2115 uses a generator drive pulley as a master disk, which has teeth for determining the position of the crankshaft by a sensor. The sensor is attached to the engine housing through an eyelet, which is pressed against the ebb on the engine using an M6 bolt. The sensor's power supply is shielded; this is necessary so that the signal reaches the control unit without interference.
Replacing the sensor
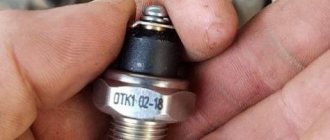
There are dozens of manufacturers on the market that produce original replicas of VAZ spare parts. Experts recommend choosing a universal controller from the MASTER SPORT brand, article number dpkv for VAZ 2110–2115 2112–3847010. The body is made of high-strength plastic, where there is a steel rod; the operation of the part is based on the principle of electromagnetic induction.
Replacing the DPKV is carried out with the engine turned off. When installing, it is necessary to maintain the distance between the transmitting tooth of the disk and the sensitive element. For Lada, the minimum distance should be 1 mm, the gap can be increased to 1.2 mm.
The sensor comes with an adjusting washer, which must be used; the element will allow you to correctly adjust the gap when tightening the DPKV fastener bolt. If the driver independently changed the sensor, but did not adjust the gap, the ECU will receive an unstable signal, which will lead to uncoordinated operation of the internal combustion engine.
Experts recommend having a spare parts kit with you; the controller may suddenly fail, and the car will simply stall in the middle of the road. Replacing the sensor takes 5 minutes and does not require much experience or special tools.
Symptoms of a problem
The crankshaft sensor has several characteristic signs of failure that clearly indicate its malfunction, but at the same time there are also signs that can be confused with other parts of the car engine.
If the DPKV is faulty, the car will show the following signs of breakdown:
- There is no spark;
- The engine does not start;
- One of the cylinders does not work;
- The car jerks when driving;
- Poor dynamics;
- Loss of power;
- Increased fuel consumption;
- The engine starts and immediately stalls;
- Doesn't start hot;
If there is no spark on the engine, this indicates a malfunction in the DPKV.
Sensor overview
What the controller is responsible for:
- Fuel injection phase synchronization;
- Timely supply of an impulse to ignite the fuel in the cavity of the combustion chamber.
The serviceability of the controller determines the timeliness and completeness of supply of the fuel mixture to the cylinders and combustion chamber.
The angle of inclination of the teeth is 6°. During the passage of each of them, the sensor counts the quantity and sends the data to the electronic control unit of the ECU.
The ECU analyzes the received data, reduces or increases the crankshaft speed in order to maintain the ignition timing within the permissible range.
The crankshaft teeth are equidistant from each other. The last two teeth are removed from centering the pulley at the top dead center (TDC) position.
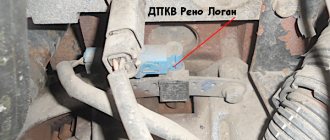
Where is the controller located: on the oil pump cover in the engine compartment. Access to equipment for preventive maintenance from under the bottom of the machine.
Note to the driver!!! Some motorists practice installing a sensor from a VAZ 2107 due to its low cost. The automaker strongly recommends purchasing and installing original parts with factory catalog numbers. External similarity and identity of parts does not guarantee full functionality.
Signs of a faulty crankshaft sensor:
- The engine does not start;
- Starting the engine is difficult;
- Idle speed is unstable;
- Sudden drop in engine power;
- Detonation;
- Passive acceleration dynamics;
- Increased fuel consumption;
- Under light loads, systematic shifts to a lower range of gears.
These symptoms are signs of a number of other malfunctions. Carry out comprehensive diagnostics using digital equipment for data objectivity.
| Name / catalog item | Price in rubles |
| Injector 351.3847 ROMB | From 170 – 200 |
| 402.3837 AutoTrade | From 170 – 200 |
| 191.3847 (8 valves) | From 170 – 200 |
| 2112-3847010-04 | From 170 – 200 |
| EMZ 'Pegasus' 191.3847 | From 170 – 200 |
| Astro 27.3847 (8 valves) | From 170 – 200 |
| StartVolt VS-CS 0112 | From 170 – 200 |
| CTR Cartronic 2112-3847010-04 | From 170 – 200 |
| RepCom RK02004 (8 valves) | From 170 – 200 |
| Schetmash 2112-3847010 (8 valves) | From 170 – 200 |
Technical characteristics of DPKV:
- Winding resistance range: 570 – 750 Ohm;
- Winding inductance: 250 MHz;
- Minimum sensor voltage amplitude: 0.3V;
- Maximum sensor voltage amplitude: 225V;
- Dimensions: 30x45x69 mm;
- Weight: 52 grams.
Step-by-step instructions for self-diagnosis
To check the DPKV you will need a multimeter.
- We dismantle the metal protection of the oil pan, provided that it is installed. Fastening with six screws around the perimeter.
- From under the bottom of the car, disconnect the terminals from the sensor.
- We bring the limit switches of the multimeter to the contacts;
- Turn on the multimeter, set the position of the regulator to “resistance”;
- We carry out actual measurements;
- We compare the obtained data with standards. If the arrow tends to infinity, the controller is working. If it goes to “zero”, it’s a breakdown. Average readings are 550-750 Ohms.
Depending on the diagnostic results, the technician makes a decision on the advisability of further operation of the equipment.
Causes of premature wear of the DPKV
- long-term operation without prevention;
- manufacturing defects;
- third-party mechanical damage;
- getting sand, dirt, or metal shavings inside the controller;
- sensor breakage due to crankshaft teeth;
- damage to the DPKV during repair work;
- short circuit in the on-board circuit.
Examination
You can check the DPKV using diagnostic equipment using the ADC and multimeter channels. As a diagnostic device, you can use the ELM327 with the OpenDiag smartphone application; this assembly of the device and application allows you to determine faults in the car quite simply and is in no way inferior to professional diagnostic equipment.
Checking with a multimeter
Testing with this method consists of measuring the resistance of the inductor, which is located inside the sensor; most often it is the cause of sensor failure.
To carry out the check you must:
- Set the resistance measurement limit on the multimeter to 2 kOhm;
- Next, connect the multimeter probes to the terminals on the sensor;
- The readings on the multimeter should be in the range from 500 to 800 Ohms, if the readings agree, then the sensor is working;
- If the readings have a different range or the tester even shows 1, then this indicates a break in the inductor inside the sensor;
- In case of such a breakdown, the sensor must be replaced with a new one;
Types of crankshaft sensors
Inductive (magnetic) DPKV
The device is based on a magnetized core placed in a coil. At rest, the magnetic field is constant and there is no self-induction emf in its winding. When the top of the metal tooth of the driving disk passes in front of the magnetic core, the magnetic field around the core changes, which leads to the induction of current in the winding. When the disk rotates, an alternating current appears at the output, and the frequency of the current varies depending on the speed of the shaft rotation. The work is based on the effect of electromagnetic induction.
A special feature of this sensor is its simple design, which operates without additional power supply.
Hall effect sensor
The type of these sensors operates on a microcircuit, placed in a housing with a magnetic core, and the drive disk creates a moving magnetic field with magnetized teeth.
The sensor provides high accuracy of signal output in all specified crankshaft rotation modes. A sensor operating on the basis of the Hall effect requires a constant voltage connection.
Optical sensors
It is based on the physical phenomenon of the photoelectric effect. Structurally, it is a light source with a receiver (photodiode). Rotating between the source and the receiver, the perforated disk periodically closes and opens the path to the light source, as a result the photodiode produces a pulse current that arrives in the form of an analog signal to the control unit (the system has limited use and was previously installed in the distributors of injection cars, for example, Matiz).
Replacement
To independently replace the DPKV on a VAZ 2115, you do not need to have great skills in car repair. You just need to prepare the necessary tools.
To replace you will need:
- Pliers;
- 10 mm wrench;
Replacement process
It is most convenient to carry out work from an inspection hole or overpass, but if one is not available, you can remove the right front wheel and unscrew the engine mudguard, after which free access to the sensor will open.
- Remove the connector from the sensor;
- Unscrew the bolt with a 10mm wrench;
- Quite often, the sensor turns sour in its seat, after which it is difficult to get it out of there; to do this, you can use pliers and rotate the sensor to remove it;
- Before installing a new sensor, you need to clean the seat for easier installation;
- We assemble in the reverse order;
How to independently replace the crankshaft sensor on a VAZ 2115 car
Required materials and tools:
- wrench “10”, socket, wrench, flat-tip screwdriver;
- rags, additional lighting as needed;
- new DPKV.
Step-by-step DIY replacement guide:
- we place the car on the inspection channel, secure the wheels with wheel chocks, and squeeze the parking brake;
- in the area where the oil pump is located, use a screwdriver to pry up the block with terminals, remove it, and move the power contacts to the side;
- Unscrew the screw (to “10”) – the sensor lock;
- we remove the controller, carry out troubleshooting, wipe it, clean the seat from any remaining dust and dirt;
- insert the new controller, screw it on, and assemble the structure in reverse order.
DIY replacement completed.
Video
Recommended viewing:
- Speed sensor VAZ 2115
- Idle speed regulator VAZ 2115: Replacement and check
- TPS on VAZ 2115: Malfunctions, Check, Replacement
- VAZ 2115 engine three valves 8 valves
- Replacing the fuel pump mesh
- Replacing the clutch disc and basket of a VAZ 2115
Category: Sensors
← DPKV VAZ 2107: Malfunctions, Check, Replacement
Mass air flow sensor VAZ 2115 →
Functionality check
If you decide to check the serviceability of the sensor yourself, treat this procedure responsibly and carry it out correctly. On a VAZ 2114 car, the crankshaft sensor is checked in several ways.
- Using a multimeter. The serviceability of the induction sensor can be assessed by the resistance of its coil. In a working product it is 500-700 Ohms.
- On the multimeter, set the measurement limit to 200 millivolts, connect the probes to the terminals (where the standard wires are connected). Pass a steel object several times in front of the core. The working sensor will “see” the metal and there will be voltage spikes on the multimeter display. If there are none, replace the part.
- But the most accurate results when checking are provided by an oscilloscope. When using this device, one hundred percent results can be guaranteed; it reads all the information from the sensor while the engine is running. It can be observed on the device screen. The engine, during tests, should operate at different speeds. They start with eight hundred revolutions, then two thousand, and raise it to six thousand. If the lines (on the device screen) are of different lengths, you need to look for the cause of the malfunction. Remove dirt, check the pulley for defects, and so on.
Oscillogram of a working sensor
Oscillogram of a working VAZ 2114 crankshaft sensor
It should be noted that these verification methods work on all VAZ models with DPKV. If you have any doubts about your own abilities, then contact the service. Thanks to specialized equipment, the result will be more accurate, and the check will not take much time.
Remove from the engine
The malfunction has been identified. Let's start eliminating it. Let's look at this operation using the VAZ 2114 as an example.
Turn off the car ignition. We open the hood, fix it firmly, and visually determine where the VAZ 2114 crankshaft sensor is located. Before removal, it is advisable to remove all contaminants in the area where it is located. Next, carefully remove the block with wires from the connector.
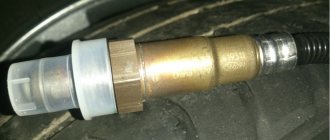
Connector DPKV VAZ 2114
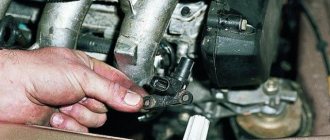
Using a “10” wrench, unscrew the fastening bolt.
Removing the crankshaft sensor on a VAZ 2114
Let's take it out.
Removing the DPKV VAZ 2114
After dismantling the sensor, it is advisable to check the generator drive toothed pulley for defects. Since its damage can introduce errors into the operation of the entire system.
After we are convinced that there are no defects of any kind, we proceed to assembly. The seat must be clean. We install the new part in place and fasten it with a bolt (the tightening torque should not exceed 8-12 Newton meters). In this case we use adjusting washers. They are sold complete with a new sensor. Thus, using a special probe, we ensure that the gap between the pulley and the sensor core is one millimeter. The permissible error is 0.41 millimeters in the larger direction.
The gap between the pulley and the crankshaft sensor core on a VAZ 2114
We connect the block with wires into place.
After installation and checking the gap, we try to start the engine. With a confident start and stable operation of the engine, we can say that the repair was carried out successfully.
Despite the fact that the breakdown of the synchronizing sensor is not frequent, knowledge of its symptoms and consequences, as well as methods of elimination, will be useful to the car enthusiast.
New sensors are available in almost any auto parts store. The price of DPKV can vary between 200-400 rubles. How much a VAZ 2114 crankshaft sensor costs depends on your region, the location of large spare parts stores nearby (usually cheaper there) and the greed of the seller. Can be ordered in the online store. When purchasing, take the old one with you so as not to make a mistake in choosing a model. To avoid defects and repeated purchases, it is advisable to purchase from well-established sellers.
Dismantling and installation
So, you have determined that the DPKV has failed. Therefore, there is nothing left to do but replace it. To do this you will have to dismantle the old device.
- Turn off the ignition and open the hood. Securely secure it to avoid unpleasant blows to the back or head.
- Remove any dirt from around the sensor so that it can be removed and visually inspected.
- Disconnect the wiring block from the corresponding connector.
- Using a 10 mm wrench, you can easily remove the crankshaft sensor mount.
- Remove the damaged device.
- At the same time, be sure to check the generator drive timing pulley. It is not uncommon for damage to appear on it, due to which the device cannot operate correctly. These teeth cause error codes to appear on the on-board computer.
- If there are no defects and nothing prevents the installation of a new device, begin assembly.
- If necessary, clean the installation site of the DPKV.
- Place the new measuring device in the socket and tighten the mounting bolt. In this case, do not exceed a tightening torque of more than 12 N m.
- Be sure to use the adjusting washer, which is already supplied by responsible sensor manufacturers.
- Using a special feeler gauge, make sure that there is a gap of 1 millimeter between the pulley and the DPKV core.
- The gap error can be no more than 0.41 millimeters in the upward direction. Under no circumstances should the gap be less than the required 1 mm.
Maintain clearance
Price issue
As we have already noted, VAZ 2114 owners are not often faced with the need to change the DPKV. But always be prepared for such troubles.
You don’t have to spend a lot of money purchasing a new sensor. The price depends on the store and region where car parts are sold. On average, a recreation center costs about 200-400 rubles.
Replacement at a service station is still a cost around the cost of several sensors. Therefore, think about who exactly will do the work - you or the car service specialists.
Technical parameters of the crankshaft sensor VAZ 2114, 2113, 2115 8 valves
Crankshaft sensor 2114, 2113, 2115 model 0191.38471 has the following technical characteristics:
| list of technical characteristics of the crankshaft sensor VAZ 2114 |
| Weight - 50 grams |
| Supply voltage 12 V |
| Operating temperature range from -40 to +125 oС |
| Sensor winding resistance, kOhm – 0.570 – 0.750 |
| Winding inductance, mH – 200 – 420 |
| The smallest voltage amplitude from the sensor, at an indicating pulley frequency of 30 rpm, not less, V – 0.3 |
| The largest voltage amplitude from the sensor, at a frequency of the driving pulley of 7000 rpm, no more, V – 250 |
| The plug connector is equal to Packard Electric connector 12052648 |
| External dimensions, mm – 30x45x69 |
Crankshaft sensor device for VAZ 2114, 2113, 2115 brand 2112-3847010 (191.3847)
The internal structure of the crankshaft sensor VAZ 2114, 2113, 2115 consists of a magnetic core, at the end of which there is a permanent magnet. A coil of wire is wound around the magnetic core. All this internal content is enclosed in a plastic case. The magnetic core winding has two terminals. To isolate the circuits of the crankshaft sensor 191.3847, its winding (coil) terminals are enclosed in a screen that is connected to a digital ground. The internal structure of the crankshaft sensor VAZ 2114, 2113, 2115 model 2112-3847010 (191.3847) is shown below in the figure.
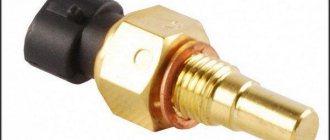
Coolant temperature sensor VAZ 2114 model 2112-3851010 It, like the crankshaft sensor, greatly influences the start and operation of the VAZ 2114 engine