Replacing the heater radiator on a VAZ-2106 car is a very simple, albeit time-consuming task. The main problem is that the stove of the domestic VAZ-2106 is a single compact unit equipped with a pumping device, which has an electric motor, a ventilation device with impellers. In addition, the heater has a heating structure in the form of a radiator with a control valve. As for the air flows entering the vehicle interior, they are regulated by means of a damper.
The heater can fail due to several important parts; in particular, most often the malfunction can occur due to the fact that the electric motor has stopped functioning properly or the radiator has leaked.
What to wash with
The VAZ-2106 has standard and widely used radiators that do not impose special requirements on the composition or quality of the flushes used. You can use the same products that are widely used in other cars when cleaning radiators:
- two-component;
- acidic;
- alkaline;
- neutral.
Although among them, as experts note, the optimal choice would be a two-component mixture. An alternative to purchased formulations are folk solutions, which are quite simple and easy to prepare. Folk recipes are based on alkaline and acidic substances available in any home and grocery store. Namely:
- vinegar;
- soda;
- lemon acid.
In order not to harm the radiator of your VAZ-2106, be sure to use acids and alkalis alternately.
The stove blows cold air. How to turn on the stove VAZ 2107
The stove blows cold air: how to turn on the VAZ 2107 stove
How to turn on the stove so that hot air comes out
If you feel cold in your car, then it's time to turn on the heater. It seems like a simple question, but sometimes warm air comes out, something hums, but there is no heat and warming up does not help. Therefore, this article is not just an answer to the question of how to turn on the heater on a VAZ 2107, and what to do if the heater blows cold air, but a consideration of all possible cases with specific recommendations.
Are you sure you turned on something, but the stove doesn’t heat up?
First of all, if you are a beginner, check - are you sure you turned on the stove?
Installing a motor from a chisel stove into a stock stove with modifications
I would like to bring to your attention my version of a modification of a classic stove. First, I will say that a serviceable Zhiguli heater copes with its task quite successfully, the car is warm even in severe frost, but at the same time it has a number of significant shortcomings that every classic car owner dreams of getting rid of. This includes strong annoying noise, insufficient airflow of the windshield and side windows, and a low number of heater fan speeds. It all started with the fact that a fifth assembled stove and an old chisel stove motor with an impeller ended up in my hands “completely free of charge.” This allowed me to experiment slowly while continuing to drive my car with the stock heater.
- Read more about Installing a motor from a chisel stove into a stock stove with modifications
- Login to leave comments
Aquagel - CAR GLASS PROTECTOR
The heating unit, in essence, is a complex set of equipment that serves to heat the interior. This unit includes the following components:
- Fan powered by an electric motor;
- Plate - a damper responsible for the direction of air flow;
- Radiator, which directly carries out heating;
The heater core is removed if it malfunctions or if cleaning is necessary. One way or another, the procedure for removing the heater core is quite simple.
Also, this operation is necessary if any problems occur in the heating system, be it a breakdown of the fan motor or a leak in the radiator itself.
To remove the heater core you will need the following tools:
- Spanner 7;
- 10mm wrench;
- Screwdriver;
If you already have all this at hand, then the process of removing the heater core will go quickly and without unnecessary difficulties.
- First things first, drain the coolant from the system. To do this, you need to open a specialized tap on the heaters and move the control lever to the right.
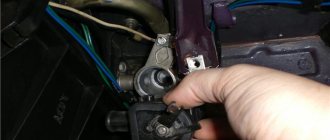
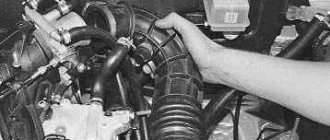
- Let's move on to work under the hood. From there you should have access to the heater hoses. To open this access, you will need to unbend the brackets that hold the vacuum hose and move the hose and wiring harness to the side by hand.
- Release the radiator pipes from the heater hoses. To do this, loosen the fastening of these hoses;
- Remove the seal from the radiator pipes. To do this, unscrew the bolts securing it and, using a screwdriver, pry it off the edge and pull it off the pipes. Find the holes where the bolts were. Now you see that they contain spacers. Remove them and set them aside;
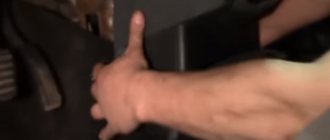
- We dismantle the fan along with its casing;
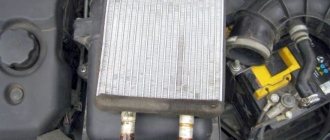
- We are trying to lower the heater radiator as much as possible. You can do this exactly as much as the crane control rod allows you. We remove the above-mentioned pipes from the hole on the front panel;
- Then we remove the fastenings of the crane control rods, after which we finally remove the radiator from the car;
The radiator that we removed is in tight conjunction with the pipes and faucet. Let's begin to disconnect these three components.
- We start by removing the outlet pipe. Remove the rubberized seal (gasket) from its flange. We unscrew the fastening bolts and separate the faucet along with the outlet pipe from the assembly. Unscrew the two bolts securing the pipe to the tap and disconnect them. Remove the gaskets from the flanges.
- Carefully inspect all the parts that wear out the most - the tubes. seals, gaskets. The gaskets, no matter the degree of wear, must be replaced with new ones. Examine the tubes for obvious mechanical damage, as well as for the presence of traces of corrosion. If there is even the slightest hint of such damage, then it is necessary to replace them with new ones.
- Install a new radiator;
Perform all the described steps again, but in reverse order, and this completes the entire procedure for removing the heating radiator and replacing it.
Aquagel - is not washed off by rain, snow and water.
Characteristics of the main radiator
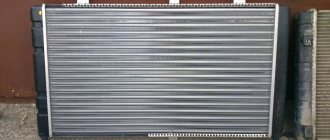
The purpose of the element is to cool the heated antifreeze, which is driven through the system by a water pump. For maximum airflow efficiency, the radiator is installed in the front part of the body and is protected from mechanical damage by a decorative grille.
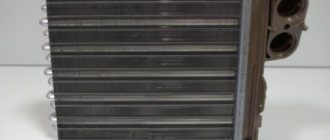
In recent years of production, VAZ 2106 models were equipped with aluminum heat exchangers with side plastic tanks. Technical characteristics of the standard unit:
- radiator catalog number - 2106–1301012;
- honeycomb - 36 round aluminum tubes arranged horizontally in 2 rows;
- size - 660 x 470 x 140 mm, weight - 2.2 kg;
- number of fittings - 3 pcs., two large ones are connected to the cooling system, one small one is connected to the expansion tank;
- in the lower part of the left tank there is a drain plug, in the right there is a hole for a temperature sensor;
- The product is equipped with 2 rubber supports.
In a standard radiator, antifreeze enters the left plastic tank and flows through horizontal honeycombs into the right one
Cooling of the antifreeze in the radiator occurs due to flow through horizontal tubes and heat exchange with aluminum plates blown by an air flow. The unit cover (not included when purchasing a spare part) plays the role of a valve that passes excess coolant through the outlet pipe into the expansion tank.
Standard heat exchangers for the “six” are produced by the following companies:
- DAAZ – “Dimitrovgrad Automobile Unit Plant”;
- PEKAR;
- luzar;
- "Pramo."
DAAZ radiators are considered original, since these are the spare parts that were installed by the main manufacturer, the Atovaz company, when assembling the cars.
In a brass heat exchanger, the tubes are located vertically and the tanks are located horizontally
An alternative option is a brass heat exchanger with catalog number 2106–1301010, . The cooling cells in this unit are located vertically, the tanks are located horizontally (top and bottom). Element dimensions - 510 x 390 x 100 mm, weight - 7.19 kg.
The VAZ 2106 radiator, made of copper, is considered more reliable and durable, but will cost twice as much. All early Zhiguli models were equipped with similar spare parts. The transition to aluminum is associated with a reduction in cost and lightening the car - a brass heat exchanger is three times heavier.
The design and method of mounting the main heat exchanger does not depend on the type of power system. The carburetor and injection versions of the six use the same cooling units.
Installing a heat exchanger from another VAZ model is fraught with serious alterations that are difficult for the average car enthusiast
In a makeshift way, you can install on the “six” a unit from the tenth VAZ family or a large radiator from a Chevrolet Niva, equipped with two fans. A serious reconstruction of the car will be required - you need to move the hood opening hinges to another place, otherwise the unit will not fit on the front panel of the body.
How to Remove the Heater on a VAZ 2106 ~ AUTOINTERLINE.RU
We study the design and function of replacing the stove in a VAZ 2106 car
The “six” cabin heater is presented as a small-sized device that has in its design such components as:
- the stove motor, which is a lively EDC;
- fan device with a corrugated impeller;
- stove valve with variable control knob;
- radiator;
- damper that distributes air flow.
Design and main malfunctions of VAZ stoves
The standard radiator of the VAZ 2106 stove, despite its small size, copes quite well with its task of cooling the water and warming up the interior. You can see the design of the interior heater more clearly below.
The mechanism of operation of this device is shown in the figure.
The “six” type of heating system is one of the most common designs based on the use of water from the cooling system of the power plant. It consists of three main components - actually a stove, the cost of which is applicable for Russian car owners, mounts with control accessories in the form of taps and air ducts with a radiator.
The air intake damper and valve of the VAZ 2106 stove are connected to control accessories using flexible and elastic rods.
If the lower accessory occupies this position, then this means the maximum opening of the air absorber damper, which directs a greater flow of air through the stove further into the heating system.
Plastic deflectors with a variable angle of airflow into the cabin make it possible to change the direction of air flow and point it in the appropriate direction.
Structurally, from time to time, the air flow dispersal cover is called, and is not connected in any way to the system central stove control switch.
This damper is adjusted to open and close using a lever device mounted for comfort on the driver's side of the seat.
With this switch you can set 2 fan rotation speed ranges, both lower and higher levels.
It is strictly not recommended to start the electronic heater fan with the air absorber damper retracted and the valve in the “open” position.
Replacing the stove fan VAZ 2106
Replacing the stove
by car VAZ 2106
. Subscribe, like. New videos coming soon.
The main defects of the VAZ 2106 stove include the following:
- defects in the stove motor, as a result of which it does not start;
- depressurization of the radiator heating system or pipelines, which is why the stove in the VAZ 2106 does not heat well and the cabin becomes cool;
- sometimes the stove blows cold when there is not enough coolant in the system, and if, when adding it to the norm, the defect is not eliminated, you need to cover the front part of the radiator of the cooling system with thick cardboard and the situation should improve.
Replacement of individual stove elements
Car enthusiasts often ask about the VAZ 2106 car, how to remove the stove for maintenance or service work. Such questions arise in connection with the need to repair the stove and subsequent assembly. To replace the heater radiator and heater tap, you need to prepare a set of plumbing tools and new spare parts for the heating system to be replaced:
- Moving the lever to the right, open the heater tap, and then drain the coolant from the system.
- In the mechanical compartment under the hood, unbend the fastening bracket for the vacuum type hose and the wiring kit that goes to the panel, put them aside so that you can get to the heating hoses.
- We slightly unscrew the fasteners of the hoses to the heating radiator tubes and dismantle them.
- We unscrew the 2 bolts securing the seal to the shield, and then slowly dismantle it, remembering that spacer-type bushings are installed there.
- We dismantle the fan device of the stove.
- We dismantle the heater radiator, leaving it hanging on the heater faucet rod and remove the tubes from the hole in the shield.
- We unscrew the fasteners of the stove tap rod and disconnect it.
- We remove the heater radiator from the “six” along with the pipes and the heater tap.
- Having removed the fasteners, we remove the pipe from the heater radiator and the flange gasket from it.
- Having removed the fasteners, remove the stove valve along with the gasket and the pipe from the heating radiator.
- Having unscrewed the fasteners, we remove the pipe from the stove faucet along with the gasket.
- If necessary, after a visual inspection of the gaskets, they must be replaced.
- We are installing the stove.
Heating and ventilation system VAZ 2106
Heater device for VAZ 2106
1 – deflector; 2 – air duct for heating the windshield; 3 – air supply cover; 4 – radiator; 5 – radiator casing; 6 – heater tap rod; 7 – outlet pipe; 8 – underwater pipe; 9 – heater tap; 10 – air distribution cover; 11 – heater fan electric motor; 12 – fan impeller; 13 – additional resistor; 14 – internal ventilation duct; 15 – lever of the air distribution cover; 16 – control lever bracket; 17 – air supply cover control handle; 18 – heater tap control handle; 19 – draft of the air supply cover.
Scheme of operation of the VAZ 2106 stove
How the stove works on a VAZ 2106: 1 – air distribution cover; 2 – fan electric motor; 3 – impeller; 4 – heater tap; 5 – underwater pipe; 6 – outlet pipe; 7 – radiator casing; 8 – air supply cover; 9 – hood; 10 – deflector; 11 – air duct for heating the windshield; 12 – drive rods; 13 – control lever bracket; 14 – control handles; 15 – radiator; 16 – internal ventilation duct; 17 – lever of the air distribution cover.
The heating system of the VAZ 2106 is liquid. Coolant from the engine cooling jacket is used as a coolant. The system consists of the heater itself, a bracket with control levers and air ducts. The heater housing contains a radiator with a tap, an electric fan and two air dampers.
The valve and air intake damper of the VAZ 2106 stove are connected by flexible rods to the levers of the control unit. The extreme right position of the upper lever corresponds to the full opening of the valve and the maximum flow of coolant through the heater radiator.
With a similar position of the lower lever, the outside air intake damper is fully open, which corresponds to the maximum air flow through the heater. Rotating deflectors on the instrument panel allow you to direct air flow to heat the windshield, front door glass and interior. The lower damper (air distribution cover) is not connected to the heater control unit.
We open and close the flap using the lever attached to it on the left (driver's) side. The air flow rate through the heater is controlled by a three-position switch. They can set one of two operating modes of the VAZ 2106 electric fan - minimum and maximum.
ATTENTION! It is forbidden to turn on the electric fan of the VAZ 216 stove with the air intake damper closed and the heater tap open.
PROCEDURE FOR REPLACING THE VAZ 2106 HEATER
The vehicle interior is heated by engine coolant. The heater design details are shown in the diagram.
Many car enthusiasts only think about the heating system when it gets cold. But sometimes the heater can remind you of itself with an unpleasant smell in the cabin and the appearance of puddles of antifreeze under the feet of the driver or passenger in the front seat. This means that the heater core is leaking and needs to be replaced. This work can be done with your own hands.
To do this you will need:
- open-end wrenches for 7 and 10;
- flat and Phillips screwdriver;
- Antifreeze supply is approximately 1.5 liters;
Replacing the heater radiator VAZ 2106
Open the heating valve and remove the vacuum hose and wiring harness
- Having moved the heater control lever to the right all the way, open the heating tap and drain the Antifreeze from the heater radiator;
- in the engine compartment, release the fastening of the vacuum hose and wiring harness and move them to the side, thereby providing access to the heater hoses;
Release the clamps, remove the hoses and gasket
- loosen the hose clamps and remove them from the pipes;
- then unscrew the two bolts that secure the seal to the shield;
- carefully remove the sealing gasket from the radiator pipes so as not to damage it;
PLEASE NOTE: THERE ARE TWO SPACE WASHERS INSERTED INTO THE GASKET, IT IS PREFERABLE NOT TO LOSE THEM. remove the electric heating fan together with the casing (how to dismantle the electric fan is described below);
remove the electric heating fan together with the casing (how to dismantle the electric fan is described below);
Replacing the heater radiator on a VAZ 2106
We take out the radiator and remove the heating valve VAZ 2106
- we take out the heating radiator along with the tap, lower it down as far as possible and remove it along with the pipes;
- unscrew the bolts securing the outlet tube and disconnect the tap;
RECOMMENDATION: REMOVE ALL SEALING GASKETS, INSPECTION THE FLANGE CONNECTIONS, CLEAN THEM IF NECESSARY, INSPECTION THE ATTACHMENTS OF THE PIPE TO THE RADIATOR, IF THERE ARE SUSPECTS OF LACK OF TIGHTNESS, IT MUST BE ELIMINED IMMEDIATELY, REPLACEMENT IS MANDATORY REPLACE ALL GASKETS WITH NEW ones.
- install a heating tap on the new radiator, connect all the pipes;
- install the new radiator in the reverse order;
- set the heating tap control lever to the extreme right position and make sure that the tap is fully open, connect the tap control cable;
- Replenish the engine cooling system, start the engine and carefully check all connections for leaks.
Replacing the heater cable of a VAZ 2106
remove the instrument panel cover; in this case, you need to push the heating system control panel inside;
Remove the air damper drive cable
Having removed the latches, disconnect three cables from the heater panel: 2 air damper control cables and one heater valve control cable;
Loosen the heater tap rod
Remove the heater tap drive cable
- Using a screwdriver, disconnect the cable from the heater tap drive;
- remove the cable from the holder;
- We also remove the heater damper control cable;
- we take out the old cables and insert new ones;
Installing a new cable
- connect and fix the cable for driving the air dampers on the heater;
- using a cable, install the damper for blowing the windshield in the fully open position;
- set the knob on the heater panel to the “windshield blowing” position;
- in this position, connect the heater air damper control cable and fix it;
- we secure the air damper drive cables in the heater holder;
Warning. When you install the instrument panel, you will not see the windshield defroster. To check its correct operation, you need to attach the cables to the control panel and turn on the fan. After this, turn the air damper control lever to blow the windshield. In this position, air should flow to the windshield, but there is no air blowing to the foot nozzles. If this is not the case, then disconnect the air damper cable from the panel and turn the air control knob 360˚, then attach the cable and check the air flow distribution again.
Connect the cable to the heating tap
- connect and secure the radiator damper control cable to the heater;
- turn the radiator choke control cable clockwise until it stops;
- after this, you need to set the heater knob to the “on” position;
- in this position, connect and fix the heater tap cable;
Replacing the heating motor of a VAZ 2106 Before starting work on replacing the heating fan motor, you must disconnect the negative terminal from the battery.
Removing and replacing the heater radiator on VAZ 2101, 2102, 2103, 2104, 2105, 2106, 2107
Hello, from this article you can learn how to replace the heater radiator on a VAZ 2101, 2102, 2103, 2104, 2105, 2106, 2107. In fact, leaking heater radiator is a fairly common problem in old Russian cars, especially if it happens in cold weather. time of year, the problem becomes even worse, it’s cold in the cabin, the windows sweat. The first signs of failure of the heater radiator are the smell of antifreeze in the cabin and the damp carpet at the passenger's feet, since that is where the heater radiator is located. Another situation is also possible: the heater radiator may not leak, but produce little heat, this is due to the fact that over time it becomes heavily clogged with various dirt and rust and its heat output decreases. We will consider replacing the heater radiator using the VAZ 2107 as an example; on other rear-wheel drive VAZ cars, this procedure is carried out in a similar way. Together with the heater radiator, you can change the heater valve at the same time, because you still have to remove it. To replace the heater radiator you will need: a 7 and 10 wrench, a flat screwdriver, antifreeze, a new heater radiator. First of all, place some rags under the heater radiator on the interior side so that the antifreeze does not drip onto the carpet. Next, take a screwdriver and loosen the clamps of the heater radiator hoses under the hood
After this, we remove the hoses from the radiator pipes; you can place a bottle under the hoses to collect the draining antifreeze.
Next, take a key or socket 7 and unscrew the 2 bolts that secure the seal to the shield and remove it
Then we disconnect the drive rod from the heater valve and remove the heater fan casing. The next step is to remove the heater radiator pipes from the holes in the engine shield and remove it
Now, using a 10mm wrench, unscrew the bolts securing the outlet pipe and remove it from the radiator
Installing the heater radiator on a VAZ 2107 is done in the reverse order. After installing a new radiator, add antifreeze to the max level in the expansion tank. Now you need to expel the air from the cooling system, to do this, warm up the engine to operating temperature and accelerate, if this does not help, then you will need to stand on some hill, the steeper the better, with the front up and also accelerate.
How to replace the heater radiator in a VAZ-2106 car
Replacing the heater radiator on a VAZ-2106 car is a very simple, albeit time-consuming task. The main problem is that the stove of the domestic VAZ-2106 is a single compact unit equipped with a pumping device, which has an electric motor, a ventilation device with impellers. In addition, the heater has a heating structure in the form of a radiator with a control valve. As for the air flows entering the vehicle interior, they are regulated by means of a damper.
The heater can fail due to several important parts; in particular, most often the malfunction can occur due to the fact that the electric motor has stopped functioning properly or the radiator has leaked.
Coolant replacement
Antifreeze circulating through the cooling circuit of the VAZ 2106 gradually loses its anti-corrosion properties, becomes dirty and forms scale. Therefore, periodic replacement of the fluid is necessary at intervals of 2-3 years, depending on the intensity of use. Which coolant is better to choose:
- initially the manufacturer recommended pouring G11 class antifreeze, colored blue or green (this also includes antifreeze, invented in the USSR);
- it is allowed to fill with liquid of classes G12 and G12+, made on the basis of ethylene glycol, the color is predominantly yellow and orange;
- the best and most modern option is G13 antifreeze based on propylene glycol, color – pink or purple.
The color of antifreeze is given by special dyes added by manufacturers at their discretion.
G13 class fluid is significantly more expensive than ethylene glycol antifreeze, but more durable. Minimum service life is 4 years.
To replace antifreeze in the cooling circuit of a VAZ 2106, you need to purchase 10 liters of new fluid and follow the instructions:
- While the engine is cooling, remove the dust shield located under the radiator drain plug. It is fastened with 4 8mm key screws.
- Open the stove tap, place a container under the drain neck of the body exchanger and remove the plug. A small amount of liquid will drain.
Immediately after unscrewing the plug, no more than a liter of liquid will flow out of the unit - Remove the expansion tank cap and slowly unscrew the top radiator cap. Antifreeze will flow out of the hole again.
The bulk of the antifreeze will drain out after opening the top cover of the heat exchanger - Remove the cap completely and wait until the system drains. Screw the plug into the drain hole.
Brass radiators may not have a drain outlet. Then you need to unscrew the temperature sensor or remove the large lower hose and drain the antifreeze through the pipe.
To prevent air pockets from forming when filling the circuit with new fluid, you need to remove the hose at the highest point of the system. On carburetor versions this is the manifold heating tube, on injection versions it is the throttle valve.
During the process of pouring antifreeze, air will exit the system through the removed pipe located at the highest point
Fill through the upper neck of the radiator, observing the removed pipe. As soon as antifreeze flows from the hose, immediately put it on the fitting. Then install the heat exchanger plug and add fluid to the expansion tank. Start the engine, warm it up to a temperature of 90 °C and make sure that the radiator housing is warmed up from top to bottom.
Step-by-step instructions for installing a new heater radiator
In order to correctly and accurately replace an old device that has ceased to function properly, first of all, as a rule, you should stock up on the necessary tools. In particular, if we are talking about replacing the radiator installed in the heating unit of a VAZ-2106 car, the car owner will only need a pair of keys (for “7” and “10”), as well as a screwdriver.
The first step is to open the stove faucet; this manipulation can be done by moving the control lever to the right side. Then you need to rid the engine cooling system of antifreeze.
Replacing the heater radiator on a VAZ-2106 car requires unbending the brackets that hold the vacuum hose. These small structural elements are located in the engine compartment, holding the wiring harness. Thanks to the fact that the motorist can move the hose with the harnesses to the side, it will be possible in the future to easily begin working directly with the heating unit.
Further actions should be aimed at loosening the clamps; after reducing the fastening force, all hoses can be removed from the system. After both bolts securing the seal are unscrewed, with which the front panel is held in place, the motorist will be able to remove the seal without much effort by carefully pulling it along the pipes
It is important to take into account one important detail, in particular the spacers. These small elements of the system are located inside the seal, so it is important not to lose them when removing them
The radiator of the VAZ-2106 stove can be upgraded only after removing the fan. It is worth noting that the unit should only be removed together with the machine casing. Immediately after this, you can begin to dismantle the heater radiator itself, carefully lowering the unit down to a level that will be directly determined by the control rod of the heater tap. When dismantling the device, it should be taken into account that the rear part of the radiator is lowered first, after which the pipes located in the niche of the front panel are removed.
The motorist must unscrew the bolt that holds the shell of the faucet control rod, and then remove the rod from the faucet itself. After this, not only the radiator can be removed from the vehicle, the faucet and pipes should be removed along with it. If you carefully unscrew a couple of bolts and remove the outlet pipe, you can quickly get rid of the gasket located on the pipe flange. After unscrewing the next two bolts, you should dismantle the faucet directly with the supply pipe.
The next thing to be removed is the gasket, which is fixed on the tap of the heating device. By unscrewing a couple more bolts, it will be possible to remove the supply pipe fixed to the heater faucet, so it will be necessary to rid the system of the gasket located on the supply pipe and faucet.
Before proceeding with replacing the main device, the motorist should first inspect both gaskets (on the inlet and outlet pipes). It should be remembered that these elements are interchangeable. In addition, the gaskets should not have any mechanical damage, and there should be no marks on them that hint at aging of the rubber. It is more expedient to replace these parts with new standard elements.
If the car owner was interested in how to remove the heater radiator on a VAZ-2106, then the described instructions, with the right approach, will allow you to do everything yourself in the shortest possible time. After dismantling, the car owner will only need to install a new radiator along with a faucet, in the reverse order described.
To make sure that their actions are correct, the motorist can check the heater radiator, in particular, by plugging all the holes in the device’s tank, supply air to it, which will have a pressure of at least 0.1 MPa. Then the unit should be placed in any container filled with water, and everything should be left there for at least 20–30 seconds. Any leaky place in the radiator with this approach will make itself felt by escaping air bubbles.
After a thorough check, it is necessary to position the rod shell, through which the stove faucet is controlled, in such a way that, when positioned in extreme positions, the adjustment handle can completely fix the opening or closing of the faucet.
At the end of the manipulation, you should fill the engine cooling system with antifreeze, check the tightness of the structure, as well as the functionality of the stove in the cabin.
Design and operation of the VAZ 2106 cooling circuit
The main element of the cooling system - the water jacket - is part of the engine. The channels that vertically penetrate the block and cylinder head have common walls with piston liners and combustion chambers. The non-freezing liquid circulating through the ducts - antifreeze - washes hot surfaces and takes away the lion's share of the generated heat.
To transfer heat to the outside air and maintain a stable operating temperature of the engine, the cooling system of the “six” uses a number of parts and assemblies:
- mechanical water pump - pump;
- 2 radiators - main and additional;
- thermostat;
- expansion tank;
- electric fan triggered by a temperature sensor;
- connecting rubber hoses with reinforced walls.
Antifreeze is heated in the cylinder head and pumped to the radiator by a water pump
Water cooling of the engine is one of the most conservative car systems. The design and principle of operation of the circuit is the same for all passenger cars, only modern models use electronics, high-performance pumps and often have 2 fans instead of one.
The operation algorithm of the VAZ 2106 cooling circuit looks like this:
- After starting, the engine begins to warm up to an operating temperature of 90-95 degrees. The thermostat limits the heating - while the antifreeze is cold, this element closes the passage to the main radiator.
- The liquid pumped by the pump circulates in a small circle - from the cylinder head back to the block. If the cabin heater valve is open, a second flow of liquid passes through the small heater radiator, returns to the pump, and from there back to the cylinder block.
- When the temperature of the antifreeze reaches 80-83 °C, the thermoelement begins to open the damper.
Hot fluid from the cylinder head enters the main heat exchanger through the upper hose, cools and moves to the thermostat through the lower pipe. Circulation occurs in a large circle. The higher the temperature of the flowing liquid, the more the thermostat opens the passage to the main heat exchanger - At a temperature of 90 °C, the thermocouple damper is fully open. The antifreeze expanding in volume compresses the spring of the valve built into the radiator cap, moves the lock washer and flows into the expansion tank through a separate tube.
- If there is not enough liquid cooling and the temperature continues to rise, the electric fan is activated by a signal from the sensor. The meter is mounted in the lower part of the heat exchanger, the impeller is installed directly behind the honeycomb.
While the thermostat damper is hermetically closed, only the upper part of the main radiator heats up, the bottom remains cold. When the thermoelement opens slightly and the antifreeze circulates in a large circle, the lower part also gets warmer. Based on this feature, it is easy to determine the functionality of the thermostat.
I had an old version of the six, which was not equipped with an electric fan. The impeller stood on the pump pulley and rotated constantly, the speed depended on the crankshaft speed. In summer, in city traffic jams, the engine temperature often exceeded 100 degrees. Later I resolved the issue - I installed a new radiator with a temperature sensor and an electric fan. Thanks to efficient airflow, the problem of overheating was eliminated.
The expansion tank of the “six” does not work under pressure, so it lasts up to 20 years
Unlike more modern passenger cars, the expansion tank on the VAZ 2106 is a plastic container with a regular air valve in the plug. The valve does not regulate the pressure in the system - this function is assigned to the top cover of the cooling radiator.
VAZ 2106 stove repair
Heating the VAZ 2106 never caused any particular problems if all elements of the heating system worked smoothly. The stove lasts a long time and requires almost no maintenance, so in winter you can always rely on it. Mechanics are mechanics, and sometimes even the most reliable and proven units malfunction, and the 2106 stove is also subject to aging.
Signs of a malfunctioning stove
It's cold in the cabin, that's all the signs. And if you go deeper and study the issue in more detail, then the first signs of a malfunction of the stove and the heating system as a whole can be considered:
- antifreeze leak;
- increased noise of the stove fan;
- difficult adjustment of curtains and heater tap;
- the blowing air temperature is not high enough.
As a rule, the stove fails suddenly, and at the most inopportune moment. Then you have to find out the reasons and eliminate them, and no matter how reliable the VAZ 2106 is, repair of the stove is inevitable.
Causes of malfunction of stove 2106
Fundamentally, the design of the stove is very simple, which is why it is reliable. The stove consists of
- Heater radiator.
- A fan consisting of a motor and an impeller with a casing.
- Stove tap.
- Distribution valve.
The stove diagram is shown in the photo, and it hardly requires any explanation. Despite its rather compact size, the stove successfully does its job, but there may be reasons, which we will discuss later on eliminating. The causes of heater malfunctions in most cases are antifreeze leakage, failure of the heater motor and failure of the heater tap.
Antifreeze leak
It is simply impossible not to see an antifreeze leak from the system, because it will literally leak under your feet. First of all, we find the place where the antifreeze is leaking and think about how to deal with this problem.
The main culprit, as a rule, is the stove radiator. Older models have copper radiators, and if that's what you have, you're in luck. It can be tinned, washed, and it will be as good as new. If the stove radiator is made of aluminum, there is little use in repairing it. If there is absolutely nothing else to do, you can try to restore it - put a patch of epoxy resin if it bursts in the area of the pipe, or try sealing it with a sealant if a leak has formed in the honeycomb. But there is no guarantee as to the result of the work, so it’s easier to change it.
Before removing the radiator, you need to make sure that it is the radiator that is leaking and not the rubber hose on the pipe. The temperature often causes the rubber to dry out and develop a barely noticeable crack, from which antifreeze leaks. Replacing the tube will solve this issue if it is not possible to trim and shorten it.
The same applies to the heater tap. The faucet itself is quite reliable in design, but the heating pipes are simply leaking. Inspect the places where it interfaces with the tap, and then you will be able to avoid dismantling the tap, although there is nothing complicated about it.
Replacing the stove radiator
If the diagnostics determines that the radiator is to blame for the antifreeze leak, we will remove it. It's not so difficult as it is just inconvenient, and the operation itself will take a few minutes. Here is the algorithm for dismantling the radiator:
- We drain the antifreeze from the cylinder block, having first removed the expansion tank cap.
- From the engine compartment, loosen the fastening clamps and remove the hoses from the pipes.
- Remove the rubber seal.
- Inside, unscrew the two bolts securing the console and remove it.
- Disconnect the cable from the heater tap.
- Unclip the spring brackets securing the fan casing.
- We dismantle the stove radiator.
After inspecting the stove radiator, we decide whether it can be repaired.
Fan motor replacement or repair
The heater fan motor has a hidden talent. After a certain mileage of the car, he begins to sing, and in exactly the kind of voice that can infuriate the stony Dzerzhinsky. It starts to make noise when the engine is not warmed up, and then calms down, but not for long. Therefore, at the first manifestation of a malfunction, it should be changed immediately.
It is better to do this when we are changing the radiator itself, so as not to disassemble the entire structure once again. As a rule, it cannot be repaired and can be thrown away with a pure heart.
The operation of the VAZ 2106 stove may be affected by the operation of the thermostat; you should pay more attention to the condition of the air ducts - they may simply become clogged with leaves. As you can see, repairing the VAZ 2106 stove is not difficult, the main thing is to know the reason, and you can always fix it quite simply, and then your six will always be warm
Don't freeze, and good luck on the roads!
Repair as a way to solve the problem
In some cases, you can try to repair the fan using fairly simple manipulations. Repairs are carried out quickly and without complications if you have already had to disassemble and reassemble your favorite “six”.
Signs that the stove is still “alive”, but requires some intervention, can be the following signals:
- noise;
- squeak
It is when the heater squeaks or makes noise that you can think about trying to repair the problem unit.
Noise
If your heater makes a lot of noise, try the following.
Remove the fan and clean off accumulated dirt and dust. Just don’t forget to remove the ground first, since you are working with the electrical component of the VAZ-2106
For instructions on how to remove the fan, see the replacement section. Pay attention to the presence of axial play in the heater motor. You can check this yourself
If there is any play, it should be eliminated. Use a fluoroplastic washer. Please note that after the manipulations have been completed, there should be a small gap between the elements to minimize friction. It is recommended to lubricate the bearings with a thick compound that does not respond to temperature changes (MS 1000 is suitable). Next, disassemble the motor. Make the required number of washers, lubricate them and return them to the electric motor. Attempting to lubricate with engine oil will only give a temporary effect.
Squeak
If the heater produces an unpleasant squeak, then you should resort to such manipulations.
- Unclip the casing along with the engine and airflow, which goes to the feet of the passenger and driver. In total, the VAZ-2106 has 4 fastening elements. To the left of the heater above the dashboard there is a negative wire that needs to be unscrewed.
- Now you remove the wiring from the button to turn on the fan. You need 2 outer wires.
- That's it, you can remove the bottom plastic with the engine. The motor is removed by removing a pair of metal brackets and installing a new one in its place. Experienced VAZ workers advise choosing a motor with bearings, since it is more reliable and durable.
- We put everything back together in reverse order, and there is no squeak.
How to replace the heater radiator in a VAZ-2106 car
Replacing the heater radiator on a VAZ-2106 car is a very simple, albeit time-consuming task. The main problem is that the stove of the domestic VAZ-2106 is a single compact unit equipped with a pumping device, which has an electric motor, a ventilation device with impellers. In addition, the heater has a heating structure in the form of a radiator with a control valve. As for the air flows entering the vehicle interior, they are regulated by means of a damper.
The heater can fail due to several important parts; in particular, most often the malfunction can occur due to the fact that the electric motor has stopped functioning properly or the radiator has leaked.